Use & Care Guide Manual de uso y cuidada English / Espa5ol Models / Modelos: Ken 790.8033* ore @ P/N 316495106 Sears Brands Management Corporation Hofl:man Estates, IL 60179 U.S.A. www.kenmore.com www.sears.com www.kmart.
Table of Contents Warranty ....................................................................... Master Protection Agreement .................................... Microwave Oven Safety ..................................... Getting to Know Your Microwave Oven ................. How Your Microwave Oven Works ......................... Radio Interference ....................................................... 2 3 4 7 7 7 Using Add 30 Sec .......................................................
Sears Service Master Protection Agreement Congratulations on making a smart purchase.Your new KenmoreQ product is designed and manufactured years of dependable operation. But like all products, it may require preventive maintenance or repair to time.That's when having a Master Protection Agreement can save you money and aggravation. The Master includes: [] [] [] [] [] [] [] [] [] [] [] Protection Agreement also helps extend the life of your new product.
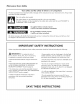
Microwave Oven Safety Your safety We have provided many important and obey all safety messages. and the safety of others is very important. safety messages in this manual and on your microwave oven. Always read This is the safety alert symbol. This symbol alerts you to hazards that can kill or hurt you and others. All safety messages will be preceded by the safety alert symbol and the word "DANGER" "WARNING.
iMPORTANT SAFETY iNSTRUCTiONS " The microwave oven should be serviced only by qualified service personnel. Call an authorized service company for examination, repair, or adjustment. • See door surface denning instructions in the "Caring for Your Microwave Oven" section. • To reduce the risk of fire in the oven cavity: Do not overcook food. Carefully attend to the microwave oven when paper, plastic, or other combustible materials are placed inside the oven to facilitate cooking.
PRECAUTIONS TO AVOID POSSIBLE EXPOSURE TO EXCESSIVE MICROWAVE ENERGY (a) Do not attempt to operate this oven with the door open. Doing so can result in harmful exposure to microwave energy. It is important not to defeat or tamper with the safety interlocks. (c) Do not operate the oven if it is damaged.
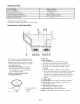
Getting to Know Your Microwave Oven This section discusses the concepts behind microwave cooking. It also shows the basics that you need to know in order to operate your microwave oven. Please read this information before using your oven. HOW YOUR MICROWAVE OVEN WORKS Microwave ovens are safe. Microwave energy is not hot. It causes food to make its own heat, and it is this heat that cooks the food. Microwaves You cannot they do. Magnetron L_ are like TV waves, radio waves, or light waves.
COOKWARE GUIDE Most heat resistant, nonmetallic cookware is safe for use in your microwave oven. However, to test cookware before using, follow these steps: 1. Place empty cookware in the microwave oven. 2. Measure I cup (250ml) 3. Microwave of water in a glass measuring cup and place it in the oven beside the cookware. on 100% power for I minute. If the cookware is warm, it should not be used for microwave cooking. NOTE: Some dishes (melamine, some ceramic dinnerware, etc.
SPEC! FICATIONS AC Line Voltage AC Power Required Microwave Overall 120VAC, 60 Hz 1550W/13.0amps _1000W Output Power Dimensions(WxHxD) 297/8"X 1613/32"X 151/4" 2015/16"X 913/16"X 1413/32'' 1.7 cu.ft Oven Cavity Dimensions(WxHxD) Capacity of Oven Cavity _IEC 60705 RATING STANDARD Specifications subject to change without MICROWAVE OVEN prior notice. FEATURES The microwave oven is designed to make your cooking experience as enjoyable and productive as possible.
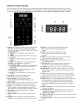
CONTROL PANEL FEATURES Your microwave oven control panel Jets you select the desired cooking function quickly and easily. All you have to do is touch the necessary Command Pad. The following is a list of all the Command and Number Pads located on the control panel. For more information on these features, see the "Using Your Microwave Oven" section. ® ® ® ® @ ® @ ® @........................ @- @ ® ®-® 1.
Microwave Amount Cooking Tips of Food * If you increase or decrease the amount of food you prepare, the time it takes to cook that food will also change. For example, if you double a recipe, add a little more than half the original cooking time. Check for readiness and, if necessary, add more time in small increments. Starting Temperature of Food * The lower the temperature of the food being put into the microwave oven, the longer it takes to cool<.
Using Aluminum Foil NOTE:Metal containers should not be used in a microwave oven. There are, however, some exceptions. If you have purchased food prepackaged in an aluminum foil container, refer to the instructions on the package. When using aluminum foil containers, cooking times may be longer because microwaves will only penetrate the top of the food.
Using Your Microwave This section gives instructions for operating function. Please read this section carefully. CLOCK & SETTINGS (Control SETTING CONTROL LOCI{ ON/OFF ( Control Panel Oven Feature 18) each To turn ON Control Lock touch Clock & Settings twice. Panel Feature 18) Touch: The microwave oven has settings that allow you to customize the operation for your convience. Below is the table showing the various settings.
TURNING SOUND ON/OFF Feature 18) (Control Panel SETTING WEIGHT LB/KG (Control Panel Feature 18 Example: Audible signals are available to guide you when setting and using your oven. * A programming tone will sound each time you touch a pad. e Three tonessignai the end of a Kitchen Timer Touch: Example: To turn Touch: 1. Clock & Settings audible weight between Clock & Settings 2. Clock & Settings 3. Clock & Settings 4. Clock & Settings cycle.
SETTING DEMO MODE ON/OFF (Control Panel USING VENT FAN (Control Panel Feature 21) Feature 18) Example: To enter The pad controls the 2-speed vent fan. If the vent fan is OFF the first touch of the Vent pad will turn the fan on High, second touch LOW andthird touch OFF. Demo mode. Touch: Example: To set the vent fan speed to LOW from the OFF position. Display Shows: 1. Clock & Settings Touch: Time digits flashing 1. Settings . iSEE 3. Clock & Settings 4.
SETTING TIMED COOK (Control Panel Feature :2 USING ADD 30 SEC. (Control Example: To cook for five minutes, 30 seconds at 100°/o power. Touch: This is a time-saving pad. It is a simplified feature that lets you quickly set and start microwave cooking at 100% power. Display Shows: 1. Time Example: • e-e Cook Panel Feature 14) To cook for one minute. - u Touch: press STARt Display Shows: s _,_, _:,"-' 1.@ .....
SETTING TWO-STAGE COOKING For best results, some recipes call for different power levels during a cook cycle. You can program your oven for two power level stages during the cooking cycle Example: To set a 2-stage cook cycle. The first stage is a 3 minute cook time at 80% cook power then a 7 minute cook time at 50°/o cook power. Display Shows: • m-I l_l Touch: 1. Time Cook PRESS START PRESS START D'uu To set a 3 minute cool< time for first stage. 3.
MICROWAVE POWER LEVELS For best results, some recipes call for different cook powers. The lower the cook power, the slower the cooking. Each number from I to 9 stands for a different percentage of full cook power. The table also tells you when to use each cook power. Follow recipe or food package instructions if available. NOTE: Refer to a reliable cookbook for cooking times based on the 1,000 Watt cook power of your microwave oven.
USING AUTO DEFROST OPERATING • For best results, remove Three defrost sequences are preset in the oven. The auto defrost feature provides you with the best defrosting method for frozen foods. The cooking guide will show you which defrost sequence is recommended for the food you are defrosting. • For best results, roll your ground meat into a ball before freezing. During the DEFROST cycle, the microwave will signal when it is time to turn the meat over.
AUTO DEFROST TABLE NOTE:Meat of irregular shape and large, fatty cuts of meat should have the narrow foil at the beginning of the defrost sequence. or fatty areas shielded with MEAT SETTINGS FOOD SETTING AT BEEP SPECIAL INSTRUCTIONS BEEF Ground Beef, Bull< MEAT Remove thawed portions with fork. Turn over. Return remainder to oven. Do not defrost less than 1/4 lb. Freeze in ball shape. Ground Patties MEAT Separate Do not defrost Jess than 2 oz. patties. Depress center when freezing.
AUTO DEFROST TABLE (CONTINUED) POULTRY SETTINGS FOOD SETTING CHICKEN Whole POULTRY AT BEEP SPECIAL iNSTRUCTiONS Turn over breast side down. Cover warm areas with aluminum foil. Place chicken breast-side up in a microwave safe dish. Finish defrosting by immersing in cold water. Remove giblets when chicken is partially defrosted. Separate Place in a microwave (up to 6 Ibs) pieces and rearrange. safe dish. Cut-up CORNISH HENS Whole POULTRY TURKEY POULTRY Breast (up to 6 Ibs) Turn over.
DEFROSTING TIPS • When using Auto Defrost, the weight to be entered is the net weight in pounds and tenths of pounds (the weight of the food minus the container). • Before starting, make sure to remove any and all metal twist4ies that often come with frozen food bags, and replace them with strings or elastic bands. • Open oven. • Always containers, such as cartons, slit or pierce plastic • If food is foil wrapped, suitable container. • Bend plastic placing in the pouches or packaging.
SENSOR OPERATING INSTRUCTIONS Sensor Cook allows you to cook most of your favorite foods without The display selecting cooking will indicate times and power 4. levels. Sensing during the initial sensing amount of humidity coming from the food,it show the remaining cooking heating by sensor, follow 1. Food cooked normal storage will will escaping time. For best results for these recommendations. and cause food to overcook. sensing time. When and the remaining temperature.
SENSOR COOK SELECTION Sc-1 Sc-2 TABLE CATEGORY Bacon Frozen Dinner DiRECTiON AMOUNT Place bacon strips on a microwave bacon rack for best results. (Use dinner plate lined with paper towels if rack is not available). 1-3 slices Place in an appropriately sized microwave container. Cover with plastic wrap. After cooking, stir and allow to stand for 3 minutes. 10 oz./20 oz. 1-2 cups Place rice and twice or vegetable Sc-3 Rice as much liquid (water, chicken stock) in a 2 quart microwave dish.
USING QUICK TOUCH Your microwave has preprogrammed cook food automatically. SETTING POPCORN (Control SETTING PIZZA (Control selections to The Pizza sensor cook quick touch pad lets you reheat up to four slices of pizza (based on a 5 ounce slice). Panel Feature 5) The Popcorn quick touch pad lets you pop 3.3, 3.0, 1.75 ounce bags of commercially packaged microwave popcorn. Pop only one package at a time. If you are using a microwave popcorn popper, follow manufacturer's instructions.
SETTING POTATO (Control Panel Feature 11) MELT/SOFTEN TABLE The Potato sensor cook quick touch pad lets you cook potatoes with preset times and cool< powers. SELECTION NOTE: • Cooking times are based on an average 8 ounce potato. Before baking, pierce potato with fork several times. • After baking, let stand for five minutes. Example: CATEGORY 1 or 2 sticks BUTTER 2, 4 or 8 oz. CHOCOLATE Chocolate chips or squares of baking chocolate may be used. Unwrap squares and place in microwavable container.
Caring for Your Microwave In order to ensure that your microwave should maintain it properly. For proper Far interior surfaces: Oven oven looks good and works well for a long time, you care, please follow these instructions carefully. Far exterior surfaces and control panel: Use a soft cloth with spray glass cleaner. Apply the spray glass cleaner to the soft cloth; do not spray directly on the oven. Wash often with warm, sudsy water and a sponge or soft cloth.
CARING FOR THE FILTERS The grease filters should be removed and cleaned often; at least once a month. NOTE: Models are shipped for recirculafing exhaust book included with your microwave.). Some models smoke and odors. Replacement filters are available cannot be cleaned and should be replaced every 6 Grease filters (To duct air outside reference the Installation Instructions have a disposable charcoal filter installed to help remove from Sears by calling 1-800-4-MY-HOME.
REPLACING OVEN CAVITY The cooktop 1. Unplug THE COOKTOP AND LIGHTS 4. Lift the bottom straight out. llghts microwave Mounting oven or disconnect power. filter. Slide the filter screv 5. Lift upthe 2. Remove the bulb cover mounting screw for the specific bulb you want to replace. 3. Replace bulb with candelabra-base (Part No. 5304464090) available calling 1-800-4-MY-HOME. 7. Replace holder. the bulb holder. 8. Slide the charcoal filter into place.
Questions and Answers QUESTIONS ANSWERS Can I operate my microwave turntable or turn the turntable large dish? Can I use either my microwave metal oven without the glass over to hold a or aluminum Is it normal for the turntable either direction? Sometimes appears pans in oven? to turn in No. If you remove or turn over the glass turntable, will get poor cooking results.
Troubleshooting Most cooking problems often are caused by little things that you can find and fix without tools of any kind. Check the lists below and on the next page before calling for assistance or service. If you still need help, call Sears Service at 1-800-4-MY-HOME. MICROWAVE OVEN DOES NOT WORK PROBLEM CAUSE Nothing • The power supply cord is not plugged into a grounded 3 prong outlet. (See the "Electrical Requirements "and " Electrical Connection" sections.) works.
Your Home For troubleshooting, product manuals and expert advice: managemylife www.managemylife.com For repair - in your home - of all major brand appliances, lawn and garden equipment, or heating and cooling systems, no matter who made it, no matter who sold it! For the replacement parts, accessories and owner's manuals that you need to do-it-yourself. For Sears professional installation of home appliances and items like garage door openers and water heaters.
Use & Care Guide Manual de uso y cuidada English / Espa5ol Models / Modelos: 790.8033* Ke ® @ @ P/N 316495106 Sears Brands Management Hofl:man Estates, IL 60179 www.kenmore.com www.sears.com www.kmart.com Corporation U.S.A.
Tabla de contenidos Garanfia ................................................................................. 2 Uso de la funci6n agregar Acuerdos maestros de protecci6n ..................................... 3 Ajuste de tiempo y nivel de potencia Seguridad de homo microondas de cocci6n Conocimiento del microondas Funcionamiento del de radio Para mejores resultados Guia de utensilios Precauciones Conexi6n el6ctrica Funciones Consejos ........................................
Servicio Sears Acuerdos maestros de protecci6n Enhorabuena par haber a_os de funcionamiento hecho una compra inteligente. fiable. cualquier Pero, coma cas. Es par eso que tener un Acuerdo El Acuerdo maestro de protecci6n maestro tambi6n Su nuevo producto producto, de protecci6n sirve para puede podria prolongar I
$eguridad de homo microondas Su seguridad y la de arras personas son muy irnpor_ntes Existen muchos mensajes de seguridad importante tanto en este manual como en su horno microondas. Siempre lea y signs todas Ins instruccionesde seguridad. Este es eJ s{mbolo de alerta Este simbolo Io alerta de seguridad. sobre peligros potenciales que pueden matado o lastimado tanto a usted como a otras personas.
INSTRUCCIONES DE SEGURIDAD IMPORTANTES o El horno microondas s6io debe ser reparado por • No utilice almohadillas de metal para limpiar. personal de servicio t_cnico calificado. Llame a una metal podrian desprenderse de la almohadiila empresa de servicio t_cnico autorizado para que el_ctricas del dispositivo, Io que podria causar realice pruebas, reparaciones o ajustes ai dispositivo, choque el_ctrico. • Consulte las instrucciones de limpieza de la superficie.
PRECAUCIONES PARA EVITAR EXPOSICi6N EXCESIVA A ENERGJA DE MICROONDAS (a) No intente hacer funcionar este horno con la puerta abierta. Si Io hace se expondr6 a energia de microondas da_ina para su saludo Es importante no interferir con los seguros de1 dispositivoo (c) No opera el homo microondas si est6 daSado.
Conocimiento del rnicroondas Esta secci6n trata sabre los conceptos necesaria para que pueda coma FUNCIONA Los hornos utilizar microondas son seguros. Las microondas son coma pero se pueden observar mueven dentro al interior mientras ondas entonces absorbidas pl6sticos calor, Su energia no es caliente. par media del cual ondas de televisi6n, los resultados del horno Tambi6n posee informaci6n b6sica radio Hace que la se produce Magnetr6n el calenta- o luz.
GUJA DE UTENSILIOS La mayor parte Io anterior 1. Coloque 2. Mida de Sos utensiffos antes de utilizarSos, los utensilios vacfos dentro una taza 3. Encienda (250 et homo ml) de agua a1100% OBSERVACI6N: AIgunos que la comida se ¢ocine aquetlos ¢ontenedores incline o permita - Cuando * Nunca mejores contenedores o despu6s podria puede de vidrio pueden resultados, del calentamiento a usted o al horno . Las microondas podrian 6reas cocidas del dentro, ejemplo cocci6n.
ESPECIFICACIONES Voitaje de linea CA 120V CA, 60 Hz Aiimentaci6n CA requerida Aiimentaci6n de salida 1550W/13.0amps del microondas _ 1000/v' Dimensiones (AI x An x Pro) Dimensiones de cavidad Capacidad 297/8"X de horno (Ai x An x Pro) de cavidad 1613/32"X 151/4 '. 2015/_6"X913/16" X1413/32" del horno 1.7 cu.ft ESTANDAR DE PRECISION _IEC 60705 Las especificaciones est6n sujetas a cambios sin aviso previo.
FUNCIONES DEL PANEL DE CONTROL Elpanel de su homo microondas le permite seleccionarIo _nci6n de cocci6n deseada rRpida y fRcilmente. Todo Io que tiene que hacer estocar el panel de comandos. La siguiente es una lista de todc_ los comandos y ngmeros que se ubican en el panel. Para m6s informc_6n sobre estas funclones, consuEek_ secci6n "Use de su homo microondas_. ® ® ® ® ® ® ® ® ® ® @ ® ® ® ® 1.
Consejos de cocina Canfidad " de comida Si aumento prepara, Liberaci6n de presi6n en los affmentos o disrninuve el tiempo cambiar6. la cantidad que tarda en cocinar Por ejemplo, si duplica un poco m6s de la mitad original. haciendo membrana. agregue * Mientros liberar agregue La cocci6n la presi6n comidas aumentos. inicial de la comida menor sea Io temperoturo cuando la pone en el horno tiempo tardar6 tura ambiente comida en cocinarla.
Uso de Papel Aluminio OBSERVACI6N: Si compr6 No debe usar contenedores comida empaquetada Cuando utilice este %o de contenedores, penetrar6n met61icos en un homo microondas. de antemano en un contenedor Existen, sin embargo, algunas excepciones. de papel aluminio, consulte las instrucciones los tiempos de cocci6n podr_an set mayores debido la comida desde su parte superion Cuando use contenedores del paquete.
Uso de su homo microondas AJUSTE DEL BLOQUEO DE CONTROL ON/OFF (Funci6n 18) Esta secci6n le entrega instrucciones para usar cada funci6n. Por favor lea esta secci6n Pora activor esta fund6n toque el bot6n Clock& Settingsdosveces. atentamente. RELOJ&AJUSTES (Funci6n 18) El horno microondas personalizar tabla que muestra Settings" deseada. posee propiedades su uso para varias que Je permitirSn su conveniencia. los ajustes.
SONIDO ON/OFF Las se_ales cuando (Funci6n 18) de sonido ajuste AJUSTES DEL PESO LB/KG (Funci6n 18) estan dispanibles para guiarlo Ejemplo: Para cambiar entre libras y kilogramos. y use su horno. • an tono de programaci6n sonar6 presione un bot6n. • La sepal de Ires tonos indica cada vez que T6cfil: el t_rmino Panfalla muesfra: de una cuenta regresiva del temporizador de la cocina. • La serial de Ires tonos indica el t_rmina de un ciclo 1.
AJUSTE DE MODALIDAD DEMO ON/OFF USO DE VENTILADOR Funci6n 18) El bot6n controJa el ventilador de 2 veJocidades. Si el ventiJador estpa apagado al primer toque el ventilador se encender6 en veJocidad Alta, al segundo en lenta y al tercero se apagar& Ejemplo: Para ingresar a la modalidad demo. T6ctlk Panfalla muesfra: Clock & NOmeros Ejemplo: Configurar la velocldad a Desactlvada. intermitentes Settings SE_ 2. Clock & Settings MENU LABEL PRESS L-I Oi- T6cfil: START _--t C - 1.
AJUSTES DELTIEMPODECOCCION USO DE LA FUNCION (Funci6n 2) (Funci6n Ejemplo: Para cocinar segundos durante 14) cinco minutos, 30 aJ 100°/o de potenciao Este es un bot6n T6cEi: 1. AGREGAR 30 SEG. Panfalla muesfra: Time simplificada • _-e Cook de ahorro que le permite ente la cocci6n a1100% de tiempo. ajustar Es una funci6n e iniciar r6pidam- de potencia. _-' Ejemplo: PRESSSTART s-_,_, Coclnar durante un minutoo T6ctU: ,.
AJUSTE DE COCCION Para obtener necesitan mejores distintos de cocci6n. resultados, etapas. Puede programar el ciclo de cocci6n. ser6 de una cocci6n de 3 y la segunda Panfalla muesfra: 1. Time Cook . e-e u - "UU un tiempo de 3 minutos de cocci6n para la primera etapa. Power Level p_ i-i ! PO_e ® ..... PnESSSTART Ajustar un nivel de 80% 5. PRESSSTART ®©© Ajustar 4o ser6 de 7 de potencla.
NIVELES DE POTENCIA Para obtener de potencia mejores resultados, para su cocci6n. m6s lenta ser6 la cocci6n.
USO DEL DESCONGELAMIENTO CONSEJOS AUTOMATICO " Para obtener Existen tres secuencias en el homo. La funci6n mejor de descongelamiento m_todo de acuerdo a la comida Para mayor conveniencia, incluye que le recordar6 comida autom6tico para descongelar qu6 secuencia autom6tico dentro comida. le ofrece que quiera revisar, dar vuelta, del homo separar para obtener puede haga bolas de came Durante emitir6 incorporado de dar vuelta la came.
TABLA DE DESCONGELAMIENTO OBSERVACION: de iniciar Deberia la frecuencia envolver AUTOMATICO la came de tama_os y formas irregulares y los cortes grasosos en papel alurninio antes de descongelamiento. AJUSTES PARA CARNE COMIDA CARNE AJUSTE DE RES CARNE AL SONIDO Retire las partes De vuelta Carne CARNE molida, Separe descongeladas la carne. Regrese INSTRUCCIONES con un tenedor. el resto al horno.
TABLA DE DESCONGELAMIENTO (CONTINUADA) AJUSTES PARA EL POLLO COMIDA POLLO AJUSTE AVES Gire de Jado. Cubra papel CompJeto (hasta AL SONIDO las partes INSTRUCCIONES calientes con aluminio. Coloque el polio deable 6 Ibs) seguro. de lado Termine ESPECIALES en un plato microon- de descongelar sumergiendo el polio en agua menudencias cuando et polto frra. Retire las est_ parcialmente descongetado. Cortado Separe y reordene los trozos.
CONSEJOS " Cuando debe PARA DESCONGELAR utilice la funci6n ingresar de descongelamiento_ el peso que es el peso neto (el peso de la comida menos Antes de comenzar_ ataduras comida de metal congelada asegOrese de haber que a menudo vienen y reempl6celas retirado todas Abra con las balsas con cuerdas los contenedores, Siempre de el descongelamiento o bandas Mientras carte par ejemplo las cajas de cart6n, • Carte o haga agujeros en los balsas o envoltorios est6 envuelta en
INSTRUCCIOES DE FUNCIONAMIENTO DEL SENSOR El sensor de cocci6n comidas favoritas La pantalla detecci6n indicar6 "Sensing" la mayoria tiempos de sus 4. AsegOrese interior ni niveles de potencia. (Detectado) durante el periodo de cantidad autom6ticamente alimento. Cuando de humedad el tiempo cocinada temperatura 2. Siempre detecta en calentarla. una cierta indicar6 Nunca pueden siempre debe sensor debe utilice evitar cubiertas estar a la puerta tiempo de detecci6n.
TABLA DE COCCION SELECCI6N DEL SENSOR CATEGORiA DIRECCION Coloque Tocino Sc-| para tiras toaNas Comida congelada Utitice en una rejilla resultados. de papel Col6quela Sc-2 de tocino mejores (Utilice si la rejilla no est6 en un contenedor pl6stico y permita para cubrir que repose para un plato para microondas revestido 1 - 3 rebanadas con disponible). mieroondas el recipiente. durante CANTIDAD de tamafio Despu6s apropiado. de cocinar, 10/20 revuelva onzas.
USO DE LA FUNCION Su microondas TOQUE posee selecciones para cocinar de forma RAPIDO programadas AJUSTES PIZZA (Funci6n 10) previamente El sensor de cocci6n autom6tica. AJUSTES PARA PREPARAR PALOMITAZ DE MAIZ (Funci6n 5) Esta funci6n microondeabies paquete • Coloque le permite preparar de 3.3, 3.0 y 1.75 libras. deabie especial, OBSERVAClON: microondas sigas las instrucciones Retire la rejiila cuando bolsas de papel prepare reguiares.
AJUSTES PARA PAPAS (Funci6n 11) El sensor de cocci6n r6pida cocinarlas con tiempo minada. OBSERVACION: • Los tiempos para papas y potencia SELECCI6N Je permite de cocci6n predeter- D|RECCK)N Desenvolver deable. So-1 onzas. Antes de hornear, tenedor varias veces. est6n basados perfore en papas durante y colocar CHOCOLATE muestra: uC HELADO SENSOR .... es necesario So-3 p_e uC al t6rmino Desenvolver y colocar en cuadritos dentro de un contenedor microondeable. Pinta, 1.
Cuidados Para asegurar hacerlo, de su homo que su horno se vea y trabaje sigas las siguientes Para superncles microondas instrucciones interlores: Lave a menudo tibia jabonosa o paso bien durante mucho tiempo, debe realizar mantenciones con agua Para superficies exterlores con una esponja de mantener se cierra.
CUIDADO Los fiitros DE LOS FILTROS de grasa OBSERVACN_N: clones de instala para HOME. deben ser retirados Se envian Instalaci6n incluidas remover El filtro modelos humo Los filtros no se puede a menudo, ventilaci6n con su microondas). y olores. de carb6n y limpiados para AIgunos de remplazo limpiar al menos una vez al mes. (Para el ducto de aire recirculante.
REMPLAZO DE LA TAPA Y DE LAS LUCES DE LA CAVIDAD DEL HORNO Las lutes 4. Levante Deslice 1. Desconecte el horno microondas Tornillos o desconecte la parte el filtro de la ampolleta que desea el porta-ampolleta. remplazar. 6. Remplace la ampolleta N°5304464090) MY-HOME. con una del mismo estilo disponible el microondas en Sears Ilamando o reconecte (Parte la ampolleta N°5304464090) al 1-800-4- 7. Remplace la energia. microondas 2.
Preguntas y respuestas PREGU NTAS RESPU ESTAS _Puedo hacer funcionar vidrio giratorio mi microondas o darlo vuelta sin usar el plato de para soportar otro m6s No. Si saca o da vuelta resultados el plato giratorio obtendr6 pobres de cocci6n.
Soluci6n de problernas La mayoria de los problemas a menudo son causados por cosas peque_as que puede identificar y soiucionar herramientas de ning6n tipo. Revise las iistas de abajo ilamando antes de ilamar a personal de servicio t_cnico. Si aOn necesita ayuda consuite con ei servicio de Sears al 1-800-4-MY-HOME. EL HORNO MICROONDAS NO FUNCIONA PREGU NTAS RESPUESTAS Nada * funciona. El cable de suministro conexi6n a tierra.
Your Home For troubleshooting, product manuals and expert advice: managemylife www.managemylife.com For repair - in your home - of all major brand appliances, lawn and garden equipment, or heating and cooling systems, no matter who made it, no matter who sold it! For the replacement parts, accessories and owner's manuals that you need to do-it-yourself. For Sears professional installation of home appliances and items like garage door openers and water heaters.