Use & Care Guide Manual de Uso y Cuidado English / Español Model/Modelo: 796. 8147#, 796.9147# Kenmore Elite Steam Dryer Secador con vapor # = color number, numero de color P/N MFL62512871 Sears Brand Management Corporation Hoffman Estates, IL 60179 U.S.A. www.kenmore.com www.sears.
PROTECTION AGREEMENTS TABLE OF CONTENTS IMPORTANT SAFETY INSTRUCTIONS.....................3-6 GROUNDING REQUIREMENTS.................................... 4 FEATURES AND BENEFITS Key Parts and Components ........................................7 INSTALLATION INSTRUCTIONS Key Dimensions and Specifications ...........................8 Location Requirements . ...............................................8 Choose the Proper Location .......................................8 Clearances . ........................
IMPORTANT SAFETY INSTRUCTIONS READ ALL INSTRUCTIONS BEFORE USE Your safety and the safety of others is very important. We have provided many important safety messages in this manual and on your appliance. Always read and obey all safety messages. This is the safety alert symbol. This symbol alerts you to potential hazards that can kill or hurt you and others. All safety messages will follow the safety alert symbol and either the word DANGER or WARNING.
IMPORTANT SAFETY INSTRUCTIONS BASIC SAFETY PRECAUTIONS WARNING: To reduce the risk of fire, electric shock, or injury to persons when using this appliance, follow basic precautions, including the following: • Read all instructions before using the dryer. • Before use, the dryer must be properly installed, as described in this manual. • Do not place items exposed to cooking oils in your dryer.
IMPORTANT SAFETY INSTRUCTIONS SAFETY INSTRUCTIONS FOR INSTALLATION WARNING: To reduce the risk of fire, electric shock, or injury to persons when using this appliance, follow basic precautions, including the following: • Properly ground dryer to conform with all governing codes and ordinances. Follow details in the installation instructions. Electrical shock can result if the dryer is not properly grounded. • Remove all packing items and dispose of all shipping materials properly.
IMPORTANT SAFETY INSTRUCTIONS SAFETY INSTRUCTIONS FOR STEAM FUNCTIONS WARNING: To reduce the risk of fire, electric shock, or injury to persons when using this appliance, follow basic precautions, including the following: • Do not open the dryer door during steam cycles. Failure to follow these instructions can result in a burn hazard.
FEATURES AND BENEFITS KEY PARTS AND COMPONENTS There are several important components that are referenced in this manual. A EASY-TO-USE CONTROL PANEL Rotate the cycle selector knob to select the desired dry cycle. Add cycle options or adjust settings with the touch of a button. B TIME AND STATUS DISPLAY The easy-to-read LED display shows cycle status and estimated time remaining. A A E B C D C CYCLE MODIFIERS Adjust the cycle settings such as temperature and dry level with the touch of a button.
INSTALLATION INSTRUCTIONS KEY DIMENSIONS AND SPECIFICATIONS Description Electrical Requirements Gas Requirements* NG: Gas Requirements* LP: Dimensions Net Weight Drying Capacity *Gas Models Only Dryer (Gas and Electric) Refer to the rating label 4–10.5 inches WC (Water Column) 8–13 inches WC 27 in. (W) X 30 1/4 in. (D) X 38 in. (H), 52 ¼ in. (D with door open) 68.6 cm (W) X 76.7 cm (D) X 96.5 cm (H), 132.7 cm (D with door open) Electric : 147 lb. (66.7 kg) Gas : 150.5 lb. (68.3 kg) IEC 7.4 cu. ft.
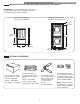
INSTALLATION INSTRUCTIONS INSTALLATION WITH OPTIONAL PEDESTAL BASE OR STACKING KIT IMPORTANT: If you are installing your dryer using an optional pedestal base or stacking kit, refer to the instructions included with the accessory. Required Dimensions for Installation with Stacking Kit Required Dimensions for Installation with Pedestal 6 in. (15.2 cm) 52 ½ in. (133.4 cm) 76 in. (193 cm) 30 1/4 in. (76.7 cm) 4 in. (10 cm) 1 in. (2.5 cm) 27 in. (68.6 cm) 1 in. (2.
INSTALLATION INSTRUCTIONS CONNECTING GAS DRYERS GAS REQUIREMENTS (GAS MODELS ONLY) WARNING: To reduce the risk of fire, electric shock, or injury to persons when using this appliance, follow basic precautions, including the following: • Gas supply requirements: As shipped from the factory, this dryer is configured for use with natural gas (NG). It can be converted for use with propane (LP) gas. Gas pressure must not exceed 8 inches water column for (NG), or 13 inches water column for (LP).
INSTALLATION INSTRUCTIONS CONNECTING GAS DRYERS (continued) WARNING: To reduce the risk of fire, electric shock, or injury to persons when using this appliance, follow basic precautions, including the following: • Installation and service must be performed by a qualified installer, service agency, or the gas supplier. Failure to do so can result in fire, explosion, or death. • Use only a new stainless steel flexible connector and a new AGA-certified connector.
INSTALLATION INSTRUCTIONS CONNECTING ELECTRIC DRYERS ELECTRICAL REQUIREMENTS Electrical Requirements for Electric Models Only WARNING: To help prevent fire, electrical shock, serious injury, or death, the wiring and grounding must conform to the latest edition of the National Electrical Code, ANSI/NFPA 70 and all applicable local regulations. Please contact a qualified electrician to check your home’s wiring and fuses to ensure that your home has adequate electrical power to operate the dryer.
INSTALLATION INSTRUCTIONS CONNECTING ELECTRIC DRYERS (continued) WARNING: Connect the power cord to the terminal block. Connect each power cord wire to the terminal block screw that has the same colored wire. For example, connect the black power cord wire to the terminal block screw with the black wire. Failure to follow these instructions may result in a short or overload.
INSTALLATION INSTRUCTIONS VENTING THE DRYER IMPORTANT! CHECK YOUR EXHAUST SYSTEM FOR PROBLEMS The most common cause of dryer problems is poor exhaust venting. Before installing your new dryer, check the items listed below to make sure you get the best possible performance. This can save you time and money by reducing cycle times and increasing energy efficiency. • RESTRICTED OR DAMAGED VENT HOOD. Check your vent hood outside. It must be clean and free of lint buildup.
INSTALLATION INSTRUCTIONS VENTING THE DRYER (continued) Correct Venting Routing and Connecting Ductwork Follow the guidelines below to maximize dryer performance and reduce lint buildup and condensation in the ductwork. NOTE: Transition duct (from dryer to wall) and fittings are NOT included and must be purchased separately. • Use 4 inch (102mm) diameter rigid or semi-rigid metal duct. • The exhaust duct run should be as short as possible. • Use as few elbow joints as possible.
INSTALLATION INSTRUCTIONS INSTALLATION INSTRUCTIONS LEVELING THE DRYER REVERSING THE DOOR SWING The swing of the dryer door can be reversed to fit your installation location. WARNING: WARNING: • Wear gloves during installation. • Failure to follow these instructions can result in injury. To ensure that the dryer provides optimal drying performance, it must be level. To minimize vibration, noise, and unwanted movement, the floor must be a level, solid surface.
INSTALLATION INSTRUCTIONS INSTALLATION INSTRUCTIONS FINAL INSTALLATION CHECK Testing Dryer Heating Once you have completed the installation of the dryer and it is in its final location, confirm proper operation with the following steps and tests. 1 Close the dryer door. 1 Is gas turned on? (Gas models only) 2 Press the POWER button to turn the dryer on. 2 Is dryer plugged in? Dryer should always be plugged into the proper outlet. 3 Turn the cycle selector knob to Normal drying cycle.
HOW TO USE WARNING: To reduce the risk of fire, electric shock, or injury to persons, read this entire manual, including the Important Safety Instructions, before operating this dryer. CONTROL PANEL FEATURES AP2Plus Dryer 111027 박양리 H A D G B E F C AP2Plus Dryer 111027 박양리 A POWER (ON/OFF) BUTTON Press to turn the dryer ON or OFF. Pressing the POWER button during a cycle will cancel that cycle and any settings will be lost.
HOW TO USE OPERATING THE DRYER 1 LOAD THE DRYER Load the dryer with the wet laundry from the washer. If the load is extra large, you may need to divide it into smaller loads for proper performance and fabric care. 2 CLEAN THE LINT FILTER If the lint filter has not already been cleaned, lift out the filter and remove the lint from the last load. This will help ensure the fastest and most efficient drying performance. 3 TURN ON THE DRYER Press the POWER button to turn ON the dryer.
HOW TO USE CYCLE GUIDE The cycle guide below shows the available options and recommended fabric types for AUTO DRY cycles. *NOTE: The default time and actual time will vary depending on the size of the load and moisture content. Auto Dry Cycles Auto Dry cycles utilize a sensor that detects moisture levels in the clothes and adjusts the drying time as needed to ensure superior results. The dryer automatically sets the dry level and temperature at the recommended setting for each cycle.
HOW TO USE CYCLE GUIDE The cycle guide below shows the available options and recommended fabric types for TIMED DRY cycles. Timed Dry Cycles Use Timed Dry cycles to select a specific amount of drying time and the drying temperature. When a TIMED DRY cycle is selected, the display shows the actual time remaining in your cycle. You can change the actual time for the cycle by pressing MORE TIME or LESS TIME. Press and hold the MORE TIME or LESS TIME buttons to rapidly change the time.
HOW TO USE WARNING: To reduce the risk of fire, electric shock, or injury to persons, read this entire manual, including the Important Safety Instructions, before operating this dryer. SORTING LOADS LOADING THE DRYER WARNING: Fabric Care Labels To reduce the risk of fire, electric shock, or injury to persons when using this appliance, follow basic precautions, including the following: Most articles of clothing feature fabric care labels that include instructions for proper care.
HOW TO USE TIME AND STATUS DISPLAY The Time and Status Display shows the cycle time, cycle progress, and vent status. When the dryer is turned on, the display will illuminate. E D C B F A TIME DISPLAY When a cycle is selected, the display will indicate the default time for that cycle including selected options or adjustments. In AUTO DRY cycles, the time remaining will be estimated and may change during the cycle, depending on the condition of the load.
HOW TO USE CYCLE MODIFIER BUTTONS NOTE: To protect your garments, not every dry level, temperature, or option is available with every cycle. Each cycle has default settings that are selected automatically. You may also customize these settings using the cycle modifier buttons. AUTO DRY cycles are designed to properly care for specific fabrics and loads. As a result, not all settings are available for each cycle selection.
HOW TO USE CYCLE OPTIONS AND SPECIAL FEATURES Your dryer features several additional cycle options and special features to meet your individual needs. For all steam features, see the following pages. WRINKLE GUARD DRUM LIGHT Selecting this option will tumble the clothes after the cycle ends for a few seconds every few minutes without heat. This option is active for 150 minutes after the end of the cycle, or until the door is opened.
HOW TO USE STEAM FEATURES Using the STATIC SHIELD option WARNING: This option uses steam late in the drying cycle to reduce the static electricity caused by dry fabrics rubbing together. Change the steam time by pressing the MORE TIME and LESS TIME buttons to display the approximate number of articles in the load: 7, 9, 11, 14, 16 or 18. • Do not open the dryer door during Steam Cycles. Steam can cause severe burns.
HOW TO USE STEAM FEATURES (continued) Filling the Steam Feeder: Steam Steam Feeder Feeder Tap water water Tap ON LY ONLY Drawer M MA 1 Pull out the drawer. 2 Lift out the steam feeder. 3 X AX Fill the steam feeder with ordinary tap water to the MAX line or until the water touches the filter screen. 4 Place the steam feeder in the drawer; then push in the drawer until it clicks into place.
USER MAINTENANCE INSTRUCTIONS WARNING: To reduce the risk of fire, electric shock, or injury to persons, read this entire manual, including the Important Safety Instructions, before operating this dryer. • Unplug the dryer or turn the power off before cleaning to avoid the risk of electric shock. Failure to follow this warning can cause serious injury, fire, electrical shock, or death. • Never use harsh chemicals, abrasive cleaners, or solvents to clean the dryer. They will damage the finish.
USER MAINTENANCE INSTRUCTIONS MAINTAINING THE EXHAUST SYSTEM The most common cause of dryer problems is poor exhaust venting. Poor exhaust venting may result from the following conditions: • DIRTY OR DAMAGED EXHAUST DUCTS • WRONG VENT MATERIAL • RESTRICTED OR DAMAGED VENT HOOD • EXCESSIVELY LONG VENT • THE USE OF PLASTIC OR FOIL VENTING Maintaining the Exhaust System CHECK VENT Operation Vent ducts should be checked for lint buildup and cleaned at least once per year.
Kenmore Connect™ System If you experience problems with your dryer, call 1-800-4-MY-HOME ® . Only use the Kenmore Connect System feature when instructed to do so by the Kenmore Connect Team. The transmission sounds that you will hear are normal and sound similar to a fax machine. Kenmore Connect cannot be activated unless your dryer is turned on by pressing the POWER button. If your dryer is unable to turn on, then troubleshooting must be done without using Kenmore Connect.
TROUBLESHOOTING GUIDE BEFORE CALLING FOR SERVICE Problem *CHECK VENT is blinking Possible Cause Solutions Exhaust system is too long or has too many turns/restrictions. Install a shorter or straighter duct run. See the Installation Instructions for details. Partial blockage of the ductwork due to lint buildup or other foreign object. Ductwork should be checked/cleaned immediately. Dryer can be used in this condition, but drying times will be longer and energy consumption will increase.
TROUBLESHOOTING GUIDE BEFORE CALLING FOR SERVICE (continued) Problem Clothes take too long to dry Possible Cause Exhaust ducts are blocked, dirty, or duct run is too long. Load is not properly sorted. Large load of heavy fabrics. Solutions Confirm that the exhaust duct is properly configured and free of debris, lint, and obstructions. Make sure that outside wall dampers can open properly and are not blocked, jammed, or damaged. Separate heavy items from lightweight items.
TROUBLESHOOTING GUIDE BEFORE CALLING FOR SERVICE (continued) Problem Display shows error code: tE1 or tE2 Lint on clothes Steam Features Not Working Possible Cause Solutions Temperature sensor failure. Turn off the dryer and call for service. Lint filter not cleaned properly. Remove the lint from the filter before every load. With the lint removed, hold the filter up to a light to see if it is dirty or clogged. If it looks dirty, follow the cleaning instructions in the Care and Cleaning Section.
WARRANTY Kenmore Elite Limited Warranty When installed, operated and maintained according to all instructions supplied with the product, if this appliance fails due to a defect in material and workmanship within one year from the date of purchase, call 1-800-4-MY-HOME® to arrange for free repair. If this appliance is ever used for other than private family purposes, this warranty applies for only 90 days from the date of purchase. This warranty covers only defects in material and workmanship.
NOTE 35