CONTENTS Kenmore SAFETY ............................................................................ TO STA| START THINGS 1- 3 COOKING Features of Your Oven ............................................... 4 Electronl_ Oven Controls ...................................... 5, 9 Electronic ...... Clock ............................................................................ 6 Timer ...... ............................................................................ 6 To Bake and Timed Baking .........
IMPORTANT INSTRUCTIONS FOR YOUR SAFETY SAVE Read appliances, all instructions basic safety before THESE using precautions INSTRUCTIONS this should appliance• be followed, When using including electrical the following: I[I WARNING: If the information in this manual is not followed exactly, a fire or explosion may result causing property damage,personal injury or death. -- Do not store or use gasoline or other flammable vapors and liquids in the vicinity of this or any other appliance.
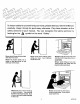
:::_:_:_: '::!_i:_:' :.:::::!:::_i!i_i_: _!_ii!_¸¸. -::::!:::_!!_!!: ::_!i!ii_; ::'::;:::!: To insure safety for yourself and your home, please read your Owner's carefully. Keep it handy for quick easy reference. Pay close attention to the safety sections of your manual. You can recognize looking for the _i, symbol or the word "Safety". Never store things child ren m ight want above an oven. Never let anyone climb, sit or stand on the open door or any other part of the oven.
IMPORTANT SAFETY INSTRUCTIONS Keep this book for later use. Be sure your oven Is installed and grounded properly by a qualified technician. Always keep the oven area clear and free from things that will burn, gasoline and other flammable vapors and liquids. After broiling, always take the broiler pan out of the oven and clean it. Leftover grease in the broiler pan can catch on fire next time you use the pan. Always use dry potholders when removing pans from the oven.
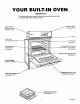
YOUR BUILT-IN OVEN IMPORTANT: The model and serial number of your oven can be found on a tag, on the left side of the oven front frame. )VEN CONTROL (See pages 5-9) LIGHT SWITCH (Push to turn oven light on and off.
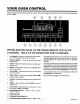
YOUR OVEN CONTROL Read this page to become familiar with the control. The next two pages will explain how to set the different operations of your control. PRESS AND RELEASE UP OR DOWN ARROW FOR SLOW CHANGES. HOLD UP OR DOWN FOR FAST CHANGES. 1. UP ARROW - Press to increase time and temperature. Press and hold for larger increases. 2. DOWN ARROW temperature. Programmed information can be displayed at any time by pressing the operation you wish to see.
CLOCK: 1. Press CLOCK. display. The word "TIME" will flash in the 2. Press the UP or DOWN arrow pad to set the time. Press and release changes. for slow changes. Hold for fast Fig. 1 *Note: The time of day cannot be changed an active TIMED BAKE CYCLE. during You can display the time of day at any time during oven _perations by pressing CLOCK. See Fig. t. TIMER: Note: Tl_e timer' does ;_ot control oven operations. The maximum tirne setting is 9 hours and $5 minutes, 1.
BAKE: 1. Press BAKE, "BAKE" appear In display. will flash and (- - - °) will 2. Pressuparrow 350Owillappearindisplay. Quickly, adjust to the temperature you want using up or down arrow. NOTE: The display will show ON and the oven temperature as it heats up. When the oven reaches the set temperature a tone will sound. See Fig. 6. To change the temperature during a BAKE cycle, repeat steps 1-2 under BAKE. After BAKE is finished press CLEAR/OFF.
OVEN IGNITION When you turn the oven on, the glow bar Igniter begins to heat. When the Igniter is hot enough, in about 1 minute, the gas flows into the burner and is ignited. The Igniter glows bright orange when hot. It cycles on and off with the thermostat and will glow whenever the burner Is on. When cooking for the first time in your new oven, use time given on recipes as a guide. Your new oven has been set correctly at the factory and is more apt to be accurate than the oven It replaced.
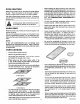
BROI LING p.EsslCE Fo..l grid with foil. Poor drainage of Do not entirea broiler hot fat cover may the cause fire. If a fire starts, close the oven door and turn controls off. If fire continues, throw baking soda on the fire, Do not put water on the fire. POSITIONING BROILER PAN After placing food on the broiler par',, slide the pan Into the proper r_.ck position. Be sure the surnp {greas_ welt]inthe pan is to the Most foods can be broiled at the HI Broil Setting.
CONTINUOUS-CLEANING OVEN FINISH The rough surfaces In your oven have a continuouscleaning finish. Spatters spread and fill the pores of this special finish and then gradually burn away at medium to high temperatures. (some models) The continuous-cleaning Heavy splllovers or believers need a little help from you: i Use clear water and a detergent or a cleanser such as Fantastik®, Liquid Ajax®, Top Job®, Liquid Lyso!® or Mr.
CLEANING TIPS On the following pages, all removable parts on your oven are shown. Refer to those pages when cleanlng your oven. Warm water, a mild detergent and a soft cloth are sate to use on all cleanable parts of your range. All-purpose cleaners, such as Fantastlk® can also be used. Do not use metal scouring pads, except where recommended. PART CLEANING MATERIALS REMARKS Control panel Lightly dampened cloth Do notuss abrasive cleaners, stealorpla_lc pads.
REMOVABLE OVEN DOOR TO remove: 1. Open the door to the stop positlon (see lllustration). 2. Grasp the door at each side and lift up and off the hinges. NOTE: When the door is removed and hinge arms are at stop position, do not bump or try to move the hinge arms. The hinges could snap back causing an injury to the hands or damage to the porcelain on the front of the range. Cover the hinges with toweling or insert empty towel rolls behind the hinges while working in the oven area.
BEFORE Save time CALLING and money. FOR SERVICE Check this list before you call for service. To eliminate unnecessary service calls, first, read all the instructions In this manual carefully. Then, if you have a problem, always check this list of common problems and possible solutions before you call for service. If you do have a problem you cannot fix yourself, call your nearest Sears Store or Service Center for help.
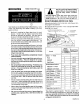
PROBLEM POSSIBLE DON'T CALL FOR SERVICE UNTIL YOU CHECK CAUSE Burners have yellow or yellow-tipped flames A C B Yellow flames -Call for service. Soft blue flames -- Yellow tips on outer cones -Normal for L.P. Gas Normal for Natural Gas If burner flames look like (A), call for service. Normal burner flames should look like (B) or (C), depending on the type of gas you use. With LP. Gas, some yellow tipping on outer cones Is normal.
KENMORE GAS OVEN WARRANTY f f FULL ONE YEAR WARRANTY ON THE FUNCTIONING PARTS EXCEPT GLASS PARTS OF ALL If, within one year from the date of Installation, any part, other than a glass part, fails to function properly due to a defect In material or workma nshlp, Sears will repair or replace It, free of charge.