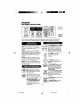
t_i_i_i_ii_ Single 24" Self-Cleaning _i_i_i_i_i_i_: Built-In Wall Oven Use & Ca_e Guide Homo de Pared de 24" de Una Unidad con Autolimpieza G_da para e_ Uso y C_._idado Models, Modelos 911.40494, 40495, 40499 ÷ ÷ ! 229c4o2oP322 (SR-10503) I I 20P322 ENvO3 • Sears, Roebuck and Co., Hoffman Estates, IL 60179 U.S.A.
÷ _ii!_iii!iiiim iiiiiiiiiiiiiMiiiiiiiii_i_ ......... IL 24" SELF-CLEANINGOVEN Tableof Contents Oven Safety .......................... ÷ Self-Cleaning Cycle .......... 17-18 Control Panel .......................... 19 Broiler Pan and Grid ............... 19 Walls of the Oven ................... 19 Oven Door Glass .................... 19 Door Vent Trim ........................ 19 Oven Light Bulb ...................... 20 Oven Racks ............................ 21 Oven Door .............................
[I iiii:ii:iiMiiii!i t IMPORTANT SAFETYINSTRUCTIONS SAVE THESE INSTRUCTIONS Read all instructions before using this appliance. When using gas or electrical appliances, basic safety precautions should be followed, including the following: • NEVER USE a towel or other bulky cloth as a pot holder. Make sure the pot holder is dry. Moist pot holders could cause steam burns. DO NOT let pot holders touch hot surfaces. • ALWAYS KEEP the oven area free from things that will burn.
[L IMPORTANTSAFETY INSTRUCTIONS • NEVERTRY to clean utensils, ccokware, removableparts, or broiler pan and grid in the self-cleancycle. • DO NOT USEoven cleaners No commercial oven cleaneror protective coatTngof any kind should be used in or around any part of the oven. • IF THE SELF-CLEANINGmode malfunctions,turn the ovenoff and disconnectthe power supply. Have it serviced by a qualified technician. DO NOT touch heatingelements, surfaces near them or interioroven surfaces.
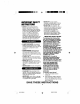
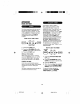
[i i ÷- t -- II OPERATION FEATURESOF YOUR24" GASBUlLT-IN WALLOVEN Self-Clean Automatic Door Latch Oven Control :lock Pad Oven Light Broil Automatic Oven -Light Switch Broiler Pan Oven Light Model and Serial Number Oven Rack Guides ÷ Self-Cleaning Removable Oven _Racks Self-Cleaning Door Gasket Removable Oven Door To remove the adhesive left from packaging tape, use household diehwashing liquid, mineral oil or cooking oil With a soft cloth rub into the area and allow to soak.
OPERATION OvenControl,ClockandTimer $oo Your new touch pad oven control will allow you to set various functions with ease. Below are the different types of functions and a description of each. _ The HOUR/MINUP and DOWN BAKE - Cooks foods in the traditional arrow pads set the time of oven with a temperature rangeof 170°F HOUR Mm day, length of cooking time, to 550°F. _ f_. / _length of cleaning time. the _,,Vj; ,V_VJ delayed start time.
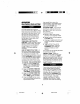
÷ iii!i!iiT L iiiiiiiii iiim!i!l , LL OPERATION Control Display OvenTemperature "On" Indicator Indicator \ Set Indicator/ / flBBB ('BBBB'+ _ • DF.LAY BAKE CLEAN Oven Function Indicator This indicator • Displays INDICATOR has a multiple SET INDICATOR - The set indicator will flash in combination with an oven function or timed function to let you know you need to set a time or temperature.
OPERATION Clockand Timer The clock r must be set for the correct HOW TO SET THE CLOCK MIN 1. Press the CLOCK pad. 2. Press the HOUR/MIN UP and/or DOWN arrow pads to set the time. 3. Press the START pad. HOW TO SET THE TIMER KITCHEN T.,. @@ QV) \YJ RECALL THE CLOCK While using your oven for cooking, press the CLOCK pad if you wish to check the time of day.
IL iiiii!!i!i!iim ii i OPERATION OvenControl,Clock and Timer If you would like to return the 6-second heap, repeat steps above until the display shows your choice and press the START pad A'rrENTION TONE - This tone will sound if you make an error or an oversight is made while setting an oven function, Your new control has a series of tones that will sound at different times. These tones may sound while you set the control for an oven function, or at the end of the oven function.
OPERATION OvenCookingTips Opening the door often to check foods will cause heat loss and poor baking results It is normal to have some odor when using your oven for the first time. TO help eliminate this odor, ventilate the room by opening a window or using a vent hood. Preheating is bringing the oven temperature up to the temperature you will be using during baking.
OPERATION OvenCookingTips FLAT COOKIE SHEETS, without sides, allow air to circulate all around the cookies for even browning The Oven Temperature Sensor at the back of the oven continuously senses and controls the temperature inside the oven. To keep a constant set temperature, the elements will cycle (turn on and off during cooking). When using your convenient Delay Start operation, foods such as deity products, fish, poultry, etc., should never sit more then 1 hour before cooking.
L II T I L OPERATION Oven Cooking Tips The oven racks ere designed with stops, a convenience as well as a safety precaution, The guides have a bump to prevent the racks from tilting when racks are pulled out of the oven. This design allows the racks to be inserted in only one way. Baking results will be better if baking pans are centered in the oven as much as possible.
irT iiiii] ! ÷ liiiiiiiiiii OPERATION Baking& Boasting To set the oven to turn on at a later time time and turnfor offaautomatically. of day, cook specific amount of 1. Press the BAKE pad. TEMP 2. Press the TEMP UP and/or DOWN arrow pads to set the oven (_ _ LfJ) temperatureyou prefer to use. 3. Press the START pad. and/or DOWN arrow pads to set the oven _ prefer to use.you temperature TIME pad. 3, COOKING Press the OVEN To set the oven to cook for a specific time and turn off automatically.
OPERATION Broiling The closer you place foods to the broil burner, the faster foods brown on the outside yet remain red to pink in the center. Broiling is cooking by direct heat from the upper element, The oven door should remain open to the broil stop position during broiling.
II , I: iiiiilliiii!i!l i Iii: i i OPERATION SettingSpecialFeatures 2. (a) Press the BROIL pad. The control display will show the degree sign and "F" (b) Press the BROIL pad again This will change "F°" (Fahrenheit) to "C °" (Celsius). :3. Press the START pad. Your new touch pad control has additional features that you may choose to use. After making your selection, if you want to change the setting, follow the steps until the display shows your choice. Your control is set to use the 12-hour clock.
OPERATION SettingSpecialFeatures Your new contro! has a cook and hold feature for timed cooking only that will keep hot cooked foods warm up to 3 hours after the timed cooking is finished To activate this feature: Your control will allow you to lock the touch pads so they cannot be activated when pressed. If you're worried about leaving the oven unsupervised, activate this feature. 1. Press and hold, atthe same time, the BAKE and BROIL pads for 3 seconds, until the display shows "SF" 1.
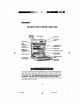
J CAREAND CLEANING Self-CleaniegCycle The door gasket is designed to have a 5" 6" gap at the bottom of the door. This allows for proper air circulation. Door Panel 1. Gasket Remove the broiler pan and grid, utensils and any foil that may be in the oven, 2. If your oven =sequipped with nickel oven racks, they. should be removed If your oven is equipped with gray porcelain-coated oven racks, they may stay in the oven during the self-clean cycle.
IL , ii iiil # CAREAND CLEANING Self-CleaningCycle The Clean Cycle, including cooldown time, is automatically set for 4 hours, but you may change this from 3 hours if oven is lightly soiled up to 5 hours if oven is heavily soiled pad. 4the hours will 1. Press CLEAN show in the display. _2. HOUR MIN Ifyouwantto change the length of clean time, pressthe _ or DOWN arrow HOUR/MIN UP and/ pads. 3. pad.
CAREAND CLEANING Cleaning Clean only as touch-up between clean cycles. Use dishwashing liquid, warm water, or soap-filled pad Rinse well after cteaning and dry. Never use oven cleaners in or around any part of the oven. When cleaning, be sure not to bend or displace the temperature sensor located on the back wall of the oven. CLEANING MATERIALS • Dishwashing detergent • Warm water • Soft cloth Do not use abrasive cleaners, industrial cleaners, or bleach. _lif_i'.
L M_s_'"'III l CAREAND CLEANING CleaningAndRemovableParts ÷ BulbCover ÷ BailWire TO REMOVE THE COVER 1. Disconnect electrical power to the oven at the main circuit breaker or fuse box. 2, Hold your hand under cover and firmly push back the bail wire, until it clears and releases the bulb cover. REPLACE THE LIGHT BULB Unscrew the light bulb and replace it with a 40-watt appliance bulb. TO REPLACE COVER 1. Place the bulb cover into the groove of the bulb socket, 2.
CARE AND CLEARING CleaningAnd RemovableParts Broil Stop Position I CLEANING MATERIALS • Dishwashing detergent • Warm water • Scouring pad or soap-filled pad Bumpin I TO REMOVE RaisedBack of 1_ 1. Open the door to the broil stop position 2. Grasp the door at each side and lift up and off the hinges. DO NOT LIFT DOOR BY THE HANDLE. The_ TO REMOVE 1. 2.
] iiiii,i ii! ÷ liiiiiiiiiiii ..... iiii! iiiil iiiiiiiII BEFORECALLINGFORSERVICE To save you time and money, before making a service call, check the list below for any problem you may feel you have with the performance of your oven, If the problem is something you cannot fix, use the Consumer Service Numbers located at the back of this guide. When making any calls, have the Model No., Serial No., Repair Parts List, Use and Care Guide and the Date of Purchase available.
> 7t i ] ÷ IL BEFORECALLINGFORSERVICE PROBLEM POSSIBLE CAUSE POSSIBLE SOLUTION Oven temperature seems inaccurate, Oven control calibration, See the temperature adjustment instructions following this section Oven will not unlock, Clean cycle is not finished, Oven temperature must drop below the lock temperature before the door will unlock. Oven light does not work. s. Light switch is in off position. b. Oven light bulb loose or burned out. a. Check switch setting. a.
BEFORECALLINGFOR SERVICE PROBLEM Cleaning results were poor, POSSIBLE CAUSE a. Oven was heavily soiled b. Clean cycle interrupted POSSIBLE SOLUTION e. Heavy spillovers should be cleaned before the cycle is set. b.
/I . : iiiii:ili/1 ÷ liiiiiiiiii:i "DO-IT-YOURSELF" TEMPERATURE ADJUSTMENT 1. You may feel that your new oven cooks differently than the oven it replaced We recommend that you use your new oven a few weeks to become more familiar with it, following the times given in your recipes as a guide. If you think your new oven is too hot (burning foods) or not hot enough (foods are undercooked) you can adjust the temperature yourself.
BUILT-IN WALLOVENWARRANTY fFULL ONE-YEAR WARRANTY ON ALL PARTS If, within one year from the date of installation, any part fails to function properly due to a defect in material or workmanship, Sears will repair or replace it, at our option, free of charge. If this product is subjected to other than private family use, the above warranty is effective for only 90 days WARRANTY SERVICE IS AVAILABLE BY CONTACTING THE NEAREST SEARS SERVICE CENTER IN THE UNITED STATES.
HORPlO DE24" CONAUTOLIMPIEZA Indice Seguridad en el uso del homo ....................................... ÷ Ciclo de autolimpieza ............. 4_43 Panel de control ............................ 44 Caeerola y parrilla para asar a la parrilla ...................................... 44 Interior del horno con autolimpieza .................................. 44 Vidr]o de la puerta del homo ........ 44 Moldura de la ventilaci0n 28-29 Caracteristicas de su homo .......... 30 Como sacar la cinta de empaque .....
L, INSTRUCCIO#ESDESEGURIDADIMPORTA#TES GUARDE ESTAS INSTRUCCIONES Lea todas las Instrucclones aparatos a gas o eldctricos, incluyendo antes de usar este aparato.
INSTRUCCIO#ES IMPORTANTESPAPA SU $EGURIDAD toque o permita que la ropa o matefiales inflamables hagan conlacto con las superficies calientes hasta que hayan tenido tiempo de en[riarrse Las otras suprficies cerca de tas ventanillas de ventilacidn del homo, puertas, ventanas y I_s superficies para eocinar tambien podrian estar suficientemente caliente_ para causaT quemaduras • COLOQUE LAS PARRILLAS DI=L HORNO eft la position deseada miefltras el homo este frio Si las parrillas se deben mover mientras el homo
!I I ÷ LL OPERAClON CARACTERISTICAS DESU RORNODE PAREDA GASDE 24" VentilaciCn del botCn Con_oldel horno Interruptor de Cerrojo automatico para Interruptor automdtico de la Elemento ÷ pflr8 assr a 18 parrilla Gufas para Luz del Interior del homo Cacemla y pandlla para asar a la Parrillas n_mero homo de homo ÷ de modelo y serie Puerta removibie Elemento Sello de la puerta pare autolimpleza Para sacar el residuo del adhesivo de la cinta de empaque, use detergente IfQuido para platosr ac
II , ÷ .......... m....... OPERACION Control Del Homo, Roloj y CrooGmetro I sooL L Su nuevo cent[el de homo a botones le permitira programar _as varias {unciones con |acilidad. abajo est&n los diferentes tipos de funciones y la descripciSn de cada uno, I II I! III HORNEAR - Cocina los alimentos en el homo (_ tfadicional a una temperatura 170°F a 550°F. HOUR MIN _x F_.
I! ;; ii!i!iiiiiii] i ÷ OPERAClON PanelDeControl Indlcador de temperature del homo -f B BB BBBB : S Indle_dor de progrema Indicador de encendido _ _o S • .
IL i . OPERAClON Relojy CronGmetro El cron6metro de la cocina se usa para medir el tiempo de los procesos para cocinar u otras activ]dades del hogar No controla el horno. Se puede programar hasla 9 horas y 59 minutos. Contar_ hacia atras en minutos hasta que Ilegue a los ULTIMOS 60 SEGUNDOS, entonces el control sonata una vez.
II ........ I i I ii! !!ii!iiiiI@liiiii. I.'---o OPERACION CoahwlDelHomo, Relojy CronGmetro Si desea regresar a los tones de 6 segundos, repita los pasos de arriba hasta qua el dia_ muestr_ su seleoc_3n y ampule el botdn START (comienzo). TONe BE ATFNOION - Este tone sonar& si haee un error u omite algo mienlras prog_ama una tuncidndelhorna.
_ iii_ili_ii I OPERAGION Consejo$Para Cocinar en el Homo Si abre la puerta frecuentemente para mirar los alimentos causar_ una p_rdida de calor causar_ malos resultados cuando horn_, Es normaE sentir un poco 0e olor cuando use su homo por primera vez. Esto es causado por el calentamiento de las partes nuevas y del aislante. Para ayudar a eliminar este olor, venUle la habltacl6n abdendo un8 ventana o usando una csmpana de ventllaci6n.
"_S iiiiiiiiiiiii OPERACION ConsejosPara Cocinar en el Homo I.A8 BANDEJAS BAJAS, sin lados, para galletas perm]ten que el aire circule alrededor de las galletas para que se doren en forma parela. El Sensor de Temperatura del Homo en la parte trasera del homo mide y controla continuamente la temperatura dentro del homo Para mantener una temperatura programada constante, los elementos har_n un ciclo de encendido y apagado m]enlra$ el homo coc]na.
[I i ÷ OPERAClON ConsejosPara Cocinar En El Homo lii i i i; iii Mii Las parrillas del homo est_n diserladas con topes, una convenienc]a y tambien una precauc]On de seguridad. Las guias tienen un tope para preven_r que las parrillas se den vuelta cuando se sacan del homo, Este dise5o permite que ]as parrillas puedan ser insertadas de solo una manera. S] esla horneando con m&s de un utensilio, Col0quelos de manera que cada uno tenga por Io menos de 1" a 1V2" de espacio de aJre a su alrededor.
OPERAClON CGmoHornearYAsK 1. Empuje _ eL bolon Para programar que el homo se enoienda a una hora posterior del dia, cocine por una canlidad de l]empo especiflca y se apague automaticamente. BAKE 1. Empuje el botch BAKE. 2. con Empuje las flechas los botones TEMP TEMP UP y/o DOWN para programar la temperatura del homo que desea usar. _V._ TEMP 3. START Empule _CC_)EARj_ ÷ @ el bot6n hornea, empuje 4. Cuando termine eldebotOn CLEAR/OFF. 3.
OPERACION CGmoAsarA LaParrilla Mientras mas cerca coloque los alimentos del elemento para asar, mas r&pido se dorartm per afuera, pero quedando rojo o rosado en el centre. Asar es cocinar al calor dire;to del elemento superior. La puerta de! homo deberia permanecer abierta en la posici6n de tope para asar cuando ase a la parrilla. Colocando las carnes lejos del eiemento permitira que las carries se eocinen en el centre mienlras se doran per afuera.
fill OPERACION (b) Empuje el botOn BROIL nuevamente. Esto cambiara "F °'' (Fahrenheit) a "C °'' (Centigrado). 3. Empuje el bot6n START, CGmo SelecMonar Programa$E_peciales Su nuevo control a bolones tiene caracteristicas adlclonales que usted podria usar, Despu{_s de hacer su selecci6n, si usied desea cambiar el programa, siga los pasos hasta que el dial muestre su selecci6n. ÷ Su control esta programado para usar el relo i en 12 horas.
OPERAClO# CGmo$eleccionar ProgramasEspeciales Su nuevo control tiene una funci6n para cecinar y mantener la temperatura para cocinar autom_ticamente solamente que man|endrPJ los al]mentos tibios hasta 3 horas despues que el cocinado automatico haya terminado Pare aclivar esta funci6n: El control le permitira cerrar los botches de manera que no se puedan activar cuando los empuje. Si se preocupa de deJarel homo sin supervision, active este programa. 1. 1.
CUIDADO Y LIMPIEZA E1CicloDeAutolimpieza El sello de que tenga del homo, adecuada 1, Saque 4a caceroLa y la parrilla para asar. ulensilios, y cuaiquier papel de aiuminio que podria quedar en el homo. 2. Si su homo est,[ equipado con parrillas de niquel. 1as mismas deben ser removidas. S] su homo est_l la puerta esta dise_ado para un espacio de 5L6 ' en el rondo Esto permite la circulacl6n del a_re. Reveetimiento equipado con pamllas cub]ertas de porcelana gr]s.
CUIDADO Y LIMPIEZA Ciclo De Autolimpieza Despues del c]clo usted podria notar un poco de cenizas blancas en el homo S]mplemente limpielas con un patio o esponja homed& El Ciclo de Limpieza, ]nciuyendo ei tiempo de enfriamiento, est& programado autom&ticamenle pot 4 horas, pero usted puede camb]ar esto de 3 horas si el homo esla levemente sucio a 5 horas si el homo Si algunas manchas blancas persisten, frieguelas con una lan]lla con jabon Asegtlrese de enjuagar b]en.
I[ I CUIDADOYLIMPIEZA Limpieza MATERIALES Limpie solamente como un toque enlre ciclos de limpieza, Use detergente liquida, agua libia, o lanikla con jab6n. Enjuague bien despu_s de limpiar y seque. Nunca use limpiadores de hornos dentro o alrededor de cualquler parle del homo. Cuando I]mp]e, asegt)rese de no doblar o desplazar el sensor de temperatura ubicado en la pared trasera del horno.
i CUIDADO Y LIMPIEZA Partes Removibles PRECAUCION: Us_ed debe desconectar el poder eh_ctrico hacia el homo en el interruptor principal del circuito o en ia caJa de los fusibles antes do trater de reemplazar los focos de la luz del homo. No toque el foco de la luz con laa manos moJadas o con un pai_o mojado. Espere haste que ol foco se haya enfriado y use un pai_o seco. Collar ÷ Cubierta del foco C(_MO SACAR con Soqueto ÷ Alambre suJetedor LA CUBIERTA 1.
iiiiiiiiii il i ÷ i i iiiiiiiMiii! !iiiiiiiiiiii CUIDADO Y LIMPIEZA Limpieza y Partes Removibles Poslci6n de tope pare sear a la pardlla MATERIALES DE LtMPIEZA • Detergente pare plates •Agua tibia •Lanas pare fregar o lanillacon jab0n Tope I;" BIsa0ra _ IE en 1. Abra la puerta hasta [a posicion para asar ala parrilla. 2, Tome la puerta de cada lado, levantela y s&quela de las bisagras. NO LEVANTE LA PUERTA DE LA MANILLA. CbMO SACAR 2. ÷ PRECAUCION: Tire las parrillas haste la posiei_n de tope.
rI t ÷ I" ANTESDELLAMARPARAIIN SERVICIO Para ahorrar liempo y dinero, antes de Ilamar para un servicio, revise la I]sta de m_ts abajo para cualqu]er problema que usted crea _ue t]ene con el luncionamiento de su homo, Si el problema es algo que usted no puede reparar, use los Nt3meros de ServiGio para el Consumidor qua se encuentran al final de este manual ¢uando haga un Ilnmado, tenga disponible el n,',mero de modelo, n_mero de aerie, llsta de partes para mpamciones, manual de use y cuidado y la fecha de
ANTESDE LLAMARPARA UN SERVIClO PROBLEMA PO$1BLE CAUSA POStBLE SOLUCION La tempemtuna del homo no parece estar exacta, Calibraci6n del control del homo Vea las instrucciones para a]usta_ la temperatur_ due siguen esta seccion La puerta del homo no se desengencha, El ciclo de limpieza no ha terminado, La temperatura de! homo debe bajar a menos de la temperatura de enganche antes que la puerta pueda abrirse, La luz del homo no funciona a.
J ANTESDE LLAMARPARA UN SERVlClO PROBLEMA El homo un oloi'. emlte El homo no se limpi6 los resultados fueton ma_os. POSIBLE POSIBLE CAUSA o SOLUCION a. El aislante del homo podria emitir un olor guran|e los primeros usos, a. Ponga el homo en un ciclo de 8utolirrlpiez8 par8 acelerar el proceso de eliminar el oLor. b. Falla de limpiar el exceso de suciedad. b, Limpie eLexceso de suciedad antes de usar el homo a. El homo estaba demasiado sucio a.
AJUSTES DE TEMPERATURA "HABALDS USTED MISMO" Usted nueVOquehOrnOco{_ na podriad ferentementePensar aue_homoSU / BAKE] reemplaz0. Recomendamos que use su 1. j,. Empuje y sujele los botones BAKE y BROIL por 3 segundos, hasta que el dial muestre "SF" homosenuevo faro liance seUnaSdanP°CaSen con _,lasSemanaSrecelas slgulendOcomolOSque_ paratemposqUe una guia. 2.
GARANTIA DELIlORNO DEPAREDEMPOTRADO UN AI;IO COMPLETO DE GARANTIA PARA TODAS Si, dentro de un argo de la fecha de instalaci6n, funcionar adecuadamente debido a un defecto mano, Sears la reparar_ o reemplazar&, LAS PARTES cualquier parte deja de en el material o la obra de a nuestra opci6n, sin costo Si este producto es eometido a un uso que no sea el familiar privado, la garantia de arriba es efectiva pot solamente 90 alias.
Forrepeur of majorbra_dappliancesin your own home... nomatterwhomade it, nomatterwhosold_t! 1-800-4-MY-HOME _ (1_00469A663) Any_me, dayornight (U.SAandCanada) W_MN.S_ThCOITI WWW Jm_,LC, a Forrepairof carry-inproductslikevacuums,lawnequipmentand eleclronics, callforthe nearestSears Parts arid Repair Center. 1-800-488-1222 Anyum_ _y orrigri([_SAo_y) wv_v.@eam.o0111 For the replacementparts,a_ccessories andowne('smanuals thatyouneedtodo4t-yourself, callSears PartsDirect_! ÷ 1-800-366-PART ÷ 6 &m.