OWNER'S MANUAL DOUBLE BUILT.IN OVEN 24" WALL MODEL NO. 911.41389 CAUTION: Before using this oven, read this manual and follow all its Safety Rules and Operating Instructions. Sears, Roebuck and Co., Hoffman • • • • Safety Instructions Operation Care and Cleaning Problem Solving Estates, IL 60179 229C4020P202(SR- U.S.A.
DOUBLEBUlLT-IN WALLOVEN TABLEOF CONTENTS Oven Safety ........................... 3-4 Self-Cleaning Cycle (Upper Oven) .................... 17-18 Control Panel .......................... 19 Broiler Pan and Grid ............... 19 Oven Light Bulb ...................... 19 Oven Interior Self-Cleaning (Upper Oven) ......................... 20 Oven Interior Conventional (Lower Oven) .......................... 20 Oven Racks ............................ 21 Oven Door ..............................
IMPORTANT SAFETYINSTRUCTIONS SAVE THESE INSTRUCTIONS Read all instructions before using this appliance. When using gas or electrical appliances, basic safety precautions should be followed, including the following: IMPORTANT: To insure safety for yourself, family and home, please read your Owner's Manual carefully. Keep it handy for reference. Pay close attention to Safety Sections. BE SURE your appliance is installed and grounded by a qualified technician.
• DO NOT USE oven cleaners - No commercial oven cleaner or protective coating of any kind should be used in or around any part of the oven. IMPORTANTSAFETY INSTRUCTIONS IMPORTANT • DO NOT touch heating elements, surfaces near them, or interior oven surfaces. These may be hot enough to cause burns even though they are dark in color. During and after use, do not touch or let clothing or flammable material contact the elements or hot surfaces until they have had time to cool.
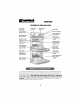
OPERATION FEATURESOF YOUR WALLOVEN Self-Clean Automatic Door Latch (upper oven) _ (both ovens) Model & Serial Broiler Pan Lower Oven Control Upper Oven Control Clock Pad rght Pad Automatic Oven Oven Light (both ovens) and Self-Cleaning "Oven Interior (upper oven) Self-Cleaning Removable (upper oven) (both Oven Vent Oven Rack (both ovens) (behind grille, both ovens) ovens) Removable Oven (both ovens) (both ovens) To remove the adhesive left from packaging tape, use household dishwashing li
OPERATION Oven Control, Clock and Timer (Upper Oven) Your new touch pad oven control will allow you to set oven functions with ease. Below are the different types of functions and a description of each. BAKE - Cooks foods in the traditional oven with a temperature range of 170°F to 550°F. BROIL - Cooks foods at 550°F HI broil or 450° LO broil from the direct heat of the upper element. Broiling should be done with the door opened to the broil stop position.
OPERATION Control Display (Upper Oven) Oven Temperature Indicator Indicator To Let You Know The Oven Has Turned On Location Flashing To Alert You Time To Set A of for Day Kitchen Temperature Or A Time or Cleaning Function Indicator The Control Display is an easy reference for using your oven control. Below are descriptions of how the Control Display works. OVEN TEMPERATURE INDICATOR - This indicator has a multiple purpose.
The Kitchen Timer is used to time cooking processes or other household activities. It does not control the oven. It can be set for up to 9 hours and 59 minutes. It will count down in minutes until the LAST 60 SECONDS is reached, then the control will beep once. When the countdown reaches ZERO, the control will beep 3 times followed by one beep every 6 seconds until the KITCHEN TIMER ON/OFF pad is pressed. Tile 6 second beep carl be removed for future cycles if desired.
OPERATION Oven Control, Clock and Timer (Upper Oven) Your new control has a series of tones that will sound at different times. These tones may sound while you set the control for an oven function, or at the end of the oven function. It will also alert you that there may be a problem with the functions. Below are the types of tones and a brief description of each. 4. Press the START pad to cancel the 6 second beep and leave the special feature mode.
In the back of the oven you will notice a small tube. This is a heat sensor that maintains the temperature of the oven. Never move or bend this tube. OPERATION OvenCookingTips It is normal to have some odor when using your oven for the first time. To help eliminate this odor, ventilate the room by opening a window or using a vent hood. The low temperature zone of your oven (between 170° and 200°F) is available to keep hot cooked foods warm.
The oven racks are designed with stop locks, a convenience as well as a safety precaution. The guides have a bump to prevent the racks from tilting when racks are pulled out of the oven. OPERATION OvenCookingTips Bump in _ Rack Guide_ The Oven Temperature Sensor at the back of the oven continuously senses and controls the temperature inside the oven. To keep a constant set temperature, the elements will cycle or turn on and off during cooking. i/ !'i Your oven has four (4) rack positions.
OPERATION © Baking and Broiling (Lower Oven) © 1, Open lower oven door to the broil stop position. 2, Push in and turn both the OVEN SET and the OVEN TEMP knobs to BROIL. 1. Push in to turn OVEN SET knob to BAKE. 3. When cooking is complete, turn the OVEN SET knob to OFF. 2. Push in to turn the OVEN TEMP knob to the desired temperature. 3, When baking is complete, turn OVEN SET knob to OFF.
OPERATION Baking(UpperOven) (_ To set the oven to turn on at a later time of day, cook for a specific amount of time and turn off automatically. 1. Press the BAKE 1.Press BAKE the pad. (_ TEMP 2, Press TEMParrow UP and/or the DOWN pads to set the oven 2. Press the TEMP UP and/or DOWN arrow pads to set the oven temperature you prefer to use. TEMP @ temperature prefer to use.you pad. 3, START Press thepad. 3. COOKING Press the OVEN TIME pad.
The closer you place foods to the broil element, the faster foods brown on the outside yet remain red to pink in the center. OPERATION Broiling(BothOvens) Moving meats away from the element will allow the meat to cook to the center while browning on the outside. Cook side 1 at least 2 minutes longer than side 2. If your oven is connected to 208 volts, you may want to use a higher rack position and/or broil foods longer.
2. (a) Press the BROIL pad. The control display will show the degrees sign and "F." OPERATION (b) Press the BROIL pad again. This will change F (Fahrenheit) to C (Celsius). Setting Special Features (Upper Oven) 3. Press the START Your new touch pad control has additional features that you may choose to use. After making your selection, if you want to change the setting, follow the steps until the display shows your choice. Your control is set to use the 12 hour clock.
2. (a) Press the OVEN COOKING TIME pad. The display will show "HLd OFF." OPERATION (b) Press the OVEN COOKING TIME pad again to activate the feature. The display will show "HLd ON." Setting Special Features (Upper Oven) 3. Press the START Your control will allow you to lock the touch pads so they cannot be activated when pressed. If you're worried about leaving the oven unsupervised, activate this feature.
CAREAND CLEANING Self-CleaningCycle (UpperOven) The door gasket is designed to have a 5"-6" gap at the bottom of the door. This allows for proper air circulation. Door Panel 1. Remove the broiler pan and grid, oven racks, utensils and any foil that may be in the oven. 2. Soil on the front frame, 1" inside the oven, and outside the door gasket will need to be cleaned by hand. Front Gasket Door Liner It is normal for your oven door to give the appearance of not having a good seal against the oven.
After the cycle, you may notice some white ash in the oven. Just wipe it up with a damp cloth or sponge. CARE AND CLEANING Self-CleaningCycle (UpperOven) If white spots remain, scrub them with a soap-filled steel wool pad. Be sure to rinse thoroughly. These are usually deposits of salt that cannot be removed during the cycle. The Clean Cycle, including cooldown time, is automatically set for 4 hours, but you may change this from 3 hours if oven is lightly soiled, up to 5 hours if oven is heavily soiled.
CAREAND CLEANING Cleaningand RemovableParts _ CLEANING MATERIALS • Dishwashing detergent • Warm water • Soft cloth Do not use abrasive cleaners, industrial cleaners or bleach. cooled and use a dry cloth. Bulb CLEANING • • • • AUTION: power Disconnect electrical to the oven at the main circuit breaker or fuse box before attempting to replace the oven light bulb. Do not touch a hot light bulb with wet hands or a wet cloth.
CONVENTIONAL OVEN (LOWER OVEN) CLEANING MATERIALS CARE AND CLEANING Cleaning • Dishwashing detergent • Oven cleaner • Soap-filled steel wool pad • Warm water • Cleansing powder TO CLEAN SELF-CLEANING OVEN (UPPER OVEN) CLEANING MATERIALS • • • • Cleaning inside the oven after each use will make cleanup easier. For heavy soil, if a commercial oven cleaner is used follow the label directions carefully. Do not get any cleaner on the temperature sensor. Rinse well after cleaning.
Broil Stop Position CARE AND CLEANING RemovableParts CLEANING MATERIALS , Dishwashing detergent ° Warm water ° Scouring pad or soap-filled wool pad Bump in of the rack _ Hinge__ TO REMOVE steel 1. Open the door to the broil stop position. /_ 1 I_ I/I/ 2. Grasp the door at each side and lift up and off the hinges. DO NOT LIFT DOOR BY THE HANDLE.
BEFORECALLINGFORSERVICE To save you time and money, before making a service call check the list below for any problem you may feel you have with the performance of your oven. If the problem is something you cannot fix, use the Consumer Service Numbers located at the back of this manual. When making any calls, have the Model No., Repair Parts list, Use and Care Manual and the Date of Purchase available.
BEFORECALLINGFORSERVICE PROBLEM Oven smokes. Foods do not bake properly. POSSIBLE CAUSE a. Dirty oven. SOLUTION b, Improper use of aluminum foil. a. Check for heavy spillover. b. Use of foil not recommended. c, Broiler pan containing grease left in the oven. c. Clean pan and grid after each use. a. Oven is not preheated. b, Improper rack or pan placement. a. Be sure to preheat until the tone sounds. b. Maintain uniform air space around pans and utensils. See oven cooking tips section. c.
3, Use a screwdriver to loosen the two screws about 1 turn each. "DOIT YOURSELF" TEMPERATURE ADJUSTMENT You may feel that your new oven cooks differently than the oven it replaced. We recommend that you use your new oven a few weeks to become more familiar with it, following the times given in your recipes as a guide. If you think your new oven is too hot (burning foods) or not hot enough (foods are undercooked), you can adjust the temperature yourself.
BUILT-IN WALLOVENWARRANTY FULLONEYEARWARRANTYONALLPARTS If,withinoneyearfromthe dateof installation,anypartfailsto functionproperlydueto a defectin materialor workmanship,Searswill repairor replaceit,at ouroption,freeof charge. Ifthis productis subjectedto otherthanprivatefamily use,the abovewarrantyis effectivefor only 90 days.
For in-home major brand repair service: Call 24 hours a day, 7 days a week 1-800-4-MY-HOME (1-800-469-4663) _ Para pedir servicio de reparaci6n a domicilio 1.800.676.5811 In Canada for a// your service and parts needs ca//Au Canada pour tout le service ou les pieces 1-800-665-4455 For the repair or replacement parts you need: Call 7 am-7 pro, 7 days a week 1-800-366-PART (1-800-366-7278) Para ordenarpiezas con entrega a domicilio 1.800.659.