Kenmore OWNER'S MANUAL MODEL NO. 911.47465 911,47466 911.47469 911. 47485 lIHH'l SINGLE 27" ELECTRIC SELF-CLEANING BUlLT-IN WALL 0 VEN • Safety Instructions • Features CAUTION: Read and Follow All Safety Rules and Operating Instructions Before First Use of This Product iii • • • • • Operation Care and Cleaning Problem Solving Easy Adjustment Consumer Service illl illlllll Sears, Roebuck ............. ,,,, ,,,, , and Co., Hoffman ,,,,,,,,,,,,,, , ,, Estates, IL 60179 U.S.A.
BUILT-INWALLOVEN TABLEOFCONTENTS Broiling .................................. 14 General Rules .......................................... 14 Preparing Meats 14 Oven Rack Position ................................. 14 To Set Broil ................................................ 14 ........................................... Range Safety .......................................... 3-4 Features Oven .................................
IMPORTANTINSTRUCTIONS FOR YOURSAFETY To insure safety for yourself, family and home, please read .your Owner's Manual careful!y Keep it handy for reference Pay close attention to the Safety sections. BE SURE your appliance is installed grounded by a qualified technician. TEACH CHILDREN • Not to play with controls or any part of the appliance • Not tosit, climborstandon the oven door_ NEVER WEAR loose fitting using Four appliance.
IMPORTANT SAFETYPFtECA UTIONSoontinued IMPORTANT NOTICE ! The California Safe Drinking Water and Toxic Enforcement Act requires the governor of California to publish a list of substances known to the state to cause birth defects or other reproductive harm and requires businesses to warn their customers of potential exposure to such substances. The fiberglass insulation in serf.cleaning oven will give off a very small amount of carbon monoxide durfng the cleaning cycle.
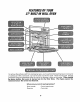
FEATURESOF YOUR 27"BUILT-IN WALLOVEN To remove or cooking procedure be done removed the adhesive left from packaging tape, use household dishwashing liquid, mineral oil oil. With a soft cloth, rub into the area and alfow to soak Rinse and dry welt Repeat using an appliance polish to insure no damage is done to the range This should before the oven is turned on for the first time. The tape cannot be once the oven has heated.
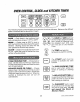
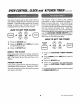
OVENCONTROL,CLOCKand KITCHENTIMER f TIMED OVEN @ @® ® ®® TEMP HOUR KITCHEN TIM£R MIN Your new touch pad control will allow you to set oven functions types of functions and a description of each, BAKE -- Cook foods in the traditional oven with a temperature range of 170_F to 55CPF @ HOUR BROIL -- Cooks meat at 550°F hi broil or 45_ low broil from the direct heat of the upper elemenL Broiling should be done with the door opened to the broil stop position MIN @ CLEAN -- Cleans the inside area of t
OVENCONTROL,CLOCKand KITCHENTIMERco.tinued CONTROL DISPLAY OVENTEMPERATURE INDiCaTOR 000 INDICATORTOLETYOUKNOW / THEOVENHASTURNEDON r'7 l.na_75 FR_ E _._==,_. _.,m, €` f,_. w,e_..-l-- CLOCK,K/TCRENTIMER,DELAY TOALE'TrOUTOS'A _ I TIZI CI C! I_I TI I! I"1 !1 IZ STA.TTJME. OVENCOOK, N.,OR OVENFUNCTION iNDICATOR III"qlll'!lll OVENFUNCTION INDICATOR .........
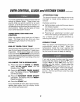
OVENCONTROL,CLOCKand KITCHENTIMERcontinued The Kitchen Timer is used to time cooking processes or other household activities. It.
OVENCONTROL,CLOCKand KITCHENTIMERcontinued ATTENTION This tone will sound if you make an error or an oversight is made while setting an oven function Your new control has a series of tones that will sound at different times These tones may sound while you set the control for an oven function, or at the end of the oven function It will also alert you there may be a problem with the functions Below are the types of tones and a brief description of each TONES WHILE CONTROL SETTING Examples OF TIMED CYCLE
OVENCOOKINGTIPS lt is normal to have some odor when using.your oven for the first time. This is caused by the heating of new parts and insulation Let the oven preheat thoroughly when recipes call for preheating. Preheating is bringing the temperature up to the temperature .you will be using during baking.. When the oven has reached the preheat temperature, a tone will sound.
OVENCOOKINGTIPScontinued During any oven operation you may hear a fan noise° This is the internal cooling fan that keeps all electrical parts from overheating, It is not uncommon for this fan to keep running even after the oven is turned off_ As the oven heats, the change in temperature ii_side the oven may cause water droplets to form on the oven door glass, To prevent this, open the door momentarily to allow the moist air out FLAT If baking with more than one pan, place the pans so each has at least 1
OVENCOOKINGTIPScontinued The oven racks are designed You may feel that your new oven cooks with We differently than the oven it replaced recommend that you use .your new oven a few weeks to become more familiar with it, following the times given in .your recipes as a guide.
BAKING t. TEMP @ Press the BAKE To set the oven to delay the start, cook for a specific time and turn off automatically: pad 2. Press the Temp UP and DOWN arrow pads to set the oven temperature ,you prefer to use. 1. Press the BAKE 2. Press the Temp UP or DOWN arrow pads to set the oven temperature you prefer to use TEMP 3. Press the START pad 3. To set the oven to cook for a specific tum off automatical!y: 4_ pad HOUR MIN @@ 2.
BROILING The U S. Department of Agriculture notes that meat cooked rare is popular, but meat cooked to only t40°F (rare) means that some poisoning organisms may survive. Broiling is cooking by direct heat from the upper elemenL The oven door should remain opened to the broil stop position during broiling_ The closer you place foods to the broil element, the faster foods brown on the outside yet remain red to pink in the center.
SELF-CLEANING CYCLE Utensils should never be left in a self-clean cycle. J The oven racks may be cleaned during the self-clean cycle, but will lose their luster and become hard to slide. If you choose to leave them in during the cycle, wiping them down with vegetable oil after the cycle will help them slide easier. Remove the broiler pan and grid, oven racks, utensils and any foil that may be in the oven. FRONT FRZ,M_ 2.
SELF-CLEANING CYCLEcontinued The Clean Cycle is automatically set for 4 hours, but,you may change this from 3 hours ff oven is lightly soiled up to 5 hours if oven is heavily soiled, Press the CLEAN pad, 1,, 4 hours will show in the display, _ HOUR _ MIN @@ HOUR Press the CLEAN pad. if you want to change the length of clean time press the UP and/or DOWN arrow pads Press the DELAY START TIME pad. pad HOUR Simply press the CLEAR/OFF pad.
SETTINGSPECIALFEATURESOF YOURCONTROL Your new touch pad control has additional features that you may choose to use. After making your selection, ff you want to change the setting, follow the steps until the display shows your choice, Your control is set to use the 12 hour clock If .
SETTINGSPECIALFEATUREScontinued Your control will allow .you to lock down the touch pads so they cannot be activated wheh pressed. If you're worried about leaving the oven unsupervised, activate this feature. This special feature will allow you to change the speed; #1 means speed of change is stow up to #5 which means speed of change is fast, To set the speed you prefer, follow these steps, 1. Press and hold, at the same time, the BAKE and BROIL pads, until the display shows SF_ 1.
CLEANING TO REPLACE: CLEANING MATERIALS Set the raised back of the rack on the pair of rack guides. Push until you reach the stop locks; lift the front of the rack until the back slides easily under the bump. Push rack into the oven. TO USE: • Dishwashing detergent • Warm water • Soft cloth Do not use abrasive industrial cleaners, cleaners, or bleach.
REMOVABLEPARTS TO REMOVE: BULB OVER TO REMOVE THE SOCKET LiVE COLLAR Open the door to the broil stop position. Grasp the door on each side and lift uP and off the hinges. DO NOT LIFT THE DOOR BY THE HANDLE. BAIL WiRE COVER: i,ii iiill 1. Disconnect electrical power to the oven at the main circuit breaker or fuse box. 2. Hold .your hand under cover and firmly push back the bail wire, until it clears and releases the bulb cover..
BEFORECALLINGFORSERVICE To save .you time and money, before making a service call, check the list below for any problem ,you may feel you have with the performance of your range if the problem is something you cannot repair, use the Consumer Service Numbers located at the back of this manual. When making any calls, have the model number, repair parts list, use and care manual and the date of purchase available.
BEFORECALLINGFORSERVICEco, n,ed PROBLEM POSSIBLE iii Foods i do not broil a. Improper position properly. i i n n u iin,,,,,,,,,, Oven smokes, rack emits SOLUTION . II II II IIIII IIII c. Improper c. Check broiling I IIIIIIIII use of foil see when broiling section d. Oven door closed during broiling. d. Open door to broil stop position e. Low voltage (208 volts) e. Use higher rack position longer cooking time,, f. f.
"DOIT YOURSELF" TEMPERA TUREADJUSTMENT You may feel that your new oven cooks differently than the oven it replaced, We recommend that.you use your new oven a few weeks to become more familiar with it, following the times given in your recipes as a guide. , + If you think .your new oven is too hot (burning foods) or not hot enough (foods are undercooked) you can adjust the temperature .yourself.
Fortherepairor replacement partsyouneed delivereddirectlytoyourhome Call7 am - 7 pro, 7 daysa week 1-800-366-PART (1-800-366-7278) Forin-homemajorbrandrepairservice Call24 hours a day,7 daysa week 1-800-4-REPAIR (1-800-473-7247) Forthelocationofa SearspartsandRepairCenterinyourarea Call24 hours a day,7 daysa week 1-800-488-1222 Forinformation onpurchasinga Sears MaintenanceAgreementor toinquire Call9 am - 5 pm, Monday-Saturday aboutanexisting Agreement 1-800-8 4 _ _,__,_ '_.
ELECTRIC OVEN WARRANTY ir ,,,'H II L F FULL Dear Customer: Our constant efforts are directed toward making sure your new Kenmore Oven will arrive at your home In perfect condition and will give you properperformance. As :_artof these efforts, we feel it Is our responsibility to provide you with this warranty for your range.
Kenmore MANUAL DEL CONSUMIDOR MODELONO. 911. 47465 911. 47466 911.47469 911. 47465 HORNOELECTRICO EMPOTRADO DE27" DEUNAUNIDAD CON AUTOLIMPIEZA • Instruccionesdeseguridad • Camcterisficas PRECAUCION: Lea y siga todas/as reg/as y/as instrucciones paraelfuncionamiento antes de usar este producto por primera vez . Funcionamiento . Cuidadoy Limpieza • CSmoreso/verProb/emas • AjusteF_cii • ServicoParael Consumidor j i H, Sears, Roebuck and Co., Hoffman Estates, IL 60179 =,= ii1=== = ,H,H=rN,=I U.S.
HORNOEMPOTRADO INDICE C6mo asar a la parrilla ............. 14 Reglas generafes .......................................... 14 Cdmo preparar tas cames #ara asar a la parrilla .......................................................... 14 Posicidn de parrilla ....................................... 14 Cdmo asar a la parfilla ................................. 14 Seguridad en el uso de la estufa ...........3-4 Caracterlsticas .......................... Autoliapieza ........................
INSTRUCCiONES IMPORTANTESPARASU SEGURIDAD PARA GARANTIZAR SU seguridad, ta de su familia y la de su hogar, por favor lea su Manual del Consumidor cuidadosamente. NUNCA GUARDE cosas de interns para los ni#os en los gabinetes sobre el estufa Mant_ngalo a la mano para referencias, Ponga mucha atencidn a tas secciones de seguridad.
INSTRUCCIONES IMPORTANTES PARASUSEGURIDAD ;ADVERTENCIA DE SEGURIDAD IMPORTANTE! COLOQUE en la posicidn Sf las parri/las est_ caliente, contacto con California Safe Drinking Water and Toxic Enforcement Act requiere que el gobernador de California publlque una lista de substancias que el estado sepa que producen defectos de nacirniento u otros daSos reproductivos y requiere que los hombres de negocios advlertan a sus clientes del contacto potencial a tales substancias.
CARACTERISTICAS DESUHORNO EMPOTRADODE27" Para sacar el residuo del adhesivo de la cinta de empaque, use detergente tJquido para platos, aceite mineral o aceite para cocinar. Con un pa4o suave frdte!os sobre el _rea y permita que se remqie Enjuague y seque bien. Repita elprocedimiento usando un putidor para estufas para asegurarse que el homo no se da_eo Esto se deberia hacer antes de encender la estufa por primera vez. La cinta no se puede sacar una vez que el homo se haya calentado.
CONTROL DELHORNONUEVO,RELOJYCRONOMETRO DELA COCINA KITCHEN TIMER ......... J Su nuevo control a botones le permitir_ programar las funciones det homo con facilidad.
CONTROL DELHORNO,RELOJYCRONOMETRO DELA COCINAcontinua. PANEL DE CONTROL INDtCADOR DE INDICADOR QUELE TEMPERATURA AVISAQUEELHORNO . \ _ SE_ ENCENDIDO f'_-""",wm_ _ ,w_. O"_ ^ ,_ ,_ ,w_ ,_'_ USICACIOH PARALAHORADELDIA LUZINTERMITENTE QUELE_ T€ io_ i_,_ i_,P_ JOJ _ I'_'1 Im'_ • I_="_ I'='_ -I1" COCINAHORADECOMIENZO AWSAQUEPROGRAME UNA J ' L-f t_,L4f I_,,L# J_tj " !_,,,_#Id,J Pd=J !,,,J I DEMORAD'O COCCION ENELHORNO TEMPERATURA 0 UN T/EMPO i DELAYBAKE CLEAN _ STARTCLOCKCLEANJ 0 _EMP_7DEL/MP/EZ4. _.,,.BROIL\
CONTROl, DE!,HORNO,RELOJY CRONOMETRO DELACOClNA El reloj debe ponerse a la correcta hora del d[a antes que una funcidn demorada del horno funcione correctamente.
CONTROL DELHORN&R£LOJY CRONOMETRO DELA COCINA TONO DE A TENCION Este tono sonars1 si hace un error u omite algo mientras programa una funcidn del homo, El nuevo control tiene una serie de tonos que sonar_n a tiempos diferente& Estos tonos pueden sonar mientras usted programa una funcidn del homo, o al final de una funcidn del homo Tambi#n le avisar_ si existe un problema con una de las funciones. M_s abajo est_n los tipos de tonos y una breve descripcidn de cada uno.
CONSEJOS PARACOClNAR ENELHORNO Permita que el homo se precafiente bien cuando Es normal sentir un poco de olor cuando use su las recetas requieren precalentamientoo El precalentamiento es subir la temperatura a la temperatura que va a usar cuando homee Cuando el horno Ilegue a la temperatura de precalentamiento, sonar_ un tonoo Tenga los alimentos a la mano .
CONSEJOS PARACOCINARENELHORNO A medida que et homo se calienta, el cambio de temperatura dentro del homo causa que gotas de agua se formen sobre el vidrio de la puerta def homo Para prevenir esto, abra la puerta por unos momentos para permitir que salga el aire hdmedo, Durante cualquier operaci_n del homo usted podrfa ofr un ruido de ventilador.
CONSEJOS PARACOClNARENELHORNOco, nu, Las parrillas del horno estbn diset_adas con topes, una .... conveniencia ytambi_n una LAS GUIAS precaucidn de seguridad PARA LAS_., para colocar o sacar /a PAt;RILL/IS comida del horno_ Cuando t._ TOPE_EN_ las parrillas esther7puestas correctamente en el homo, las gufas tienen un tope para prevenir que las parrillas se den vuelta Su homo tiene cuatro (4) posiciones para parrittas que se pueden usar cuando hornee.
COMOHORNEAR 1. @ @ Empuje el botdn Para programar que el homo empiece en forma demorada, cocine por un tiempo especffico y se apague autom#ticamente. BAKE. 2. Empuje los botones con las flecha UP y DOWN, para programar la temperatura del homo que desea usar TEMP B_ @ 1. Empuje el Botdn BAKE, 2. Empuje los botones Temp con /as flechas UP o DOWN para seleccionar la temperatura del homo que desea usar, 3. Empuje el botdn OVEN COOKING TIME 4.
COMOASARA LAPARRILLA Asar es cocinar al calor directo del elemento superior La puerta det homo deberfa permanecer abierta en la posici6n de tope para asar cuando ase a la parrilla No es necesario precalentar el homo cuando ase a la parrilla Use la cacerola y la parrilla para asar que viene con su estufa Ambas est_n diser_adas para drenar adecuadamente la grasa y los li'quidos El papei de alumlnio debe ser moldeado firmemente a ia parrilla y debe hacer cortes en el papel que est#n alineados con ias ranuras
EL CICLODEAUTOLIMPIEZA deber[an dejar dentro del homo durante un ciclo de autolimpieza. _ Los utensi!los nunca se Las parrillas dei horno se podrfan iimpiar durante el ciclo de autolimpieza, pero perder_n su brillo y se pondr_n dif[ciles de desllzar. Si decide dejarlas dentro durante el clclo de limpieza, pdseles acelte vegetal para que se deslicen mds fdcilmente.
CICLODEAUTOLIMPIEZA El Ciclo de Limpieza est_ programado para 4 horas, pero usted podrfa cambiar esto desde 3 horas si el homo esta levemente sucio a 5 horas si el homo est# muy sucio., 1. @@ @@ HOUR 2. MIN 3. Empuje el bot6n CLEAN, Mostrar_ 4 horas en el dial HOUR et bot6n MIN Empuje START START @ (_ HOUa 4.
COMOSELECCIONAR PROGRAMAS ESPECIALES DELCONTROL El nuevo control a botones tiene programas Empuje y sujete, al mismo tiempo, el botdn BAKE y BROIL, hasta que el dial muestre SF. 2. Empuje el botdn DELAY START TIME El dial muestra 12shdn (apagado en 12 horas) horas o poner el dial en blanco, Empuje 2. 2. (a) Empuje et botdn BROIL,, El dial del control mostrar_ el signo para grado y F, (b) Empuje el botdn BROIL nuevamente Esto cambiar_ F (Fahrenheit) a C (Centfgrado) 3.
COMOSELECC!ONAR PROGRAMAS ESPECIALES cont ,,aci6n El control le permitir_ cerrar que no se puedan activar se preocupa de dejar el active este programa_ Se los botones de manera cuando los empuje_ Si homo sin supervisi_no hace asL 1. Empuje y sujete, a la botdn BAKE .y BROIL, muestre SF. 2. (a) Empuje el botdn CLEAN. Et dial muestra LOC OFF (cierre inactivo) (b) Empuje nuevamente, (cierre 3.
LIMPIEZA QUE MA TERIALES DE LIMPIEZA QUE USAR: • Detergente , Detergente Ifquido para plates,, • Agua tibia, • Par_o suave No use iimpadores abrasivos, industriales, o blanquedores MA TERIALES para ptatos PARA limpiadores (cloro). LIMPIAR: Lave y enjuague PARA • Detergente plates.
PARTESREMOVIBLES PARA FOCO COLLAR CON _fO SACAR Abra la puerta hasta la posiciCn de tope para asar a laparrilla. Tome la puerta de carla lade y lev_ntela de las bisagras, NO LEVANTE LA PUERTA DE LA MANILLA. $OQUETE LA CUBIERTA: _esconecte la electricidad hacia el homo en e/ ::ircuito principal o en la caja de los fusibtes Cuando la puerta se saca y las bisagras est_n en la posici6n para asar a la parrilla, no pase a ilevar los brazos de las bisagras.
ANTESDE LLAMARPARAUNSERVICIO Para ahorrar tiempo y dinero, antes de Ilamar para un servicio, revise la fista de m_s abajo para cualquier problema que usted crea que tiene con el funcionamiento de su estufa Si el problema es afgo que usted no puede reparar, use los NOmeros de Servicio para el Consumidor que se encuentran al final de este manual Cuando haga un ilamado, tenga disponible el n_lmero de modelo, lista de partes para reparaciones, manual de uso y cuidado y la fecha de compra.
ANTESBE LLAMARPARAUN SERVICIO PROBLEMA t tllll tt ii tit lill POS/BLE ii LOS alimentos se asan adecuadamente mH.,m no a. a b. CAUSA n .. POS/BLE ,,,,,,i,,,,,,i Itll ....... Posicidn incorrecta de la a. parritla. El homo se precalentd, b. SOLUCION ttI tttttltttttltttt ttttt' Revise la posicidn de tas cacerotas; vea la seccidn para asar a la parrilla No precaliente cuando ase a ta parrilla, la parrilla, c. Mal uso de papel de c. Lea fa seccidn para asar a la parrilla_ aluminio, d.
AJUSTESDE TEMPERATURA - "HAGALOSUSTEDMISMO" Usted posrfa pensar que su nuevo homo cocina diferentemente al homo que reemplazd Recomendamos que use su homo nuevo unas pocas semanas para que se famitiarice con _1, siguiendo los tiempos que se dan en las recetas como una gufa.
Parapartesde reparacioneso de reemplazoque necesita Llamede 7 am - 7 pm, 7 d[asa la semana 1-800-366-PART © (1-800-366-7278) Para reparacionesy serviciode marcas mayoresensu casa Llame24 horasal dfa, 7 d[as a la semana 1-800-4-REPAIR ,$__/,/A./RL,$ ............ (1-800-473-7247) ParaubicarunCentrodeServiciode Reparaciones ensu_rea Llame24 horasal dia,7 diasa lasemana 1 .,800-488.
GARANTIA DE LA ESTUFA ELECTRICA iiiiiirl f _Estimado cflente: INue rosesfuerzos I dirlgldos lque a asegurar su nueva I Kenmore Estufa jComo 1! Ilegue a su_l ! cond|ciones ! servlclo GARANTIA ACABADO I I I hOgar en perfectas ii I DE y le d_ elll Jl GARANTIA TOTAL DE 90 DIAS EN AJUSTES MECANICOS Durante 90 dies a partlr de la fecha de instalacl6n, Sears proporclonar_, sin costo alguno, cualquler aJuste mecdnico necssatlo para la correcta operacl6n de la estufa, exceptuando el mantenimlent