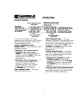
OWNER'S MANUAL 27" SELF-CLEANING MODEL NO. BUILT-IN WALL OVEN 911. 47465 911. 47466 911. 47469 CAUTION: Before using this range, read this manual and follow ail its Safely Rules and Operating Instructions. Safety Instructions Operation Care and Cleaning Problem Solving Sears, Roebuck and Co., Hoffman Estates, IL 60179 U.S.A.
Table of contents Removal of Packaging Tape Features of Your Oven... Oven Control, Clock, Timer Control Display . Clock... Kitchen Timer Tones .. F Codes .. Even Cook Setting Bake | Rolling .. en Special Features een TARE 27" SELF-GLEANING OVEN Self Cle waning Cycle. Self-Cleaning Oven interior . 18 Control Panel .. . Broiler Pan and Grid Even Light Bulb Oven Backs... Oven Door Sade Before Calling for Service .. 20-21 22 23 24 Temperature "Adjustment .. Warranty .
IMPORTANT SAFETY INSTRUCTIONS SAVE THESE INSTRUCTIONS Read all instructions before using this appliance. When using gas or electrical appliances, basic safety precautions should be followed, including the following: Pox 3 IMPORTANT: To insure safety for yourself, family and home, please read your Owner's Manual carefully Keep it handy for reference. Pay close attention to Safely Sections. BE SURE your appliance is installed and grounded by a qualified technician.
IMPORTANT SAFETY INSTRUCTIONS = B30 NOT touch heating elements, surfaces near them, or interior oven surfaces. These may be hot enough to cause bums even though they are dark in color. During and after use, do not touch or let clothing or flammable material contact the elements or hot surfaces until they have had time to cool. Other surfaces near the oven vent openings, oven door, or window may also be hot enough to cause bums. * PLACE OVEN RACKS in the desired position while the oven is cool.
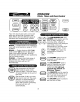
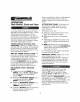
OPERATION FEATURES OF YOUR OVEN Clock Range Control Oven Vent Even Light Switch Set-Clean Automatic Door Latch Automatic Oven Light Switch Broil Element Oven Rack Guides Oven Light Self-Cleaning Broiler Pan And Oven Interior Grid Removable Oven Model & Serial Racks Number Location Bake Element Removable Set-Clearring Oven Door Door Gasket To remove the adhesive left from packaging tape, use household dish washing liquid, mineral oll or cocking oil. With a soft cloth rub into the area and allow to soak.
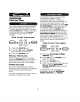
OPERATION Clack, Timer and Oven Control awn CLEAR [fry nine poh poi : TIMED OVEN | Kitchen BROIL VER TIMER TEMP HOUR WIN ONION CLEAN Te LIGHT Your new touch pad oven control will allow you to set oven functions with ease. Below are the different types of functions and a description of each. Dy HOUR MIN OO» BAKE — Cooks foods in the traditional oven with a temperature range of 170°F to B50°F. BROIL — Cooks foods at S50°F Hi broil or 480° LO broil from the direct heat of the upper element.
Control Display Oven Temperature Indicator SII I BELAY BAKE ~ LEAN KNICKERBOCKER DOOR Flashing Indicator To Alert You To Set A Temperature Or A Time ven Function Indicator The Control Display Is an easy reference for using your oven control. Below are descriptions of how the Control Display works EVEN TEMPERATURE INDICATOR — This indicator has a multiple purpose.
| Kenmore] OPERATION Clock and Timer is Hale) The clock must be set for the correct time of day before a delayed oven function can work properly. The time of day cannot be changed during a timed oven function, but can be changed during a bake or broil function. HOW TO SET THE CLOCK Press the CLOCK pad 2. Press the UP and/or DOWN arrow pads to set the time. 3. Press the START pad. RECALL THE CLOCK While using your oven {or cooking, press the CLOCK pad if you wish to check the time of day.
OPERATION Oven Control, Clock and Timer Your new control has a series of tones that will sound at different times. These tones may sound while you set the control for an oven function, or at the end of the oven function. It will also alert you there may be a problem with the functions. Below are the types of tones and a brief description of each TONES WHILE SETTING THE CONTROL—When you press a touch pad you will hear a beep.
OPERATION Oven Cooking Tips Eo AT ele ft is normal to have some odor when using your oven for the first time. To help eliminate this odor, ventilate the room hy opening a window or using a vent hood. La el IMPORTANT: Never cover the oven bottom or oven rack with aluminum foil. Improper use can cause Poor heat flow, poor baking results, and may damage the oven finish ITO ALL AS LA BANS The oven vent is located under the control panel. This area could become hot during oven use.
OPERATION Oven Cooking Tips The Oven Temperature Sensor at the back of the oven continuously senses and controls the temperature inside the oven. To keep a constant set temperature, the elements will cycle or turn on and off during cooking If raking with more than one pan, place the pans so each has at least 1to 1 1/2° of air space around it. Place pans so one is not directly above the other CARE ETS EL Eo HE FLAT COOKIE SHEETS, without sides, allow air to circulate all around the cookies for even browning.
OPERATION Baking Ee 1. Press the BAKE pad. 2. Press the TEMP UP and for DOWN arrow pads to set the oven temperature you prefer to usa 3. Press the START pad. TEMP © To set the oven to cook for a specific time and turn off automatically. 1. Press the BAKE (axe) pad. TEMP COOKING, TIME AN HOUR MIN 2. Press the TEMP UP and/or DOWN arrow pads to set the oven temperature you prefer to use 3. Press the OVEN COOKING TIME pad.
OPERATION Broiling Broiling is cooking by direct heat from the upper element. The oven door should remain open to the broil stop position during broiling it is not necessary to preheat the oven when broiling. Use the broiler pan and grid that came with your range. Both are designed for proper The closer you place foods to the broil element, the faster foods brown on the outside yet remain red to pink in the center.
RW CT life a= OPERATION Setting Special Features Your new touch pad control has additional features that you may choose to use. After making your selection, if you want to change that setting, follow the steps until the display shows your choice. The control is automatically set to turn off the oven after 12 hours baking or 8 hours broiling should you forget and fave the oven on. if you want to remove this feature: 1.
eam 2. {a} Press the OVEN COOKING Ken i TIME pad. The display will show i child OFF OPERATION {b) Press the OVEN COOKING 5 7: TEEM pad again to activate the Setting Sp special Features feature. The display will show Hid Press the START pad Your control will allow you to lock the touch pads so they cannot be activated when pressed.
1. Remove the broiler pan and grid, oven racks, utensils and any foil that may be in the oven. 2. Soil on the front frame, 1" inside the oven, and outside the door gasket will need to be cleaned by hand. Front Frame Door Liner Clean these areas with hot water, soap-filled steel wool pads or cleansers such as Soft Scrub® to remove any soil. Rinse well with clean water and dry. 3. Wipe up any heavy spillovers on the oven bottom. Do not clean the door gasket.
CARE AND CLEANING Self-Cleaning Cycle The Clean Cycle, including cool down time, is automatically set for 4 hours, but you may change this from 3 hours if oven is lightly soiled up to & hours if oven is heavily soiled. 1. Press the CLEAN CLEAN pad. 4 hours will >= show in the display. HOUR MIN ©» if you want to change the length of clean time press the MOURNING UP and/or DOWN arrow pad. 3. Press the START pad. Simply press the CLEAR/OFF pad.
CARE AND CLEANING Removable Parts g CONTROL PANE] CLEANING MATERIALS e Dish washing detergent s Warm water » Soft cloth Do not use abrasive cleaners, industrial cleaners or bleach. SPOILER PAN AND GRID CLEANING MATERIALS » Dish washing detergent = Warm water » Soap-filled scouring pad * Commercial oven cleaner TO CLEAN Allow the pan to soak. Sprinkle the grid with dish washing detergent and cover with a damp cloth or paper towel. Rinse and dry well. Scour as needed.
CARE AND CLEANING Removable Paris CLEANING MATERIALS ° Dish washing detergent » Warm water * Scouring pad or soap-filled steel wool pad Raised Back of The Rack 1. TO REMOVE Open the door to the broil stop position 2. Grasp the door at each side and It up and off the hinges. DO NOT LIFT DOOR BY THE HANDLE. and the hinge arms CAUTION: When the door is removed Wy) are at the broil stop position, as a precaution, cover the hinge arms with TO REMOVE toweling or an empty paper 1.
| Kenmore) BEFORE CALLING FOR SERVICE To save you time and money. before making a service call check the list below for any problem you may feel you have with the performance of your range. If the problem is something you cannot fix use the Consumer Service Numbers located at the back of this manual. When making any calls have the Model No., Repair Parks list, Use and Care Manual and the Date of Purchase available. PROBLEM POSSIBLE CAUSE POSSIBLE SOLUTION The display of your Range malfunction.
PROBLEM Oven smokes. POSSIBLE CAUSE a. Dirty oven. Bb. Improper uss of aluminum foil. <. Broiler pan containing grease left in the oven. . BEFORE CALLING FOR SERVICE POSSIBLE SOLUTION a. Check for heavy spillover. b. Use of foll not recommended. oc. Clean pan and grid after each use. Foods do not bake properly. a. Oven is not preheated. b. improper rack or pan placement ©. Oven vent blocked or covered. d. Improper use of foil e. Improper temperature setting for utensil used. #. Recipe not followed. Gg.
“pO IT YOURSELF” TEMPERATURE ADJUSTMENT You may feel that your new oven cooks differently than the oven it replaced. We recommend that you use your new oven a few weeks to become more familiar with it, following the times given in your recipes as a guide. If you think your new oven is too hot {burning foods) or not hot enough {foods are under cooked) you can adjust the temperature yourself.
. RANGE WARRANTY (Fut ONE YEAR WARRANTY ON THE FUNCTIONING OF ALL PARTS EXCEPT GLASS I PARTS if, within one year from the date of Installation, any part, other than a glass part, fails to function properly due to a defect in material or workmanship, Sears will repair or replace it, free of charge.
For the repair or replacement parts you need delivered directly to your home Call days a week 1-800-366-PART (1-800-366-7278) For in-home major brand repair service Gall 24 hours a day, 7 days a week el 1-800-4-REPAIR EY (1-800-473-7247) For the location of a Sears parts and Repair Center in your area groans Call 24 hours a day, 7 days a week [SE IE 1-800-488-1222 For information on purchasing a Sears Maintenance Agreement or to inquire about an existing Agreement Call Monday-Saturday 1-800-827-6655 SEARS A
MANUAL DEL CONSUMIDOR HORNO DE PARED MODELO NO. EMPOTRADO DE 27" os Tae CON AUTO LIMPIEZA 911. 47459 LTT REM BALE) tT ere PRECAUCIÓN: > instrucciones de Lea y siga todas las Seguridad reglas y las instrucciones ° Funcionamiento para el funcionamiento ° Cuidado y Limpieza antes de usar este * Como Resolver producto por primera vez. Problemas Seras, Ceburro and Co., Hoffman Estayes, IL 60179 U.S.A.
“Moren Indice Seguridad el uso de la estufa 3-4 Como sacar la cinta de empegue Características de su horno .. Control de gormo-relof, cronometro Dial de control... . Reloj. . Cronometro de la cocina TONOS cero Bodigo F Consejos para c cocinar ene moho. . 10-11 Como horrorizar . . Como asar a la parí Er Programas especiales... 14-15 . HORNO DE 27" CON AUTO LIMPIEZA El ciclo de auto limpieza Panel de control .
INSTRUCCIONES 3. DE SEGURIDAD IMPORTANTES GUARDE ESTAS INSTRUCCIONES Lea todas las instrucciones antes de usar este aparato. Cuando use aparatos a gas o eléctricos, se deberían seguir precauciones de seguridad, incluyendo lo siguiente: IMPORTANTE: Para garantizar su seguridad, la de su familia vy la de slu hogar, por favor lea su Manual del Consumidor cuidadosamente Manténgalo a la mano para referencias. Ponga mucha atención a las secciones de seguridad.
INSTRUCCIONES DE SEGURIDAD IMPORTANTES » NO TOQUE las superficies para calentar, las superficies cerca de eolias o fas superficies interiores. Estas podrían estar suficientemente callantes para quemar aunque se vean de color oscuro.
OPERACIÓN CARACTERÍSTICAS DE SU HORNO Reloj Adventicio del horno Control de la . estufa interruptor de Cerrojo la uz del horno automático para . Interruptor auto limpieza automático de Ia Elemento luz dei horno para asar Guías para 1a parrilla I | parrillas del horno Luz det rr] .
e more OPERACIÓN . Introito Del Orne, Reloj Y Cronometro De La Cocina (Ron) (oxean) == © OVEN CONGIO TIME DELA TASTAR ME CELAR or) | (22) TIMES OVEN CLOC } CINCHEN TIME ON/OFF OVEN LIGHT Su nuevo control de horno a botones le pernituerta programar las funciones del boro con facilidad. Mas abajo estén los diferentes tipos de funciones y la descripción de cada HORNEAR — Cocina los alimentos en ef moho tradicional a una temperatura que vara de 170°F a 850°F.
Panel De Control Indicador de temperatura Luz (R77 intermitente que le avisa que 5 ae Tid a programe una CELAN ge BAQUE temperatura o OIL\LOCKED DORO un tiempo Indicador de funcione del horno El Dial de Control es una referencia faca para utilizar el control del moho. Mas abajo estén las descripciones para indicar cadmio funciona el Dial de Control INDICADOR DE LA TEMPERATURA DEL HORNO — Este indicador tiene un propósito múltiple.
OPERACIÓN Reloj Y Cronometro El reloj debe ponerse a la correcta hora del dia antes que una función demorada det horno funcione correctamente. La hora del dia NO SE PUEDE cambiar durante una función automática del horno, pero SE PUEDE cambiar durante una función para orear o para asar a la parola COMO PONER EL RELOJ Empuje el boten CLOC 2. Empuje log botones con las flechas SUBIR oc BAJAR para poner {a hora correcta del dia. 3.
OPERACIÓN Control Del Orne, Belfo V Cronometro Ef nuevo control tiene una serie de tonos gue ensenar a tiempos diferentes, Estos tonos pueden sonar mientras usted programa una función del home, o al final de una función del horno. También le avisaré si existe un problema con una de las funciones. Mas abajo están los fiaos de tones y una breve descripción de cada uno. TONOS MIENTRAS PROGRAMA EL CONTROL-Cuando empuje un boten usted escuchara un tono.
| Moren] OPERACIÓN Consejos Para Cocinar En El Horno Es normal sentir un poco da olor cuando use su horno por primera vez. Esto es causado por el calentamiento de las partes nuevas y det aislante, Para ayudar a eliminar esta olor, ventile ta habitación abriendo una ventana o usando una campana de adventicio. IMPORTANTE: Nunca cubra el fondo del horno o la paritaria del home con papel de aluminio.
0 re OPERACIÓN Consejos Para Cocinar En El Horno El Sensor de Temperatura del Oro en la parte trasera del moho mide y controla continuamente la temperatura dentro del horno. Para mantener una temperatura programada constante, fos elementos harán un ciclo de encendido y apagado mientras el horno cocina Si esté horneando con més de un utensilio, colóquelos de bananera gue cada uno tenga por ko menos 1/2" de espacio de aire a su alrededor.
OPERACIÓN Rimo Asar A La Panilla Asar es cocinar al calor directo del elemento superior. La puerta del horno debería permanecer alerta en la posición de ope para asar cuando ase ala parrilla, Ne es necesario recalentar gl moho cuando ase a la parola. Use la cacerola y Ia parola para asar que viene con su atufa.
GOT OPERACIÓN Como Seleccionar Programas Especiales Del Control El nueve control a botones tiene programas adicionales que usted puede seleccionar. Después de hacer su selección, si desea cambiar esa posición, siga los pasos hasta que el dial muestre su selección. El control se programa automáticamente para apagarse después de hornear por 12 horas © después de asar a la parola por 3 horas en case que se is olvide y deje ef horno encendido, 81 desea eliminar este programa: 1.
7. OPERARIO Gamo Seleccionar Programas Especiales El control le permitir cerrar los botones de manera que no se puedan activar cuando 0s rempuje. Bi se preocupa de dejar ef moho ain supervisor, active este programa. 1. Empuje y sujete, a Ia misma vez por 3 segundero boten BAQUE vy BRILLO, hasta que el dial muestre SF 2. {a) Empuje el botón CELAN. Ei dial muestra LOC OFF (cierre inactiva. {b) Empuje el botón CELAN nuevamente. Ei dial mostrar LOG ON (cierre activado). 3. Empuje el bono TASTAR.
CICLO DE AUTO LIMPIEZA Saque la cacerola vy la par tilia para asar, la parrilla del horno, utensilios, y cualquier papel de aluminio que podría quedar en el horno. La suciedad en el frente del marco, 1* dentro del horno, y alrededor det sello de la puerta del horno tendré que ser limpiada a mano, Marco frontal roces a ia puerta Limpie estas áreas con agua caliente, anillas con jabón o limpiadoras maco Sofá Querub@ para sacar cualquier suciedad. Enjuague bien con agua limpia y seque 3.
Moren) CUIDADO ¥ LIMPIEZA Ciclo De Auto limpieza El Ciclo de Limpieza, incluyendo el tiempo de enfriamiento, estad programado automáticamente por 4 horas, pero usted puede cambiar esto de 3 horas si ef horno asta levemente sucio a 5 horas si el moho esta muy siclo I) TOUR MIN 1. Empuje el boten CELAN. Mostrar 4 horas en el dial. 2.
EEA CUIDADO Y LIMPIEZA Partes Semovientes MATERIALES DE LIMPIEZA = Detergente liquido para platea = Agua tibia * Pafio suave No use limpiadores abrasivas, limpiadores industriares, o blanquecedores {(cloro}. MATERIALES DE LIMPIEZA » Detergente liquide para platos eo Agua tibia * Lanillas de acero con jabino s Limpiador comercial para hornos COMO LIMPIAR Permite que ia cacerola se remoje. Canga detergente para platos sobre la paritaria y cubra con un pao © una toalla húmeda por un rato.
Moren CUIDADO ¥ LIMPIEZA Arfes Re movibles MATERIALES DE LIMPIEZA =» Detergentes para platos ° Agua tibia « Lanas para fregar o lanilla de acero con jabón Parte trasera levantada de la paritaria Tope en Ne guía COMO SACAR 1. Tire las parirlas hasta ja posición de tope. 2. Levante el frente de la parrilla y deslícela bajo ef ope de la guía para tas parcelas. PARA LIMPIAR Imple con agua tibia y detergente.
ANTES DE LLAMAR PARA UN SERVICIO Para ahorrar tiempo y dinero, antes de Amar para un servicio, revise la lista de mas abajo para cualquier problema que Usted crea que tiene con el funcionamiento de su estufa. Si el problema es algo que usted no puede reparar, use (08 Umeros de Servicio para el Consumidor que se encuentran al final de este manual. Cuando haga un Amado, tenga disponible el minero de modelo, lista de partes para reparaciones, manual de uso y cuidado y la fecha de compra.
PROBLEMA El horno humea. a Bb. ©. ANTES DE LLAMAR PARA UN POSIBLE CAUSA Horno sucio Mal uso de papel de aluminio, Cacerola para asar con grasa se dejad en el horno SERVICIO POSIBLE SOLUCIÓN a. Vea que no hayan derrames b. No se recomienda el papel de aluminio. ©. Imple la cacerola y ia parola después de cada uso. Los alimentos no se hornean adecuadamente. El horno se deprecante Posiciona incorrecta de la parrilla 0 la cacerola. La ventilación det horno esta obstruida o cubierta.
[TOT AJUSTES DE TEMPERATURA “HÁGALOS USTED MISMO” Usted podría pensar que su nuevo horma cocina diferentemente al moho que relimpias. Recomendamos gue use su horno nuevo unas pocas semanas para que se familiarice con él, siguiendo los tiempos que se dan en las recetas como una guía. Bi cree gue su nuevo hora esta funcionando demasiado caliente (quema fa cornuda) o no callante lo suficiente {ia comida no gurda bien cocida) usted mismo puede ajustar la temperatura.
SC Trae servicio de reparación de aparatos marcas. Para servicio de reparación a domicilio, Líame 24 horas al dia, 7 días a la semana 1 800-676-5811 Para ordenar piezas con entrega a domicilio, lame de 7ama7 pm, 7 diosa la -semana Seras se complace en ofrecer a sus clientes electrodomésticos y electrónicos de todas las En Seras, usted puede contar con operadores en español, a los que puede llamar sin cargo alguno.