CONTENTS MODELS 48425_ _J8429 @ @
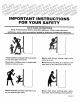
IMPORTANT INSTRUCTIONS FOR YOUR SAFETY SAVE THESE Read appliances, all instructions basic safety before using precautions INSTRUCTIONS this should appliance. be followed, When using including electrical the following: Teach children not to play with oven knobs or any other part of the oven. Never store things above an oven. Never leave children alone or unattended where an oven is in use. Never let anyone climb, sit or stand on the open door or any other part of the oven.
To insure safety for yourself carefully. and your home, please read your Owner's Keep it handy for quick easy reference. safety sections looking for the Pay close attention of your manual. You can recognize _ symbol or the word "Safety". Manual to the the safetY sections by I Always keep the oven area clear and free from things that wilt burn. Never use your oven for warming or heating a room. You could be burned or seriously injured. Such misuse could also cause damage to the oven.
IMPORTANT Keep this book for later use. Never try to repair or replace any part of the oven unless Instructions are given in this book, All other work should be done by a qualified techniclano Be sure your oven is installed and grounded properly by a qualified technician. Neverheat unopened food containers. Pressure buildup may make container burst and cause injury.
IMPORTANT S CAUTION: Do not store items of interest to children oven to reach items could be seriously injured. in cabinets above an oven. Children climbing on Be sure the oven is securely installed in a cabinet that is firmly attached to the house structure. Weight on the oven door could cause the oven to tip and result in injury. Never allow anyone to climb, sit, stand or hang on the oven door. if the self-cleaning mode qualified technician.
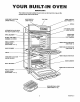
iMPORTANT: The model and serial number of your oven can be found on a tag, on the left side of the oven front frame.
DOUBLE OVEN CONTROL The foilowi ng Illustration and text will help you to "get-to-know" your OVEN CONTROL. You may select the oven and operation (BAKE, BROIL, CLEAN, CLEAR/OFF) you wish to use by pressing the appropriate pad(s) under UPPER OVEN or LOWER OVEN_ UPPER LOWER OVEN OVEN Kenmore TO SET YOUR TO CANCEL CLOCK 1. Press CLOCK release UP oforday. DOWN to set thethetime Pressarrow and i A pad to change time one minute at a time; hold to change time 10 minutes at a time. 3.
TIMED BAKING 6. Press the UP or DOWN arrow pad to select the desired STOP TIME, or when you wish the oven to turn "OFF" automatlc_lly_ NOTE: 1 ) Timed Baking a time. can be used in only one oven at Never let food such as dairy prod. ucts, fish, meat, pouRry, etc., sit for more than 1 hour before cooking starts, when you set your oven for a delay start. Room temPerature promotes the growth of harmful bacteria. Be sure the oven light is off because heat from the bulb will speed bacteria growth.
TONES Pans too close to each other, to oven walls or to the oven bottom block the free movement of air. Ira* proper air movement causes uneven browning and cooking. The end-of-cycle tone will sound at the end of timed oven functions. The end-of-cycle tone Is 3 short beeps followed by I beep every 6 seconds that repeat every 6 seconds until you press any operation. If you would like to eliminate the I beep every 6 seconds, push and hold CLEAR/OFF pad for 10 seconds.
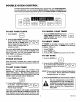
TO SET 1_ PRESS BROmL 2. PRESS FOR HI. POSiTIONiNG PRESS FOR LOo BROILER PAN Broiling Is cooking by direct heat from the broil element, Tender cuts of meat or marinated meat should be selected for broiling, For best results steaks and chops should be at least 3/4" thick. After placing food on the broiler pan, put the pan on an oven rack !n the proper position. The recommended rack position and cooking time can be found In the ch art below.
BEFORE A CLEAN 1. Close the oven door. CYCLE 1. Remove the broiler pan and grid, oven racks, all utensils and any foil that may be in the oven. Do not try to clean utensils or any other objects in the oven during a self.clean cycle, if oven racks are left in the oven during a clean cycle, they will darken, lose their luster and become hard to slide.
AFTER A CLEAN CYCLE Q. Can I clean the woven gasket around the oven door? After a clean cycle is complete, the oven door will stay locked until the oven temperature cools to a safe level. AmYou cannot clean the woven gasket, Be careful not to rub, move, or damage the gasket. 1. When clean cycle has ended and oven has had time to cool, the word "LOCK" will disappear from the display. NEVER FORCE THE DOOR TO OPEN AFTER A CLEAN CYCLE.
CLEANIN@ REMOVAL TraP@ OF PACKAGUMG TAPE; The safest way to remove adhesive left from packing tape on new appliances to assure no damage is done to the finish o1the product ts by using an appllcatlon of household Ilquld dtshwashlng detergent, mineral oil, or cooking oil. Apply with a soft cloth and allow to soak. Wipe with soft cloth. DO NOT use plastic pad or equivalent. This procedure Is also safe for the face of microwave doors and other plastic parts.
CLEANING TiPS (continued) CLEANING PART Oven door MATERIALS REMARKS inside of door: Detergent and water. Do Not Use oven cleaners, cleaning powders or harsh abrasives. NOTE: Soap left on liner causes Clean only the door liner outside the gasket. The door is automatic ally cleaned if the oven Is in the self-cleaning cycle. DO NOT rub or damage t he gasket. Avoid getting soap and water on the gasket or in any openings on the door. Rinse well. additional stains when oven is reheated.
REMOVABLE OVEN RACKS Be careful not to bump or damage the oven finish when Installlng or removing oven racks. BUMP IN RACK \ GUIDE \ To install: 1. Set the raised back edge of the rack on a pair of rack guides. 2. Push the rack in until you reach the bump in the rack guide, then lift the front of the rack a bit and push the rack all the way in. To remove,' 1. Pull the oven rack out, then up, in one motion. See the cleantng chart. NOTE: For best performance remove oven racks before a clean cycle.
BEFORE Save time CALLING FOR and money _ Check SERVICE this llst before you call for service. To eliminate unnecessary service calls, first, read all the instructions in this manual carefully. Then, if you have a problem, always check this list of common problems and possible solutions before you call for service. If you do have a problem you cannot fix yourself, call your nearest Sears Store or Service Center for help.
BEFORE CALLING FOR SERVICE POSSIBLECAUSE PROBLEM • Oven does not clean or poor cleaning results Oven door will not open "Door" appears in display • "Off" appears in display (CONTINUED} . Controls not set properly DoNor CA L FORSERVICE UNTEL YOU CHECK . Check self-clean instructions. • Clean cycle interrupted tteavily soiled ovens require a 3 1/2 hour clean cycle. • Oven too dirty Heavy splllovers should be removed before setting clean cycle.
"DO-IT-YOURSELF" OVEN TEMPERATURE You may feel that your new oven cooks differently than the oven it replaced. We recommend that you use your new oven a tew weeks to become more familiar with it, following the times given In your recipes as a guide. 4. Use the UP or DOWN arrow pad to select temperature adjustment you want. Your oven has been preset to maximize cooking efficiency.
NOTES ii, 18 q
KIENMORE C OVEN EL WARRANTY FULL ONE YEAR WARRANTY ON THE FUNCTIONING PARTS EXCEPT GLASS PARTS OF ALL ::i :ii:ii:i if, within one year from the date of installation, a ny part, other than a glass part, fails to function properly due to a defect in material or workmanship, Sears will repair or replace it, free of charge. Dear Customer: Our constant directed efforts toward FULl.