OWNER'S MANUAL DOUBLE 27" SELFCLEANING BUILT-IN WALL OVEN MODEL NO. 911. 48485 911. 48489 CAUTION: Before using this oven, read this manual and follow all its Safety Rules and Operating Instructions. Sears, Roebuck and Co., Hoffman • • • • Safety Instructions Operation Care and Cleaning Problem Solving Estates, IL 60179 229C4020P199 U.S.A.
7" SELF-CLEANING BUILT-INWALLOVEN Table of Contents Self-Cleaning Cycle ......... 17-18 Control Panel .......................... 19 Broiler Pan and Grid .............. 19 Self-Clean Oven Interior .......... 19 Oven Light Bulb ....................... 19 Oven Racks ........................... 20 Oven Door ............................... 20 Oven Safety ............................. 3-4 Features of Your Oven ............... 5 Removal of Packaging Tape 5 Oven Control, Clock, Timer ...... 6 Contro! Display ..
IMPORTANT SAFETYINSTRUCTIONS SAVE THESE INSTRUCTIONS Read all instructions before using this appliance. When using gas or electrical appliances, basic safety precautions should be followed, including the following: NEVER USE a towel or other bulky cloth as a pothofder and make sure the potholder is dry. Moist potholders could cause steam burns DO NOT let potholders touch hot surfaces. To insure safety for yourself, family and home, please read your Owner's Manual carefully. Keep it handy for reference.
- DO NOT USE oven cleaners- No commercial oven cleaner or protective coating of any kind, should be used in or around any part of the oven IMPORTANT INSTRUCTIONS IMPORTANT NOTICE! • DO NOT touch heating elements, surfaces near them, or interior oven surfaces These may be hot enough to cause burns even though they are dark in color During and after use, do not touch or let clothing or flammable material contact the elements or hot surfaces until they have had time to coo] Other surfaces near the oven vent
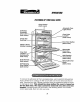
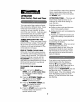
OPERATION FEATURESOF YOURWALLOVEN Oven Control (both ovens) A utomatic Oven Light Switch Self-Clean Automatic Door Latch (both ovens) Oven Light (both ovens) Broiler Pan And Grid Guides (both ovens) Model & Serial Number L_ Removable Oven Door (both ovens) Oven Vent Location (behind grille both ovens) Self-Cleaning Oven Interior (both ovens) Bake Element Removable Oven 'Racks (both ovens) (both ovens) Self-Cleaning Door Gasket (both ovens) To remove the adhesive left from packaging tape, use hous
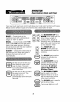
OPERATION OvenControl, Clock and Timer Your new touch pad oven control wilt allow you to set oven functions Below are the different types of functions and a description of each. BAKE -- Cooks foods in the traditional oven with a temperature range °f 170°F t° 550°F BROIL -- Cooks foods at 550°F HI broil or 450 ° LO broil from the direct heat of the upper element Broiling should be done with the door opened to the broil stop position, CLEAN -- Cleans the inside area of the oven for you.
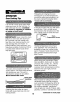
OPERATION ControlDisplay Oven Temperature indicator indicator To Let You Know The Oven Has Turned On Location For The Time Of Day Clock, Kitchen Timer, Delay Start Time, Oven Cooking, Or Cleaning Time Indicator To Alert You To Set A Flashing Temperature Or A Time Oven Function indicator Oven Function indicator SET iNDICATORS --The set indicator will flash in combination with an oven function or timed function to let you know you need to set a time or temperature Example: "SET" and "BAKE" will Flash to
The Kitchen Timer is used to time cooking processes or other household activities. It does not control the oven, It can be set for up to 9 hours and 59 minutes.
If you would like to return the 6 second beep, repeat steps above until the display shows your choice and press the START pad OPERATION OvenControl,Clock and Timer ATTENTION TONE -- This tone will sound if you make an error or an oversight is made while setting an oven function.
Preheating is bringing the oven temperature up to the temperature you will be using during baking. Let the oven preheat thoroughly when recipes call for preheating. OPERATION OvenCookingTips It is normal to have some odor when using your oven for the first time. To help eliminate this odor, ventilate the room by opening a window or using a vent hood. In the back of the oven you will notice a small tube. This is a heat sensor that maintains the temperature of the oven. Never move or bend this tube.
SHINY PANS reflect heat, and are perfect for cakes and quick breads that need a light brown crust OPERATION OvenCookingTips Margarine (cont.) with low-fat spreads Low-fat spreads contain less fat and more water. The high moisture content of these spreads affects the texture and flavor of favorite baked recipes. The lower the fat content of a spread product, the more noticeable these differences become_ To ensure best results, use margarine, butter or stick spreads containing at least 70% vegetable oil.
OPERATION To set the oven to turn on at a later time of day, cook for a specific amount of time and turn off automatically. Baking 1, Press the BAKE pad. @ @ TEMP (_ 2, Press the TEMP UP and/or DOWN arrow pads to set the oven temperature you prefer to use. 1, Press the BAKE pad 2. Press TEMP arrow UP and/or the DOWN pads to set the oven TEMP temperature prefer to use.you 3, Press the START pad, COOKING TIME 3. Press the OVEN pad.
The closer you place foods to the broil element, the faster foods brown on the outside yet remain red to pink in the center.
2. (a) Press the BROIL pad. The control display will show the degrees sign and IF, OPERATION (b) Press the BROIL pad again, This will change IF (Fahrenheit) to C (Celsius)_ Setting Special Features Your new touch pad control has additional features that you may choose to use. After making your selection, if you want to change the setting, follow the steps until the display shows your choice. 8. Press the START pad. Your control is set to use the 12 hour clock.
(b) Press the OVEN COOKING TIME pad again to activate the feature, The display will show HLd ONr OPERATION 3, Press the START SettingSpecialFeatures Your control will allow you to lock the touch pads so they cannot be activated when pressed, If you're worried about leaving the oven unsupervised, activate this feature.
OPERATION • You can set both ovens for self-clean at the same time, but the second oven will automatically delay the start time to begin at the end of the first oven's clean cycle° SettingSpecialFeatures • You can set delay start in both ovens at the same time, but the second oven will automatically delay the start time to begin at the end of the first oven's clean cycle_ • You may set bake in both ovens at the same time. • You may set a timed bake and traditional bake at the same time.
CAREANDCLEANING Self-CleaningCycle The door gasket is designed to have a 5-6" gap at the bottom of the door, This allows for proper air circulation. 1. Remove the broiler pan and grid, oven racks, utensils and any foil that may be in the oven, Door Panel 2.
CAREANDCLEANING After the cycle, you may notice some white ash in the oven, Just wipe it up with a damp cloth or sponge, Self-CleaningCycle If white spots remain, scrub them with a soap-filled steel wool pad. Be sure to rinse thoroughly. These are usually deposits of salt that cannot be removed during the cycle. The Clean Cycle, including coot down time, is automatically set for 4 hours, but you may change this from 3 hours if oven is lightly soiled, up to 5 hours if oven is heavily soiled.
CAREANDCLEANING r RemovableParts CLEANING • electrical power to CAUTION: Disconnect the oven at the main circuit breaker or fuse box before attempting to replace the oven light bulb. Do not touch a hot light bulb with wet hands or a wet cloth. Wait until the bulb has cooled and use a dry cloth. MATERIALS • Dishwashing detergent • Warm water • Soft cloth Do not use abrasive cleaners, industrial cleaners or bleach.
CAREANDCLEANING Broil Stop Position RemovableParts CLEANING MATERIALS Hinge • Dishwashing detergent • Warm water • Scouring pad or soap-filled wool pad TO REMOVE steel 1, Open the door to the broil stop position_ 2, Grasp the door at each side and lift up and off the hinges. DO NOT LIFT DOOR BY THE HANDLE, Bump In Of The Rack _ i_._..
BEFORECALLINGFORSERVICE To save you time and money, before making a service call check the list below for any problem you may feel you have with the performance of your oven, If the problem is something you cannot fix use the Consumer Service Numbers located at the back of this manual When making any calls have the Model No., Repair Parts list, Use and Care Manual and the Date of Purchase available. PROBLEM POSSIBLE The display of your control is flashing "F" followed by a number or letter.
BEFORECALLINGFORSERVICE PROBLEM Oven smokes, Foods do not bake properly, Foods do not broil properly. POSSIBLE CAUSE a. Dirty oven, POSSIBLE SOLUTION b. Improper use of aluminum foil, a. Check for heavy spillover b. Use of foil not recommended. c. Broiler pan containing grease left in the oven, c. Clean pan and grid after each use, a. Oven is not preheated, a. Be sure to preheat until the tone sounds b. Improper rack or pan placement, b.
"DO IT YOURSELF" TEMPERATURE ADJUSTMENT Press and hold down both the BAKE and BROIL pads, at the same time for 3 seconds, until the display shows SF, + You may feel that your new oven cooks differently than the oven it replaced, We recommend that you use your new oven a few weeks to become more familiar with it, following the times given in your recipes as a guide.
NOTES 24
BUILT-IN WALLOVENWARRANTY G.LL o.F Y,:.. ,,,,,ll, o..L,P TS i i If, within oneyearfrom the dateof installation,anypartfails to functionproperlydueto a defectin materialor workmanship,Searswill repairor replaceit, at our option,freeof charger If this productis subjectedto otherthan privatefamilyuse,the abovewarrantyis effectivefor only 90days.
For in-homemajor brandrepair service: Call 24 hours a day, 7 days a week 1-800-4-MY-HOME (1-8oo4694663) 8. Parapedir serviciode reparaci6na domicilio1.800.,676.5811 In Canada for all ,your service and parts needs call Au Canada pour tout le service ou les pi#ces 1-800-665-4455 For the repair or replacementparts you need: Call 7 am-7 pro, 7 days a week 1.800.366.PART (z-8oo-366-7278) Para ordenarpiezas conentregaa domicilio1.