E L ! T 30" Convection Electric E Self-Cleaning Built-In _<__ Double Wall Oven _,,.... Horno de Pared Empotrado Doble de 30" a Convecci6n Models EI6ctrico con Autolimpieza 911.49032,49033,49034,49039 t. t _ill == • 229C4020P286 (SR-10480) ! Sears, Roebuck Hoffman Estates, and Co., IL 60179 U.S.A. www.sears.
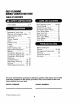
SELF-CLEANING DOUBLE CONVECTION OVEN TABLEOFCONTENTS Oven Safety .......................... Self-Cleaning Cycle .......... 29-30 Control Panel .......................... 31 Broiler Pan and Grid ............... 31 Self-Clean Oven Interior ......... 31 Oven Door Glass .................... 31 Door Vent Trim ........................ 31 Stainless Steel ........................ 31 Oven Light Bulbs .................... 32 Oven Racks ............................ 32 Oven Door ..............................
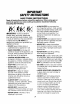
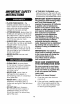
IMPORTANT SAFETYINSTRUCTIONS SAVE THESE INSTRUCTIONS Read all instructions before using this appliance. When using gas or electrical appliances, basic safety precautions should be followed, including the following: ALWAYS KEEP the oven area free from things that will burn. Food, wooden utensils and grease buildup could catch fire. Plastic utensils could melt and canned foods could explode. Your appliance should never be used as a storage area.
IMPORTANTSAFETY INSTRUCTIONS • PLACE desired cool. If oven is contact • IF THE SELF-CLEANING mode malfunctions, turn the oven off and disconnect the power supply. Have it serviced by a qualified technician.
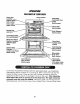
OPERATION FEATURESOF YOUROVEN Oven Control Oven Vent (behind gl both ovens) Self-Clean Automatic Door (both ovens) Oven Light (both ovens) Oven Light (both ovens) Broiler Pan and Grid "Broil Element (both ovens) Convection Bake Fan and Elen Model and Serial Number Location (behind upper door) Oven Rack (both ovens) Self-Cleaning "Oven Interior (both ovens) Hidden Bake Element (under oven floor) (both ovens) Removable (both ovens) Removable Oven Racks Self-CI aaning Door Gasket (both ovens) _i
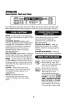
OPERATION OvenControl,Clock and Timer l @1.@__@1®@ @ L_ @ m (_N ®@ LOgan O,_N Your new touch pad oven control will allow you to set various functions with ease. Below are the different types of functions and a description of each. BAKE Cooks foods in the traditional oven with a temperature range of 170°F to 550°F. Cooks food with hot air circulated over and around foods by a convection fan, located at the back of the oven.
OPERATION OvenControl,Clock and Timer (cont.) The TEMP UP and DOWN arrow pads set the oven temperature. The HOUR/ MIN UP and DOWN arrow pads set the time of day, length of cooking time, length of cleaning time, the delayed start time and the time set on the Kitchen Timer. The START pad must be touched to activate any oven function. The CLEAR/OFF pad is used to cancel any oven function and the end of cycle tone. It will not cancel the Clock or Kitchen Timer.
OPERATION ControlDisplay Oven Temperature Indicators Set Indicator Function Indicators On Indicator Convection Cooking Indicator Timed Function Indicators Oven Function Indicators The Control Display is an easy reference for using your oven control. Below are descriptions of how the Control Display works. TIME INDICATOR - Displays the time of day, cooking time, delay start time, cleaning time or the time set on the kitchen timer. OVEN TEMPERATURE INDICATOR - This indicator multiple purpose.
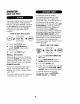
OPERATION Clock and Timer The Kitchen Timer is used to time cooking processes or other "] a[,l']Z,.,.=,,,=.=.=,, w household activities. It does not control the oven. It can be set for up The clock must be set for the correct to 9 hours and 59 minutes. It will time of day before a delayed oven count down in minutes until the LAST function can work properly. The time 60 SECONDS is reached, then the of day cannot be changed during a control will beep once.
OPERATION OvenControl,ClockandTimer Your new control has a series of tones that will sound at different times. These tones may sound while you set the control for an oven function, or at the end of the oven function. It will also alert you that there may be a problem with the functions. Below are the types of tones and a brief description of each. TONES WHILE SETTING THE CONTROL - When you touch a pad, you will hear a beep. This beep will let you know that the pad has been activated.
OPERATION OvenCookingTips Opening the door often to check foods will cause heat loss and poor baking results. It is normal to have some odor when using your oven for the first time. To help eliminate this odor, ventilate the room by opening a window or using a vent hood, IMPORTANT: Never cover the oven bottom or oven rack with aluminum foil. Improper use can cause poor heat flow, poor baking results, and may damage the oven finish.
OPERATION OvenCookingTips(cont.) Most recipes for baking have been developed using high-fat products such as butter or margarine (80% fat by weight--the federal requirement for products labeled "margarine"). You will get poor results if cakes, pies, pastries, cookies or candies are made with low-fat spreads. Low-fat spreads contain less fat and more water. The high moisture content of these spreads affects the texture and flavor of favorite baked recipes.
OPERATION OvenCookingTips(cont.) You may feel that your new oven cooks differently than the oven it replaced. We recommend that you use your new oven a few weeks to become more familiar with it, following the times given in your recipes as a guide. If you feel your oven is too hot or too cool for your cooking preference, see Do-It-Yourself Temperature Adjustment in the back of this manual to make the adjustment. The oven racks are designed with stops, a convenience as well as a safety precaution.
OPERATION 4. Touch the HOUR/MIN UP and/or DOWN arrow pads to set the amount of cooking time. Baking 1. Touch the BAKE pad, o G O (_ Touch the TEMP UP or DOWN arrow pads to set the oven temperature you prefer to use. 3. Touch the START pad. 4. When baking is finished, touch the CLEAR/OFF pad. You can set the oven to turn on at a later time of day, cook for a specific amount of time, and turn off automatically. Make sure the clock is set correctly. 1. Touch the BAKE pad.
OPERATION ConvectionBaking Tips (Upper Oven) When using 2 racks, place the two racks in positions 2 and 4. Convection Baking uses heated air that is circulated over and around foods by the convection fan located in the back of the oven. When convection baking, cooking temperatures used in recipes should be reduced 25°F. When using 3 racks, place the racks in positions 2, 4 and 6. METAL OR GLASS Any type cookware will work in the convection oven. However, metal pans heat faster and are recommended.
OPERATION Convection Roasting Tips (UpperOven) During Convection Roasting, heat comes from the top element. The convection fan circulates the heat evenly around the food. When you are Convection Roasting, you should use the broiler pan and grid that came with your new oven. The pan is used to catch grease spills and the grid is used to prevent grease splatters. To use the Pan and Grid a. Place the oven rack in the lowest rack position.
OPERATION ConvectionRoasting Tips(UpperOven)(cont.) *The U.S. Department of Agriculture MIN./LB. OVEN TEMP. (°F_ recommends Rib (3 to 5 Ibs.) to cook meat Rare* 20 to 24 325 ° and poultry Medium 24 to 28 325 ° thoroughly-Well 28 to 32 325 ° meat to at least Boneless Rib, Top Sirloin an INTERNAL Rare* 20 to 24 325 ° Medium temperature of 24 to 28 325 ° Well 160°F and 28 to 32 325 ° Beef Tenderloin poultry to at least Rare* 10 to 14 325 ° an INTERNAL Medium 14 to 18 325 ° temperature Pot Roast (2V2to 3 Ibs.
OPERATION ConvectionBakingand Roasting (Upper Oven) (2) Touch the CONVECTION BAKE or ROAST pad. Touch the CONVECTION BAKE or ROAST pad. Touch the TEMP UP or DOWN arrow pad to set the oven temperature you prefer to use. Touch the TEMP UP or DOWN arrow pad to set the oven temperature you prefer to use. (_) db Touch the START pad. Touch the COOK TIME pad. When baking is finished, touch the CLEAR/OFF pad.
@ OPERATION Cooking TimeSavers (UpperOven) ilullluuulllllluu,uuul!ll . I . You can preset up to five temperature/ cooking time combinations with this function. You can then bake or convection bake/roast any one of five of your favorite recipes without choosing settings each time. NOTES: • You can not use Favorite Broil or the Self-Cleaning • Your oven will remember Recipe presettings even power outage. Touch the FAVORITE RECIPE pad. The display shows "Save.
OPERATION 3. Touch the FAVORITE RECIPE pad to delete the recipe. CookingTimeSavers (Upper Oven) (cont.) 4. Touch the CLEAR/OFF pad to exit from the Favorite Recipe feature. To change or replace a favorite recipe (cont.) @ = . Touch the BAKE, CONVECTION BAKE, or CONVECTION ROAST pad. You can set the oven to cook your recipes that require two-stage cooking.
OPERATION NOTES: Cooking Time Savers (Upper Oven) (cont.) • Add your estimated preheat time to your first cooking time. At the preheat tone, put your food in the oven. When the first cooking stage is complete, the control will display the second temperature and cooking time that you have chosen. The oven will cut off when the second stage of cooking is complete, but the beep will continue until you touch the CLEAR/OFF pad.
OPERATION these temperatures against food-borne Broiling The closer you place foods to the broil element, the faster foods brown on the outside yet remain red to pink in the center. Broiling is cooking by direct heat from the upper element. The oven door should remain open to the broil stop position during broiling. It is not necessary to preheat oven when broiling. Use the pan and grid that came with oven. Both are designed for drainage of fat and liquids. usually protects illness.
OPERATION Broiling(cont.) la. lb. Touch the BROIL pad, (This will automatically set HI BROIL.) While the set indicator is flashing in the display, touch the BROIL pad again if you prefer to use Lo Broil. Use Lo Broil to cook foods such as poultry or thick cuts of meat thoroughly without over-browning them. Touch the START pad. When broiling is finished, touch the CLEAR/OFF pad.
OPERATION SettingSpecialFeatures 2. Your new touch pad control has additional features that you may choose to use. After making your selection, if you want to change that setting, follow the steps until the (a) Touch the BROIL pad. The control display will show the degree sign and "F°. '' (b) Touch the BROIL pad again. This will change F° (Fahrenheit) to C° (Celsius). 3. Touch the START pad. display shows your choice.
OPERATION Setting Special Features (cont.) Your control win allow you to lock the touch pads so they cannot be activated when pressed. If you're worried about leaving the oven unsupervised, activate this feature. Your new control has a cook and hold feature for timed cooking only that will keep hot cooked foods warm up to 3 hours after the timed cooking is finished. To activate this feature: , Press and hold, at the same time, the BAKE and BROIL pads for 3 seconds, until the display shows "SF." 1.
OPERATION @ @ Setting Special Features (cont.) TEMP (Designed for use on the Jewish Sabbath and Holidays.) (in some models) The Sabbath feature can be used for baking/roasting only. It cannot be used for broiling, self-cleaning or Delay Start cooking. Touch the START pad. After a random delay period of approximately 30 seconds to 1 minute, D C will appear in the display indicating that the oven is baking/ roasting. If D c does not appear in the display, start again at Step 4.
OPERATION pad. 6. Touch the START Setting Special Features (cont.) G HOW TO SET FOR TIMED BAKING/ ROASTING-IMMEDIATE START AND AUTOMATIC STOP TEMP NOTE: To understand how the oven control works, practice using regular (non-Sabbath) immediate Start and Automatic Stop before entering the Sabbath mode. Make sure the clock shows the correct time of day and the oven is off.
OPERATION Setting Special Features (cont.) HOW TO EXIT THE SABBATH FEATURE Touch the CLEAR/OFF pad. If the oven is cooking, wait for a random delay period of approximately 30 seconds to 1 minute, until only D is in the display. 3. Touch and hold both the BAKE and BROIL pads, at the same time, until the display shows "SF." @ 4. Tap the DELAY START pad until "12 shdn" or "no shdn" appears in the display. "12 shdn" indicates that the oven will automatically turn off after 12 hours.
CAREANDCLEANING Self-Cleaning Cycle The gasket is designed to have an 18" gap at the bottom of the door. This allows for proper air circulation. Door Panel Gasket 1. Remove the broiler pan and grid, utensils and any foil that may be in the oven. 2. If your oven is equipped with nickel oven racks, they should be removed. If your oven is equipped with gray porcelain-coated oven racks, they may stay in the oven during the self-clean cycle. 3.
CAREANDCLEANING Self-CleaningCycle (cent.) After the cycle, you may notice some white ash in the oven. Just wipe it up with a damp cloth or sponge. The Clean Cycle, including cooldown time, is automatically set for 4 hours and automatically turns off after the set time, but you may change this from 3 hours if oven is lightly soiled, up to 5 hours if oven is heavily soiled.
CAREANDCLEANING Cleaning TO CLEAN _L_[,],'li;[o]q'..rzf,V:l_ CLEANING For everyday cleaning, use glass cleaner and a paper towel. For stubborn soil, use paste of baking soda and water. Rinse thoroughly. MATERIALS • Dishwashing • Warm water • Soft cloth detergent Do not use abrasive cleaners, industrial cleaners or bleach. CLEANING • • • • CLEANING MATERIALS • Soft abrasive cleaner • Sponge-scrubber Do not use hard abrasive cleaners, industrial cleaners or bleach.
CAREANDCLEANING TO REPLACE RemovableParts 1. Wrap bulb with cotton cloth or bulb packaging material. Don't touch bulb with your fingers. . . must disconnect CAUTION: You electrical power to the oven at the main circuit breaker or fuse box before attempting to replace oven light bulbs. Do not touch the light bulbs with bare hands. The bulbs get very hot very quickly. Wrap foam rubber from bulb package around bulb when installing.
CAREANDCLEANING TO CLEAN OUTSIDE RemovableParts (cont.) OF DOOR Use soap and water to thoroughly clean the top, sides and front of the oven door. Rinse well. You may also use a glass cleaner to clean the glass on the outside of the door, Do not let water drip into the vent openings. Broil Stop Position Spillage of marinades, fruit juices, tomato sauces and basting materials containing acids may cause discoloration and should be wiped up immediately. When surface is cool, clean and rinse.
BEFORECALLINGFORSERVICE To save you time and money, before making a service call check the list below for any problem you may feel you have with the performance of your oven. If the problem is something you cannot fix, use the Consumer Service Numbers located at the back of this manual. When making any calls, have the Model No., Serial No., Repair Parts List, Use and Care Guide and the Date of Purchase available.
BEFORECALLING FORSERVICE PROBLEM Oven smokes, POSSIBLE CAUSE POSSIBLE a. Dirty oven. a. Check for heavy spillover. b. Use of foil not recommended. b. Improper use of aluminum foil. Oven emits odor. Foods do not bake properly. SOLUTION ¢. Broiler pan containing grease left in the oven. c. Clean pan and grid after each use. a. Oven insulation may emit odor during the first few usages. a. Put oven through self-clean cycle to speed up process of odor "wearing off." b.
BEFORECALLINGFORSERVICE PROBLEM Foods do not broil properly, POSSIBLE a. Improper position. CAUSE rack b. Oven preheated. c. Improper use of foil. POSSIBLE SOLUTION a. Check broil pan placement; see broiling section. bo Do not preheat when broiling. c, Do not let foil cover slits in the grid; this will prevent grease drainage. d. Oven door closed during broiling. d. Open door to broil stop position; see broiling section. e. Low voltage e. Use higher rack position. f. (208).
"DO-IT-YOURSELF" TEMPERATURE ADJUSTMENT 1. You may feel that your new oven cooks differently than the oven it replaced. We recommend that you use your new oven a few weeks to become more familiar with it, following the times given in your recipes as a guide. + G . If you think your new oven is too hot (burning foods) or not hot enough (foods are undercooked), you can adjust the temperature yourself. The appearance and texture of foods is a better indicator of oven accuracy than oven thermometers.
E L I T BUILT-IN WALLOVENWARRANTY E f FULL ONE YEAR WARRANTY ON ALL PARTS If, within one year from the date of installation, any part fails to function properly due to a defect in material or workmanship, Sears will repair or replace it, at our option, free of charge. If this product is subjected to other than private family use, the above warrant is effective for only 90 days. WARRANTY SERVICE IS AVAILABLE BY CONTACTING THE NEAREST SEARS SERVICE CENTER IN THE UNITED STATES.
HORNOA CONVECCION DOBLECONAUTOLIMPIEZA INDICE Seguridad en el uso del homo ........................................ El ciclo de autolimpieza ........... 66-67 Panel de control ............................. 68 Cacerola y parrilla para asar a la parrilla ..................................... 68 Interior del homo con autolimpieza ................................... 68 Vidrio de la puerta del homo ......... 68 Moldura de la ventilaciOn del homo ..............................................
INSTRUCCIONES DE SEGURIDAD IMPORTANTES GUARDE ESTAS INSTRUCCIONES Lea todas las instrucciones antes de usar esta estufa.
INSTRUCCIONES DE SEGURIDAD IMPORTANTES • NO USE limpiadores para hornos - No se deberla usar ninguna clase de limpiador para hornos o cremas protectoras dentro o alrededor de cualquier parte del horno. • SI LA FUNCION DE AUTOLIMPIEZA falla, apague el homo y desconecte la electricidad. H_gale un servicio por un t_cnico calificado. ;ADVERTENCIA DE SEGURIDAD IMPORTANTE! • COLOQUE LAS PARRILLAS DEL HORNO en la posici6n deseada mientras el homo este frio.
OPERACION CARACTERISTICAS DESU HORNO Ventilacibn del horno Control del homo rejilla ambos hornos) Luz del (smbos hornos) Cacerola y parrilla psra asar a la parrilla Cerrojo automdtico para (ambos hornos) I Luz del (ambos hornos) Elemento Ventilador y elemento de hornear a conveccibn pars asar a la (ambos hornos) Ubicacibn del nOmero de modelo y serie (detrds de la puerta superior) Guias para parrillas del (ambos hornos) Interior del homo con autolimpieza (ambos hornos) Elemento pars (debajo del fo
OPERACION ControlDel Homo, Reloj y CronGmetro Su nuevo control de horno a botones le permitirA programar las varias funciones del homo con facilidad. MAs abajo est&n los diferentes tipos de funciones y la descripci6n cada uno. de HORNEAR A CONVECClON - Ideal para alimentos horneados sobre parrillas meltiples. Bueno para grandes cantidades de comida. HORNEAR - Cocina los aNmentos en el homo tradicional a una temperatura que varia de 170°F a 550°F.
OPERACION ControlDel Homo, Reloj y CronGmetro (cont.) Los botones con las flechas para SUBIR y BAJAR TEMP programan la temperatura del homo. Los botones con las flechas para SUBIR y BAJAR las HORAS/MINUTOS programan la hora del d[a, la cantidad de tiempo para cocinar, la cantidad de tiempo para limpiar, la hora para un comienzo demorado, la temperatura del homo y la hora del cron6metro de la cocina. El bot6n START debe ser tocado para activar cualquier funci6n del homo.
OPERACION Panel De Control Indicador de Funcibn Indicadores de Temperatura del Horno Indi Funcibn del Homo s de Encendido Cocinado a Conveccibn El Dial de Control es una referencia f_cil para utilizar el control del horno. M_s abajo est_n las descripciones para indicar c6mo funciona el Dial de Control. INDICADOR DE LA TEMPERATURA HORNO - Este indicador tiene un prop6sito multiple.
OPERACION Reloj y CronGmetro El cron6metro de la cocina se usa para medir el tiempo de los procesos para cocinar u otras aetividades del hogar, No controla el homo Se puede prograrnar hasta 9 horas y 59 minutes. Contar_ hacia atrAs en minutes hasta que Ilegue a los ULTIMOS 60 SEGUNDOS, entonces el control sonar_ una vez. Cuando la cuenta Ilegue a CERO, el control sonar_ 3 veees seguido de un sonido cada 6 segundos hasta que el bot6n KITCHEN TIMER ON/ OFF se toque.
OPERACION ControlDel Homo, Relojy CronGmetro Si desea regresar a los tonos de 6 segundos, repita los pasos de arriba hasta que el dial muestre su selecci6n y empuje el bot6n para el comienzo (START). TONO DE ATENCION - Este tono sonar_ si hace un error u omite algo mientras programa una funci6n del homo, El nuevo control tiene una serie de tonos que sonar_n a tiempos diferentes. Estos tonos pueden sonar mientras usted programa una funci6n del homo, o al final de una funci6n del homo.
OPERACION Consejos Para Cocinar en el Homo Si abre la puerta frecuentemente para mirar los alimentos, causar& una p#rdida de calor y malos resultados cuando hornee. Es normal sentir un poco de olaf cuando use su horno par primera vez. Para ayudar a eliminar este ajar, ventile la habitaci6n abriendo una ventana o usando una El precalentamiento es subir la temperatura del homo a la temperatura que va a usar cuando hornee. Permita que el homo se precaliente cuando las recetas requieren precalentamiento.
OPERACION ConsejosPara Cocinar en el Homo (cont.) Los resultados del horneado ser& mejor si las cacerolas para homear est_n centradas en el homo Io m_s posible. Si est_ horneando con m_.s de un utensilio, col6quelos de manera que cada uno tenga per Io menos de 1" a 1Y2"de espacio de aire a su alrededor. Si est_ horneando cuatro queques al mismo tiempo, coloque dos queques en la parrilla 2 y dos queques en la parrilla 4. Coloque los moldes en zigzag para que no queden directamente uno encima del otro.
OPERACION Conse#os ParaCocinar en el Homo(cont.) Las parrillas del horno est_n dise_aclas con topes, una conveniencia y tambien una precauci6n de seguridad. Las gufas tienen un tope para prevenir que las parrillas se den vuelta cuando se sacan del horno. Este diser_o permite que las parrillas puedan ser insertadas de s61o una manera. Usted podrfa pensar que su homo nuevo cocina diferentemente al homo que reemplaz6.
OPERACION 4. Toque el bot0n con las flechas para SUBIR y/o BAJAR las HORAS! MINUTOS para seleccionar la cantidad de tiempo para cocinar. CGmoHornear 5. Toque el bot6n START. (_1. (_2. Toque el bot6n BAKE. Toque botones flechas los para SUBIRcon y/o las BAJAR TEMP, para programar la temperatura del homo que desea usar. Toque el bot6n START.
OPERACION Consejos Para Hornear a ConvecciGn(Homo Superior) Cuando use dos parrillas, coloque parrillas en las posici6nes 2 y 4. Hornear con aire caliente que es circulado sobre y alrededor de los alimentos per el ventilador de convecci6n ubicado en la parte trasera del homo. Cuando se hornea a convecci6n, las temperaturas para cocinar se deberfan reducir en 25°F. las dos Cuande use 3 parrillas, coloque las parrillas en las posici6nes 2, 4 y 6.
OPERACION ConsejosParaAsara ConvecciGn(HomoSuperior) Cuando ase a convecci6n, usted deberra usar la cacerola y la parrilla para asar que vienen con su nuevo homo. La cacerola se usa para recibir los derrames de grasa y la parrilla se usa para _orevenir salpicaduras de gras_. Durante el asado a convecci6n, el calor viene del elemento superior. El ventilador de convecci6n hace circular el calor parejamente alrededor de los alimentos. Cbmo usar la Cacere;la y la Parrilla: a.
OPERACION ConsejosPara Asar a ConvecciGn(HomoSuperior) GUIAS PARA ASAR A CONVECCION TEMP. DEL CARNES Res MIN/LB Costillas (3 a 5 tbs.) Crudas* Medio cocinadas Bien cocinadas Costillas sin hueso, "top sirloin" Crude* Medio cocinados Bien cocinados "Tenderloin" de res Crude* Medio cocinado Asado a la cacerola (2V2a 3 Ibs.) "Chuck", "Rump" Cerdo Jam6n Cordero Con hueso (3 a 5 Ibs.) Sin hueso (3 a 5 Ibs.) Chuletas de cerdo (Y2a t pulgada de grueso) 2 chuletas 4 chuletas 6 chuletas Envasado (3 Ibs.
OPERACION CGmuHorneary Asar a ConvecciGn(HomoSuperior) Para programar que el homo se encienda a una hora posterior del dia, cocine por una cantidad de tiempo especifica, y se apague autom_.ticamente. Aseg_rese que el reloj este puesto correctamente. @ 1. Toque el bot6n CONVECTION COOKING BAKE o ROAST. Toque los botones con las flecha para SUBIR o BAJAR TEMP, para programar la temperatura del homo que desea usar. 2, @ @ (_ 1. BAKE Toque oelROAST. bot6nOONVEOOlON G @ 3. Toque el bot6n START. 3.
@ OPERACION Ayudaspara Tiemposde Cocinar(Homo Superior) 4. Toque el bot6n COOK TIME. 5. Toque los botones con las flechas para SUBIR o BAJAR las HORAS/ MINUTOS para programar la cantidad de tiempo para cocinar. Usted puede preseleccionar hasta cinco combinaciones de temperatura/cantidad de tiempo para cocinar con esta funci6n. Usted puede entonces hornear u hornear o asar a convecci6n cualquiera de cinco de sus recetas favoritas sin tener que seleccionar posiciones cada vez.
OPERACION 2. Toque el bot6n CLEAR/OFF. "DEL" aparecer_, en el dial. Ayudaspara Tiemposde Cocinar (Homo Superior) 3. Toque el bot6n FAVORITE RECIPE para borrar la receta. (cont.) O C6mo cambiar o reemplazar una receta favorita (cont,) @ 2o Toque el bot6n BAKE, CONVECTION BAKE, 0 CONVECTION ROAST. 3. Toque el bot6n con la flecha para SUBIR o BAJAR TEMP para programar la temperatura para cocinar. (Si no programa una temperatura, el homo cocinar_, a la temperatura que se muestra en el control).
OPERACION NOTAS: • Agregue el tlempo de precalentamiento estimado al primer nivel de coccibn. AI tone de precalentamiento, penga la cemida en el homo. Cuando el primer nivel de cocciOn est_ complete, el control mostrar_ la segunda temperatura y la cantidad de tiempe que usted ha seleccionado. El homo se apagar_ cuando el segunde nivel de cocci6n se haya completado, pero el sonido continuar_ hasta que usted toque el bot6n CLEAR/OFF Ayudaspara Tiemposde Cocinar(HomoSuperior) (cont.
OPERACION dorar&n por afuera, pero quedando rosado en el centro. CGmoAsar a la Parrilla rojo o Colocando las carnes lejos del elemento permitir_ que las carnes se cocinen en el centro mientras se doran por afuera. Usando estas posiciones, cocine el lado 1 por Io menos 2 minutos m_s que el lado 2. Si su homo est_ ceneotado a 208 voltios, usted podrfa usar una_osici6n de parriNa mAs alta y/o cocinar los alimentos por mAs tiempe. Asar es cocinar al calor directo del elemento superior.
OPERACION CGmoAsar a la Parrilla (cont.) Toque el bot6n BROIL. (Esto automdticamente programa ASADO en HIALTO.) (_la. lb. Mientras el indicador de programa pestarhea en el dial, toque nuevamente el botOn BROIL si prefiere asar en BAJO (LO). Ase en LO (BAJO) para cocinar bien alimentos tales como aves o cortes de carne gruesos sin que se doren demasiado. Toque el bot6n START. Cuando termine de asar, toque el bot6n CLEAR/OFF.
OPERACION , Toque y sujete, al mismo tiempo, los botones BAKE y BROIL por 3 segundos, hasta que el dial muestre "SF." o (a) Toque el bot6n BROIL. El dial del control mostrarA el signo para grado y F° . CGmoSeleccionar ProgramasEspeciales Su nuevo control a botones tiene caracter[sticas adicionales que usted podria usar. Despu6s de hacer su selecci6n, si usted desea cambiar el programa, siga los pasos hasta que el dial muestre su selecci6n. (b) Toque el bot6n BROIL nuevamente.
OPERACION CGmoSeleccionar ProgramasEspeciales El control le permitir& cerrar los botones de manera que no se puedan activar cuando los empuje. Si se preocupa de dejar el homo sin supervision, active este program& Su nuevo control tiene una funci6n para cocinar y mantener la temperatura para cocinar autom_.ticamente solamente que mantendr& los alimentos tibios hasta 3 horas despu_s que el cocinado autom_tico haya terminado.
OPERACION 5_ CGmoSeleccionar TEMP ProgramasEspeciales @ (Dise_ado para usar los Sdbados Judios y los dias festivos,) (En algunos modelos) La caracteristica de los S_bados puede ser usada solamente para hornear/asar. No puede ser usada para convecci6n, asado a la parrilla, limpieza automAtica o cocci0n de Inicio Retrasado. NOTA: Empuje el bot6n START.
OPERACION Empuje el bot6n START. (_ CGmoSeleccionar 6. Toque el bot6n BAKE. No aparecer_l ninguna serial. ProgramasEspeciales TEMP C6MO SELECCIONAR EL HORNEADO/ASADO POR TIEMPO INICIO INMEDIATO Y PARADA AUTOMATICA NOTA: Para entender c6mo el control del homo trabaja, practique utilizando las funci6nes de Inicio Inmediato y Parada Autom_tica regulares (no S_bado) antes de usar la funcion del S_lbado. Cerci6rese de que el reloj muestra la hora correcta del dia y de que el homo est_l apagado.
OPERACION CGmoSeleccionar ProgramasEspeciales COMO SALIR DE LA FUNCI6N SABADO DEL CLEAR/OFF. 1. Empuje el bot6n 2. Si el homo est_ cocinando, espere por un periodo de tiempo de retraso al azar de aproximadamente 30 segundos a 1 minuto, hasta que las serlales :) aparezcan en la pantalla. Empuje y sostenga empujados ambos botones, BAKE (Horneado) y BROIL, al mismo tiempo, hasta que la pantalla muestre "SF." 3. @ , Toque el bot6n de DELAY START hasta que "12 Shdn" o "no Shdn" aparezca en la pantalla.
CUIDADOYLIMPIEZA E1Ciclo de Autolimpieza El sello est_ disetlado para qua tenga un espacio de 18" en el rondo de la puerta. Esto permite la circulaci6n adecuada del aire. Saque la cacerola y la parrilla para asar, utensilios y cualquier papel de aluminio que podria quedar en el homo. 1. Panel de la puerta Si su homo estA equipado con parrillas de niquel, las mismas deben ser removidas. Si su homo est,.
CUIDADOYLIMPIEZA Ciclo de Autolimpieza(cont.) Despu6s del ciclo usted podria notar un poco de cenizas blancas en el horno. Simplemente limpielas con un patio o esponja homed& Si algunas manchas blancas persisten, frieguelas con una lan_qlade acero con jabdn. AsegOrese de enjuagar bien. Estas son generalmente de_6sitos de sal que no se pueden sacar durante el ciclo.
CUIDADOYLIMPIEZA CGmoLimpiar MATERIALES PARA LIMPIAR Para limpieza diaria, use un limpiador para vidrios y una toalla de papel. Para suoiedad pesada, use una pasta de soda para hornear y agua. Enjuague bien. DE LIMPIEZA • Detergente liquido para platos • Agua tibia • Pano suave No use limpiadores abrasivos, limpiadores industriales o blanquedores (cloro). MATERIALES DE LIMPIEZA • Limpiador abrasivo suave • Esponja-fregador No use limpladores abrasivos fuertes, limpiadores industriales o cloro.
CUIDADOYLIMPIEZA COMO COLOCAR Partes Removibles 1. debe desconectar el poder elOctrico hacia el horno en (_ PRECAUCION: Usted el interruptor principal del circuito o an la caja de los fusibles antes de tratar de reemplazar los focos de la luz del horno. No toque el foco de la luz con las manos peladas. El foco se calienta mucho rdpidamente. Envuelva la goma de espuma del paquete dal foco alrededor del foco para la instalacibn.
CUIDADOYLIMPIEZA PARA COLOCARLANUEVAMENTE Partes Removibles(cont.) 1. Asegt_rese que los brazos de las bisagras est_n en la posici6n de tope para asar a la parrilla. 2. Levante la puerta de arnbos lados. 3. Coloque en linea las ranuras en la edna del fondo del homo con los brazes de las bisagras. Posici6n de tope para asar a la parrilla 4. Deslice la puerta hacia abajo sobre los brazes de 1as bisagras Io rn_s posible. 5. Cierre la puerta. COMO LIMPIAR AFUERA DE LAPUERTA Bisagra PARA SACAR 1.
ANTESDELLAMARPARAUNSERVICIO Para ahorrar tiempo y dinero, antes de Ilamar para un servicio, revise la lista de m_.s abajo para cualquier problema que usted crea que tiene con el funcionamiento de su homo. Si el problema es algo que usted no puede reparar, use los NQmeros de Servicio para el Consumidor que se encuentran al final de este manual. Cuando haga un Ilamado, tenga disponible el nt_mero de modelo, nt_mero de serie, lista de partes para raparaciones, manual de uso y cuidado y la fecha de compra.
ANTESDELLAMARPARAUNSERVICIO PROBLEMA El horno humea. El homo emite un olor, POSIBLE CAUSA POSIBLE SOLUCION a. Horno sucio, b. Mal uso de papel de aluminio, a. Vea que no hayan derrames grandes. b. No se recomienda el uso del papel de aluminio. ¢, Se dej6 la cacerola para asar con grasa dentro del horno, ¢. Limpie la cacerola y la parrilla despues de cada uso. a.
ANTESDE LLAMARPARAUNSERVIClO PROBLEMA Los alimentos no se asan adecuadamente la parrilla. POSIBLE POSIBLECAUSA a. Posici6n incorrecta a de la parrilla. SOLUCION a. Revise la posici6n de las cacerolas; vea la secci6n para asar a la parrilla. b. El homo se precalent6. b. No precaliente cuando ase a la parrilla. c. Mal uso de papel de aluminio. c. Lea la secci6n para asar a la parrilla. d. La puerta del homo se cerr6 durante el asado a la parrilla. d.
AJUSTESDE TEMPERATURA"HAGALOS USTEDMISMO" Usted podrfa pensar que su nuevo horno cocina diferentemente al horno que reemplaz6. Recomendamos que use su horno nuevo unas pocas semanas para que se familiarice con 61,siguiendo los tiempos que se dan en las recetas como una guia. 1. Toque y sujete los botones BAKE y BROIL por 3 segundos, hasta que el dial muestre "SF". 2, Para ajustar el horno, toque el bot6n BAKE. Un n0mero puesto en f_brica de dos digitos aparecer_ en el dial, generalmente "00".
E L I T GARANTIA DELHORNODE PAREDEMPOTRADO E UN ANO COMPLETODE GARANTIAPARATODASLAS PARTES Si, dentro de un aho de la fecha de instalaci6n, cualquier parte deja de funcionar adecuadamente debido a un defecto en el material o la obra de mano, Sears la repararA o reei-nplazar& a nuestra opci6n, sin costo. Si este producto es sometido a un uso que no sea el familiar privado, la garantia de arriba es efectiva por solamente 90 dias.
Get it fixed, at your home or ours! For repair of major brand appliances in your own home... no matter who made it, no matter who sold 1-800-4-MY-HOME @ AnylbT_ dayornight (1-SOO-Zleg-46_3) (U.S.A.and Canada) wwtN..,._e_ull.com wwwJ_a/_.ca For repair of carry-lnproductslikevacuums, lawn equipment and electronics,callfor the nearest Sears Parts and Repair Center. 1-800-488-1222 Any_'ne,dayorright(U.S.A.only) Wt_P/l.seEb'_.