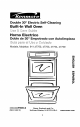
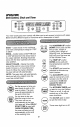
Double 30" Electric Self-Cleaning Built-In Wall Oven Horno Electrico Doble de 30" Empotrado Models, Modelos 911.47752, i con Autolimpieza 47753, 47754, 47759 i 1.... t J I B m JI _ iii z, 0 iiiiiiii rIIIIIIIIIIII III | ................................... _ Ir 229C4020P308-2 (SR-10497-2) == H IIIIJlI W I ,i , Sears, Roebuck and Co,, Hoffman Estates, IL 60179 U.S,A, www.
30" SELF-CLEANINGDOUBLEOVEN TABLE OFCONTENTS Oven Safety .......................... Features 3-4 of Your Oven .............. 5 Removal of Packaging Tape .... 5 Oven Control, Clock, Timer ...... 6 Control Display ......................... 7 Clock ........................................ 8 Kitchen Timer ........................... 8 Control Lookout ........................ 8 Tones ........................................ 9 F Code ...................................... 9 Oven Cooking Tips ...........
IMPORTANT SAFETY INSTRUCTIONS SAVE THESE INSTRUCTIONS Read all instructions before using this appliance. When using gas or electrical appliances, basic safety precautions should be followed, including the following: To _nsure safety for yourself, family and home, please read your Use and Care Guide carefully. Keep it handy for reference. Pay close attention to Safety Sections. BE SURE your appliance Is installed and grounded by a qualified technic_an.
IMPORTANT SAFETY INSTRUCTIONS • DO NOT touch heating efements, surfaces near them or interioroven surfaces, These may be hot enough to cause burns eventhough they are dark mncolor. Dunng and after use, do not touchor let cIothing or flammable matenalcontact the elements or hot surfaces until they have had timeto cool, Other surtaces near the oven vent openings, oven door and w_ndowmay also be hot enough to cause burns.
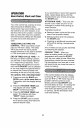
OPERATION FEATURESOF YOUROVEN Self*Clean Automatic D oor Latch _,. (Both Ovens)_ Oven Vent _ -- Oven Control, ,.,lock and Timer _ __ _ _- Oven Ligh (Both Ore Broiler Pan and Grid H] IL] _ItlL_.._,.-.--_ ,,_;'7! , ,;_l'_']tl L.i:, _i !_|I ill ['oi ---_=_ '" Model & Serial aumberLocation---...._ (Behind Upper Ill 1t='-__II Ill oven Rack Grade (Both Ovens) Removable Oven Racks Bake Element Door) (Both Ovens} ........ _,,,,,_ II_- _T_ _,_ _ _::tl Ill l Ove" -7// ...... 'X_....
OPERATION OvenControl, Clock and Timer @@ Your new touch pad oven control wilt allow you to set various tunct_ons with ease. Below are the different types of functions and a descrzption of each. BAKE - Cooks foods In the traditional oven with a temperature range of 170°F ',d _-'_ to 550'_F BROIL- Cooks roods at 550°F HI broil or 450 ° LO broil from the direct heat of the upper element.
OPERATION ControlDisplay Upper Oven Temperature Indicator ..... i_li_li_slf_ na,ca
OPERATION Clock, Timer and Control Lockout until the KITCHEN TIMER pad is pressed. The 6 second beep can be removed for future cycles if desired, For directions on remowng this continuous beep, see Tones on the following page, HOW TO SET THE TIMER The clock must be set for the correct time of day before a delayed even function can work properly. The time o3 day cannot be changed dunng a t_med oven 1unction, but can be changed during a bake or broif function. HOW TO SET THE CLOCK t.
OPERATION OvenControl,Clockand Timer Your new control has a series of tones that will sound at different times, These tones may sound while you set the control for an oven function, or at the end of the oven function, It will also alert you that there may be a problem with the functions, Be$oware the types ot tones and a brief description of each. TONES WHILE SETTING THE CONTROLWhen you press a touch pad you wil! hear a beep.
OPERATION OvenCookingTips It _snormal Preheating _sbr_ng=ng the oven temperature up to the temperature you will be using dunng baking. Let the oven preheat thoroughly when recipes call for preheating. to have some odor when using your oven tot the first time. To help eliminate this odor, ventilate the room by opening a window or using a vent hood. oven light bulbs, follow this To helpful prolong hp: Always the life of turnyour the lights off when the oven ts not _n use or dunng a clean cycle.
OPERATION OvenCooking Tips Baking results will be better if baking pans are centered in the oven as much as possible, If baking with more than one pan, place the pans so each has at least 1 to 1 1/2" of a_rspace around it. Place pans so one _snot directly above the other. When using your convenient Delay Start operation, foods such as dairy products, fish, poultry, etc., should never sit more than 1 hour before cooking. Room temperature and the heat from the oven light promote bacterial growth.
OPERATION OvenCookingTips(cont.) You may feel that your new oven cooks differently than the oven it replaced, We recommend that you use your new oven a few weeks to become more familiar with it. foUowlng the t_mes g(ven in your recipes as a guide, if you feel your oven (s too hot or too cool for your cooking prelerence, see Do*it-Yourself Temperature Adiustment in the back of th_smanual to make the adjustment.
OPERATION Baking & Roasting (_ 1. Press the BAKE pad. (_) 2. Press the TEMP UP and/ or DOWN arrow pads to set the oven temperature To set the oven to turn on at a later time el day, cook for a specific amount of time and turn off automatically. (_ 1. Press the BAKEpad. you prefer to use. 2. Press TEMParrow UP and/or the DOWN pads to set _he oven temperature you preler tO use. 3. Press the START pad.
OPERATION Baking Your new control has a cook and hotd feature for timed cooking onty that will keep hot cooked foods warm up to 3 hours alter the timed cooking _sfinished. To activate th_s feature: 1. Press and hold, at the same time, the BAKE and BROIL pads for 3 seconds, until the display shows "SF" 2. (a) Press the OVEN COOKING TIME pad. The display will show "HLd OFF" (b) Press the OVEN COOKING TIME pad again to activate the feature. The display will show "HLd ON." 3. Press the START pad.
OPERATION The closer you place foods to the broil element, the faster foods brown on the outside yet remain red to pink Enthe center. Broiling Broiling _scooking by direct heat from the upper element. The oven door should remain open to the broil stop position dunng broiling, Mowng meats away from the element will ailow the meat to cook to the center while browning on the outside.
OPERATION SettingSpecialFeatures Your new touch pad control has additional features that you may choose to use. After making your setechon, if you want to change the setting, _,oI!owthe steps until the display shows your choice. Your control is set to use the 12 hour clock. If you prefer to use the 24 hour MiRary Time clock or black out the disptay: 1, Press and hold, at the same time, the BAKE and BROIL pads for 3 seconds, untii the display shows "SF7 2, (a) Press the CLOCK pad. The display shows "12hr.
OPERATION Setting Special Features • Both ovens cannot self-clean at the same t_me. • You can set both ovens for self-clean at the same tzme, but the second oven will automatically delay the start time to beg_n at the end of the first oven's clean cycle, • You can set delay start in both ovens at the same time, but the second oven will automatically delay the start time to beg_n at the end of the first oven's clean cycle.
OPERATION Setting Special Features TEMP (_ (Designed for use on the Jewish Sabbath and Holidays.) The Sabbath feature 550°F. No signal or temperature will be g_ven, for baking/roasting only, It cannot be used for broiling, self-cleaning or Delay Start cooking. Touch the START Oven Ltght models with oven light on. HOW TO SET FOR REGULAR BAKING/ROASTING NOTE: To understand Make sure the clock correct _soff.
Touch the START pad. OPERATION SettingSpecialFeatures Touch the BAKE pad. No s_gnal will be g_ven. HOW TO SET FOR TIMED BAKING/ ROASTING-IMMEDIATE START AND AUTOMATIC STOP NOTE: To understand how the oven controi works, practice using regular (non-Sabbath) immediate Start and Automatic Stop before entenng the Sabbath mode. TEMP @ Make sure the clock shows the correct time of day and the oven is off. the BAKE and BROIL 1. Touch and both pads, at thehold same time, until the display (_ _ shows 9.
OPERATION Setting Special Features HOW TO EXIT THE SABBATH FEATURE pad. 1. the CLEAR/OFF 2. Touch tf the oven _scooking, wait for a random delay period ot approximately 30 seconds to 1 minute, until only ::3 is in the display. (_ (_) @ the BAKE and BROIL 3. Touch and both pads, at the hotd same time, until the display shows "SF" 4. Tap the DELAY START TIME pad until "12 shdn" or "no shdn" appears in the display. "12 shdn" indicates that the oven will automatically turn off after 12 hours.
CAREAND CLEANING Self-CleaningCycle The door gasket _sdesigned to have an 10" gap at the bottom of the door, This allows for proper a_refrculation. 1. Remove the broiler pan and grid, utensils and any foit that may be in the oven, 2. The gray porcelain-coated oven racks may stay _nthe oven during the self*clean cycle. 3. Soil on the front frame and outside the gasket on the door liner will need to be cleaned by hand.
CAREANDCLEANING Self.Cleaning Cycle Simply press the CLEAR/OFF pad. You will need to wail tot the oventemperature to drop below the lock temperature (approx. 1 hour) before attempting to open the door. The Clean Cycle, _ncluding coot down time, offers preset options of 3, 4 or 5 hours, but you may change this to any time between 3 and 5 hours. After the cycle, you may notice some white ash _nthe oven. Just wipe _tup with a damp cloth or sponge. SELECT CLEAN pad. 3 and "Lo"Press will the show fn I.
CAREANDCLEANING CLEANING MATERIALS electrical to the CAUTION: power Disconnect oven at the main circuit breaker or fuse box before attempting to replace the oven light bulb. Do not touch a hot light bulb with wet hands or a wet cloth. Wait until the bulb has cooled and use a dry cloth. • DishwashJng detergent • Warm water • Soft cloth Do not use abrasive cleaners, industrial cleaners or bleach. Clean only as touch-up between clean cycles. Use dishwash_ng liquid, warm water or a soap-filled pad.
CAREANDCLEANING CLEANING MATERIALS o Dishwash_ng detergent ,, Warm water o Scounng pad or soap*filled Bump in Rack Gulde._ Raised Back\ of the Rack _._ pad _ , '%. _ _-._.. TO REMOVE 1. Pull the racks out to the stop lock position. 2. Pull up the front of the rack and slide under the bump of the rack guide. TO CLEAN Clean with warm water and detergent. For hard to remove staLns, gently scrub with a scouring pad or a soapfilfed pad.
CAREANDCLEANING The door is very heavy. Be carefulwhen removing and lifting the door. Do not lift the door by the handle, TO REMOVE 1. Futlyopen the door_ 2. Pullthe hinge locks down toward the door lrame, to the unlocked position. Th_smay require a flat-blade screwdriver. Hinge Lock Removable Oven Door (cont.) 3. Fufiyopen the door. If thedoor will not tully open, the indentation _s not seated correctly in the bottom edge of the slot. Hin! • Arm 4.
BEFORE CALLINGFOR SERVICE To save you t_me and money, before making a service call check the list below tot any problem you may lee! you have with the performance ot your oven. If the problem _ssomething you cannot fix, use the Consumer Serwce Numbers located at the back of thts guide. When making any calls, have the Model No., Serial No., Repair Parts List, Use and Care Guide and the Date of Purchase available. PROBLEM i iliUm POSSIBLE CAUSE ii ii .i.,.... ii iii Oven and oven control will not work.
BEFORECALLINGFOR SERVICE PROBLEM POSSIBLE CAUSE POSSIBLE SOLUTION .H Oven rack does not elide easily, Racks were left _n the oven during a self-clean cycle. Wipe the rack edges with a small amount of vegetable oil, a. Dirty oven, a. Check tot heavy spiltover. b. Use of foil not recommended, i Oven smokes, b. improper use of aluminum foil. c. Broiler pan containing grease lett in the oven. Illlllllllll,ll,l,,lllllll Foods do not bake properly. II I I a.
"DO-IT-YOURSELF" TEMPERATURE ADJUSTMENT 1, You may feel that your new oven cooks differentiy than the oven it replaced. We recommend that you use your new oven a few weeks to become more familiar with it. foi!ow_ng the times given recipes as a guide. + _n your Press and hold down both the BAKE and BROIL pads for 3 seconds, until the display shows "SF" Press the BAKE pad for the oven to adjust.
NOTES 29
NOTES 30
BUILT-IN WALLOVENWARRANTY f FULL ONE YEAR WARRANTY ON ALL PARTS If, within one year from the date of installation, any part fails to function properly due to a defect _nmaterial or workmanship, Sears will repair or replace it, at our optTon, free of charge. ]f th_s product is subleeted to other than prfvate family use, the above warranty _seffechve for only 90 days.
HORNODOBLEDE 30" CON AUTOLIMPIEZA Indice El mclo de aulolimp_eza .......... 50, Panel de control ............................ tntenor del homo ........................... Cacerola Y pa_filla pa[a asar a la parritta .................................... Foco de la bz del homo ............... Parrillas del homo ......................... Puerta del homo ........................... Seguridad en et uso del homo ........................... 33, 34 Cafacter{sticas de su homo ..........
INSTRUCCIONES DESEGURIDAD IMPORTANTES GUARDE ESTAS INSTRUCCIONES Lea todas las instrucciones antes de user este aparato, Cuando use aparatos a gee o efdctricos, se deberian seguir precauciones de seguridad, iecluyendo Io sigutente: agarrade_'a esle seca, Los agarraderas hamedas poddan causer quemaduras per vapor. NO PERMITA que los agarraderas toquen las superficies para cocmar calientes.
INSTRUCCIONES DESEGURIDAD IMPORTANTES • NUNCA FRIEGUE, mueva, limpte o dahe eI seIIo de ia puerta en los homes con autolimp_eza,Es esenc=alpara un buen setlado. • NUNCA TRATE de timp+arlos ulensilios, elias, pares removibles ola caceroIa y la pamlla pare asar en el c+c!ode autelimp+eza. • NO USE timp+adorespara homes - No se deberia user n3ngunacfase de limp_adorpare homes dentro o alrededor de cuatqu_erparle del homo. • S! LA FUNCION DE AUTOUMPIEZA 1alia,apague e_homo Ydesconecte ta eleclocidad.
OPERACION CARACTERISTICAS DE SU HORNO Ce_7oio autom:_tico pars (ambos autolimpieza hornos| Control del homo, retoj y cronbmetro Etemento para asar a la t _ , Ventitaci6n del homo (ambos homos) Sensor de temperatura del homo Luz del hornc (ambos hornos} Interior del homo con Cacero_a y parrilla pars asar a ta parrilla autolimpieza Sello de la puerta pars Ubicaci6n del numero de modeto y (detras de puerta superior) Gums pars , parrillas del homo {ambos hornos) Parrillas removibles det homo Elemen
OPERACION Control Dei Homo, Reloj y CronGmetro @®® Su nuevo control de homo a botches le pe_milira programar las va_-lasfunoones con lacilidad. Mas abalo asian los dilerentes tipos de func_ones y la descrfpcisn de carla uric. (X-h Los belches NORNEAR - Coona los alimonies en el homo |radic_onala una lemperaluraque varla de '-..--' "---" _'_ ASAR A LA PARRILLA- Asa los alimenlos en ALTO a 550=Fo en BAJO a 450°F a calor didechodel elemenlo superior.
OPERACiON PanelDe Control Indicador de temperatura del homo super=_ ]ndicador de encendido indicador de ///7 ,.ooro..
OPERACION Relojy CronGmetro seguido de un sonido cads 6 segundos hasta qua el bot0n KITCHEN TIMER se ampule, El sonido de cads 6 segundos se puede e]im_nar para clc_os _uturos s_se desea. Para las inslrucelones de come elimmar estos sonidos continues, yea tones en la p&gina s_gu_ente.
OPERACION Control Del Homo, TONO DE ATENCION - Este tono sonarS. si hace un error u omite algo mEentras programa una fur}ciOn del horno. Reloj y Cron#metro Unos elemplos serian: a. Programar un c_elo de limp=eza y la puerta del homo no esta b_en cerrada. b. Programar ur}a fur}ciCn y no empular el boron START, E1nuevo conlroi tiene una sene de tones que sonaran a l_empos diferentes. Estos tones pueden sonar m_entras usted programa una IunciCn dei homo, o al final de una tunciOn del homo.
OPERACION ConsejosPara Cocinar En E! Homo Si abre la puer_a trecuentemente pare mtrar los alimentos, eausara una pe[dida de caior y males resultados cuando homee, Es norma! sentir un pace de olor cuando use su homo per pnmera vez, Para avudar a eiim_nar este e]or, ventile la habitaci6n abriendo una ventana o usando una campana de ventilaci6n. 1MPORTANTE: Nunca cubra el rondo de! homo o ta parrilla del homo con papel de alum_nlo.
OPERACION Consejos Para Cocinar en el Homo El Sensor de Temperatura del Homo en ta parte trasera del homo mide ",/controJa continuamente ]a temperatura dentro del homo. Para mantener una temperatura programada constance, Ios elementos har;&n un ciclo de encendido y apagado m_enlras et homo coc_na. La zona de temperatura bate de su homo (entre 170° y 200°F) esl,_ disponible para mantener los alimentos tibios.
OPERACION ConsejosPara Cocinar en el Horno/CGmo Hornear Y Asar Usted podria pensa_"que su homo nuevo cocma di{erentemente a! homo que reemplazO. Le recomendamos que use su homo nuevo per vanes semanas pare que se tamiliaace mas con el, s{gulendo los tiempos que se dan en la receta come una guia. Si cree que su homo esta func_onando demas_edo calien_.e o fdo pare su pfelerenc_a, yea Ajustes Haga_os Usted Mismo en la parte de aires de este manual pa_-ahaee_ los a}ustes.
OPERACION C6moHornearYAsar _ 4, Empule los belches con los ffechas pare SUBtR vie ._. BAJAR lospare,seleccJonar HORAS/ MINUTES la cantidad de tiempe,en que desea coc=narlos alirnenlos. Pare`programar qua el homo coctne per un liempo determ_nadoy se apague automalicamenle: START TIME 5. Empuie e_bol0n DELAY 1_ ,.._j 6. Empule los belches con los flechas pareSUBIR vie I. EmpuleeJbol6nBAKE, = 2.
OPERACION CSmoAsarA La Parrilla Mientras mas cerca coIoque los alimen|os del elemenlo para asar, mas rapido se doraran por aluera, pero quedando rolo o rosado en el cent[o. Asar es coc_nar a! calor directo del elemento supenor_ La puerta del homo debeda permanecer ab_erta en la pos]oi6n de lope para asar cuando ase a la parrilia. Cotocando tas cames lewesdel etemento permitira que las cames se coclnen en el cenlro mlenlras se doran por afuera.
OPERACION 2. CGmoSeleccionar Programas Especiales Del Control (b) Empuie los borons BROIL y OVEN COOKING TIME al mismo tiempo nuevamenle. Esto camb_ar_ "F" (Fahrenheit) a "C" (Cenligrado). El nuevo control a botones tiene programas adiclonales que usied puede selecc_onan Despues de haoer su selecci6n, si desea camb_arla, s_ga los pesos hasla que el dial mueslre su nueva selecci6n, 3. Empu!e el bolon START. Su conlrol esi& programado para usar el reloi en !2 horas.
OPERACION C6mo Seleccionar Programas Especiales Del Control • Ambos homos no pueden $imp_arse automat_eamente al mismo ttempo. • Usted puede programar ambos homos pare autolimp_eza al m_smo tiempo, pero el segundo homo demorarA autom&ticamente la hera de com_enzo pare empezar a! final det c_clo de timpJeza del primer homo. Este Programa Especial le permitira cambiar ta vefocidad; #1 s_gnifica qua el carabao de velocidad es lento haste #5 que s_gnifica qua e! cambio de vefocidad es r,_pido.
OPERACION CSmoSeleccionarProgramas EspecialesDeiControl(cont.) 4, Toque el bot6n BAKE. NO aparecera n_nguna seSal. (_ TEMP UP o DOWN a 350" Toqueque los se bolones se5alan con flechas para aumentar o dism_nu_r ta _emperatura en _ncremenlos de 5% La temperatura se puede a_ustar entre 170" v 550 ° NO aparecer_ n_nguna sepal o temperatura. (Disefiado para usar los Sabados Judfos y los dfas festivos.} La caracteristlca de los Sabados puede set usada solamente para hornear/asar.
OPERACION 6. Empule el botGn START. 7, Toque el botch BAKE. No aparecera n_nguna seSal. 8. La lemperatura mlciat preprogramada se CSmo Seleccionar Programas Especiales Del Control COMO SELECCIONAR EL HORNEADO/ASADO POR TIEMPO INICIO INMEDIATO Y PARADA AUTOMATICA @ @ "'fEMP - NOTA: Para entender cOmo el control del homo trabala, practique utilizando las tunciGnes de In_cio Inmediato v Pa_ada Automa.tica regulares (no Sabado) antes de usar la luncton del S,_bado.
OPERACION CGmo Seleccionar Programas Especiales Dei Control (cont.) COMO SAL|R DE LA FUNCION DEL S/_BADO CLEAR/OFF. 1. Empule el bol0n 2. Si el homo est_ coc_nando, espere per un perlodo de tiempo de retraso al azar de aprox_madamen_e 30 segundos a t m_nuto, basra que lab seP,ales aparezcan en _a pantalla_ (_ (_) empulados ambos 3. Empu_e bolones. y BAKE sostenga (Homeado} y BROIL tiempo, haste que la (Asado}, a! mismo"SF." pantal]a muestre START TIME hasta que "12 Shdn" o "node Shdn" 4.
OPERACiON Ciclo de Autolimpieza El se_lo de la puerta es'_a,diseSado para que tenga un espac_o de 10" en el rondo del homo. Panel de la puerta 1, Saque Ia cacerola y la parfilla para asar, utensiiios y cuaiqu_er papet de alum_n_oqua podria quedar en el homo. 2, 3. Las parrillas cub_ertas de porcelana gns m_smas deben ser removidas durante el c_cio de Iimp_eza autom,_tica. Revestimento Sello de la puerta Esto permite la ctreulaci6n adecuada del a=re.
OPERACION Ciclode Autolimpieza Simplemenleampuleel bol6n CLEAR/OFF.Usled necesitar_espe[ata qua lalemperaiomdel homo bajemas quala temperaWra de engaeche(aprox. 1 hera)anlesdel_'alardoabr_[la puott& "Locked door"desapareoe[add dial El Cidode rimp_eza, _ncluvendo e_tiempode entdam_ento, effaceopctoo_ p_ese',ecc_on_das de 3, 4,O5 horas,peruusted puedecambiar escog_ondo cua!qu_ertiempoentre3 V5 hera& 1. (_'_-'_ 2. %J Despuesdotciclo, oaredpodriaeclat uo pacede can_zas b_ancasan elhomo.
CUIDADOYLIMPIEZA Fill I MATERIALES DE LIMPIEZA el poder el_ctrico hacia e! RECAUCION: homo en la cajaDesconecte del circuito pnncipal o en la caja de los fueibles antes de tratar de reemplazar el foeo de la luz del homo. No toque un foco de la luz caliente con las manos mo]adas o con un paso humedo, Espere a que el foco se enfrie y use un paso seco.
CUIDADOYLIMPIEZA MATERIALES DE LIMPIEZA * Detergenle para plates * Agua tibia • Lanas para tregar o lanilla con labon Tope en _ .:.e la parrilla H_ Ill tl_ COMO SACAR 1. Tire las parfillas hasta la pos_ciOn de tope, 2. Levante el fl'enle de la parrilla y desficela balo el lope de la guia para las pardllas, PARA LIMPIAR L_mple con agua tibia y detergente+ Para sacar manchas duras, fdegue levemenle con lana para fregar o con una lanilla con labOn, Enluague blen.
CUIDADOYLIMPIEZA Puerta removible de| homo (cont.) 3, La puertaes muy pesada. Tenga cuidado cuando remueva y ]evante la puerta. No levante la puerta par Ia maniia, Abra compleiamenle la Braze de la bisagra pueda. Sila puer_ano tl _1 abre complelamenle, Ia hendidura no esta asentada cor[ec,'amenle en el extreme _otenorde la raRura. C0MO SACAR 1, Abra la puerla completamente, 2. "fke los lopes de las bisagras hac_aabajo hac_ael marco de ra puerla,ala pos_cion de abierto.
ANTES DE LLAMAR PARAUN SERVICIO Para aborter tiempo y dinero, antes de Ilamar para un servlclo, revise la lista de rn&s abaio para cualqu_er probtema qua us_ed crea que tiene con el funclenamtento de su homo, Si ef probtema es aigo qua usted no puede reparar, use los NQmeros de Serv_c_opa[a ei Consumldor que se encuentran al final de este guia, Cuando haga un Ilamado, tonga disponible el ndmero de modelo, ntimero de serie, lista de partes para reparacmnes, guia de use y cuidado y la fecha de compra.
ANTESDELLAMARPARAUN SERVICIO PROBLEMA i POSIBLE CAUSA i Homo humea, a, Home suc+o. b, Mal use de papel de a[umin+o+ 0. Cace_'ola para asar con grasa se dei6 en el homo, iii Los alimentos no se hornean adecuadamente, a, Yea que no hayan deffames. b. No se recom_enda el use del papel de alumm_o. c. Limp_e +acacerola Vta parrilla despues de cada use, m,,,m, a. El homo no se preca_enlo lo sufic_ente.
AJUSTESDE TEMPERATURA"HAGALOSlISTED MISMO" Usted podda pensa{- qua su nuevo homo eocene dilerentemenle el homo que reempfaz6, Recomendamos qua use su homo nuevo unas pocas semanas paca que se familiance con (_, sigu_endo los ttempos que se dan entas recetas come una gu{a. (_ 1. BAKE V BROIL per 3 Empu_e segundos,y sulele basra ios quebotones el dial muestre "SF" 2. empuie el botdn BAKE. Un Pare alustar el homo, n_Jmem puesto en fabnca .
GARANTIADEL HORNODE PAREDEMPOTRADO UN AI_IO COMPLETO DE GARANT|A PARA TODAS LAS PARTES Si, dentro de un a_o de ia fecha de instalaci6n, cuatqu_er parte dela de tuncionar adecuadamente deb_do a un defecto en el matertal o la obra de mano. Sears la reparara o reemplazara, a nues_:ra opcidn, sin costo. Si este producto es sometzdo garantia de arriba es efectiva EL SERVIClO DE GARANT[A SERVICE a un uso que no sea et familiar prxvado, la por solamente 90 dias. EST/i.
Contrato de protecci6n maestra Fetic_taclones per su compra _nteligente. Su nuevo apara|o Kenmore _"est,. diseSado y [abricado para touches aries de operaci6n confiable, Sin embargo, at igual que redes los productos, puede requenr de mantenlm_ento o reparaci6n preventivas en cualquier memento. Es ahi cuando el contrato de protection maestra te puede ahorrar dinero y molestias. Adqutera un Contrato de proteccion maestra ahora mtsmo y proteiase contra _noonvententes y gastos _nesperados.
Your Home For repair-in your home-of all ma_or brand appliances, lawn and garden equipment, or heating and cooling systems, no matter who made it, no matter who sotd it! For the replacement parts, accessones anff owner's manuats that you need to do-it-yourself. For Sears professional installation of home appliances and items like garage door openers and water heaters. 1-800-4-MY-HOME _' (1-800-469-4663) Call anytime, day or n_ght(U.S.A. and Canada) www.sears,com w_',_!.