Use & Care Guide Manual de Uso y Cuidado English / Español Model/Modelo: 01898 Item / Artículo: 500-04815963-6 Kenmore ® Natural Gas Conversion Kit Paquete de conversion a gas natural P/N 3027977-Manual Sears Brands Management Corporation Hoffman Estates, IL 60179 U.S.A. www.kenmore.com www.sears.com www.kmart.
TABLE OF CONTENTS Part List…………………………………………………….…...….………….…….…...3 Conversion Instructions………………………………………………....….………….…….….4-7 Use & Care……………………………………………………………………………8 Troubleshooting ………………………………………………………………………………….9 Warranty …………………………………………………………………………………………….10 PREPARATION Before beginning conversion, make sure all parts are present. Compare parts with package contents list. If any part is missing or damaged, do not attempt to convert.
Part list detail with graphic: MM.Orifice 1.37mm NN. Orifice 1.38mm QTY: 1pcs QTY:1pcs OO. M4 Screw QTY:5pcs PP. Wrench S17_19 QTY:1pcs QQ. Orifice removal tool S7 QTY:1pcs RR. Knob QTY: 5 pcs SS. Hose QTY: 1set TT. NG Rating Label QTY: 1 pcs NG Orifice Used Main Burner Rotisserie Burner Side Burner Part Number LL NN MM Diameter ¢1.45mm ¢1.38mm ¢1.37mm QTY 4 1 1 3 17 19 LL. Orifice 1.
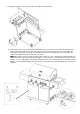
Natural Gas Conversion Instructions: 1. Remove the Cotter pins at the back of main burners to detach burners from bracket. Lift back of main burners while sliding burners out of firebox, disengaging main burners from valves as shown 2.Unscrew the orifice from the valve with the orifice removal tool (Part QQ), put the new orifices (Part LL, 1.45mm) into the valves and secure it with the wrench. Repeat this step for all four MAIN burners.
3.Unscrew the M4 screw as shown, rotate the air shutter opening counterclockwise , adjusting it from the LP setting to the NG setting. Replace the M4 screw, thus securing the air shutter opening. Reinstall the main burner and R pin. 4.Detach the rotisserie burner cover by removing the screws as shown. During this process, hold the rear burner cover, otherwise, it will drop and may break, possibly causing injury.
5.Use the wrench (Part PP) to remove the nozzel assembly from the Rotisserie burner, unscrew the orifice from the assembly with the orifice removal tool (Part QQ). Replace it with the new orifice (Part NN, 1 pcs) and tighten it. Reinstall nozzle assembly and rotisserie burner cover. 6.Detach the side burner nozzel assembly by removing the two screws, use the orifice removal tool (Part QQ) to remove the orifice, and replace it with new orifice (Part MM, 1 pcs) and tighten it.
.Detach the regulator with wrench (Part PP), and replace with the NG hose. 8.Remove the 5 main burner control knobs and the side burner control knob. Do not remove the rotisserie burner knob. Install the M4 locking screws (Part OO, 5 pcs) into the correct hole as shown in the inset. Replace the knobs with the new knobs from the kit when finished. Paste the new rating label (part TT) for NG under the original rating label for LPG at the cart door inner panel.
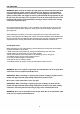
USE AND CARE WARNING: Many areas of an outdoor gas grill generate extreme heat. We have taken every precaution to protect you from the contact areas. However, it is impossible to isolate all high-temperature areas. Therefore, use good judgment and caution when grilling on this product. We suggest a covered, protected hand during operation of grill. Do not move your grill when it is in operation or hot to the touch. Wait until your unit is turned off and properly cooled down before moving it.
TROUBLESHOOTING Problem Possible Cause Corrective Action Grill or side burner 1. The ignition system is not properly installed. 1. Reinstall the ignition system and make sure the sparks are produced close to the burner ports or close to the infrared burner ceramic surface. 2. Please refer to the Use and Care Guide for more details. will not light 2. Other possible causes are described in the Use and Care Guide. Burner flame is yellow and gas odor can be smelled 1.
WARRANTY Kenmore Full Warranty If this Kenmore product fails due to a defect in material or workmanship within one year from the date of purchase, call 1-800-4-MY-HOME to arrange for a free replacement. This warranty is void if this product is ever used for commercial or rental purposes. This warranty gives you specific legal rights, and you may also have other rights which vary from state to state.
TABLA DE CONTENIDOS Lista de componentes………………………………………….…...….………….…….…...12 Instrucciones de conversión………………………………………....….………….…….….13-16 Uso y Cuidado.……………………………………………………………………………17 Problemas y Soluciones…………………………………………………………………….18 Garantía………………………………………………………………………………….19 PREPARACIÓN Antes de empezar la conversión, asegúrese de que están presentes todas las piezas. Compare las piezas con la lista de contenido. Si falta alguna pieza o hay alguna dañada, no intente la conversión.
Lista detallada de piezas con dibujo: Orificio LL1.45mm CANT: 4p. Orificio MM 1.37mm Orificio NN 1.38 mm Tornillo OO M4 CANT: 1p. CANT: 1p. CANT: 5p Pulsador RR CANT: 5p Herramienta para quitar orificios QQ CANT: 1p Manguera SS CANT: 1p Llave S17_19 PP CANT: 1p Etiqueta de clasificación de NG. TT CANT: 1p Orificio NG usado Quemador principal Número de pieza Diámetro CANT Quemador de Asado QuemadorSecundario LL NN MM ¢1.45mm ¢1.38mm ¢1.
Instrucciones de conversión a gas natural: 1. Retire los pasadores situados detrás de los quemadores principales para sacar los quemadores. Levante los la parte trasera de los quemadores principales mientras los desliza fuera de la zona, desmontándolos de las válvulas tal y como se muestra. 2.Desatornille el orificio de la válvula con la herramienta para quitar orificios (Pieza QQ), ponga los nuevos orificios (pieza LL, 1.45mm) en las válvulas y asegure con la llave.
3.Desatornille el tornillo M4 como se muestra, rote la válvula de respiración en el sentido de las agujas del reloj, ajustándola de LP a NG. Coloque de nuevo el tornillo M4, asegurando la apertura de la válvula. Reinstale el quemador principal y el pasador. 4.Retire el cobertor del quemador de asado retirando los tornillos como se muestra. Durante este proceso, sujete la cobertura trasera de los quemadores porque si no lo hace puede caer y romperse, además de causar daños personales.
5.Use la llave (Pieza PP) para retirar el cuerpo de la espita del quemador de asado, desatornille el orificio del cuerpo con la herramienta para quitar orificios (Pieza QQ). Reemplace con el nuevo orificio (Parte NN) y apriete. Reinstale la espita y el cobertor del quemador de asado. 6.Separe el cuerpo de la espita del quemador secundario retirando los dos tornillos, use la herramienta para quitar orificios (Pieza QQ) para retirar el orificio y reemplazarlo con el nuevo orificio (Pieza MM,1 p) y apriete.
7.Separe el regulador con la llave (Pieza PP) y reemplace con la manguera NG. 8.Retire los 5 pulsadores de control y el pulsador del quemador secundario. No retire el pulsador del quemador de asado. Instale los tornillos M4 (Pieza OO,5p) en los agujeros correctos como se muestra en el dibujo. Reemplace los pulsadores por los nuevos del paquete cuando termine.
USO Y CUIDADO ATENCIÓN: Muchas áreas de una parrilla de exterior a gas generan altas temperaturas. Hemos tomado precauciones para protegerle a Usted de esas zonas, pero es imposible aislarlas todas. Por lo tanto, use el sentido común y tenga cuidado cuando use este producto. Aconsejamos proteger las manos durante la operación de la parrilla. No mueva la parrilla si la está usando o está caliente. Espere hasta que esté apagada y enfriada antes de moverla. No hacer esto puede causarle daños.
PROBLEMAS Y SOLUCIONES Problema Posible Causa Solución 1. Reinstale el sistema de ignición y asegúrese La pamilla o el quemador 1.El Cause sistema de ignición mo está Corrective Problem Possible Action que las se originan secundario se encienden. instalado. Grill or sideno burner 1. Thebien ignition system is not 1.de Reinstall the chispas ignition system and cerca del properly installed.
GARANTÍA Garantía total Kenmore Si este producto Kenmore falla por un fallo en los materiales o en la fabricación en un año desde la fecha de compra, llame al 1-800-4-MY-HOME para pedir un reemplazo gratis. Esta garantía será anulada si el producto se ha usado alguna vez para fines comerciales o para alquilarlo. Esta garantía le da derechos legales específicos y puede tener otros que cambian en cada Estado.
11