® 240-Volt Compact Electric Dryer Secadora Compacta El_ctrica de 240 voltios Model/Modelo 3980599 110.84182 Sears Roebuck and Co., Hoffman Estates, IL 60179 U.S.A. iiiiii!Jiiiiiiiii www.sears.
TABLE OF CONTENTS PROTECTION AGREEMENTS PROTECTION AGREEMENTS ....................................................... 2 WARRANTY ..................................................................................... 3 DRYER SAFETY .............................................................................. 4 INSTALLATION INSTRUCTIONS .................................................. Tools and Parts ............................................................................ Location Requirements .
WARRANTY FULL ONE-YEAR WARRANTY ELECTRICAL PARTS ON MECHANICAL AND For one year from the date of purchase, when this dryer is installed and operated according to the instructions provided in this Use and Care Guide, Sears will repair this dryer, free of charge, if defective in materials or workmanship. NOTE: Exhausting this dryer with a plastic vent can void this warranty. See "Installation Instructions" for the complete exhaust requirements for this dryer.
DRYER SAFETY Your safety and the safety of others are very important. We have provided many important safety messages in this manual and on your appliance. Always read and obey all safety messages. This is the safety alert symbol. This symbol alerts you to potential hazards that can kill or hurt you and others. All safety messages will follow the safety alert symbol and either the word "DANGER" or "WARNING.
INSTALLATION INSTRUCTIONS Tools needed Gather the required tools and parts before starting installation.
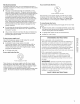
Installation Recessed or closet installation - Stacked Clearances The location must be large enough to allow the dryer door to open fully. 12" Z (30.5cm) Dryer Dimensions DRYER 12" _ (3&5 cm) m m (154.9 cm2) WASHER 31 "t (79.7 0"..-_1_,_ .- ..-=,q4-0" (o era) (o era) cm) L *Most installations require a minimum 51/2'' (14.0 cm) clearance behind the dryer for the exhaust vent with elbows. See "Venting Requirements.
Electrical Connection If your outlet looks like this: To properly install your dryer, you must determine the type of electrical connection you will be using and follow the instructions provided for it here. • This dryer is manufactured ready to install with a 3-wire electrical supply connection. The green cabinet-grounding conductor is permanently connected to the neutral conductor (white wire) within the dryer.
Power Supply Cord Direct Wire Fire Hazard Use 10 gauge somidcopper wire. Use a UL misted strain relief. Disconnect power before making emectricamconnections. Connect neutram wire (white or center wire) to center terminal (silver). Ground wire (green or bare wire) must be connected green ground connector. to Connect remaining 2 suppmy wires to remaining 2 termina_s (gored). SecureBy tighten amlemectrical connections. Failure to do so can resuJt in death, fire, or electrical shock. 3.
Electrical Connection Options 1= 2. If your home has: And you will be connecting to: Go to Section 4-wire receptacle A UL listed, 4-wire connection: (NEMA Type 14-30R) 120/240 volt Power supply cord Remove center terminal block screw. Remove neutral grounding wire (green with yellow stripes) from external ground conductor screw. Fasten it under center, silver-colored terminal block screw.
4-wire connection: Place the hooked end of the neutral wire (white or center wire) of power supply cable under the center screw of terminal block (hook facing right). Squeeze hooked end together. Tighten screw. Direct Wire IMPORTANT: A 4-wire connection is required for mobile homes and where local codes do not permit the use of 3-wire connections. C E J Direct wire cable must have 5 ft (1.52 m) of extra length so dryer can be moved if needed. h Strip 5" (12.
1= 2. Loosen or remove center terminal block screw. Connect neutral wire (white or center wire) of power supply cord to the center, silver-colored terminal screw of the terminal block. Tighten screw. B 1= 2. C Loosen or remove center terminal block screw. Place the hooked end of the neutral wire (white or center wire) of power supply cable under the center screw of terminal block (hook facing right). Squeeze hooked end together. Tighten screw. B C / / • A.
6, Connect a separate copper ground wire from the external ground conductor screw to an adequate ground. A Use clamps to seal all joints. Exhaust vent must not be connected or secured with screws or other fastening devices which extend into the interior of the duct. Do not use duct tape. B IMPORTANT: Observe all governing codes and ordinances.
Alternate installations for close clearances 2. Venting systems come in many varieties. Select the type best for your installation. Two close-clearance installations are shown. Refer to the manufacturer's instructions provided with the vent system. Determine vent length. The maximum length of the exhaust system depends upon: • The type of vent (rigid metal or flexible metal). • The number of elbows used. • Type of hood. Recommended hood styles are shown here. B A B (10.2 A.
If dryer is not level, prop the dryer up using a wood block. Use a wrench to adjust the legs up or down and check again for levelness. 1. To protect the floor, use a large flat piece of cardboard from the dryer carton. Place cardboard under the entire back edge of the dryer. See illustration. 2. Firmly grasp the body of the dryer (not the console panel). Gently lay the dryer on the cardboard. 3. 4= NOTE: It may be necessary to level the dryer again after it is moved into its final position. 1.
DRYER USE TIMED PUSH TO START WRINKLE FABR|C LESS DRY TEMPERATURE PEBMANENT PBESS _ I OFF 70 DRY -- AUTO DRY | MEDBUM DELICATE GUARD COTTON NORMAL DRY- [_4ORE DRY -OFF 20 TOUCH AiR DRY 30 UP Before using your dryer, wipe the dryer drum with a damp cloth to remove dust from storing and shipping. 1. Clean the lint screen before or after each cycle. See "Cleaning the Lint Screen." 2. Load clothes loosely into the dryer and close the door. Do not pack the dryer.
Load clothes loosely into the dryer. Do not pack the dryer. Allow space for clothes to tumble freely. The following chart shows the maximum load you can place in your compact dryer. Expect longer drying times.
See the following chart for examples of items that can be dried using an air cycle. Type of Load Time* Foam rubber - pillows, padded bras, stuffed toys 20 - 30 Plastic - shower curtains, tablecloths 20 - 30 Rubber-backed 40 - 50 rugs Olefin, polypropylene, sheer nylon The following table lists suggested auto dry or timed dry settings for various loads. This is only a guide.
To clean 1. Open the door and pull the lint screen straight out. To clean dryer drum 1. Make a paste with powdered laundry detergent and very warm water. 2. Squeeze body of lint screen lightly while pulling off the cover. 3. Roll lint off the screen with your fingers. Do not rinse or wash screen to remove lint. Wet lint is hard to remove. 4. Replace cover on lint screen body. Push the lint screen firmly back into place and close the door.
TROUBLESHOOTING here and possibly avoid the cost of a service call... Is the load too big or too heavy? Clothes are not drying satisfactorily Dry smaller loads so lint can be carried to the lint screen. First try the solutions suggested • The compact dryer operates at a lower wattage. longer drying times.
iNDICE CONTRATOS DE PROTECCION CONTRATOS DE PROTECCION ................................................ 20 GARANTIA .................................................................................... 21 SEGURIDAD DE LA SECADORA ............................................... 22 Contratos DE INSTALACION ........................................ 23 Herramientas y piezas ............................................................... Requisites de ubicaci6n ..........................................
GARANT[A Garantia completa de un aho para las piezas mec&nicas y componentes el_ctricos Durante un a_o a partir de la fecha de compra, si se instala y pone en funcionamiento la secadora de conformidad con las instrucciones proporcionadas en este Manual de Uso y Cuidado, Sears reparara esta secadora, gratuitamente, si tuviese defectos en el material o la mano de obra. NOTA: El empleo de un ducto de escape de plastico para esta secadora puede anular esta garantia.
SEGURIDAD DE LA SECADORA Su seguridad y la seguridad de los demas es muy importante. Heroes incluido muchos mensajes importantes de seguridad en este manual y en su electrodomestico. todos los mensajes de seguridad= Lea y obedezca siempre Este simbolo le llama la atenci6n sobre peligros potenciales que pueden ocasionar la muerte o una lesion a usted y a los demas. Este el mensajes sfmbolo dedeadvertencia Todoseslos seguridad de iranseguridad.
INSTRUCCIONES Herramientas • Un contacto con conexidn a tierra ubicado a unos 2 pies (61 cm) de cualquiera de los lados de la secadora. Vea "Requisitos electricos". • Un piso resistente para soportar la secadora con un peso total (secadora y carga) de 115 Ibs (52 kgs). Asimismo se debe considerar el peso de otro artefacto que la acompaSe. • Un piso nivelado con un declive maximo de 1" (2,5 cm) debajo de la secadora completa.
Debe considerarse el espacio adicional para facilitar la instalaci6n y el servicio tecnico. Requisitos rodantes Se podrian necesitar espacios libres adicionales para la pared y las molduras de la puerta y del piso. Esta secadora es apropiada para instalaciones en casas rodantes.
Conexi6n el_ctrica Si el contacto de pared luce come _ste: Para instalar su secadora adecuadamente, usted debe determinar el tipo de conexidn electrica que va a usar y seguir las instrucciones que aqu[ se proveen para el caso. • • Esta secadora ha sido manufacturada lista para ser instalada en una conexi6n de suministro de energ[a electrica de 3 hilos. El conductor verde de puesta a tierra del gabinete esta permanentemente conectado al conductor neutral (cable blanco) dentro de la secadora.
Cable de suministro el_ctrico Cableado directo Peligro de _ncendio Peligre de tncendio Use un cable de suministro eiectrice nuevo de 30 amperes que este en mamista de ULo Utilice alambres Use un protector Desconecte conexiones Desconecte conexionee Use un protector de cables que este en Is Hsta de UL° el suministro emectricaso electrico antes de hacer mas Apriete firmemente todas las conexiones No seguir estas instrucciones incendio, o cheque electrico° Apriete firmemente electricas, 2.
Opciones para la conexibn electrica 1. 2.
Coloque el extremo del hilo neutro en forma de gancho (hilo blanco o central) del cable de suministro electrico debajo del tornillo central del bloque de terminal (con el gancho mirando hacia la derecha). Apriete y junte el extremo enganchado. Apriete el tornillo. Conexion de 4 hilos: Cable directo IMPORTANTE: Se necesita una conexi6n de alambre de 4 hilos para las casas rodantes y para los cases en que los c6digos locales no permitan el uso de conexiones de 3 hilos.
1= 2. Afloje o saque el tornillo central del bloque de terminal. 1= Afloje o saque el tornillo central del bloque de terminal. Conecte el hilo neutro (hilo blanco o central) del cord6n de suministro electrico al tornillo central de color plateado del bloque de terminal. Apriete el tornillo. 2. Coloque el extreme en forma de gancho del hilo neutro (hilo blanco o central) del cable de suministro electrico debajo del tornillo central del bloque de terminal (con el gancho mirando hacia la derecha).
5. Introduzca la lengOeta de la cubierta del bloque de terminal en la ranura del panel posterior de la secadora. Asegure la cubierta con el tornillo de sujeci6n. 6. Conecte un hilo de tierra de cobre separado desde el tornillo conductor de tierra externo a tierra adecuada. A B • No instale el ducto de escape de metal flexible en paredes, techos o pisos encerrados. Utilice abrazaderas para sellar todas las juntas.
Instalaciones alternas para espacios limitados Los sistemas de ventilaci6n vienen en una amplia gama. Seleccione el tipo mas apropiado para su instalaci6n. A continuaci6n se ilustran dos tipos de instalaci6n para espacios limitados. Consulte las instrucciones del fabricante provistas con el sistema del ducto de escape. A Determine la Iongitud del ducto de escape. B La Iongitud maxima del sistema de ventilaci6n depende de: A.
3= Determine el nOmero de codos que va a necesitar. NOTA: No use tendidos de ducto de escape mas largos que los especificados en el cuadro de Iongitud del ducto de escape.
Revise la nivelaci6n de la secadora. Verifique primero de lado a lado y luego del frente hacia atras. Si la secadora no esta nivelada, apuntale la secadora, usando un bloque de madera. Use una Ilave de tuercas para regular las patas hacia arriba o hacia abajo y verifique nuevamente si la secadora esta nivelada. 1. Revise para cerciorarse de que todas las piezas esten instaladas. Si hay alguna pieza extra, vuelva a revisar todos los pasos para vet cual se omiti6. 2.
USO DE LA SECADORA PUSH TO START FABR|C TEMPERATURE PERMA_YENT PRESS MEDIUM DELICATE _ CO_ON Antes de usar su secadora, limpie el tambor de la secadora con un trapo hQmedo para quitar el polvo del almacenaje y empaque. 1. Limpie el filtro de pelusa antes o despues de cada ciclo. Vea "Limpieza del filtro de pelusa". 2. Coloque la ropa holgadamente en la secadora y cierre la puerta. No sobrecargue la secadora. Deje espacio para que la ropa pueda rotar libremente. 3.
Coloque la ropa en la secadora de modo suelto. No la Ilene en exceso. Deje suficiente espacio para que la ropa rote con libertad. El cuadro siguiente muestra la carga maxima de ropa que usted puede poner en la secadora compacta. Cuente con tiempos mils largos de secado.
Retoque (Touch Up) Se puede usar este ciclo para quitar las arrugas de ropa limpia de telas sinteticas o de planchado permanente que ha estado empacada apretadamente en una valija o ropero. Este ajuste le proporciona unos 15 minutos de secado con rotaci6n seguidos de un periodo de enfriamiento de hasta 10 minutos. Quite la ropa tan pronto termine la rotaci6n.
CUIDADO DE LA SECADORA Algunas toallas fabricadas con fibras sinteticas y fibras naturales (mezclas de poliester y algod6n) pueden soltar mas iii ii_ii ii_i_ii:il;i_ii_!!:::!%iii!!ii _iiii:::ii_i!i?_ iI_Ji,i!iiiiii_!_i!i:ii_ ¸¸_ _i::;iiiiOiiii_!i:iiiii,i_? _i;i!iXi!il;;i_!_;i!!!ii ii,i,'ii!ii !!!!J_i:ii!:?O;ii%i:i:::iiiiO_ili! _J_'!!_ pelusa que otras toallas, dando como resultado que el filtro de pelusa de su secadora se Ilene mas rapido.
Cuidadoparalamudanza En el interior del gabinete de la secadora SegOn el uso de la secadora, se debe quitar la pelusa cada 2 ares, o con mas frecuencia. La limpieza debera efectuarla una persona calificada. En el ducto de escape La pelusa debe ser quitada nuevamente cada 2 a_os, o con mas frecuencia, de acuerdo con el use de la secadora. Pemigro de Choque Electrico Desconecte eBsuministro rnantenirniento. Cuidado para las vacaciones Ponga la secadora a funcionar s61o cuando este en casa.
Pelusa en la carga • &Esta obstruido el filtro de pelusa? Limpie el filtro de pelusa. Revise el movimiento del aire. Las prendas se encogen • &Se ha separado la carga de mode apropiado? Separe las prendas que sueltan pelusa (toallas, ropa afelpada) de las que atraen pelusa (pana, articulos sinteticos). Tambien separe pot color.
Your Home ............... For repair-in your home-of all major brand appliances, lawn and garden equipment, or heating and cooling systems, no matter who made it, no matter who sold it! For the replacement parts, accessories and owner's manuals that you need to do-it-yourself. For Sears professional installation of home appliances and items like garage door openers and water heaters. 1-800-4-MY-HOME Call anytime, ® (1-800-469-4663) day or night (U.S.A. and Canada) www.sears.com w .sears.