high Use & Care Guide English Model: 796.3146* Kenmore Elite Top-Loading ® Automatic Washer * = color number MFL68019756 Sears Brands Management Corporation www.kenmore.com www.sears.
TABLE OF CONTENTS PROTECTION AGREEMENTS IMPORTANT SAFETY INSTRUCTIONS............................ 3-5 GROUNDING REQUIREMENTS............................................5 FEATURES AND BENEFITS Key Parts and Components................................................6 Optional Accessories........................................................... 6 Included Accessories........................................................... 6 INSTALLATION REQUIREMENTS Key Dimensions and Specifications.............
SAFETY MESSAGES There are many important safety messages in this manual and on your appliance. Always read and obey all safety messages. This is the safety alert symbol. This symbol alerts you to potential hazards that can result in property damage and/or serious bodily harm or death. All safety messages will follow the safety alert symbol and either the word DANGER, WARNING or CAUTION. These words mean: Indicates a hazardous situation which, if not avoided, will result in death or serious injury.
IMPORTANT SAFETY INSTRUCTIONS WARNING • Do not install on carpet. Install the washer on a solid floor. Failure to follow this warning can cause serious leak damage. • Do not remove grounding prong. Do not use an adapter or extension cord. Plug into a grounded 3-prong outlet. Failure to follow these warnings can cause serious injury, fire, electric shock, or death. • Do not, under any circumstances, cut or remove the third (ground) prong from the power cord.
IMPORTANT SAFETY INSTRUCTIONS WARNING: RISK TO CHILDREN • Keep laundry products out of children’s reach. To prevent personal injury, observe all warnings on product labels. Failure to comply with these warnings could result in serious personal injury. • Do not allow children to play on or in the washer. Close supervision of children is necessary when the washer is used near children. As children grow, teach them the proper, safe use of all appliances.
FEATURES AND BENEFITS KEY PARTS AND COMPONENTS C A LID LOCK B The washer lid is locked during operation. The lid can be unlocked by pressing the START/ PAUSE button to stop the washer. G F B ULTRA-CAPACITY STAINLESS STEEL TUB H The ultra-large stainless steel tub offers extreme durability. C SOFT CLOSE, TEMPERED GLASS LID The soft close hinges allow the lid to close gently and quietly. The tempered glass is durable and makes it easy to observe the washer.
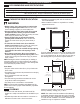
INSTALLATION REQUIREMENTS KEY DIMENSIONS AND SPECIFICATIONS Description Rated Voltage/Frequency Dimensions Net Weight Top-Loading Washer 120VAC, 60Hz 27"(W) X 28 3/8"(D) X 40 3/8"(H), 55 3/8"(H with lid open) 68.6 cm (W) X 72.1 cm (D) X 102.6 cm (H), 140.6 cm (H with lid open) 138.2 lbs. (62.7kg) • Installing on carpeting and soft tile surfaces is not recommended. • Never install the washer on a platform or weakly supported structure.
INSTALLATION INSTRUCTIONS UNPACKING AND REMOVING SHIPPING MATERIAL When removing the washer from the carton base, be sure the plastic tub support comes off with the base. If you must lay the washer down to remove the base packaging materials, always protect the side of the washer and lay it carefully on its side. DO NOT lay the washer on its front or back. Pad 3. Carefully remove the two foam pads which cover the top sides of the tub guide, making sure not to leave behind any pieces of the foam.
INSTALLATION INSTRUCTIONS CONNECTING THE WATER LINES • IMPORTANT: Use new hoses when installing the washer. Do NOT reuse old hoses. • IMPORTANT: Use ONLY the inlet hoses provided by Kenmore. Aftermarket hoses are not guaranteed to fit or function correctly. Other hoses may not tighten correctly and could cause leaks. Subsequent damage to product or property will not be covered under the terms of the product warranty. • Water supply pressure must be between 14.5 psi and 116 psi (100~800 kPa).
INSTALLATION INSTRUCTIONS CONNECTING THE DRAIN HOSE Option 2: Laundry Tub • The drain hose should always be properly secured. Failure to properly secure the drain hose can result in flooding and property damage. • The drain must be installed in accordance with any applicable local codes and regulations. • Make sure that the drain hose is not stretched, pinched, crushed, or kinked.
INSTALLATION INSTRUCTIONS LEVELING THE WASHER The tub of your new washer spins at very high speeds. To minimize vibration, noise, and unwanted movement, the floor must be a level, solid surface. • To check if the washer is level from side to side, place a level on the back edge of the lid. • To check if the washer is level front to back, place a level at the side of the washer on the edge where the cabinet side meets the top cover. Do not place the level on the top or the lid.
HOW TO USE To reduce the risk of fire, electric shock, or injury to persons, read and follow this WARNING: entire Use & Care Guide, including the Important Safety Instructions, before operating this washer. CONTROL PANEL FEATURES E A B F C D C START/PAUSE BUTTON Press this button to start the selected cycle. If the washer is running, use this button to pause the cycle without losing the current settings. A POWER (ON/OFF) BUTTON Press to turn the washer ON. Press again to turn the washer OFF.
HOW TO USE OPERATING THE WASHER Bleach 1 SORT LAUNDRY AND LOAD WASHER Sort laundry by fabric type, soil level, color and load size, as needed. Open the door and load the items into the washer. 2 ADD CLEANING PRODUCT Add High-Efficiency (HE) detergent to the detergent dispenser drawer. For proper wash performance, always measure the detergent using the measurements provided by the detergent manufacturer. 3 TURN ON THE WASHER Press the POWER button to turn ON the washer.
HOW TO USE CYCLE GUIDE The cycle guide below shows the default settings, available options and recommended fabric types for each cycle. Allowable modifier adjustments are shown below the default setting for each cycle.
HOW TO USE CYCLE GUIDE The cycle guide below shows the default settings, available options and recommended fabric types for each cycle. Allowable modifier adjustments are shown below the default setting for each cycle.
HOW TO USE SORTING WASH LOADS Fabric Care Labels Many articles of clothing include a fabric care label. Using the chart below, adjust the cycle and option selections to care for your clothing according to the manufacturer’s recommendations. CAUTION • Do not load items higher than the top edge of the tub. Failure to follow this caution can result in leakage or damage to fabrics. • Use the BULKY/BEDDING cycle for buoyant or nonabsorbent items such as pillows or comforters.
HOW TO USE ABOUT THE DISPENSERS The automatic dispenser consists of two compartments which hold: • Liquid fabric softener. • Liquid or powdered detergent for main wash. Liquid Bleach Compartment The bleach dispenser is a separate compartment at the left front of the tub opening. This compartment holds liquid bleach, which is dispensed automatically at the proper time during the wash cycle. Any liquid remaining in the dispenser at the end of the cycle is water, not bleach.
HOW TO USE DETERGENT AND DISPENSER USE A Word About Detergents Using the Softener and Detergent Dispenser High-Efficiency (HE) detergents produce fewer suds, dissolve more efficiently to improve washing and rinsing performance, and help to keep the interior of your washer clean. Using detergent that is not HE may cause oversudsing and unsatisfactory performance which could result in error codes, cycle failure, and machine damage.
HOW TO USE TIME AND STATUS DISPLAY The time and status display shows the estimated time remaining and cycle progress. A B B ESTIMATED TIME REMAINING When a cycle is selected, the default time for that cycle is displayed. This time will change as modifiers or options are selected. Once the START/ PAUSE button is pressed, the washer will measure the size of the load. The estimated time may change once the load size has been measured.
HOW TO USE CYCLE MODIFIER BUTTONS NOTE: To protect your garments, not every wash/rinse temperature, spin speed, soil level, or option is available with every cycle. A chime will sound and the LED will not light if a selection is not allowed. Each cycle has default settings that are selected automatically. You may also customize these settings using the cycle modifier buttons. Press the button for the desired modifier until the indicator light for the desired setting is lit.
HOW TO USE OPTION BUTTONS Your washing machine features several additional cycle options that customize cycles to meet your individual needs. IMPORTANT NOTES ABOUT STEAM CYCLES: • Steam may not be visible during the steam cycles. This is normal. • Do not use steam with delicate fabrics, such as wool and silk, or easily discolored fabrics. 1 Turn ON the washer and press the cycle button to select the desired cycle.
HOW TO USE OPTION BUTTONS FABRIC SOFTENER DELAY WASH Fabric softener is dispensed in the final rinse. This washer is designed to save rinse water by using a jet spray rinse system (SMARTRINSE) in NORMAL and HEAVY DUTY cycles. Press the FABRIC SOFTENER button to change the final rinse from spray rinse to regular rinse so that the fabric softener is most effective. Once you have selected the cycle and other settings, press this button to delay the start of the wash cycle.
CARE AND CLEANING WARNING: To reduce the risk of fire, electric shock, or injury to persons, read and follow this entire Use & Care Guide, including the Important Safety Instructions, before operating this washer. • Unplug the washer before cleaning to avoid the risk of electric shock. Failure to follow this warning can cause serious injury, fire, electric shock, or death. • Never use harsh chemicals, abrasive cleaners, or solvents to clean the washer. They will damage the finish.
CARE AND CLEANING Hot Cold MAINTENANCE Cleaning the Water Inlet Filters If the washer does not fill properly, an error message will show on the display. The inlet valve filter screens could be plugged by hard water scale, sediment in the water supply, or other debris. NOTE: The inlet screens protect the delicate parts of the inlet valve from being damaged by particles that could enter the valves with the water supply.
CARE AND CLEANING CLEANING THE WASHER Proper Use of Detergent Using too much detergent is a common cause of laundry problems. Today’s detergents are formulated to be effective without visible sudsing. Be sure to carefully read and follow manufacturer’s recommendations for how much detergent to use in your wash. You can use less detergent if you have soft water, a smaller load, or a lightly soiled load. NOTE: Use only low-sudsing, high-efficiency detergent. These detergents can be identified by the HE logo.
Kenmore Connect™ System If you experience problems with your washer, call 1-800-4-MY-HOME ® . Only use the Kenmore Connect System feature when instructed to do so by the Kenmore Connect Team. The transmission sounds that you will hear are normal and sound similar to a fax machine. Should you experience any problems with your washing machine, it has the capability of transmitting data via your telephone to the Kenmore Connect Team.
TROUBLESHOOTING GUIDE NORMAL SOUNDS YOU MAY HEAR The following sounds may be heard while the washer is operating. They are normal. Clicking: Lid lock relay when the lid locks and unlocks. Humming or gurgling: Drain pump is pumping water from the washer at times during a cycle. Spraying or hissing: Water spraying or circulating during the cycle. BEFORE CALLING FOR SERVICE Your washing machine is equipped with an automatic error-monitoring system to detect and diagnose problems at an early stage.
TROUBLESHOOTING GUIDE BEFORE CALLING FOR SERVICE (continued) Problem Excessive sudsing Staining Washer will not turn ON NOTE: If the washer stopped during a cycle due to a loss of power, the washer will resume the cycle where it stopped when the power is restored. Wash cycle time is longer than usual Musty or mildewy odor in washer Water leaks Possible Cause Solutions Too much detergent or incorrect detergent.
TROUBLESHOOTING GUIDE BEFORE CALLING FOR SERVICE (continued) Problem Possible Causes Washer will not operate Control panel has powered off due to inactivity. Washer not filling properly Solutions This is normal. Press the POWER button to turn the washer on. Washer is unplugged. Make sure cord is plugged securely into a working outlet. Water supply is turned off. Turn both hot and cold faucets fully on. Controls are not set properly.
TROUBLESHOOTING GUIDE BEFORE CALLING FOR SERVICE (continued) Problem Washer will not drain water Possible Causes Kinked drain hose. Drain located higher than 96 in. above the floor. Solutions Ensure that the drain hose is not kinked. Make sure that the drain hose is no higher than 8 ft. above the bottom of the washer and is no more than 5 ft. away from the washer. Proper options not selected. Heavier soils and tougher stains may require Poor stain removal extra cleaning power.
TROUBLESHOOTING GUIDE BEFORE CALLING FOR SERVICE (continued) Error Codes Problem The display shows: The display shows: The display shows: Washer fills with water slowly or not at all, or the display shows: Possible Cause Solutions The lid is not closed properly. Make sure that the lid is closed properly and press the START/PAUSE button. After starting a cycle, it may take a few moments before the tub begins to turn or spin. The washer will not spin unless the lid is locked.
TROUBLESHOOTING GUIDE BEFORE CALLING FOR SERVICE (continued) Problem Water in the washer drains slowly or not at all, or the display shows: The display shows: The display shows: Possible Cause Drain hose is kinked, pinched, or clogged. Drain discharge is more than 96 inches above bottom of washer. The washer has detected an out of balance load. If the ub rebalance (see above) is not successful, this error will be displayed. The load is too small. Heavy articles are mixed with lighter items.
WARRANTY Kenmore Elite Limited Warranty When installed, operated and maintained according to all supplied instructions, if this appliance fails due to a defect in material and workmanship within one year from the date of purchase, call 1-800-4-MYHOME® to arrange for free repair. If this appliance is ever used for other than private family purposes, this warranty applies for only 90 days from the date of purchase, and is void in Canada.
Get it fixed, at your home or ours! Your Home For troubleshooting, product manuals and expert advice: www.managemylife.com For repair – in your home – of all major brand appliances, lawn and garden equipment, or heating and cooling systems, no matter who made it, no matter who sold it! For the replacement parts, accessories and owner’s manuals that you need to do-it-yourself. For Sears professional installation of home appliances and items like garage door openers and water heaters.