
Owner's Manual


21
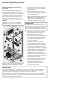
Ice Service
ON
OFF
Wire
Signal Arm
Turning your ice maker on
After the plumbing connections have been
completed, the water supply valve must
be opened. Place the ice container under
the ice maker, pushing it as far back as
possible. Lower the wire signal arm to its
“down” or ON position.
Turning your ice maker o
To stop the
ice maker,
lift the
wire signal
arm until
it clicks
and locks
in the “up”
or OFF
position.
The ice
maker
also turns o automatically when the ice
container is full. If your model has an
adjustable freezer shelf, place the shelf in
the lower position, so that the wire signal
arm will hit the ice when the container is full.
If your refrigerator has an automatic ice
maker, it will provide a sucient supply
of ice for normal use. During the initial
startup of your refrigerator, however, no
ice will be produced during the rst 24
hours of operation. Air in new plumbing
lines may cause the ice maker to cycle
two or three times before making a full
tray of ice. With no usage, it will take
approximately one to two days to ll the
ice container.
New plumbing connections may cause
the rst production of ice cubes to be
discolored or have an odd avor. Discard
ice made during the rst 24 hours.
NOTE
Automatic ice makers are also optional
accessories that may be installed in
most models at any time.
Call 1-800-4MY-HOME
®
for
information.
Ice Production: What To Expect
The ice maker will produce 2 to 3 pounds
of ice every 24 hours depending on usage
conditions. Ice is produced at a rate of 8
cubes every 75 to 160 minutes.
IMPORTANT
Your ice maker is shipped from the
factory with the wire signal arm in the
ON position. To ensure proper function
of your ice maker, hook up water supply
immediately or turn ice maker OFF by
lifting the wire signal arm until it clicks
and locks in the UP position. If the ice
maker is not turned o and the water
supply is not connected, the water valve
will make a loud chattering noise.
• Wash the ice container in warm water
with mild detergent. Rinse well and dry.
Ice Maker Tips
• Ice cubes stored too long may develop
an odd avor. Empty the ice container
and ensure that the wire signal arm is
in its “down” or ON position. The ice
maker will then produce more ice.
• Occasionally shake the ice container to
keep ice separated.
• Stop the ice maker when cleaning the
freezer and during vacations.
• If the ice maker will be turned o for
a long period of time, turn the water
supply valve to a closed position.
CAUTION
Chemicals from a malfunctioning
softener can damage the ice maker. If
the ice maker is connected to soft water,
ensure that the softener is maintained
and working properly.
NOTE
For information on ice maker noises, see
Normal Operating Sounds section.
CAUTION
DO NOT place the ice container in your
dishwasher.