
Specifications

3
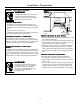
Installation Preparation
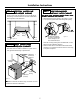
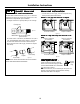
Figure C
Figure D
Install waste tee or disposer and air gap according to
manufacturer’s instructions.
CABINET PREPCABINET PREP
CABINET PREPCABINET PREP
CABINET PREP
ARAARA
ARAARA
ARA
TIONTION
TIONTION
TION
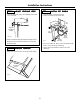
• Drill a 1-1/2” dia. hole in the cabinet wall within the shaded
areas shown in Figure A for the drain hose connection. The
hole should be smooth with no sharp edges.
Method 1 – Air Gap with Waste Tee or DisposerMethod 1 – Air Gap with Waste Tee or Disposer
Method 1 – Air Gap with Waste Tee or DisposerMethod 1 – Air Gap with Waste Tee or Disposer
Method 1 – Air Gap with Waste Tee or Disposer
Method 2 – High Drain with Waste Tee or DisposerMethod 2 – High Drain with Waste Tee or Disposer
Method 2 – High Drain with Waste Tee or DisposerMethod 2 – High Drain with Waste Tee or Disposer
Method 2 – High Drain with Waste Tee or Disposer
Provide a method to attach drain hose to underside of
countertop.
Cabinets
Square
and
Plumb
Plumbing and Electric Service
Must Enter Shaded Area
32.5"
Underside of
Countertop
to Floor
24"
Min.
17-5/8" Min.
18" Max.
4"
6"
Clearance for Door
Opening 2" Minimum
Countertop
Dishwasher
25-5/8"
18"
Min.
32"
Min.
32"
Min.
18"
Min.
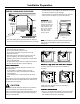
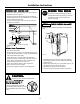
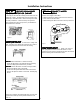
PREPARE DISHWASHER ENCLOSURE
Figure A
• The rough cabinet opening must be at least 24” deep and
17-5/8” to 18” wide. The opening should be 32.5” max. height.
CLEARANCES: CLEARANCES:
CLEARANCES: CLEARANCES:
CLEARANCES: When
installed into a corner,
allow 2” min. clearance
between dishwasher and
adjacent cabinet, wall or
other appliances. Allow
25-5/8" min. clearance
from the front of the
dishwasher for door
opening. Figure B
Note:Note:
Note:Note:
Note: ADA installation, (32-1/2”) beneath 34” high counter-
tops may be accomplished by adjusting the toekick and
leveling legs.
Figure B
DRAIN REQUIREMENTSDRAIN REQUIREMENTS
DRAIN REQUIREMENTSDRAIN REQUIREMENTS
DRAIN REQUIREMENTS
• Follow local codes and ordinances.
• Do not exceed 10 feet distance to drain.
• Do not connect drain lines from other devices to the
dishwasher drain hose.
• Dishwasher must be connected to waste line with an air
gap (not supplied) or 32" minimum high drain loop,
depending on local codes and ordinances to prevent back
flow into the dishwasher.
• Air gap must be used if waste tee or disposer connection is
less than 18" above the floor to prevent siphoning.
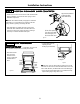
DRAIN PREPDRAIN PREP
DRAIN PREPDRAIN PREP
DRAIN PREP
ARAARA
ARAARA
ARA
TIONTION
TIONTION
TION
The type of drain installation depends on answers to the
following questions:
¨ Do local codes or ordinances require an air gap?
¨ Will waste tee or disposer connection be less than 18"
above the floor?
¨ Will installation have a drain loop less than 32" above
floor?
If the answer to ANY of the 3 questions above is YES, Method
1 MUST be used. Otherwise either Method 1 or Method 2 may
be used. Figure C or Figure D.
An air gap MUST BE USED if the drain hose is connected to
waste tee or disposer lower than 18" above the floor.
Failure to provide the proper drain connection height with air
gap or 32" minimum, high drain loop will result in improper
draining of the dishwasher.
• The dishwasher must be installed so that drain hose is no more
than 10 feet in length for proper drainage.
• The dishwasher must be fully enclosed on the top, sides and
back, and must not support any part of the enclosure.
CAUTION: