
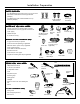
Specifications

9
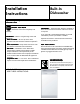
Installation Instructions
STEP STEP
STEP STEP
STEP
11
11
1
00
00
0
SECURE DISHW SECURE DISHW
SECURE DISHW SECURE DISHW
SECURE DISHW
ASHERASHER
ASHERASHER
ASHER
TT
TT
T
O CO C
O CO C
O C
OUNTEROUNTER
OUNTEROUNTER
OUNTER
TT
TT
T
OP OR CABINETOP OR CABINET
OP OR CABINETOP OR CABINET
OP OR CABINET
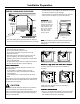
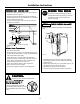
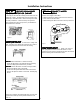
In this step you will need the 2 Phillips special head screws set
aside prior to Step 1. The dishwasher must be secured to the
countertop or the cabinet sides. When countertops are made
of wood, use Method 1. When countertops are granite or
other materials that will not accept screws, use Method 2 to
secure dishwsher at the sides.
IMPORIMPOR
IMPORIMPOR
IMPOR
TT
TT
T
ANT ANT
ANT ANT
ANT
::
::
: Drive Screws straight and
flush. Protruding screw heads will scratch the top or sides of
the control panel and can interfere with door closing.
Method 1: Method 1:
Method 1: Method 1:
Method 1: Secure dishwasher to Wood Countertop.
• Fasten the dishwasher to the underside of the countertop
with the 2 Phillips special head screws provided.
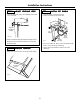
Method 2:Method 2:
Method 2:Method 2:
Method 2: Secure dishwasher with side-mounting brackets.
• Remove plug buttons (one on each side).
When step is complete, close dishwasher door and verify that
gap between countertop and top of dishwasher door is at
least 1/2".
• Install screws through the dishwasher side mount bracket
and into the adjacent cabinet on each side. Reinstall plug
buttons.
STEP 11STEP 11
STEP 11STEP 11
STEP 11
CC
CC
C
ONNECT WONNECT W
ONNECT WONNECT W
ONNECT W
AA
AA
A
TERTER
TERTER
TER
SUPPLSUPPL
SUPPLSUPPL
SUPPL
YY
YY
Y
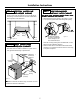
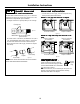
Ferrule
90° Elbow
Compression Nut
Hot Water
Supply Line
Connect water supply to 90° elbow.
• Slide compression nut, then ferrule over end of water line.
• Insert water line into 90° elbow.
• Slide ferrule against elbow and secure with compression nut.
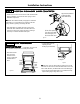
IMPORIMPOR
IMPORIMPOR
IMPOR
TT
TT
T
ANTANT
ANTANT
ANT
–
Check to be sure that
door spring does not rub or contact the fill hose or water
supply line. Test by opening and closing the door. Re-route the
lines if a rubbing noise or interference occurs.
Figure T
Figure S-2
Figure S-1