
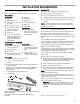
Installation Guide


7
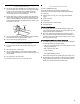
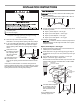
Option 2, No waste disposer - with air gap:
1. Cut end of drain hose if it needs to be cut (do not cut ribbed
section).
2. Attach drain hose to air gap with large spring-type clamp. If
the drain hose was cut, use a 1¹⁄₂" to 2" (3.8 to 5 cm) screw-type
clamp*.
3. Use a rubber hose connector* with spring or screw-type
clamps* to connect air gap to waste tee.
This connection must be before the drain trap and at least 20"
(50.8 cm) above the floor where dishwasher will be installed.
4. Insert drain hose through
hole cut in cabinet to the
front center of opening
where drain connection
will be made.
*Parts available from local
plumbing supply stores.
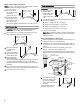
Option 3, Waste disposer - no air gap:
1. Remove the disposer knockout plug. Do not cut end of drain
hose.
2. Attach drain hose to disposer inlet with large spring-type
clamp.
This connection must be before the drain trap and at least 20"
(50.8 cm) above the floor where dishwasher will be installed. It
is recommended that the drain hose be looped up and securely
fastened to the underside of the counter.
3. Insert drain hose through
hole cut in cabinet to the
front center of opening
where drain connection will
be made.
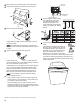
Option 4, No waste disposer - no air gap:
1. Cut end of drain hose if it needs to be cut (do not cut ribbed
section).
2. Attach drain hose to waste tee with 1¹⁄₂" to 2" (3.8 to 5 cm)
screw-type clamp*.
This connection must be before the drain trap and at least 20"
(50.8 cm) above the floor where dishwasher will be installed. It
is recommended that the drain hose be looped up and securely
fastened to the underside of the counter.
3. Insert drain hose through hole
cut in cabinet to the front
center of opening where drain
connection will be made.
*Parts available from local
plumbing supply stores.
Prepare cabinet opening where there are no
existing utility hookups
Electrical connection
Option 1, Direct wire method:
Helpful Tip: Wiring the dishwasher will be easier if you route
wire into the cabinet opening from the right side.
1. Drill a ³⁄₄" (1.9 cm) hole in
right-hand cabinet side, rear
or floor. Preferred and
optional locations are shown.
2. Wood cabinet: Sand the hole
until smooth.
Metal cabinet: Cover hole
with grommet, (Part Number 302797 - not provided.)
3. Run wire into house wiring junction box.
4. Install a UL Listed/CSA Approved clamp connector (strain
relief) for flexible-type wire. If installing conduit, attach a UL
Listed/CSA Approved strain relief to the junction box.
5. Run other end of wire
through cabinet hole. Cable
must extend to the right
front of cabinet opening.
Air gap
Drain hose -
cut here if needed
Rubber hose
connector
Large
spring-typ
e
clamp
Spring or
screw-type
clamps
Drain
hose
Waste
tee
Drain trap
Drain hose
Disposer
inlet
Large spring-type
clamp
Drain hose
Drain trap
Drain hose
Drain hose -
cut here if needed
Screw-type
clamp
Drain
hose
Waste
tee
Drain trap
Drain hose
Optional
location
Preferred
location