
Full Product Manual
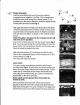


Assemble
the
corrugated
jacks
(K)
to
put
under
the
frame to
lift
it
off
the
ground.
Slide two
pieces
of
the
corrugated
board
together as
shown
in
Fig.
7.
Lift
the
kennel
frame
and
put
the
jack
under
the side
of
the
kenne[
where
installing the
latch
post(A).
This
will
make
it
easier
to clamp
the
latch
post
(A)
on
the
lower
frame.
Set
latch Post at
preferred
location
for
easy
latch
operation
and then
tighten
the
nut
on the
top
and
bottom
of
the
clamps
to
secure.
Fig.8
Note:
Loosen
clamps
of
latch
post
(Al
to adjust
for
precise
latch closure.
Using
a
screw
gun
with
a Phillips
bit,
put
a
self-
tapping
screw
through
pilot
holes
in
tubes
and
into
all vertical posts
attaching
to
the
upper
and
lower
frames.
Fig.9
Chain
Link Fabric
Lay
fabric
down.
Remove
wires
that
hold
the
roll
together.
Lift roll
carefully
and hook
the
chain
link
fabric
onto
the
hinge
post
(B)
tension
strip.
Unroll
the
fabric
around
the
kennelframe.
This
willtake
two
people
to
assure
the fabric
stays
held
to
the
frame
and
tensioned
as
it is
unrolled
and
pulled
around
the
kennelframe.
Fig.
l0
When
you
have
the
fabric
unrolled'and
have
made
it
arouRd
the
kennel
frame
to the
latch
post
(A)
hook
the fabric
onto
the
tension
strip.
Fig.
I
l lf
the fabric
is
too long
and
has
too
much slack,
you
must,tut,,the
roll.
Do this
by
removing
a wire
at
desired
length.
Unhook
the
wire
to
be
removed
at
the
top
and
bottom
with
a
pliers.
Remove
the
wire
by
twisting
the
wire
out
of
the top.
Fig.
I2
Note:
For
hest
fit
to
the
hooks,
it
may
be
necessary
to remoye
two
wires
so
that
the
mesh
are
full
dia-
monds
from
top
to
bottom.
Tension
strip
hooks
can
be
bent
down
to.secure
the
chain
link
fabric
once
final
tension
has
been
achieved.