USE E AND D CAR RE GU UIDE E __________ _________________________ __________________________ WALL L FOUN NTAIN Queestions, prroblems, missing m paarts? Please call Kenro oy Home Customerr Service at a (904) 6442-4340 or send s emaiil to custoomerservice@kenro oyhome.ccom NROYHO WWW.KE W OME.
MOD DEL: 50048BRZ/5 50052ST TST ASSE EMBLY INSTRU UCTIONS READ AND SAVE E THESE INSTRUCT TIONS Read innstructions all a the way through t prioor to assem mbly. This fouuntain shouuld take apprroximately 15 minutes to assemble. Make suure all partss are firmly tightened. TOOLS S REQUIRE ED: Level, P Pencil, Philllips screwdriver.
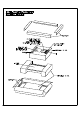
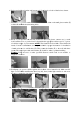
FOUNT TAIN ASSE EMBLY 1. Rem move roof frrom the fou untain body,, then remov ve water difffuser (D) fr from top of the t founntain body. 2. Rem move plasticc cover from m the water diffuser (D D) and replacce the waterr diffuser (D D) back intoo the top of the t fountain n body. 3. Attacch LED clusster assembly (C) brackket into the metal slot on o the backk of fountain n body as shhown. 4. Feedd cord from m LED clustter assemblyy (C) behind d metal braccket (follow wing the water tubee). 5.
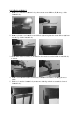
6. Peel paper backiing from thee wall spaceer pad (J) an nd apply to back of thee basin as sh hown. p on the t wall. Usse a level to o draw a lin ne on the waall, place bracket (E) 7. Locaate desired position to thee wall and mark m three mounting m hooles. 8. Based on your specific s walll material ((wallboard, sheet rock, plaster, conncrete etc.
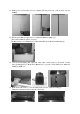
11. Placce the pumpp (A) into th he basin, maake sure thee suction feeet of pump ((A) are attached to the back of the basin as sh hown. 12. Aliggn bracket (E) ( on the wall w with braacket on thee back of fo ountain, hanng fountain body b secuurely on braacket (E) atttached to thhe wall, mak ke sure the bracket b on tthe back of founntain is on the t top of th he wall braccket (E). 13.
14. Placce power coord inside cord c cover channel (G G) and presss cord coveer securely onto the channnel. w enough water to coompletely su ubmerse pu ump (A). 15. Fill the basin with (The basin holdss 0.85 gallons of water .) (Disttilled water is recommeended to redduce mineraal deposits and a bacteriaa build-up.) 16. Tesst the waterr running an nd adjust thhe water vaalve on the pump (A) if needed.
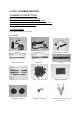
18. Joinn the connecctor from pu ump (A) to transformerr (B) and sccrew the capp to connectt the partts tightly toggether. ket and yourr new fountaain is ready for use! 19. Plugg power corrd into sock Troublee shooting:: 1. If youur fountain does d not worrk, check pluug at the soccket. Make su ure the plug is fully and properly inserted into the wall outlet. 2. Next ccheck to makke sure the outlet is powereed. 3.