
Installation Guide
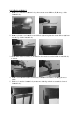
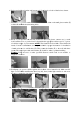


6. Peel
7. Loc
a
to th
e
8. Base
local
to h
o
wate
r
of a
n
scre
w
War
n
dang
e
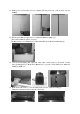
9. Fee
d
light
the c
a
10. Ins
e
paper back
i
a
te desired
p
e
wall and
m
d on your
s
hardware
s
o
ld the wei
g
r
). Consult
n
chors/scre
w
w
s. The an
g
n
in
g
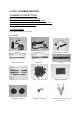
: Usin
g
erous cond
i
d
pump (A)
cord is
b
e
h
ap to conn
e
e
rt the pum
p
i
ng from th
e
p
osition on
t
m
ark three
m
s
pecific wa
l
s
tore or pr
o
g
ht of your
f
local hard
w
w
s for wall
g
led part of
t
g
incorrect
i
tion.
power cor
d
h
ind metal
b
e
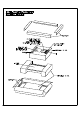
ct the parts
p
connecto
r
e
wall spac
e
t
he wall. U
s
m
ounting h
o
l
l material
(
o
fessional t
o
f
ountain (
N
w
are store
o
bracket (E
)
t
he wall br
a
or under
d
through t
h
b
racket (R
e
tightly tog
e
r
(K) into t
h
e
r pa
d
(J) a
n
s
e a level t
o
o
les.
(
wallboard,
o
determin
e
N
OTE: Thi
s
o
r professio
n
)
. Then sec
u
a
cket (E) s
h
specified
f
h
e hole in
b
e
f: Step #4)
,
e
ther.
h
e hole of p
u
nd
apply to
o
draw a li
n
sheet rock,
e
the appro
p
s
fountain i
s
n
al for pro
p
u
re the bra
c
ould be on
t
f
asteners c
o
b
ack of the
,
then join
t
u
mp (A).
back of th
e
n
e on the w
a
plaster, co
n
p
riate anch
o
s
about 30
l
p
er instruct
i
c
ket (E) to
t
he top wh
e
o
uld result
fountain b
o
t
he light co
n
e
basin as s
h
a
ll, place
br
n
crete etc.)
,
o
r type for
l
bs. after fi
l
i
ons for in
s
the wall w
i
e
n installin
g
in an uns
ody. Make
nnectors a
n
h
own.
acket (E)
,
consult
3 pieces
l
led with
tallation
i
th three
g
.
table or
sure the
n
d screw