
Installation Guide
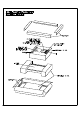
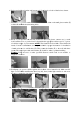

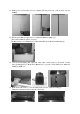


11. Pla
c
the
12. Ali
g
sec
u
fou
n
13. To
i
the
sur
e
inst
sec
u
c
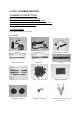
e the pum
p
b
ack of the
g
n bracket
(
u
rely on br
a
n
tain is on
t
i
nstall the
a
wall and
m
e
the flat si
d
alling the
a
u
re the cor
d
p
(A) into t
h
basin as s
h
(
E) on the
w
a
cket (E) at
t
t
he top of t
h
a
nchors (M)
m
ark two m
o
d
e of the a
n
a
nchors (M
)
d
cover cha
n
h
e basin, m
a
h
own.
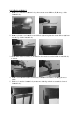
w
all with br
a
t
ached to t
h
h
e wall
b
ra
c
for the cor
d
o
unting hol
e
n
chor is flu
)
, please us
e
n
nel to the
w
a
ke sure th
e
a
cket on th
e
h
e wall, ma
k
c
ket (E).
d cover ch
a
e
s. Gently
t
u
sh with th
e
e
the moun
t
w
all with t
w
e
suction fe
e
e
back of f
o
k
e sure the
b
a
nnel (G), p
t
ap or press
e
wall. If y
o
t
ing screws
w
o screws (
M
e
t of pump
(
o
untain, han
b
racket on
t
lace the co
r
the tip int
o
o
u encount
e
(M) witho
u
M
).
(
A) are att
a
n
g fountain
b
t
he back of
r
d cove
r
ch
a
o
the dryw
a
e
r a wall st
u
u
t the anch
o
ched to
b
ody
a
nnel on
a
ll, make
u
d while
o
r. Then