You should have received the following parts in the package. Please ensure that all parts are accounted for.
JOURNEY FLOOR FOUNTAIN Care and Instruction Manual
51031SLCOP ASSEMBLY INSTRUCTIONS Thank you for purchasing a Kenroy Home water feature, you are now only minutes away from filling your home or outdoor living space with peaceful displays. Our guarantee backs all of our water features, please do not hesitate to contact our Customer Support Team for resolutions to any parts or installation concerns. CUSTOMER SUPPORT TEAM For any additional questions or concerns please contact our Customer Support Team: 904-642-4340 @KenroyHome customerorders@kenroyhome.
1031SLCOP ASSEMBLY INSTRUCTIONS Please reference the separate parts list and ensure that all pieces are included in the package prior to assembly. SUGGESTED TOOLS NOT SUPPLIED PHILLIPS SCREWDRIVER More than one person may be required to complete the assembly of this product. To protect the finish, place all parts on a soft surface when unpacking. We recommend using this fountain against a wall. When assembling ensure that all parts are firmly tightened.
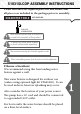
51031SLCOP ASSEMBLY INSTRUCTIONS Unscrew parts 2 x F and 2 x G from lower fountain body (B). Use 2 x F and 2 x G to secure plate (C) to lower fountain body (B). B C G F Loosen 2 x H. Insert pins into holes, tighten 2 x H.
51031SLCOP ASSEMBLY INSTRUCTIONS Feed rubber hose through hole and attach pump (K) to rubber hose. Water flow control valve Rubber hose K Run pump cord (K) through notch in back of basin (D), use 2 x F and 2 x G to secure the fountain body (B) to basin (D).
51031SLCOP ASSEMBLY INSTRUCTIONS Optional Accessory (Model# LTAS1000): Secure light assembly to upper fountain body (A) with two screws (included with light assembly kit). Install bulb in socket and tighten the screws. NOTE: This fountain will be rated for indoor use only if you add this light to the fountain. Bulb Socket Light assembly (Model# LTAS1000) A Light switch Fountain body FINAL STEPS Fill the basin (D) with distilled water between the fill lines. Place pump access door (E) into basin (D).
51031SLCOP ASSEMBLY INSTRUCTIONS PUMP SAFETY & TROUBLESHOOTING To clean the pump Unplug the pump from the electrical outlet. Use a small soft brush or place it under a water stream to remove debris. To keep water clean Periodically change water to prevent algae buildup. Tube Rotor/Impeller Impeller cover Back cover Pump housing Suction cup Front cover Flow regulator If the pump fails to run: • Check circuit breaker, or try a different outlet. • Check tubing for kinks and obstructions.
51031SLCOP ASSEMBLY INSTRUCTIONS WATER FEATURE WARNINGS & TROUBLESHOOTING • Splashing may occur when the fountain is first turned on, protect surrounding surfaces as needed. Do not place the water feature on or near any surface that can be damaged by water. • Distilled water is recommended to reduce mineral deposits, bacteria build up and algae that may damage the water feature basin and pump. • To reduce the risk of electrical shock, always disconnect the power supply before working with the water feature.
51031SLCOP ASSEMBLY INSTRUCTIONS FREQUENTLY ASKED QUESTIONS What should I consider when selecting a water feature? In addition to your personal style tastes, be sure you have an area for your water feature that can be safely exposed to water, as splashing can occur. Also take into consideration what a water feature can add to your environment: the sound of flowing water or decorative lights.
51031SLCOP ASSEMBLY INSTRUCTIONS FREQUENTLY ASKED QUESTIONS CONTINUED How much water do I need to keep in the water feature? Where possible in our water features, we have included fill lines to help you visualize the water level required for proper function. If your water feature does not include fill lines, please check the instruction manual for water capacity.
51031SLCOP ASSEMBLY INSTRUCTIONS FREQUENTLY ASKED QUESTIONS CONTINUED How do I change my pump speed? Depending on the type of pump, you will need to either move the slider or turn the knob. Flow control valve Maximum Minimum How do I clean my pump? 1. Disconnect the power supply and then remove pump cover/filter. 2. Gently pull impeller/rotor assembly out of the pump housing 3. Rinse the impeller/rotor assembly and the cavity with clean water. 4.
www.kenroyhome.