
Technical data


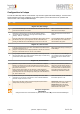

Configuration in 8 steps
To make an initial setup with the ControlCenter only the three register-tabs "Base-Settings - User Accounts -
Sensor-Devices“ have to be configured. On the other registers you find the functions for operation and
remote control of the configured AlarmManager.
No
Step
Comment
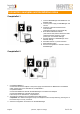
Register tab „Base settings“
Register tab „Base settings“
Register tab „Base settings“
1
Connect the AlarmManager via LAN cable to the PC. The yellow LED on the
LAN connector indicates a connection.
With 1:1 LAN connection via network
cable use crossover-adapter
2
Start Kentix ControlCenter and connect with the default IP-address
192.168.100.222 to AlarmManager. To change the IP settings, select
„Settings - Network...“ in the menu.
Make sure that your PC is in the same
network.
3
Enter the mobile data according to the used SIM card. When a PIN is used for
the SIM card, first „Save“ your configuration with the correct PIN before
inserting the SIM card into the AlarmManager to avoid a lock of the card.
You can disable the PIN of your SIM card
with a mobile phone. The entries in the
software will then be ignored.
Register tab „User accounts“
Register tab „User accounts“
Register tab „User accounts“
4
In the first user account enter your name, e-mail-address and mobile number
in international notation (+49 ...).
Assign an user password and a 4-digit Operator-PIN. The first user account is
always the "Administrator Account" and can not be deleted.
With a right mouse click you can test your
mobile settings.
5
Using a KeyPad the PIN also applies to the operation via the keyboard. Note
that the KeyPad allows only 4-digit passwords with the digits 1-9. When using
an RFID card enter the RFID card number.
In the operation of the AlarmManager via
your mobile phone the transmitted phone
number will be check in addition to the
password.
Register tab „Sensor-Devices“
Register tab „Sensor-Devices“
Register tab „Sensor-Devices“
6
Press the "+" key to teach-in new devices such as MultiSensor or KeyPad.
BASIC: A new window opens and all accessible devices appear as soon as
you press the „learn button“ at the device. After all devices are available in the
list press the "Save" button.
PRO: A windows opens where you can select RF- or LAN-components.
Selecting RF starts the scanning process as described in the BASIC-Version.
LAN-components have to be configured by entering the correct IP-address in
the „device address“-field.
When you run the teach-in process for
RF-devices a closed wireless network is
created, similar to an encrypted wireless
PC network. Make sure that the devices
are located in radio range close to the
AlarmManager / MultiSensor-LAN-RF.
7
In the list of devices you can already test functionality of the device. With a
"right click" you get a choice of test functions. Let the selected MultiSensor
LED flash and give the device a name.
Via the test functions you can switch also
the external outputs on or off.
8
Finally change the alarm settings and alarm assignments (Armed-Active /
Always-Active) according to your needs.
Armed-Active: Alarms are only triggered,
when the system is in armed state.
Always-Active: Alarms are always
triggered, independent of the armed/
disarmed state of the system
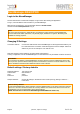
Saving the configuration
IMPORTANT!
Changes made in the ControlCenter only become active when being saved into the AlarmManager.
Saving the configuration
IMPORTANT!
Changes made in the ControlCenter only become active when being saved into the AlarmManager.
Page 10 ! ! ! ! (08-2014, subject to change) kentix.de