
Technical data
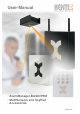


AlarmManager-BASIC/PRO
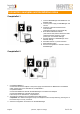
Login to the AlarmManager
The PC-Client Kentix ControlCenter displays a Login-screen after starting the Application.
To log in, enter IP-Address and user data for your AlarmManager.
With the first commissioning, use the default IP-Address 192.168.100.222
and the user data admin/password to log in.
Changing IP-Settings
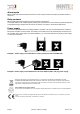
Connection with PC:! Connect the LAN interface of the AlarmManager via the supplied LAN cable to your
! ! ! PC. Note that a direct connection needs the supplied crossover adapter. Set the IP
! ! ! address of your PC for example to "192.168.100.123".
Note that changes in the IP-Settings get active directly after applying.
A wrong configuration can set the AlarmManager to a state where it is only accessible via direct connection.
Default settings / Factory defaults
Default IP-address: ! 192.168.100.222
Subnet mask:! ! 255.255.255.0
User:! ! ! admin
Password:! ! password
Setup IP-Address:! Change IP settings in the Kentix Control center opening „Settings - Network...“
! ! ! in the menu.
NOTE
Only users with the permission „Administrator“ are allowed to make changes to the AlarmManager.
For users without the admin permission, only the tab pages „Dashboard - Logbook - Monitoring“ are
available for viewing purposes.
IMPORTANT!
If you forgot the IP-address of the AlarmManager connect it with the crossover cable directly to the LAN
port of your PC. Open the Network settings in the ControlCenter to show the current IP address. You may
have to disable the firewall and also additional network cards of the PC.
Reset to factory defaults
To reset the AlarmManager to factory defaults, press the RESET Button on the back of the board and hold
it down for 5 seconds. The device will be set to factory defaults and restarts. After about 30 seconds the
AlarmManager can be accessed again via the default settings.
(NOTE: This function is valid for all AlarmManager-BASIC/PRO from 01/2014 on)
Page 9 ! ! ! ! (08-2014, subject to change) kentix.de