COMPACT Hi-Fi COMPONENT SYSTEM CLX-70 INSTRUCTION MANUAL Declaration of Conformity with regard to the EMC Directive 2004/108/EC Manufacturer: Kenwood Corporation 2967-3 Ishikawa-machi, Hachioji-shi, Tokyo, 192-8525 Japan EU Representative's: Kenwood Electronics Europe BV Amsterdamseweg 37, 1422 AC UITHOORN, The Netherlands © B60-5850-08/00 (E, X)
Before applying power ¤ Caution : Read this page carefully to ensure safe operation. Units are designed for operation as follows. Australia ........................................................... AC 240 V only Europe .............................................................. AC 230 V only Safety precautions WARNING : TO PREVENT FIRE OR ELECTRIC SHOCK, DO NOT EXPOSE THIS APPLIANCE TO RAIN OR MOISTURE.
5. Ventilation – Slots and openings in the cabinet are provided for ventilation and to ensure reliable operation of the product and to protect it from overheating. Do not block any ventilation openings. Install in accordance with the manufacturer’s instructions. The openings should never be blocked by placing the product on a bed, sofa, rug, or other similar surface.
Before use Contents Caution : Read the pages marked ¤ carefully to ensure safe operation. Before applying power...................................2 Safety precautions ......................................................................2 IMPORTANT SAFETY INSTRUCTIONS ............2 Before use .......................................................4 Connections ....................................................6 About MP3 and WMA .....................................8 About USB device ...................
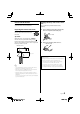
How to read this manual Most of the functions are designed to be able to operate from the remote control unit. Preparing the remote control unit Changing the battery of the remote control unit Use a commercially available button battery (CR2025). 1 Pull the battery sheet out from the remote control unit to the direction of the arrow. Insert something narrow like a paperclip into the hole 1 and pull out the battery tray.
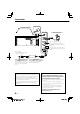
Connections FM indoor antenna AM loop antenna Connect a subwoofer (SW-40HT (separately available), etc.) to the [SUB WOOFER PRE OUT] terminal on the rear of the main unit. Connect the audio output of the VCR, etc. to the [AUX IN] terminals on the rear of the main unit. To AC wall outlet • Insert the plug firmly all the way into the AC wall outlet. Power cord Two types of power cords are provided. Select the one designed for the country in which this unit is used.
Connecting the FM antenna Connecting the iPod dock adapter 1 Connect the lead to the [FM 75Ω] terminal. 2 Find the location that gives the best reception. 3 Secure the antenna as high up as possible. 1 Insert the Dock adapter into unit. • The antenna supplied with the system is a basic antenna for indoor use. For stable signal reception, the use of an outdoor antenna (commercially available) is recommended. Disconnect the indoor antenna first before connecting an outdoor antenna.
About MP3 and WMA The playable MP3/WMA file (hereafter called Audio file) and the media format have the following limitation. The Audio file, which is not conforming to the specification, may not play normally.
About USB device Handling discs Notes on use of the USB device Handling precautions This unit can play audio files stored in the flash memory and digital audio player that have a USB port (these devices are referred to as USB devices in this document). Hold a CD taking care not to touch the played surface. (The side without the printed label is the playback side.
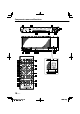
Component names and functions 2 1 3 4 7 8 9 10 11 12 5 6 13 14 22 1 2 3 4 21 5 6 20 7 8 9 19 10 18 11 12 17 13 16 14 15 10 CLX-70
1 button 1 13 DISPLAY button To switch the system on or to standby mode. To change the time display for CD. To change the information display for audio files. To change the display for Radio Data System. To change the display for clock. [STANDBY] indicator Red lighting: Ordinary standby mode Orange lighting: Timer standby mode 2 3 2 3 Source buttons TUNER/CD/USB/SD/iPod/D.AUDIO/AUX button 14 To select the source you want, or to turn the system on to the selected source.
Basic function Switching the system on Sound control Press , TUNER, CD, USB, SD, D.AUDIO, iPod, AUX button. The [STANDBY] LED will go out. The system will switch to the last selected source or the selected source. The sound control system feature enables you to enjoy special sound effects; 3D surround effect, preset equalizer settings and bass enhancement, providing the best music reproduction. To switch on DTS Envelo Speaker settings Switching the system to standby mode Press button.
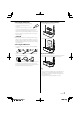
Using the CD/USB device/SD card Preparation Inserting an SD card Inserting a disc 1 Press the 1 Press CD button. 2 2 Insert the SD card into the SD card slot until it clicks. Insert a disc into the disc slot with the label side facing forward. button to select standby mode. Insert the SD card so that the label side faces up and the side with a cut comes on the right. 3 Press SD button. The total album number and total file number will appear on the display.
Using the CD/USB device/SD card Playing a CD/ audio file 4 Press 6 button to start playback. The track/file number and elapsed playing time of the current track/file appear on the display. Repeat steps 2 to 3 to select and store other desired tracks/files in this way. The icon "PGM" appears on the display. 5 Press 6 button to play the programmed tracks/files.
Repeat play 2 You can play the current track/file/album or the whole disc/audio file repeatedly. To record a single track: Play the track to be recorded. Press REPEAT button in play or pause mode. Every time the button is pressed, the repeat play changes in the following order: For CD : Repeat mode Repeat a single track Repeat all the tracks *1 Repeat off Icon "REP." "REP. ALL" — For audio file : Repeat mode Repeat a single file Repeat one album *2 Repeat all the files *1 Repeat off Icon "REP." "REP.
Using the radio Tuning in radio stations Manual preset 1 Press TUNER button to select the desired waveband: FM or AM. You can store up to 30 for FM and 10 for AM radio stations in the memory. When a preset radio stations selected, the preset number appears on the display. 2 Press and hold 4 or ¢ button to tune in to the desired frequency. 1 Press TUNER button to select the desired waveband: FM or AM. 2 Press 4 or ¢ button to tune in to the desired frequency.
Using Radio Data System Program type table Radio Data System is a system that transmits useful information (in the form of digital data) for FM broadcasts along with the broadcast signal. Tuners and receivers designed for Radio Data System reception can extract the information from the broadcast signal for use with various functions, such as automatic display of the station name.
Using the iPod/iPhone Using the D.AUDIO Inserting an iPod/iPhone Playback of Digital Audio Player 1 Connect a iPod/iPhone to the iPod applied part. 2 Kenwood digital audio player can be connected to play audio files in it. Press iPod button. The icon "iPod" appears on the display. 1 Connect an the player. Connect a Kenwood digital audio player to the [D.AUDIO] connector using an optional cable or adapter. Also read the instruction manual for the connected component.
System setup Adjusting the display brightness (BACKLIGHT) The brightness of the display backlight can be adjusted and how the display backlight and illuminations of this unit are lit can be selected. Setting Auto Power Save (A.P.S.) A.P.S. stands for Auto Power Save, which is the function that switches this unit OFF when it has not been controlled for more than 30 minutes while its power is ON and the CD and other inputs are in stop mode. 1 Press BACKLIGHT/CONTRAST button. 1 Press TIMER SET button.
Clock/timer operation Clock setting Timer setting 1 Press TIMER SET button. 2 Press MULTI CONTROL C or D button to select "CLOCK" and press ENTER button. "CLOCK SETTING" appears on the display. The system can switch on to CD, USB, SD, TUNER or iPod automatically at a preset time, serving as an alarm to wake you up. 3 Press ENTER button. The hour indication will start flashing. 4 Press MULTI CONTROL A or B button to set the hours and press ENTER button. The minute indication starts flashing.
8 Switch the system to standby mode. The STANDBY/TIMER indicators also light orange. ⁄ • When reached the preset timer, the selected source will play or switch to standby mode after the timer has been activated. • The MULTI CONTROL C or D button can be used to move across the setting items. To activate/deactivate the timer Press TIMER ON/OFF button. If activated, the icon "TIMER" appears on the display. ⁄ • The timer off will not be activated if the starting and stopping time are the same.
In case of difficulty Cannot play. Resetting the Microcomputer The microcomputer may malfunction (unit cannot be operated, or shows an erroneous display) if the power cord is unplugged while the power is ON, or due to some other external factor. If this happens, execute the following procedure to reset the microcomputer and return the unit to its normal operating condition. When the power is off (standby mode), press the [AUX] and [4] buttons on the main unit until "FACTORY RESET " is appears.
General information Maintenance Cleaning the cabinet • Use a soft cloth slightly moistened with a mild detergent solution. Do not use a solution containing alcohol, spirits, ammonia or abrasive. Cleaning discs • When a disc becomes dirty, clean it with a cleaning cloth, wipe the disc from the center out. Do not wipe in circular motion. • Do not use solvents such as benzene, thinner commercially available cleaners, or antistatic spray intended for analogue records.
Specifications Amplifier section Rated output power ..............................20 W + 20 W (1 kHz, 10% T.H.D., at 8 Ω) D.AUDIO/ AUX (Sensitivity/ Impedance) .... 500 mV/10 kΩ SUBWOOFER PREOUT (Level/ Impedance) ..........2 V/10 kΩ Tuner section FM tuner section Tuning frequency range......................87.5 MHz ~ 108.0 MHz AM tuner section Tuning frequency range...........................531 kHz ~ 1,602 kHz CD player section Laser .....................................................................