COMPACT HI-FI COMPONENT SYSTEM K-821DV INSTRUCTION MANUAL Europe only Decla Declaration of Conformity with regard to the EMC Directive 2004/108/EC Manufacturer: Kenwood Corporation 2967-3 Ishikawa-machi, Hachioji-shi, Tokyo, 192-8525 Japan EU Representative’s: Kenwood Electronics Europe BV Amsterdamseweg 37, 1422 AC UITHOORN, The Netherlands TM © B60-5815-08/01 (E, X, K) GVT0295-001B B60-5815-08_01_GVT0295-001B_K-821DV_En.indb 1 10.1.
Safety Precautions THE LIGHTNING FLASH WITH ARROWHEAD SYMBOL, WITHIN AN EQUILATERAL TRIANGLE, IS INTENDED TO ALERT THE USER TO THE PRESENCE OF UNINSULATED “DANGEROUS VOLTAGE” WITHIN THE PRODUCT’S ENCLOSURE THAT MAY BE OF SUFFICIENT MAGNITUDE TO CONSTITUTE A RISK OF ELECTRIC SHOCK TO PERSONS. THE EXCLAMATION POINT WITHIN AN EQUILATERAL TRIANGLE IS INTENDED TO ALERT THE USER TO THE PRESENCE OF IMPORTANT OPERATING AND MAINTENANCE (SERVICING) INSTRUCTIONS IN THE LITERATURE ACCOMPANYING THE APPLIANCE.
Safety Precautions IMPORTANT SAFETY INSTRUCTIONS Caution: Read this page carefully to ensure safe operation. Read These Instructions 5. Ventilation – All the safety and operating instructions should be read before the product is operated. – Slots and openings in the cabinet are provided for ventilation and to ensure reliable operation of the product and to protect it from overheating. Do not block any ventilation openings. Install in accordance with the manufacturer’s instructions.
Safety Precautions IMPORTANT SAFETY INSTRUCTIONS 9. Lightning 16. Wall or Ceiling Mounting – Unplug this apparatus during lightning storms or when unused for long periods of time. – This product should be mounted to a wall or ceiling only as recommended by the manufacturer. 10. Overloading – Do not overload wall outlets, extension cords, or integral convenience receptacles as this can result in a risk of fire or electric shock. 11.
Safety Precautions Notes: Item 7 is not required except for grounded or polarized equipment. Note to CATV system installer U.S.A. only This reminder is provided to call the CATV system installer’s attention to Article 820-40 of the NEC that provides guidelines for proper grounding and, in particular, specifies that the cable ground shall be connected to the grounding system or the building, as close to the point of cable entry as practical.
What the K-821DV Can Do Various recording formats Disc Playback As well as music CDs, VCD/SVCD, DVD Video, and DVD VR, the system can also play discs containing audio files (MP3/WMA), movie files (ASF/MPEG1/MPEG2/DivX), and still image files (JPEG). High-quality sound reproduction of iPod music iPod Playback Function With this system, the amplifier receives digital signals of iPod music as input. This realizes the reproduction of high-quality sound minimizing the deterioration of sound quality.
Contents Before Using the System Be sure to read these precautions. Safety Precautions……………………… 2 Accessories ………………………………… 8 Installing the System ……………………… 9 Connecting the System ………………… 10 Component Names and Functions …… 16 How to Use This Manual ………………… 20 Basic Operation ………………………… 22 Important Information ………………… 24 To ensure safety, read the items by this mark carefully. Procedures by Input Source P.29 This chapter explains how to connect and use the system with the different input sources.
Accessories Check that all accessories are present in the package. AM loop antenna (1) FM indoor antenna (1) Remote control (1) Batteries for Remote control (R03: 2) RC-RP0601E Speaker cords (2 m: 2) Video cord (1) Core filter (1) If any accessories are missing, or if the unit is damaged or fails to operate, notify your dealer immediately. If the unit was shipped to you directly, notify your shipper immediately.
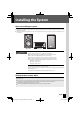
Installing the System Notes on installing the system z Always install the system on a flat, stable surface. When installing the system on a stand of some sort, be sure to check the strength of the stand. z The magnets used in the speakers may cause color irregularities on TV or PC screens. Do not set up the speakers too close to a TV or PC. Left speaker CAUTION Main unit Right speaker Observe the following cautions when installing the system.
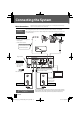
Connecting the System Main Connections Caution for Connection Ensure that all the cords are securely connected. Loose or incomplete connections may result in noise interference or no sound at all. Do not plug the AC power cord into an AC wall outlet until all the connections are completed. Before disconnecting any cords or cables, always turn the system off and unplug the power cord from AC wall outlet. AM loop antenna Push into the slot. FM indoor antenna 1 Connect to [FM75Ω].
Connecting the System Microcomputer malfunctions If the system is connected correctly and still does not operate normally or shows display errors, reset the microcomputer. (P.103) Connecting the AM loop antenna The antenna supplied with the system is for indoor use. Place it as far as possible away from the main unit, your TV set, the speaker cords and the power cord and point it in the direction that gives the best reception.
Connecting the System Connecting TV Monitor Using video cable Connect the video input terminal on a TV monitor to the [VIDEO MONITOR OUT] terminal on the rear panel of the main unit using the video cord supplied with the system. R R L SUB WOOFER PRE OUT L REC OUT D.AUDIO IN PLAY IN DIGITAL OUT SPEAKERS Video input TV monitor Using HDMI cable Connect the HDMI terminal on a TV monitor to the [HDMI MONITOR OUT] terminal on the rear panel of the main unit. R R L SUB WOOFER PRE OUT L REC OUT D.
Connecting the System Connecting Other Accessories (Commercially Available Units) z When connecting a related system component, read the instruction manual that comes with the component too. z Ensure that all the cords are securely connected. Loose or incomplete connections may result in noise interference or no sound at all. iPod Attach the Dock adapter supplied with the iPod to the system.
Connecting the System Connecting Other Accessories (Commercially Available Units) D.AUDIO IN Connect digital audio players to the [D.AUDIO IN] terminal on the rear panel of the main unit. z If you connect a Kenwood player that supports digital audio link using the dedicated cable PNC-150 (sold separately), you can control the player from the main unit and the remote control. (P.66) Other portable players can be connected using a 3.5 mm stereo mini-plug cable (commercially available).
Connecting the System DIGITAL OUT (OPTICAL)(PCM/ Bitstream signals) Connect the optical digital input terminals on a digital audio component to the [DIGITAL OUT (OPTICAL)] terminal on the rear panel of the main unit. Digital audio component R R L SUB WOOFER PRE OUT L REC OUT D.
Component Names and Functions Main unit Cover Open the cover before attaching an iPod or USB device. USB USB iPod connector (P.13, 60) USB port (P.13, 62) LDisc tray open/close (P.23, 30) Power (P.23) Turns the system on or off (Standby). STANDBY/TIMER indicator Red: Lights in normal Standby mode. Orange: Lights in Timer Standby mode. E/BAND (P.23) F/TUNING MODE (P.55) INPUT SELECTOR (P.23) G/I, J/H (P.55, 61, 63, 67) Disc tray (P.23, 30) Dial lighting (P.85) VOLUME (P.22) Display (P.
Component Names and Functions s Displays shown in this manual may differ from the actual displays. Display AUTO Lights during auto tuning. Turns off during manual tuning. (P.55) TUNED Lights when you are tuned to the radio station. (P.55) ST. Lights when you are receiving the stereo broadcast. (P.55) RDS Lights when the RDS broadcast is received. (P.58) Lights in folder playback mode and DVD VR playback mode. (P.63) Lights in program playback mode. (P.42) Lights in random playback mode. (P.
Component Names and Functions Remote control Sets the timer. (P.80, 84) Disc tray open/close (P.23, 30) Uses for several settings. Switches the information shown on the display. (P.38, 55, 58, 61, 63, 67) Numbers Selects tracks or radio stations. (P.32, 52-54, 57) Remote control keys with the same names as keys on the main unit have the same functions as the main unit keys. Turns the unit on or off (Standby). (P.23) Turns the system on or off (Standby).
Component Names and Functions Using the remote control After plugging the main unit into an AC wall outlet, press the power [K] key on the remote control unit to turn the system on. After the system powers up, press the key for the function you want to use. Point the remote control at the remote sensor when using it. Approx. 6m z The remote control may not operate correctly if direct sunlight or light from a high-frequency fluorescent lamp (such as an inverter type) is shining on the remote sensor.
How to Use This Manual Operation procedure While this system can be controlled from either the remote control or the main unit, the explanations in this manual primarily describe operation procedures using the remote control. CD/DVD This section explains how to play a disc. As well as normal playback, you can use folder playback, random playback, repeat playback and program playback. Playing a Disc Insert and play the disc.
How to Use This Manual Operation icons Explanations of main unit procedures Explains the procedure for CDs. Explains the procedure for the radio. Explanations of remote control procedures Explains the procedures for iPods. Related functions that may also be helpful Explains the procedures for USB devices. D.AUDIO Related Information Adjusting the Digital Audio Player Input Level R P.68 Audio Settings R P.69 onwards Explains the procedures for external components.
Basic Operation This section describes some basic procedures for using the system, such as tuning the radio and playing audio/video from a CD/DVD, iPod, USB device, a digital audio player. Preparations Check the connections. (P.10-15) Have the remote control ready. (P. 19) 2 2 1 1 3 Adjusting the volume level Lowers the volume 3 Increases the volume Increases the volume Lowers the volume Mute z Press this key again to unmute the sound. 22 K-821DV B60-5815-08_01_GVT0295-001B_K-821DV_En.
Basic Operation 1 Turn the system on (off ). z On remote control [D.AUDIOE], [TUNER/ BAND], [CD/DVDD], [iPodE], [USBE], [D-IN], [AUX] key also turn on the power. z Pressing the power [K] key when the system is on turns it off (Standby mode). 2 Insert a disc. To use other components for playback, proceed to step 3. Open the tray. Insert a disc. Close the tray. Insert a disc with the label side upwards. Press the [L] key. 3 Start playback. Press the Play/Pause key for the input source.
Important Information Supported Media Media Icon in this manual USB flash memory USB Explanation z Never connect any other device besides USB flash memory or a USB mass storage class compliant digital audio player to USB] terminal. Note that Kenwood will not be held the [ liable for any losses related to malfunction, damage, or data loss due to connection of any other type of device.
Important information Precautions when writing data to media z Discs recorded in Packet Write mode and CDs recorded in UDF (Universal Disc Format) cannot be played. z When writing data to a disc, always close the session or finalize the disc. The disc may not play properly if you do not close the session or finalize the disc. z Depending on the specifications of the writing software used, the recorded folder names and file names may not be displayed correctly.
Important Information Supported Files On this system, you can play the audio file types (MP3, WMA, AAC), movie file types (ASF, MPEG1/MPEG2, DivX), and still image file types (JPEG). MP3 files (disc/USB) File format: MPEG 1 Audio Layer 3 MPEG 2 Audio Layer 3 MPEG 2.5 (MPEG 2 Audio Layer 3 Lower sampling rate) Extension: .mp3 Sampling frequency MPEG 1 Audio Layer 3: 32 / 44.1 / 48 kHz MPEG 2 Audio Layer 3: 16 / 22.05 / 24 kHz MPEG 2.5: 8 / 11.
Important Information DVD Disc formats ISO9660, Joliet UDF Bridge(UDF1/ISO9660) Number of file limits Max. files/folders: 4000 in total CD/ Max. folders: 99 DVD Files per folder: 999 FAT16 USB FAT32 Max. root folders: 65534 Max. sub-folders: 512 Max. root folders: 65534 Max. sub-folders: 65536 Maximum number of displayable characters File names: 28 Folder names: 28 disc Tag display (Title/Album/Artist): 31 Available ID3 tags: 1.0/ 1.1/ 2.2/ 2.
Important Information Region codes Every player of this model has a certain region code assigned to it based on the country where the player is used. When the player is used to play back DVD VIDEO discs, it can only play the DVD VIDEO discs carrying the region codes matching the region code of the player. The region code for this player is described on the rear panel of the player.
Procedures by Input Source This chapter explains the operation procedures for each input source. For information on the sound and video quality settings and component settings regardless of the input source, see "Audio Settings" (P.69) and "Component Settings" (P.79). If an error is displayed or a problem arises, see "Maintenance" (P.97).
CD/DVD This section explains how to play a disc. As well as normal playback, you can use folder playback, random playback, repeat playback and program playback. Playing a Disc Insert and play the disc. z If a disc is already inserted, simply press the [CD/DVDD] key to turn the system on and begin playback. 1 Press the [L] key to open the disc tray and then insert the disc. z Insert the disc that the labeled side faces upwards and the disc sits snugly in the tray.
CD/DVD Display while playing CD VCD/SVCD Disc type Track number Playing time DVD VIDEO/DVD VR Chapter number Disc type Track number Playing time MP3/WMA/ASF/MPEG1/MPEG2/DivX Playing time Track number (File number) Playing time z You can change the display content by pressing the [DISPLAY] key. (See P.38) z For the track number (file number) while playing a file, see P.37. On-screen guide The following icons are displayed on the TV screen as the operational guidance.
CD/DVD Operations during disc playback Specifying a track/chapter number CD/VCD(PBC off )/SVCD(PBC off )/DVD VIDEO/DVD VR/MP3/WMA/JPEG/MPEG1/MPEG2 To play the 3rd track/chapter, press the [3] key. To play the 17th track/chapter, press the [ 10], [1], and then [7] key. To play the 123rd track/chapter, press the [ 10], [ 10], [1], [2], and then [3] key. Pausing and playback CD/VCD/SVCD/DVD VIDEO/DVD VR/MP3/WMA/JPEG/MPEG1/MPEG2 Press the [CD/DVD ] key. z Press the [CD/DVDD] key to restart the playback.
CD/DVD Related Information •zRPage Audio XX Settings R P.69 onwards • RPage XX Skipping tracks/chapters, skipping back, skipping to the start CD/VCD/SVCD/DVD VIDEO/DVD VR/MP3/WMA/JPEG/MPEG1/MPEG2 To skip to the next track/chapter: Press the [H] key. To return to an earlier track/chapter: Press the [G] key 2 or more times in succession. To return to the beginning of a track/chapter: Press the [G] key once. Playing in slow motion DVD VIDEO/DVD VR/VCD/SVCD Press the [I] or [J] key while playback is paused.
CD/DVD Selecting from the Menu When the disc contains the menu screen, display the menu screen and play the disc. DVD VIDEO and VCD/SVCD 1 Press the [TOP MENU] or [MENU] key. The menu screen of the disc is displayed. 2 Press the [A], [B], [C], and [D] keys or number keys to select the title to play. z For VCD/SVCD, only the number keys are available. 3 Press the [ENTER] key. z For VCD or SVCD, the [TOP MENU] or [MENU] key may not work in step 1. In such case, press the [RETURN] key 1 or 2 times.
CD/DVD Related Information • RPage XX • RPage XX DVD VR 1 Press the [TOP MENU] or [MENU] key. [TOP MENU]: Displays the original program. [MENU]: Displays the playlist.
CD/DVD Playing a File in the Disc MP3/WMA/JPEG/ASF/MPEG1/MPEG2/DivX Display the folder menu and select to play a file recorded in the disc. 1 Follow the steps 1 - 3 in "Playing a Disc". 2 Press the [F] key. The folder menu is displayed on the TV screen. "FILE" is displayed.
CD/DVD Related Information Information •zRPage XX Audio Files R P.26 Supported Audio XX Settings R P.69 onwards •zRPage Playback sequence for folders and track files MP3/WMA/JPEG/ASF/MPEG1/MPEG2/DivX When you play a disc containing recorded files, the track files on the disc are played sequentially beginning with the files in the ROOT folder, as shown in the figure. Sample folder configuration Folder name ROOT Track file playback sequence Track file name F0_1.mp3 F0_2.mp3 F0_3.mp3 Track 1 .............
CD/DVD Switching display contents Press the [DISPLAY] key. The mode changes as shown below each time you press the key. CD During PLAY/PAUSE Time Clock During STOP Max Track/Total Time Clock VCD/SVCD During PLAY/PAUSE Track/PBC Clock During STOP Track/PBC Max Track/Total Time Clock DVD VIDEO During PLAY/PAUSE Time Title/Chapter Audio Signal Format Clock During STOP Title 38 Clock K-821DV B60-5815-08_01_GVT0295-001B_K-821DV_En.indb 38 10.1.
CD/DVD Related Information • RPage XX • RPage XX DVD VR z For Original Program During PLAY/PAUSE Time Original Program/Chapter Audio Signal Format Clock Audio Signal Format Clock During STOP Original Program Clock z For Playlist During PLAY/PAUSE Time Play List/Chapter During STOP Play List Clock MP3/WMA/JPEG/ASF/MPEG1/MPEG2/DivX During PLAY/PAUSE Time Media/Folder/Track File Name Folder Name TAG Clock Album Artist Title TAG information is displayed only for MP3/WMA.
CD/DVD Random Playback Mode CD/VCD/SVCD/DVD VIDEO/MP3/WMA This mode plays the tracks in the disc or in a folder in a random sequence. z If the disc is already playing, press the [F] key to stop playback. 1 Press the [P.MODE] key to select the random playback mode. The mode changes as shown below each time you press the key.
CD/DVD Related Information • RPage XX • RPage XX Repeat Playback Mode CD/DVD VIDEO/DVD VR/MP3/WMA/JPEG/MPEG1/MPEG2 This mode plays the tracks on a disc repeatedly. 1 Press the [CD/DVDD] key to play the tracks you want to repeat. 2 Press the [REPEAT] key to begin repeat playback. The mode changes as shown below each time you press the key.
CD/DVD Program Playback Mode CD/VCD/SVCD/DVD VIDEO/MP3/WMA You can select up to 99 tracks/chapters and play them in the order you like. z Press the [CD/DVDD] key to switch the input source to disc. Playback begins when you switch the input source, so press the [F] key to stop playback. z If the disc is already playing, press the [F] key to stop playback. 1 Press the [P.MODE] key to select program playback mode. The mode changes as shown below each time you press the key.
CD/DVD Related Information • RPage XX • RPage XX MP3/WMA Select the folder. When folder number 58 is selected. Select the File number. When file number 5 is selected. Selecting with the Program Screen Select the Folder/Title number. PROGRAM Program No. Folder/Title Track/Chapter 1 2 3 4 5 6 7 8 Select the Track/Chapter number. PROGRAM Program No. Folder/Title 1 2 3 4 5 6 7 8 3 1 Track/Chapter 3 To select 2 or more tracks, repeat steps 1 and 2. z You can select up to 99 tracks for playback.
CD/DVD Switching Audio/Subtitle/Angle DVD VIDEO/DVD VR/SVCD If different types of audio, subtitle, or angle are recorded on the disc, you can select one of them. 1 Press the appropriate key to point the function for switching as described below. [AUDIO] Selecting the audio language DVD VIDEO, DVD VR, VCD/SVCD [SUBTITLE] Selecting the subtitle language DVD VIDEO, DVD VR, SVCD [ANGLE] Selecting the angle DVD VIDEO The setting screen is displayed on the TV screen.
CD/DVD Related Information • RPage XX • RPage XX Magnifying the Image DVD VIDEO/DVD VR/VCD/SVCD/JPEG/MPEG1/MPEG2 1 Press the [ZOOM] key during playback or while playback is paused. The magnification ratio changes each time you press the key. 2 Press the [A], [B], [C], or [D] key to select the desired area. z To return to the normal playback, press the [ZOOM] key and select “ZOOM OFF”. z This function is not available when playing the slide show of JPEG files.
CD/DVD Adjusting the Image Quality DVD VIDEO/DVD VR/VCD/SVCD/JPEG/ASF/MPEG1/MPEG2/DivX This setting is available when HDMI is not connected. 1 Press the [PICTURE] key during playback or while playback is paused. The image quality adjustment screen is displayed. Selected PICTURE mode NORMAL GAMMA BRIGHTNESS CONTRAST SATURATION TINT SHARPNESS 2 Press the [C] or [D] key to select the mode. The mode changes as shown below each time you press the key.
CD/DVD Related Information • RPage XX • RPage XX Changing the Display Resolution of the TV Screen DVD VIDEO/DVD VR/VCD/SVCD/JPEG/MPEG1/MPEG2 This setting is available when HDMI is connected. 1 Press the [RESOLUTION] key while playback is stopped. The resolution changes each time you press the key.
CD/DVD Enhanced Voice CD/DVD VIDEO/DVD VR/VCD/SVCD/MP3/WMA/MPEG1/MPEG2 It is possible to make even small voices recorded in the disc/file easier to listen. This function is useful for watching a movie. 1 Press the [CLEAR VOICE] key. CLEAR VOICE turns on/off each time you press the key. Lights when CLEAR VOICE is on. 48 K-821DV B60-5815-08_01_GVT0295-001B_K-821DV_En.indb 48 10.1.
Using Status Bar and Menu Bar This section explains how to display the status bar on the TV screen to see the current chapter or the track information. This section also explains how to display the menu bar to switch the time display or change the playback style. Displaying the Status Bar and Menu Bar CD/DVD VIDEO/DVD VR/VCD/SVCD/MPEG1/MPEG2 1 Press the [ON SCREEN] key during playback. The status bar is displayed. 2 Press the [ON SCREEN] key again. The menu bar is displayed.
Using Status Bar and Menu Bar Switching the Time Display CD/DVD VIDEO/DVD VR/VCD/SVCD Switch the time display on the display and status bar. 1 Display the menu bar. (See P.49) 2 Press the [C] or [D] key to select 3 Press the [ENTER] key. 4 Press the [ENTER] key. . The time display changes each time you press the [ENTER] key. DVD VIDEO TOTAL T.
Using Status Bar and Menu Bar Related Information • RPage XX • RPage XX Playing the Specified Range Repeatedly DVD VIDEO/DVD VR/CD/VCD(PBC off )/SVCD(PBC off ) You can repeat the desired range by specifying the starting point (A point) and ending point (B point). z Repeat styles other than A-B are also available. For more information, see P.41. 1 Press the [ON SCREEN] key twice. The menu bar is displayed. (See P.49) 2 Press the [C] or [D] key to select 3 Press the [ENTER] key.
Using Status Bar and Menu Bar Playing from the Specified Time CD/DVD VIDEO/DVD VR/VCD(PBC off )/SVCD(PBC off ) 1 Display the menu bar. (See P.49) 2 Press the [C] or [D] key to select 3 Press the [ENTER] key. 4 Press the number keys to enter the time. . To start from (0 hours) 23 minutes 45 seconds, press the [0], [2], [3], [4], and [5] keys in this order. z Minutes and seconds can be omitted. z To correct the time you have entered, press the [C] key to delete entered numbers and re-enter the time.
Using Status Bar and Menu Bar Related Information • RPage XX • RPage XX Playing from the Specified Chapter DVD VIDEO/DVD VR 1 Display the menu bar. (See P.49) 2 Press the [C] or [D] key to select 3 Press the [ENTER] key. 4 Press the number keys to enter the chapter number. . Selecting with the number keys To select chapter 3, press the [3] key. To select chapter 17, press the [ 10], [1], and [7] keys. 5 Press the [ENTER] key. English B60-5815-08_01_GVT0295-001B_K-821DV_En.indb 53 53 10.1.
Receiving Radio Broadcasts This section explains how to listen to the FM/AM radio and set radio stations. Listening to FM/AM Radio z Simply pressing the [TUNER/BAND] key turns on the system and allows you to listen to the radio. 1 Press the [TUNER/BAND] key to select "FM" or "AM". Each time you press the key, the band switches between "FM" and "AM". 2 Select a station. Choosing from preset stations (Preset Call) Select a preset station. z See P.56 and P.57 for more information on presets.
Receiving Radio Broadcasts Related Information z Presetting Stations Automatically (AUTO MEMORY) R P.56 z Presetting Stations Manually (Manual Preset) R P.57 z Audio Settings R P.69 onwards Choosing from stations that are not preset (Auto/ Manual Tuning) 1 Select Auto tuning or Manual tuning. [AUTO/MONO] key. Press the [TUNING MODE] The mode changes as shown below each time you press the key. AUTO lit AUTO unlit Auto tuning (Select this mode when reception is good.
Receiving Radio Broadcasts Europe and Australia only Presetting Stations Automatically (AUTO MEMORY) z Up to 40 stations can be preset in the system. z For use of the RDS function, stations must be memorized by AUTO MEMORY. 1 Press the [MODE] key. 2 Select “AUTO MEMORY”. Press the [C] or [D] key. z “AUTO MEMORY” flashes on the display and the receivable radio stations are preset automatically. Press the [ENTER] key. z A preset frequency can be rewritten later.
Receiving Radio Broadcasts Related Information • RPage XX • RPage XX Presetting Stations Manually (Manual Preset) Use this procedure to make the station you are currently listening to a preset number. If the selected preset number is already assigned a station, the existing station is overwritten by the new station. z You can preset up to 40 FM and AM stations. 1 Tune in the station you want to preset, and then press the [ENTER] key. Use Auto Tuning or Manual Tuning to tune in the desired station.
Europe and Australia only RDS (Radio Data System) This system is designed for RDS reception, it can extract the information from the broadcast signal for use with various functions such as automatic display of the station name. z Select the FM band. z Preset RDS stations with the AUTO MEMORY function. (P.56) PS (Program Service) Name Display When an RDS broadcast is received, the station name is automatically displayed. z The “RDS” lights up when an RDS broadcast (signal) is received.
RDS (Radio Data System) Searching for a Desired Program Type (PTY Search) The tuner automatically searches for a station which is currently broadcasting a specified program type (genre). 1 Press the [PTY] key. z When an RDS broadcast is received, the program type is shown on the display. If no PTY data is available, or if the station is not an RDS station, “None” is displayed. 2 Press the [A] or [B] key to select the desired program type. z Select it while “PTY” is lit.
iPod This section explains how to connect and play from an Apple iPod. Playing from an iPod Use this procedure to connect an iPod to the system for playback. z Also refer to the instruction manual that comes with the iPod. z Update the software for iPod to the latest version.
iPod Related Information z Supported Audio Files R P.26 z Audio Settings R P.69 onwards Operations during iPod playback You can also perform these operation on iPod. Playing the tracks in the previous/next album Press the [PREV.] key to go to the previous album, while press the [NEXT] key to go to the next album. Setting the shuffle Press the [SHUFFLE] key. Each time you press the key, the shuffle setting is changed. Setting the repeat playback Press the [REPEAT] key.
USB This section explains how to connect a USB flash memory or USB mass storage class compliant digital audio player ("USB device") and play back audio files from it. Playing back from a USB device Connect a USB flash memory or USB mass storage class compliant digital audio player to the USB port and play back audio files from it. z Also refer to the instruction manual that comes with the USB device you are connecting. z Supported Files AAC MP3 WMA See "Supported Files" for details. (P.
USB Related Information z Supported Audio Files R P.26 z Audio Settings R P.69 onwards Operations during USB device playback Playing the tracks in the previous/next folder To go to the previous folder, press the [PREV.] key. To go to the next folder, press the [NEXT] key. z These functions may not work with some USB devices. Repeat playback mode Press the [REPEAT] key to shift the selection.
External Components This section explains how to connect external components to the system and play back tracks. Playback from External Components Connect the external component to the system as described in (P.14, 15). z When connecting external components, always turn this system and the external components off beforehand. z Also refer to the instruction manual that comes with the external component being connected.
External Components Related Information z Connecting Other Accessories (Commercially Available Units) R P.14 z Audio Settings R P.69 onwards Adjusting the External Component Input Level Use the procedure below to adjust the input level for the external component connected to the [AUX IN] terminal. Use this adjustment when the volume from an external component is noticeably higher or lower than other input sources at the same volume setting. 1 Press the [AUX] key. 2 Press the [MODE] key.
D.AUDIO You can connect a Kenwood digital audio player (referred to hereafter simply as "digital audio player") to the system and use it to play tracks. Playing from a Digital Audio Player Use this procedure to connect a digital audio player to the system and play tracks. z Always turn this system and the digital audio player off before connecting the digital audio player. z Also refer to the instruction manual that comes with the digital audio player you are connection.
D.AUDIO Related Information z Adjusting the Digital Audio Player Input Level R P.68 z Audio Settings R P.69 onwards Operations during digital audio player playback Playing the tracks in the previous/next folder To go to the previous folder, press the [PREV.] key. To go to the next folder, press the [NEXT] key. z These functions may not work with some digital audio player models. Skipping forward/back Hold down the [G] or [H] key. Hold down the [G/ I] or [J/H] key.
D.AUDIO Adjusting the Digital Audio Player Input Level Use the procedure below to adjust the input level for the external component connected to the [D.AUDIO IN] terminal. Use this adjustment when the volume from an external component is noticeably higher or lower than other input sources at the same volume setting. 1 Press the [D.AUDIOE] key. 2 Press the [MODE] key. 3 Select "INPUT LEVEL". Press the [C] or [D] key. Press the [ENTER] key. 4 Adjust the Input Level. Press the [A] or [B] key.
Audio Settings Use the procedures in this chapter to specify the sound quality settings for your stereo system. You can use the system's sound quality function to customize the sound to your own preferences.
DTS Surround Sensation This function generates the pseudo surround-sound effect with 2 speakers. Setting DTS Surround Sensation 1 Press the [SOUND] key. DTS Surround Sensation setting changes each time you press the key. “dts” appears on the display and the surround-sound effect turns on. This function gives more pronounced surround-sound effect. “dts” disappears on the display and the surround-sound effect turns off.
CONEQ (Acoustic Equalizer) With the digital sound correction technology of Convolution Equalizer (CONEQ), you can select an Acoustic Effect suitable for your listening environment. Matching the Acoustic Effect to the Environment of the Room 1 Press the [MODE] key. 2 Select "CONEQ SET". Press the [C] or [D] key. Press the [ENTER] key. 3 Select a CONEQ number. Press the [A] or [B] key. The display changes as shown below.
Digital Signal Processor The system has a digital signal processor (DSP), which allows you to adjust the impact of super-bass tones and the levels of low-, mid-, and high-range tones. This provides more detailed settings that allow you to adjust the sound to your own preferences. Adjusting Super-Bass Tones (D-BASS) This feature lets you tailor the impact of super-bass tones to your own preferences. 1 Press the [D-BASS] key. 2 Press the [A] or [B] key to adjust the level.
Digital Signal Processor Adjusting the Range Levels (TONE) You can adjust the low-, mid- and high-range tones to match your preferences (TONE). Variable frequencies Adjusted level LEVEL (dB) LEVEL (dB) Frequency Variability Frequency Variability Variability Frequency Variability Frequency Frequency 1 Press the [TONE] key, and then select [BASS] from the range levels (BASS: low-range tones, MID: mid-range tones, TREBLE: high-range tones, OFF: setting off ).
Digital Signal Processor 4 Press the [TONE] key. 5 Press the [C] or [D] key to select the frequency (Low: 1kHz, Mid: 2kHz, or High: 3kHz) of the mid-range tones (MID). 6 Press the [A] or [B] key to adjust the mid tones (MID) level. z The "TONE" flashes while setting is in progress. While the "TONE" is flashing, you can adjust the level in a range from -8 to +8. 74 K-821DV B60-5815-08_01_GVT0295-001B_K-821DV_En.indb 74 10.1.
Digital Signal Processor 7 Press the [TONE] key. 8 Press the [C] or [D] key to select the frequency (Low: 5kHz, Mid: 7kHz, or High: 10kHz) of the high-range tones (TREBLE). 9 Press the [A] or [B] key to adjust the high tones (TREBLE) level. z Th e " TO N E " f l a s h e s w h i l e setting is in progress.While the "TONE" is flashing, you can adjust the level in a range from -8 to +8. 10 Press the [ENTER] key. z If you set a level other than 0, the "TONE" is displayed.
Digital Signal Processor Disabling D-BASS, TONE Effects (FLAT) 1 Press the [FLAT] key. z The "D-BASS" and "TONE" levels are set to 0. DTS Surround Sensation and Clear Voice also turns off. 76 K-821DV B60-5815-08_01_GVT0295-001B_K-821DV_En.indb 76 10.1.
Supreme EX Related Information Supreme EX is Kenwood's original sound quality enhancement technology and is used for playing discs and audio files or for playback using components connected to a digital input terminal. Setting Supreme EX 1 Press the [MODE] key. 2 Select “SPRM SET”. Press the [C] or [D] key. z The “SPRM EX” flashes while setting is in progress. Press the [ENTER] key. 3 Select “ON“ or “OFF“. Press the [A] or [B] key.
BALANCE Use this procedure to adjust the volume balance for the left and right speakers. Adjusting the Speaker Volume Balance 1 Press the [MODE] key. 2 Select "BALANCE". Press the [C] or [D] key. Press the [ENTER] key. 3 Adjust the balance. Press the [A] or [B] key. Press the [ENTER] key. 78 K-821DV B60-5815-08_01_GVT0295-001B_K-821DV_En.indb 78 10.1.
Component Settings This chapter explains basic timekeeping settings, as well as settings for the timer, display, and other functions which provide more extensive usage of this product. Setting the Timer • Setting the Sleep Timer (SLEEP) ………………………………… 80 • Setting the Program Timer (TIMER SET) ………………………… 81 Display Settings • Setting the Display Brightness (DIMMER) ……………………… 85 • Turning the Display Saver ON/OFF ……………………………… 85 Setting the System Clock……………………………………86 Auto Power Save (A.P.S.
Setting the Timer A Sleep Timer automatically turns the system off after a set interval, while a Program Timer starts playback at a specified time. Setting the Sleep Timer (SLEEP) This function automatically turns the system off after a set interval. You can set an interval from 10 to 90 minutes, in 10-minute increments. 1 Press the [SLEEP] key. The interval increases by 10 minutes each time you press the key. The next setting after 90 minutes is timer off.
Setting the Timer Related Information z Setting the System Clock R P.86 Setting the Program Timer (TIMER SET) This function allows you to use the timer to start playback automatically at a specified time. You can set 2 timers (PROG. 1 and PROG. 2) at the same time. You can play back from a radio, DVD, CD, iPod, USB device, or external component (AUX IN). z Set the system clock to the correct time before performing this procedure. (See P.86) z Make sure the times for PROG. 1 and PROG.
Setting the Timer 5 Select the day (or days) on which the Program Timer will run. Press the [A] or [B] key. The mode changes as shown below each time you press the key. EVERYDAY SUNDAY SAT-SUN MONDAY TUE-SAT TUESDAY MON-FRI WEDNESDAY SATURDAY THURSDAY FRIDAY Press the [ENTER] key. z If you selected "EVERYDAY", "MON-FRI", "TUE-SAT" or "SAT-SUN", proceed to step 7. 6 Select "EVERY WEEK" or "ONETIME". Press the [A] or [B] key. z The timer runs every week. z The specified timer runs once only.
Setting the Timer Related Information z RP.XX z RP.XX 9 Select "PLAY" or "AI PLAY". Press the [A] or [B] key. z Playback is at the volume set in step 10. z Playback begins at the specified time and the volume gradually increases to the level set in step 10. Press the [ENTER] key. 10 Set the volume. Press the [A] or [B] key. Press the [ENTER] key. z You cannot use the [VOLUME] key to set the volume. 11 Select the input source. Press the [A] or [B] key.
Setting the Timer 12 Press the power [K] key to turn the power OFF. z The [STANDBY/TIMER] indicator on the main unit lights orange. z If the indicator lights red, set the clock to the correct time. To turn a timer off or on z When the system is turned on, press the [TIMER] key. The setting changes each time you press the [TIMER] key. 1 lit 2 lit PROG. 1 on PROG. 2 on 1 2 unlit Timer off 1 2 lit PROG.
Display Settings Related Information Use these settings to adjust the brightness of the display and to specify the settings for the main unit dial lighting. Setting the Display Brightness (DIMMER) Use this procedure to adjust the display brightness. Adjust the brightness according to your preferences and the conditions in the room. 1 Press the [DIMMER] key. The mode changes as shown below each time you press the key.
Setting the System Clock Set the system clock to the correct time.If the system clock time setting is not correct, the Program Timer will not start playback at the correct time. 1 Press the [MODE] key. 2 Select "TIME ADJUST". Press the [C] or [D] key. Press the [ENTER] key. 3 Set the day of the week. Press the [A] or [B] key. Press the [ENTER] key. 4 Set the time. Use the [A] or [B] key to set the "hour". Press the [ENTER] key. Use the [A] or [B] key to set the "minute". Press the [ENTER] key.
Auto Power Save (A.P.S.) Related Information Auto Power Save (A.P.S.) is automatically turns the system off if no operation is performed for 30 minutes after a CD/DVD or a USB connected device stops playing. 1 Press the [MODE] key. 2 Select "A.P.S. SET". Press the [C] or [D] key. z "A.P.S." lights up on the display. Press the [ENTER] key. 3 Select "ON" or "OFF". Press the [A] or [B] key. z "A.P.S." flashes on the display. z "A.P.S." turns off. Press the [ENTER] key.
Setting the Power Supply Specify whether power is supplied to an iPod or USB device, even when iPod or USB device is connected but not selected as an input source. (Power is always supplied to a device selected as an input source, regardless of this setting.) 1 Press the [MODE] key. 2 Select "P.SUPPLY". Press the [C] or [D] key. Press the [ENTER] key. 3 Select "ON" or "OFF". Press the [A] or [B] key. z Power is always supplied when the system is turned on.
TV AUDIO IN Related Information When the TV set that is connected with the system through HDMI selects the built-in TV tuner, this function switches the audio input of the system from "HDMI" to "D-IN". To enable the TV AUDIO IN function, CEC must be turned on in addition to the setting of this function. (See P.95) 1 Press the [MODE] key. 2 Select "TV AUDIO IN". Press the [C] or [D] key. Press the [ENTER] key. 3 Select "ON" or "OFF". Press the [A] or [B] key. z The TV AUDIO IN function turns on.
Activating the Subwoofer Sound This function turns on/off the audio output from the subwoofer connected with the system. For connection with the subwoofer, see "Connecting Other Accessories (Commercially Available Units)". (See P.15) 1 Press the [MODE] key. 2 Select "SUBW OUT". Press the [C] or [D] key. Press the [ENTER] key. 3 Select "ON" or "OFF". Press the [A] or [B] key. z The audio output from the subwoofer turns on. z The audio output from the subwoofer turns off. Press the [ENTER] key.
System Settings Related Information This section explains how to change the system settings as needed. To do so, display the system setting screen on the TV screen. Displaying the System Setting Screen z The system setting screen is available while playback is stopped or when a disc is not loaded. 1 Press the [DVD SETUP] key. The system setting screen is displayed on the TV screen.
System Settings LANGUAGE setting screen Setting item MENU LANGUAGE AUDIO LANGUAGE SUBTITLE ON SCREEN LANGUAGE Description Select the language of the DVD Video menu. Select the language of the DVD Video audio. Select the language of the DVD Video subtitle. Select the language displayed on the setting screen. z If the selected language is not included in the disc/file, the optimal language is used.
Display System Settings Related Information • RPage XX • RPage XX Setting item PICTURE SOURCE Description Select the setting suitable for the picture source. AUTO: Automatically determines the source material (FILM/VIDEO). FILM: Suitable for the film source as well as the video source recorded in the progressive scanning mode. SCREEN SAVER FILE TYPE VIDEO: Suitable for the video source. Turn on/off the screen saver.
System Settings Setting item DOWN MIX Description Select the signal based on the external device connected to the [DIGITAL OUT] terminal of the system. This setting is available when “PCM ONLY” is selected for “DIGITAL AUDIO OUT”. DOLBY SURROUND: Used for devices that have a built-in Dolby Pro Logic decoder. D.RANGE COMPRESSION STEREO: Used for other devices. This function corrects the difference in quality between large and small sounds played at low volume.
Display System Settings Related Information • RPage XX • RPage XX OTHERS setting screen : Default setting Setting item RESUME ON SCREEN GUIDE CEC DivX REGISTRATION Description Turn ON/OFF. (See P.32) Turn ON/OFF. (See P.31) Turn on/off the CEC (Consumer Electronics Control) for the HDMI connection between the system and the TV set. Select ON1 (with Power Control), ON2 (without Power Control), or OFF. See “CEC Feature List” for details. (See P.
System Settings Language Code List Code AA AB AF AM AR AS AY AZ BA BE BG BH BI BN BO BR CA CO CY DA DZ EL EO ET EU FA FI FJ FO FY GA GD 96 Language Afar Abkhazian Afrikaans Amharic Arabic Assamese Aymara Azerbaijani Bashkir Belarusian Bulgarian Bihari Bislama Bengali Tibetan Breton Catalan Corsican Welsh Danish Dzongkha Modern Greek Esperanto Estonian Basque Persian Finnish Fijian Faroese Western Frisian Irish Scottish Gaelic Code GL GN GU HA HI HR HY IA IE IK IN IS IW JI JW KA KK KL KM KN KO KS KU KY
Maintenance This chapter explains what to do when error messages appear on the display or when problems arise. It also describes how to store and maintain the system so it continues to give pleasure for many years to come. Messages ……………………………………………………98 Troubleshooting ……………………………………………99 Glossary of Terms ………………………………………… 104 Care and Storage ………………………………………… 105 Specifications …………………………………………… 106 English B60-5815-08_01_GVT0295-001B_K-821DV_En.indb 97 97 10.1.
Messages Displayed Message 98 Meaning NO DISC There is no disc inserted. RInsert a disc. REGION ERR The region of the DVD VIDEO is different. RThis disc cannot be played. PGM FULL An attempt was made to program a 100 th disc track/chapter. RYou can program only up to 99 tracks/chapters. (See P.42) NOT SUPPORT An iPod that is not supported with this device is connected. (See P.60) This is the file that cannot be played by the system. TRAY OPEN The disc tray is open. RClose the tray.
Troubleshooting Whenever the system is not operating as expected, check the following tables to see if you can resolve the problem yourself before requesting service. Amplifier/ Speakers Symptoms Solution Ref. page z Check all connections as described in . z Increase the volume. z Cancel the MUTE setting. z Unplug any headphones plugged into the main unit. 10-15 [STANDBY/TIMER] indicator is flashing red and there is no sound. z One of the speaker cords is short-circuited.
Troubleshooting CD/DVD Symptoms Solution Ref. page A CD/DVD does not play back when loaded. z Load the disc correctly with the label side facing upward. z Clean the disc. (See .) z Allow any condensation to evaporate. (See .) z Check every cord for correct connection. 30 105 10-15 Playback skips. z Clean the disc. (See .
Troubleshooting iPod Symptoms Solution Ref. page The iPod cannot be attached firmly. z Check to see whether the correct Dock adapter is used. Then check to see whether the connector between the iPod and the system is not damaged, and reconnect them. 13 The iPod does not provide sound. z The iPod is not properly connected. Remove the iPod from the system, and then connect it again. 13 The iPod cannot be charged. z The iPod is not properly connected.
Troubleshooting USB Symptoms No sound output when USB flash memory or a USB audio player is connected. Solution z Plug in the USB flash memory correctly. z Connect the USB cable correctly. z Check to make sure the USB audio player is turned on. Ref. page 13 62 Components connected to the D.AUDIO IN terminal Symptoms The main unit and remote control cannot control a Kenwood digital audio player. Solution z Connect the player using the dedicated cable PNC-150.
Troubleshooting Resetting the microcomputer Symptoms Microcomputer malfunction (the system does not work, the display is faulty, etc.). Solution z Malfunctions may occur due to an external cause or because a connection cord was unplugged while the system was turned on. Use the procedure below to reset the microcomputer. 1 Unplug the power cord from the AC wall outlet. 2 Plug the power cord back in while holding down the power [K] key on the main unit.
Glossary of Terms Term 104 Meaning Page AAC An abbreviation for "Advanced Audio Coding". This is a compression standard that applies only to the audio component in image compression methods used for digital broadcasting, etc. 26 Bitrate A value indicating the amount of information processed per second. The higher the bitrate, the better the sound quality. 26 CD-DA Refers to music CDs. Almost all discs normally referred to as "CDs" are actually CD-DA discs.
Care and Storage Care and storage of main unit Keep the system out of the following locations z Areas exposed to direct sunlight. z Areas subjected to excessive humidity or dust. z Areas exposed to direct heat from heating equipment. Be careful against condensation Extreme differences between system temperature and air temperature can cause water droplets (condensation) to form on the system. The system will not operate properly while condensation is present.
Specifications Main unit [Amplifier] [Tuner] Effective output power during STEREO operation ..... 40 W+40 W RMS (1kHz, 10%T.H.D., 4 Ω) Total harmonic distortion ..............................0.03% (1 kHz, 1 W, 4 Ω) Tone control characteristics BASS (TURN OVER 100 Hz) ........................................ ±4.0 dB (at 100 Hz) (TURN OVER 150 Hz) ....................................... ±6.6 dB (at 100 Hz) (TURN OVER 200 Hz) ....................................... ±7.5 dB (at 100 Hz) MID (TURN OVER 1 kHz) ....
CAUTION Use of controls or adjustments or performance of procedures other than those specified herein may result in hazardous radiation exposure. In compliance with Federal Regulations, following are reproductions of labels on, or inside the product relating to laser product safety. Kenwood Corporation 2967-3, ISHIKAWA-MACHI, HACHIOJI-SHI TOKYO, JAPAN KENWOOD CORP. CERTIFIES THIS EQUIPMENT CONFORMS TO DHHS REGULATIONS N0.21 CFR 1040. 10, CHAPTER 1, SUBCHAPTER J.
This symbol is labeled on the products whose impacts on the environment are minimized by Kenwood. For your records Record the serial number, found on the back of the unit, in the spaces designated on the warranty card, and in the space provided below. Refer to the model and serial numbers whenever you call upon your dealer for information or service on this product. Model Serial Number B60-5815-08_01_GVT0295-001B_K-821DV_En.indb 108 10.1.