KRC-PS1077R KRC-977R KRC-877R KRC-877W KRC-777R CASSETTE RECEIVER INSTRUCTION MANUAL © B64-1342-00 (EY)
English Contents Before use Switching Display for Discs ...............................................................23 Fast Forwarding and Reversing Disc Play ..........................................23 Track Search ......................................................................................24 Disc Search ........................................................................................24 Track / Disc Repeat ............................................................................
Safety precautions IMPORTANT INFORMATION 2WARNING 2CAUTION To prevent injury and/or fire, take the following precautions: To prevent damage to the machine, take the following precautions: • Insert the unit all the way until it is fully locked in place. Otherwise it may fly out of place during collisions and other jolts. • When extending the ignition, battery or ground cables, make sure to use automotivegrade cables or other cables with an area of 0.
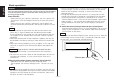
English Safety precautions Mask key NOTE • If you experience problems during installation, consult your Kenwood dealer. • If the unit fails to operate properly, press the RESET button. When the faceplate is not visible, slide the manual open switch (as illustrated on p.6) for as many times as you have preset to make the faceplate control appear. The unit returns to factory settings when the RESET button is pressed.
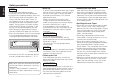
Basic operations d 4 uA T T SRC FM 44W 4 DISC EJECT DISP NAME.S LOUD B NR SCAN B.S/RDM REP D.SCN MTL/M.RDM OFF TI VOL ADJ Volume Increasing Volume: Press the u button to turn up the volume. Decreasing Volume: Press the d button to turn down the volume.
English Basic operations Power You can help prevent theft of the unit by reversing the faceplate so that the control panel cannot be seen, hiding the unit, and shutting off the audio. Power ON/OFF: When you turn your vehicle’s ignition on, the unit’s power will also turn on, with the faceplate reversing to show the control panel. When you turn your vehicle’s ignition off, the faceplate will reverse to hide the control panel, and the unit’s power will turn off.
Switching Modes Switching Modes: Each time you press the SRC button, the mode switches as follows: ▼ Tuner mode ▼ Tape mode ▼ Loudness This function amplifies low and high tones when the volume is turned down. The LOUD indicator lights up, when the loudness function is on. Turning Loudness On/Off: Hold down the LOUD button for one second or more to switch the loudness on and off. External disc control mode ▼ AUX mode NOTE • The mode switches to the next mode from any mode which cannot be used.
English Basic operations Adjustment (Contrast ##) ↔ Dimmer (Dimmer ON / OFF)➞ Switching Graphic Display(Graphic ON / OFF)* 8 ↔ Black Mask (BLACK MASK OFF / ON, BLK MASK OFF / ON) ↔ Switching Preout (SWPRE Rear / N-Fad)*9 ↔ Dual zone system*3 (Zone 2 OFF / ON)*10 ↔ External Amplifier Control (AMP BASS Flat, FLT / +6 / +12) ↔ Manual Open Switch Setting (OPEN SW #) ↔ News Bulletin Function (NEWS OFF / ##MIN) ↔ Local seek*4 (Local.
Tuner features 4 SRC FM 44W 4 B NR SCAN B.S/RDM REP D.SCN MTL/M.RDM OFF 1 Hold down the MENU button for one second or more. NF TI VOL ADJ PROG/PTY MENU Selecting Tuning Mode You can choose from three tuning modes: auto seek, preset station seek, and manual. The “AUTO 1” indicator lights up when auto seek tuning is selected, and the “AUTO 2” indicator lights when preset station seek tuning is selected. DISC EJECT DISP NAME.S LOUD ¢ "MENU" is displayed and the menu mode is turned on.
English Tuner features 2 Press the ¢ button repeatedly until the local seek function Tuning appears in the display. Press the 4 button to search in the other direction. The function setting is indicated by "Local.S ON" or "Local.S OFF" in the display, indicating that the local seek function is on or off, respectively. 1 Press the SRC button repeatedly until the tuner mode is obtained. "TUNER" is displayed only when the tuner mode is selected. 2 Press either the FM or AM button to select the band.
1 Select the band for auto memory entry. 2 Hold down the MENU button for one second or more. 1 Press the DNPP button on the remote control. “SNPP” will be displayed once the seek mode is entered. The names of the stations preset in the band currently listened to are displayed for 5 seconds each. The display band switches in the following order: = FM1 Ô FM2 Ô FM3 Ô AM + "MENU" is displayed and the menu mode is turned on. 3 Press the ¢ button repeatedly until "Auto-Memory" appears in the display.
English Tuner features RDS features 4 Monaural Reception DISP FM When poor stereo reception is experienced, this function will reduce noise and improve listening conditions. 44W 4 DISC EJECT 1 Hold down the MENU button for one second or more. DISP NAME.S OFF "MENU" is displayed and the menu mode is turned on. 2 Press the ¢ button repeatedly until the monaural reception LOUD B NR SCAN function appears in the display. Press the 4 button to search in the other direction.
RDS (Radio Data System) AF (Alternative Frequency) Function RDS is a digital information system that lets you receive signals besides those of regular radio programmes, such as network information being transmitted from radio stations. When listening to an RDS station (ie, a station with RDS capability), the programme service name of the station is displayed along with the frequency, advising you quickly which station is being received.
English RDS features the preset volume. If you are listening to a tape or disc when a traffic bulletin begins, they will automatically be turned off. When the bulletin ends or poor reception is experienced, the tape or disc will begin playing again. Restricting RDS Region (Region Restrict Function) You can choose whether or not to restrict the RDS channels, received with the AF function for a particular network, to a specific region. When the Region Restrict Function is on, the region is restricted.
Press the 4 button to search in the other direction. The function setting is indicated by "ATPS ON" or "ATPS OFF" in the display, indicating that the function is on or off, respectively. 3 Switching settings Press either the AM button or FM button. The display and setting will change. If the traffic information station you are tuned to experiences poor reception, this function automatically seeks another TP station. Radio Text You can display textual information being transmitted by RDS stations.
English RDS features Text Scroll Programme Type (PTY) Function This function permits the text to be scrolled and the entire text to be displayed. Switching between manual scrolling and automatic scrolling is permitted. The factory default is manual scrolling. Conduct auto seek tuning only on those stations with selected kinds of programmes. 1 Press the 38(PTY) button. “PTY” is displayed, and the Programme Type Selection (PTY) Mode entered.
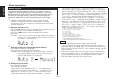
Programme type 1.News 2.Current Affairs 3.Information 4.Sport 5.Education 6.Drama 7.Culture 8.Science 9.Varied 10.Pop Music 11.Rock Music 12.Easy Listening Music 13.Light Classical 14.Serious Classical 15.Other Music 16.Weather 17.Finance 18.Children's programmes 19.Social Affairs 20.Religion 21.Phone 22.Travel 23.Leisure 24.Jazz Music 25.Country Music 26.National Music 27.Oldies Music 28.Folk Music 29.Documentary Music Speech • You can select the type of programme directly by pressing a preset button.
English RDS features NOTE News Bulletin Function with PTY News Timeout Setting You can arrange to have news bulletins interrupt your current listening source, including other radio stations. When the News Bulletin function is on, the PTY News Timeout setting allows you to set the interval during which further news interruption cannot take place. You can adjust the PTY news interruption period from 10 to 90 minutes for each journey.
Cassette player features 4 ¡ SRC DISP FM 44W 4 DISC EJECT DISP NAME.S LOUD B NR SCAN B.S/RDM REP D.SCN MTL/M.RDM OFF TI VOL ADJ NF PROG/PTY B NR/BC NR B.S REP MTL MENU 38/PROG DISC AM KRC-PS1077R/977R Tape side ¢ Playing Cassette Tapes Loading and Playing Cassettes: Press the ¡(EJECT) button to slide open the faceplate, showing the cassette (insertion) slot. Holding the cassette with the tape exposed to the right, insert it in the slot.
English Cassette player features Fast Forwarding and Rewinding Cassette Tapes Switching Tape Types Select type of tape being played. Fast Forwarding Tapes: Press the FM button. Rewinding Tapes: Press the AM button. Cancelling: Press the PROG button. Normal tape play returns. Switching Tape Types: Press the MTL button to switch the MTL indicator on and off and to select the tape type. Turn the MTL indicator off for normal tape (Type I) playback.
• The DPSS function "knows" where a track begins by detecting the blank space preceding it (i.e., the space between tracks). However, when the blank space lasts for less than 4 seconds or contains noise, DPSS may not operate correctly. Furthermore, quiet intervals within a song are detected as "blank spaces" if they last for 4 seconds or more. Cancelling DPSS During Its Operation: Press the PROG button.
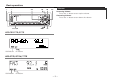
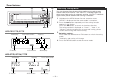
English External disc control features 4 DISP / NAME.S FM/ DISC+ SRC 44W 4 DISC EJECT DISP NAME.S LOUD B NR B.S/RDM SCAN REP D.SCN MTL/M.RDM OFF TI VOL ADJ NF PROG/PTY RDM SCAN MENU DISC D.SCN REP M.RDM 38 MENU AM/DISC– KRC-PS1077R/977R Disc number ¢ Track number Track time ■ When a unit equipped with an O-N switch is to be connected, please also see the instruction manual of this unit. Set the O-N switch to "N". "N"-operation will be set.
• "CD"...when a CD player is connected • "DISC"...when a disc changer is connected • "DISC-1", "DISC-2"...when two disc changers are connected Pausing and Restarting Disc Play: Press the 38 button to make the disc pause. Press the same button again to start play again. • Depending on the type of characters of the CD Text, some characters may not be displayable. Fast Forwarding and Reversing Disc Play NOTE • When one disc has finished playing its last track, the next disc in the changer starts playing.
English External disc control features Play starts at the beginning of the displayed disc. Track Search NOTE Search forwards or backwards through the tracks on the disc until you reach the one that you want to listen to. Making a Reverse Track Search: Press the 4 button to display the desired track number. Press once to search back to the beginning of the current track, twice to search back to the beginning of the previous track, and so forth. Play starts at the beginning of the displayed track number.
Stopping to Listen to the Track Being Scanned: Press the 38 or SCAN button again to stop the scan and keep on listening to a track normally. The display of the track number changes continuously as the next track is being selected. When the track has been selected, play starts. The selected track number blinks in the display as it is being played. NOTE • The track scan function is cancelled when you stop playing a disc. • The track scan function only scans each track on a disc once.
English External disc control features entered. The cursor blinks in the position where character input can be made. Magazine Random Play Play the tracks on all the discs in the disc changer in random order. 3 Press either the 4 or ¢ button to move the cursor to the 1 Press the M.RDM button to switch the magazine random play desired position. The 4 button moves the cursor to the left, and the ¢ button to the right.
button on the remote control. The disc name is stored and the disc name preset mode is cancelled. If you make no entry in a 10-second period, the name will be stored with the characters input so far. NOTE • The number of characters and discs whose names can be stored will differ depending on the disc changer that is connected. Please see your disc changer manual for details. • Discs are identified by their total length and number of tracks.
English External disc control features Text / Title Scroll NOTE • Only units with a CD text feature permit title display. • This function is not supported for MD changers. This function permits the text to be scrolled and the entire text to be displayed. Switching between manual scrolling and automatic scrolling is permitted. The factory default is manual scrolling. To scroll manually: 1 Press the DISP button to display the disc title or the track title.
Other features 4 Signal senser FM 44W 4 DISC EJECT DISP NAME.S LOUD B NR SCAN B.S/RDM REP D.SCN MTL/M.RDM OFF NF TI VOL ADJ PROG/PTY MENU DISC ¢ Manual Open Switch Setting By sliding the Manual Open Switch during forced closing, you can open the control panel. Follow the directions below to preset the number of times that this switch needs to be slid in order to open the panel. To preset the number of times to slide the Manual Open Switch: 1 Press the MENU button for at least one second.
English Other features Audio Control Setting Adjustment mode (Display; KRC-PS1077R, 977R/ KRC-877R, 877W, 777R) Adjust various parameters of sound quality. 1 Press the AUD button to enter the control mode. 2 Press either the FM or AM button.
procedure in step 4. Mask Key If you have transmitted the Mask Key's signal once to the unit in advance, you will have to transmit it once again if the unit has been removed from the battery. This function helps prevent theft. When using the unit for the first time: In order to deactivate the demonstration mode, be sure to press the transmit button to transmit the Mask Key's signal.
English Other features Function of the KRC-PS1077R/KRC-977R Switching Graphic Display Spectrum analyzer 1 This function permits the graphic display to be switched to one that is linked with the volume level value or to display various modes. The initial setting is ON (displaying various modes). Spectrum analyzer 2 Character Turning the Graphic Display On/Off: 1 Hold down the MENU button for one second or more. "MENU" is displayed and the menu mode is turned on.
display, indicating that the Black mask is on or off, respectively. "BLACK MASK ON/BLK MASK ON" (The display will turn on by using only the upper part of the display and the ATT indicator.) "BLACK MASK OFF/BLK MASK OFF" (The display will turn on by using the whole part of the display.) Faceplate Angle Adjustment You can adjust the faceplate angle for easy viewing.
English Other features 4 Hold down either the AM or FM button for two seconds or Adjusting Time With automatic time adjustment, you can set the clock time automatically according to time data sent from RDS stations (after receiving RDS signals for several minutes). You can also set the time manually if the automatic time adjustment function is turned off. The factory default is automatic time adjustment. more to enter the Time Adjustment mode. The time display will blink.
Automatic Dimmer Function The display dims when the car's lights are turned on. NOTE The dimmer function is not available for units if the dimmer cable is not connected. Selectable Illumination You can switch the colour of the button illumination between green and amber. 1 Hold down the MENU button for one second or more. "MENU" is displayed and the menu mode is turned on. 2 Press the ¢ button repeatedly until the Selectable Illumination function appears in the display.
English Other features "SWPRE Rear" (Rear preout) "SWPRE N-Fad" (Non-fading preout) Touch Sensor Tone This function produces a beep sound that accompanies button operation. It can be switched on or off. 3 Switching settings Turning the Beep On/Off: 1 Hold down the MENU button for one second or more. "MENU" is displayed and the menu mode is turned on. 4 Press the MENU button to end the menu mode. Press either the AM or FM button. The display and setting will change.
Function of the KRC-PS1077R/KRC-977R/KRC-877R/KRC-877W External Amp Control Dual Zone System The following operation allows separate sound sources to control the output of the front and rear speakers. The Dual zone system can only be switched on or off when the source is set to the AUX mode. Turning the Dual zone system On/Off: 1 Hold down the MENU button for one second or more. "MENU" is displayed and the menu mode is turned on. Adjust the bass boost level of the external amplifier using the main unit.
Basic Operations of steering remote control Optional for the KRC-777R English 2WARNING ¢ FM/DISC + u UP ATT 5 VOLUME ∞ ¢ ATT FM/DISC+ To prevent accidents, do not attempt to use the steering remote control whilst turning the steering wheel. Loading and Replacing the Lithium Battery: Use one lithium battery (CR2025). Insert the battery with the + and – poles aligned properly, following the illustration.
• The AUX mode is available only when the changer / AUX switching adapter (KCA-S210A or CA-C1AX) or CD changer (KDC-CPS82 or KDC-CX82) is connected to this unit. During the AUX mode, "AUX" will show in the display. When the CA-C1AX is being used, the AUX Mode will replace the External Disc Control Mode. • VOLUME buttons Press the 5 button to turn the volume up. Press the ∞ button to turn the volume down. • ATT button Turns down the volume quickly.
English Accessories External view ......... Number of items External view ......... Number of items 1 5 .........1 2 6 R L .........1 .........1 3 .........1 7 .........1 4 .........1 8 .........1 .........1 5~8...KRC-PS1077 / 977R / 877R / 877W only 2CAUTION The use of any accessories except for those provided might result in damage to the unit. Make sure only to use the accessories shipped with the unit, as shown above. Installation Procedure 1.
Connecting Cables to Terminals Antenna Conversion Adaptor (ISO–JASO) (Accessory3) FM/AM antenna input Antenna Cord (ISO) Connector Function Guide Pin Numbers for ISO Connectors Cable Colour Rear left output (White)/ Non-fading left output (White) (KRC-977R/877R/877W only) Functions Yellow Blue/White Orange/White Red Black Battery Power Control Dimmer Ignition (ACC) Earth (Ground) Connection Speaker Connector B–1 B–2 B–3 B–4 B–5 B–6 B–7 B–8 Purple Purple/Black Gray Gray/Black White White/Black Gree
English Connecting Cables to Terminals Installtion 2WARNING Connecting the ISO Connector (see p.41) The pin arrangement for the ISO connectors depends on the type of vehicle you drive. Make sure to make the proper connections to prevent damage to the unit. The default connection for the wiring harness is described in 1 below. If the ISO connector pins are set as described in 2 or 3, make the connection as illustrated.
Removing the Unit ■ Removing the Unit ■ Removing the hard rubber frame Insert the removal tool into the indentations in the hard rubber frame, and pull it gently until the lock is released. 1 Make the faceplate control panel appear. NOTE When the control panel of the faceplate is hidden, the unit will be locked by the sleeve, making it more difficult to remove the unit. 2 Refer to the section “Removing the hard rubber frame” and then remove the hard rubber frame.
English Attaching Steering Remote Control (Optional for the KRC-777R) Mounting Example 5 6 7 8 ,,,,,,,, ,,,,, ,,,,,,,,,, ,,,,,,,,,, ,,,,,,,,,,,, ,, ,,,,,,,,,,,,,,,,,,,,,,,,,,,,,,,, ,,,,,,,,,,,,,,,,,,,,,,, ,,,,,,,,,,,,,,,,,,,,,,,,,,,,,,,, ,, ,,,,,,,,,,,,,, ,,,,,,,,,,, ,, ,,, ,,,,,,,,,, ,,,,,,,, , ,, , , , , , ,,,,,,,,,,,,,,, , , ,,,,,,,,,,,,,,, ,,,,,,,,,,, Attach the operation section and the light emitting section of the Steering Remote Control as shown above.
Troubleshooting Guide What might appear to be a malfunction in your unit may just be the result of slight misoperation or miswiring. Before calling service, first check the following table for possible problems. PROBLEM The power does not turn on. POSSIBLE CAUSE SOLUTION The fuse has blown. After checking for short circuits in the cables, replace the fuse with one having the same rating. No ACC position on vehicle ignition. Connect the same cable to the ignition as the battery cable.
Troubleshooting Guide English PROBLEM The memory is erased when the ignition is turned off. POSSIBLE CAUSE SOLUTION The battery cable has not been connected to the proper terminal. Connect the cable correctly, referring to the section on "Connecting Cables to Terminals". The ignition and battery cable are incorrectly connected. Connect the cable correctly, referring to the section on "Connecting Cables to Terminals". The TEL mute function does not work.
The following messages are displayed when certain problems are occurring in your system. Take the recommended actions. EJECT No disc magazine has been loaded in the changer. The disc magazine is not completely loaded. ] Load the disc magazine properly. No CD in the unit. ] Insert the CD. NO DISC No disc has been loaded in the disc magazine. ] Load a disc into the disc magazine. E-04 No disc has been loaded in the disc magazine. ] Load a disc into the disc magazine. The CD is very dirty.
English Specifications Specifications subject to change without notice. FM tuner section Audio section Frequency Range (50 kHz Space).......................87.5 - 108.0 MHz Usable Sensitivity (S/N: 26dB) ....................................0.7 µV/75 Ω Quieting Sensitivity (S/N: 46dB) .................................1.6 µV/75 Ω Frequency Response (±3.0dB) .................................30 Hz-15 kHz Signal to Noise ratio .............................................65 dB (MONO) Selectivity (DIN) ......