Kenwood Limited, New Lane, Havant, Hampshire PO9 2NH, UK www.kenwoodworld.
BM450
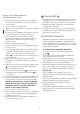
English 2 - 19 Nederlands 20 - 39 French 40 - 58 Deutsch 59 - 77 Italiano 78 - 96 Danish 97 - 115 Svenska 116 - 134 Norsk 135 - 153 Suomi 154 - 172
27 21 22 23 26 25 24
1 2 3 7 8 9 13 14 15 19 20
4 5 6 10 11 12 1 16 17 14 500g 18 750g 1kg
● ● ● before using your Kenwood appliance Read these instructions carefully and retain for future reference. Remove all packaging and any labels. safety ● ● ● ● ● ● ● ● ● ● ● ● ● ● ● ● ● Do not touch hot surfaces. Accessible surfaces are liable to get hot during use. Always use oven gloves to remove the hot bread pan. To prevent spillages inside the oven chamber, always remove the bread pan from the machine before adding the ingredients.
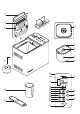
key on/off switch lid handle viewing window automatic dispenser heating element bread pan handle kneader drive shaft drive coupling on/off switch measuring cup dual measuring spoon 1tsp & 1tbsp ● ● ● Your Kenwood breadmaker is fitted with an ON/OFF switch and will not operate until the “on” switch is pressed. ● ● Plug in and press the ON/OFF switch situated at the back of the breadmaker - the unit will beep and 1 (3:15) will appear in the display window.
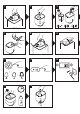
using your Bread Maker viewing light (refer to illustration panel) 1 2 3 4 7 8 9 10 11 12 13 14 15 16 17 18 19 ● Remove the bread pan by holding the handle and turning the pan to the back of the baking chamber. Fit the kneader. Pour the water into the bread pan. Add the rest of the ingredients to the pan in the order listed in the recipes. Ensure that all the ingredients are weighed accurately as incorrect measures will produce poor results.
automatic dispenser usage chart ingredients suitable for use with the automatic dispenser comments Dried Fruit i.e Sultanas, Raisins, Mixed Peel & Glace Cherries Yes Roughly chop and do not chop too small. Do not use fruit soaked in syrup or alcohol. Lightly dust with flour to stop fruit sticking. Pieces cut too small may stick to the dispenser and may not be added to the dough. Nuts Yes Roughly chop and do not chop too small. Large Seeds i.e. Sunflower & Pumpkin Seeds Yes Small Seeds i.e.
6 For making jams 12 jam Bake only feature. Can also be used to rewarm or crisp loaves already baked and cooled. Use timer buttons to change time required.
delay timer The Delay timer allows you to delay the bread making process up to 15 hours. The delayed start cannot be used with the “RAPID BAKE” program or programs (7) to (13). IMPORTANT: When using this delayed start function you must not use perishable ingredients – things that ‘go off’ easily at room temperature or above, such as milk, egg, cheese and yoghurt etc. To use the DELAY TIMER simply place the ingredients in the bread pan and lock the pan into the bread maker.
7 When the CONFIRM button is pressed for the last time after the keep warm stage a beep will sound and the program will be automatically saved. 8 If you want to move back to the previous stage press the CANCEL button to change the time. favourite program The Favourite program allows you to create and store up to 5 of your own programs. to Create/Modify Own Program 1 Plug in and switch on. 2 Press the FAVOURITE button to select the program you wish to change from P1 to P5.
power interruption protection Your Bread Maker has an 8 minute power interruption protection in case the unit is accidentally unplugged during operation. The unit will continue the program if plugged back in straight away. care and cleaning ● ● ● ● ● ● ● ● ● ● Unplug the bread maker and allow to cool completely before cleaning. Do not immerse either the bread maker body or the outside base of the bread pan in water. Do not use abrasive scouring pads or metal implements.
Recipes (add the ingredients to the pan in the order listed in the recipes) Basic White Bread Program 1 Ingredients 500g 750g 1Kg Water 245ml 300ml 380ml Vegetable oil 1tbsp 11⁄2tbsp 11⁄2tbsp Unbleached white bread flour 350g 450g 600g Skimmed milk powder 1tbsp 4tsp 5tsp Salt 1tsp 11⁄2tsp 11⁄2tsp Sugar 2tsp 1tbsp 4tsp Easy blend dried yeast 1tsp 11⁄2tsp 11⁄2tsp tsp = 5 ml teaspoon tbsp = 15ml tablespoon Brioche Bread (use light crust colour) Program 6 Ingredients 500g
Rapid White Bread Rapid Bake Button Ingredients 1Kg Water, lukewarm (32-35°C) 350ml Vegetable oil 1tbsp Unbleached white bread flour 600g Skimmed milk powder 2tbsp Salt 1tsp Sugar 4tsp Easy blend dried yeast 4tsp 1 Press the RAPID BAKE button and the program will start automatically.
granary bread flour A combination of white, wholemeal and rye flours mixed with malted whole wheat grains, which adds both texture and flavour. Use on its own or in combination with strong white flour. ingredients The major ingredient in bread making is flour, so selecting the right one is the key to a successful loaf. wheat flours Wheat flours make the best loaves. Wheat consists of an outer husk, often referred to as bran, and an inner kernel, which contains the wheat germ and endosperm.
fats and oils A small amount of fat or oil is often added to bread to give a softer crumb. It also helps to extend the freshness of the loaf. Use butter, margarine or even lard in small quantities up to 25 g (1 oz) or 22ml (11⁄2 tbsp.) vegetable oil. Where a recipe uses larger amounts so the flavour is more noticeable, butter will provide the best result. ● ● ● Olive oil or sunflower oil can be used instead of butter, adjust the liquid content for amounts over 15ml (3 tsp) accordingly.
adapting your own recipes removing, slicing and storing bread After you have baked some of the recipes supplied, you may wish to adapt a few of your own favourites, which previously have been mixed and kneaded by hand. Start by selecting one of the recipes in this booklet, which is similar to your recipe, and use it as a guide. ● ● Read through the following guidelines to help you, and be prepared to make adjustments as you go along.
● general hints and tips The results of your bread making are dependent on a number of different factors, such as the quality of ingredients, careful measuring, temperature and humidity. To help ensure successful results, there are a few hints and tips worth noting. ● The bread machine is not a sealed unit and will be affected by temperature. If it is a very hot day or the machine is used in a hot kitchen, then the bread is likely to rise more, than if it is cold.
troubleshooting guide Following are some typical problems that can occur when making bread in your bread maker. Please review the problems, their possible cause and the corrective action that should be taken to ensure successful bread making. PROBLEM POSSIBLE CAUSE SOLUTION LOAF SIZE AND SHAPE 1. Bread does not rise enough • Wholemeal breads will be lower than white breads due to less gluten forming protein in whole wheat flour. • Not enough liquid. • Sugar omitted or not enough added.
troubleshooting guide (continued) PROBLEM POSSIBLE CAUSE SOLUTION LOAF SIZE AND SHAPE 6. Collapsed while baking. • Machine was placed in a draught or may have been knocked or jolted during rising. • Exceeding capacity of bread pan. • Not enough salt used or omitted. (salt helps prevent the dough over proving) • Too much yeast. • Warm, humid weather. 7. Loaves uneven shorter on one end. • Dough too dry and not allowed to rise evenly in pan. • Reposition bread maker.
troubleshooting guide (continued) PROBLEM POSSIBLE CAUSE SOLUTION PAN PROBLEMS 15. Kneader cannot be removed. • You must add water to bread pan and allow kneader to soak before it can be removed. • Follow cleaning instructions after use. You may need to twist kneader slightly after soaking to loosen. 16. Bread sticks to pan/ difficult to shake out. • Can happen over prolonged use. • Lightly wipe the inside of bread pan with vegetable oil. • Refer to “Service and customer care” section.
service and customer care ● If the cord is damaged it must, for safety reasons, be replaced by KENWOOD or an authorised KENWOOD repairer. If you need help with: ● using your appliance or ● servicing or repairs Contact the shop where you bought your Bread Maker. IMPORTANT INFORMATION FOR CORRECT DISPOSAL OF THE PRODUCT IN ACCORDANCE WITH EC DIRECTIVE 2002/96/EC. At the end of its working life, the product must not be disposed of as urban waste.
Nederlands Vouw voor het lezen a.u.b. de voorpagina met illustraties uit ● ● ● voordat u uw Kenwood-apparaat gebruikt: Lees deze instructies zorgvuldig door en bewaar ze voor toekomstig gebruik. Verwijder alle verpakkingsmaterialen en eventuele etiketten ● veiligheid ● ● ● ● ● ● ● ● ● ● ● ● ● ● ● De hete oppervlakken nooit aanraken. De toegankelijke oppervlakken kunnen tijdens het gebruik erg warm worden. Gebruik altijd ovenhandschoenen om de hete broodpan te verwijderen.
legenda aan/uitschakelaar handvat van het deksel kijkvenster automatische dispenser verhittingselement handvat broodblik kneder aandrijfas aandrijfkoppel aan/uitschakelaar maatbeker dubbele maatlepel 1 theelepel & 1 eetlepel ● ● ● Uw Kenwood-broodmachine is uitgerust met een AAN/UIT-schakelaar en werkt pas wanneer de schakelaar op Aan staat.
19 Het broodblik en de kneder onmiddellijk na gebruik reinigen (zie Onderhoud en verzorging) gebruik van uw broodmachine (zie de illustraties) 1 2 3 4 7 8 9 10 11 12 13 14 15 16 17 18 kijklampje Verwijder het broodblik door het handvat vast te pakken en het blik in de richting van de achterkant van de bakruimte te draaien. Zet de kneder in de machine. Giet het water in het broodblik Voeg de rest van de ingrediënten aan het blik toe in de volgorde die in het recept wordt aangegeven.
tabel voor gebruik van automatische dispenser ingrediënten geschikt voor gebruik met opmerkingen de automatische dispenser Gedroogd fruit, zoals sultana’s, rozijnen, gemengde gekonfijte schillen en gekonfijte kersen Ja Grof hakken en niet te klein hakken. Gebruik geen fruit dat geweekt is in siroop of alcohol. Licht met bloem bestuiven om te voorkomen dat het fruit aan elkaar plakt. Te kleine stukken kunnen aan de dispenser blijven plakken en worden misschien niet aan het deeg toegevoegd.
24 Recepten voor wit- of bruinbrood Verkort de cyclus voor witbrood met ongeveer 25 minuten. Recepten voor tarwe- of volkorenmeel: 30 minuten voorverwarmen Te gebruiken met grof volkorenmeel en voor een sneller volkorenbrood. Niet geschikt voor 100% volkorenbrood.
25 Bakfunctie. Kan ook gebruikt worden om reeds gebakken brood op te warmen of een knapperige korst te geven. Gebruik de timertoetsen om de gewenste tijd in te stellen. Bakt een brood in minder dan een uur. Hiervoor gebruikt u warm water, extra gist en minder zout.
vertragingstimer Voorbeeld: U wilt dat er om 7 uur ’s morgens een vers gebakken brood voor u klaar ligt. Als de broodmachine om 10 uur de avond ervoor wordt voorbereid met alle benodigde ingrediënten, moet vertragingstimer ingesteld worden op 9 uren. Met de programmeerbare timer kunt u het broodproces maximaal 15 uur uitstellen. De uitgestelde start kan niet worden gebruikt met het programma SNELBAKKEN of programma (7) tot en met (13).
7 Als u de knop BEVESTIGEN voor de laatste keer indrukt na de warmhoudfase, hoort u een pieptoon en wordt het programma automatisch opgeslagen. 8 Als u wilt terugkeren naar een eerdere fase, drukt u op de knop ANNULEREN om de tijd te veranderen. favoriet programma Met het favoriete programma kunt u maximaal 5 eigen programma’s creëren en opslaan. Eigen programma creëren/wijzigen 1 Steek de stekker in het stopcontact en schakel het apparaat aan.
bescherming tegen stroomuitval Uw broodmachine beschikt over een stroomonderbrekingsbescherming van 8 minuten voor het geval de stekker van het apparaat per ongeluk uit het stopcontact gehaald wordt, terwijl het apparaat in bedrijf is. Het apparaat werkt het programma normaal af, wanneer het onmiddellijk weer op het stopcontact wordt aangesloten. verzorging en reiniging ● ● ● ● ● ● ● ● ● ● Haal de stekker van de broodmachine uit het stopcontact en laat hem volledig afkoelen voordat u hem reinigt.
recepten (voeg de ingrediënten aan het blik toe in de volgorde die in het recept wordt aangegeven) Gewoon witbrood Programma 1 Ingrediënten 500g 750g 1Kg Water 245ml 300ml 380ml 1 el 11⁄2 el 11⁄2 el Plantaardige olie Ongebleekt meel voor witbrood 350g 450g 600g 1 el 4 theel 5 theel Zout 1 theel 11⁄2 theel 11⁄2 theel Suiker 2 theel 1 el 4 theel Gedroogde gist 1 theel 11⁄2 theel 11⁄2 theel Magere melkpoeder theel = theelepel van 5 ml el = eetlepel van 15 ml Brioche Bread (g
Snel witbrood toets voor snelbakken Ingrediënten 1Kg Water, lauw (32-35 °C) 350ml Plantaardige olie 1 el Ongebleekt meel voor witbrood 600g Magere melkpoeder 2 el Zout 1 theel Suiker 4 theel Gedroogde gist 4 theel 1 Druk op de toets SNELBAKKEN en het programma start automatisch.
Broodmeel met volle korrel Een combinatie van wit meel, volkorenmeel en roggemeel gemengd met gemoute volle tarwekorrels. Deze levert zowel een betere textuur als een betere smaak op. Gebruik dit op zichzelf of samen met zwaar wit meel. Ingrediënten Het hoofdingrediënt bij broodbakken is meel. Daarom is het voor het maken van een goed brood van essentieel belang de juiste soort meel te kiezen. Tarwemeel Tarwemeel levert de beste broden op.
Vloeistof Een of andere soort vloeistof is van essentieel belang; gewoonlijk wordt water of melk gebruikt. De korst wordt door water knapperiger dan door melk. Water wordt vaak gecombineerd met magere melkpoeder. Dit is uiterst belangrijk, als de instelling voor uitstel van het bakproces wordt gebruikt, omdat verse melk achteruit zal gaan. Voor de meeste programma’s is het geen probleem water rechtstreeks uit de kraan te gebruiken. Voor de 1uurscyclus is echter lauw water nodig.
● ● ● ● ● Gebruik de in de recepten vermelde hoeveelheden; door een teveel zou het brood te sterk kunnen rijzen en over de rand van de broodpan heen kunnen komen. Zodra een zakje gist is geopend, moet de gist binnen 48 uur worden gebruikt, tenzij de producent iets anders vermeldt. Sluit het zakje na elk gebruik weer af. Gebruik gedroogde gist vóór de vermelde uiterste gebruiksdatum, omdat deze geleidelijk minder actief wordt.
● Algemene tips De resultaten van het broodbakken hangen af van een aantal verschillende factoren, zoals de kwaliteit van de ingrediënten, of deze nauwkeurig zijn afgewogen, de temperatuur en de luchtvochtigheid. Hier volgen enkele nuttige tips. ● Omdat de broodbakmachine geen afgesloten geheel is, staat hij onder invloed van de omgevingstemperatuur. Op een zeer warme dag of als de machine in een warme keuken wordt gebruikt, zal het brood waarschijnlijk meer rijzen dan als het koud is.
Het opsporen en oplossen van problemen Hier volgen enige gebruikelijke problemen die bij broodbakken in de broodbakmachine kunnen optreden. Bestudeer de problemen, hun mogelijke oorzaak en de maatregel die moet worden genomen om brood met succes te bakken. PROBLEEM MOGELIJKE OORZAAK OPLOSSING GROOTTE EN VORM VAN BRODEN 1. Brood rijst niet voldoende. • Volkorenbrood rijst minder dan wittebrood, omdat volkorenmeel een lager gehalte aan glutenvormende eiwitten heeft. • Onvoldoende vloeistof.
Het opsporen en oplossen van problemen (vervolg) PROBLEEM 4. Bovenkant en zijkanten zakken in. MOGELIJKE OORZAAK OPLOSSING • Te veel vloeistof. • Verlaag de volgende keer de hoeveelheid vloeistof met 15 ml/3 tl. of voeg wat extra meel toe. • Gebruik de in het recept aanbevolen hoeveelheid of probeer de volgende keer een snellere cyclus. • Te veel gist. 5. Misvormde, knoestige bovenkant - niet glad. • Het deeg is mogelijk te snel gerezen als gevolg van een hoge luchtvochtigheid en warm weer.
Het opsporen en oplossen van problemen (vervolg) PROBLEEM MOGELIJKE OORZAAK OPLOSSING BROODTEXTUUR 8. Dichte textuur. 9. Open, grove, sponsachtige structuur. 10. Het midden van het brood is onvoldoende gebakken. 11. Het brood is niet gemakkelijk in sneetjes te snijden en is erg kleverig. • Te veel deeg. • Nauwkeurig afmeten. • Onvoldoende gist. • De juiste hoeveelheid aanbevolen gist afmeten. • Onvoldoende suiker. • Nauwkeurig afmeten. • Geen zout toegevoegd.
Het opsporen en oplossen van problemen (vervolg) PROBLEEM MOGELIJKE OORZAAK OPLOSSING MECHANISCHE ASPECTEN VAN DE MACHINE 17. De broodmachine functioneert niet/De kneder beweegt niet. 18. De ingrediënten zijn niet gemengd. • Broodmachine staat niet aan • Controleer of de aan/uitschakelaar AAN-stand staat. • De broodpan is niet goed in de machine geplaatst. • De vertragingstimer werd ingesteld. • Controleer of de pan goed vergrendeld is. • De broodbakmachine is niet aangezet.
onderhoud en klantenservice ● ● ● Als het snoer beschadigd is, moet het om veiligheidsredenen door KENWOOD of een door KENWOOD geautoriseerd reparatiebedrijf vervangen worden. Als u hulp nodig hebt met: het gebruik van uw apparaat of onderhoud en reparatie kunt u contact opnemen met de winkel waar u het apparaat gekocht hebt.
Français Avant de lire, dépliez la première page pour voir les illustrations ● ● ● avant d’utiliser votre appareil Kenwood Lisez et conservez soigneusement ces instructions pour pouvoir vous y référer ultérieurement. Retirez tous les emballages et, le cas échéant, les étiquettes. ● sécurité ● ● ● ● ● ● ● ● ● ● ● ● ● ● ● Ne pas toucher les surfaces chaudes. Les surfaces accessibles sont susceptibles de devenir très chaudes en cours d’utilisation.
● légende poignée du couvercle hublot de surveillance distributeur automatique elément chauffant poignée du moule à pain bras pétrisseur arbre de transmission accouplement entre bras pétrisseur et moteur interrupteur marche / arrêt tasse graduée double cuillère à mesurer : 1 cuillère à café & 1 cuillère à soupe ● ● Utilisez toujours la cuillère à mesurer fournie pour mesurer des quantités plus petites d'ingrédients secs et liquides.
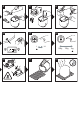
15 A la fin du programme de cuisson, débranchez la machine à pain. 16 Retirez la cuve à pain en la saisissant par la poignée et en la tournant vers l’arrière de la chambre de cuisson. Utilisez toujours des gants isolants car la poignée de la cuve est chaude. Veillez à ne pas toucher le distributeur automatique situé sous le couvercle car il est chaud également. 17 Retournez le pain sur une grille pour le laisser refroidir.
● 2 Remplissez le distributeur avec les ingrédients souhaités. 3 Le distributeur automatique fonctionne après 15 à 20 minutes de pétrissage et un signal sonore retentit au cas où vous auriez également besoin d’ajouter des ingrédients manuellement. ● ● astuces & conseils Tous les ingrédients ne sont pas adaptés à une utilisation avec le distributeur automatique.
44 Recettes à base de farine blanche ou de farine de blé entier Permet de réduire le cycle Pain blanc d’environ 25 minutes. Recettes à base de farine de blé entier ou de farine complète: 30 minutes de préchauffage Pour la farine avec grains concassés et pour obtenir un pain complet plus rapidement. Ne convient pas aux pains 100 % blé complet.
45 Produit des pains en moins d’une heure. Les pains nécessitent de l’eau tiède, plus de levure et moins de sel.
programmateur ● Le minuteur vous permet de différer la préparation du pain pour une durée maximale de 15 heures. La mise en marche différée ne peut être utilisée avec le programme « CUISSON RAPIDE » ou avec les programmes (7) à (13). IMPORTANT : lorsque vous employez cette fonction de départ retardé, n’utilisez pas d’ingrédients périssables – des aliments qui se gâtent à température ambiante ou à une température supérieure, comme le lait, les œufs, le fromage, le yaourt, etc.
7 Lorsque vous appuyez sur le bouton CONFIRMER pour la dernière fois, après le cycle de maintien au chaud, un signal sonore retentit et le programme est automatiquement sauvegardé. 8 Si vous souhaitez revenir au cycle précédent, appuyez sur le bouton ANNULER pour modifier la durée. programme favori Le programme Favori vous permet de créer et de stocker jusqu’à cinq de vos propres programmes. pour créer/modifier votre propre programme 1 Branchez et allumez l’appareil.
protection en cas de coupure de courant Votre machine à pain est équipée d’une protection contre les coupures de courant de 8 minutes, en cas de débranchement accidentel de l’appareil en cours de fonctionnement. L’appareil continue le programme s’il est rebranché immédiatement. entretien et nettoyage ● ● ● ● ● ● ● ● ● ● Débranchez la machine à pain et laissez refroidir totalement avant le nettoyage. N’immergez pas le corps de l'appareil ou la base externe du bol à pain dans de l'eau.
Recettes (ajoutez les ingrédients dans le moule en respectant l’ordre indiqué dans les recettes) Pain blanc basique Programme 1 Ingrédients 500g 750g 1Kg Eau 245ml 300ml 380ml 1 c à soupe 11⁄2 c à soupe 11⁄2 c à soupe 350g 450g 600g 1 c à soupe 4 c à café 5 c à café 11⁄2 c à café Huile végétale Farine T55 Lait en poudre écrémé Sel 1 c à café 11⁄2 c à café Sucre 2 c à café 1 c à soupe 4 c à café Levure déshydratée facile à mélanger 1 c à café 11⁄2 c à café 11⁄2 c à café c à ca
Pain blanc rapide touche de cuisson rapide Ingrédients 1Kg Eau, tiède (32-35 °C) Huile végétale 350ml 1 c à soupe Farine T55 600g Lait en poudre écrémé 2 c à soupe Sel 1 c à café Sucre 4 c à café Levure déshydratée facile à mélanger 4 c à café 1 Appuyez sur le bouton CUISSON RAPIDE. Le programme commence automatiquement.
La farine bis forte Celle-ci peut être utilisée en association avec de la farine blanche, ou bien seule. Elle contient environ 80 à 90 % de grains de blé et elle produit donc un pain plus léger, qui a toutefois très bon goût. Essayez d'utiliser cette farine avec le cycle "Pain blanc normal", en remplaçant 50 % de la farine blanche forte par de la farine bis forte. Il vous faudra peut-être ajouter un peu plus de liquide.
● Les édulcorants Utilisez des sucres blancs ou roux, du miel, de l'extrait de malt, du sirop de sucre roux, du sirop d'érable, de la mélasse ou de la mélasse raffinée. ● ● ● ● ● ● Le sucre et les édulcorants liquides contribuent à la couleur du pain et aident à donner un aspect doré à la croûte. Le sucre attire l'humidité, ce qui permet de mieux conserver le pain.
● ● ● Comment défourner, couper en tranches et conserver le pain Dès qu'un sachet de levure a été ouvert, il doit être utilisé en 48 heures, sauf indication contraire du fabriquant. Refermez le sachet après l'usage. Utilisez la levure déshydratée avant la date d'utilisation indiquée sur l'emballage car sa force se détériore avec le temps. Il se peut que vous trouviez dans le commerce de la levure déshydratée spécialement conçue pour utiliser dans les machines à pain.
● Recommandations générales et petits conseils pratiques ● Le succès de la fabrication de votre pain dépend d'un certain nombre de facteurs divers, parmi lesquels la qualité des ingrédients, leur mesure exacte, la température et l'humidité. Pour vous aider à obtenir de bons résultats, voici quelques recommandations générales et petits conseils pratiques qui valent la peine d'être mentionnés. ● La machine à pain n'est pas une unité hermétique et elle sera affecté par la température.
guide de depannage Voici quelques exemples de problèmes types que vous risquez de rencontrer lorsque vous faites du pain dans votre machine à pain. Lisez bien tous ces problèmes, leur cause possible et l'action à entreprendre pour y remédier et réussir vos recettes. PROBLEM POSSIBLE CAUSE SOLUTION TAILLE ET FORME DU PAIN 1. Le pain ne lève pas assez • Les pains complets ne lèveront pas autant que les pains blancs car la farine complète contient moins des protéines qui forment du gluten.
guide de depannage PROBLEM 5. Le dessus est bosselé et noueux - il n’est pas lisse. 6. Le pain s’est affaissé durant la cuisson. 7. Les pains sont irrégulièrement plus courts à une extrémité. POSSIBLE CAUSE SOLUTION • Il n’y a pas assez de liquide. • Il y a trop de farine. • Le dessus des pains n’est pas toujours parfaitement formé mais cela n’affecte pas le goût très savoureux du pain. • La machine était placée dans un courant d’air ou bien elle a été cognée ou secouée pendant que la pâte levait.
guide de depannage PROBLEM POSSIBLE CAUSE SOLUTION COULEUR ET EPAISSEUR DE LA CROUTE 12. La croûte est trop foncée/trop épaisse. 13. Le pain est brûlé. • Vous avez utilisé le réglage pour pain à croûte BIEN CUITE. • La machine ne fonctionne pas bien. • Utilisez un réglage Pâle ou Moyenne la prochaine fois. • Référez-vous à la section “Service Après-Vente” • Prolongez le temps de cuisson.
guide de depannage PROBLEM POSSIBLE CAUSE SOLUTION 20. La machine est • Si la machine est en cycle de pétrissage, retirez les ingrédients et recommencez. débranchée par accident • Si la machine est en cycle de levée, retirez la pâte de la cuve, mettez-la en ou il n’y a plus de pendant le courant forme et placez-la dans un moule à pain graissé de 23 x 12,5 cm, couvrez et fonctionnement. laissez-la lever jusqu’à ce qu’elle ait doublé de taille.
Deutsch Bevor Sie die Bedienungsanleitung lesen, bitte Deckblatt mit Illustrationen auseinander klappen ● ● ● vor Gebrauch Ihres Kenwood-Gerätes Lesen Sie diese Anleitung sorgfältig durch und bewahren Sie diese zur späteren Benutzung auf. Entfernen Sie jegliches Verpackungsmaterial und alle Aufkleber ● Sicherheitshinweise ● ● ● ● ● ● ● ● ● ● ● ● ● ● ● Heiße Fläche nicht berühren. Die zugänglichen Flächen können im Gebrauch heiß werden. Zur Herausnehmen der Brotwanne immer Backhandschuhe tragen.
Legende ein/aus Taste Deckelgriff Sichtfenster Zutatenspender Heizstab Handgriff Innenbehälter Kneter Antriebswelle Antriebskupplung ein/aus Taste Messbecher Doppelmesslöffel – 1 TL (tsp) & 1 EL (tbsp) ● ● ● Ihr Kenwood Brotbackautomat ist mit einer Taste EIN/AUS ausgestattet und funktioniert erst nach Drücken der Taste „ein“.
16 Entfernen Sie den Brotbackbehälter, indem Sie ihn am Griff fassen und ihn zur Rückseite der Backkammer drehen. Verwenden Sie immer Backhandschuhe, da der Brotbackbehälter heiß ist, und achten Sie darauf, den Zutatenspender an der Unterseite des Geräts nicht zu berühren, da auch dieser heiß ist. 17 Kippen Sie das Brot aus dem Einsatz auf einen Rahmen und lassen es abkühlen. 18 Vor dem Aufschneiden, lassen Sie das Brot mindestens 30 Minuten abkühlen, damit Dampf entweichen kann.
● 2 Befüllen Sie den Zutatenspender mit den erforderlichen Zutaten. 3 Der Zutatenspender schaltet sich nach ungefähr 15 bis 20 Minuten Kneten ein. Sollten Sie weitere Zutaten manuell einzugeben haben, ertönt ein akustisches Signal. ● ● Hinweise & Tipps Nicht alle Zutaten sind für den automatischen Zutatenspender geeignet. Für optimale Backergebnisse beachten Sie bitte die unten stehenden Empfehlungen: Überfüllen Sie den Zutatenspender nicht – folgen Sie den Mengenangaben in den Rezepten.
63 Vollkorn- bzw. Volkornmehl-Rezepte: Vorwärmen 30 Minuten Zum verwenden für Kornmehl und schnellerem Vollkornbrot. Nicht geeignet für 100% Vollkornmehl mit einer Vorwärmzeit von 5 Minuten. Ergibt eine knusprigere Kruste und eignet sich für Brote mit niedrigem Fett- und Zuckeranteil 3 Vollkorn 4 Vollkorn schnell 5 Französisch 1:22 Teig zum selber formen und backen im eigenen Ofen. Lange Ruhezyklen für die Hefe bei der Zubereitung von Hefeteig.
64 Nur backen. Kann aber auch zum Aufwärmen oder Auffrischen bereits gebackener und abgekühlter Brote verwendet werden. Zum Ändern der gewünschten Backzeit verwenden Sie die Timer-Schalter.
Verzögerungs-Timer ● Der Verzögerungstimer (Die Zeitprogrammierung) erlaubt es Ihnen, den Backvorgang um bis zu 15 Stunden versetzt zu starten. Der verzögerte Start kann jedoch nicht im „Schnell-Back“-Programm oder den Programmen (7) bis (13) aktiviert werden. WICHTIG: Für diese Timer-Funktion dürfen Sie keine verderblichen Zutaten verwenden, d.h. keine Zutaten, die bei Raumtemperatur oder höheren Temperaturen leicht schlecht werden, wie z.B. Milch, Eier, Käse und Joghurt usw.
7 Wenn nach der Warmhalte-Stufe die Taste BESTÄTIGEN zum letzten Mal gedrückt wird, erklingt ein Ton und das Programm wird automatisch abgespeichert. 8 Wenn Sie zur vorherigen Stufe zurückgehen wollen, drücken Sie die Taste ABBRECHEN, um die Zeiteinstellung zu verändern. Favoriten-Programm Das Favoriten-Programm ermöglicht Ihnen, bis zu 5 Ihrer eigenen Backprogramme zu kreieren und zu speichern. Eigenes Programm kreieren/ändern 1 Gerät ans Netz anschließen und einschalten.
Unterbrechung der Stromzufuhr Ihr Brotbackautomat hat einen 8-minütigen Stromunterbrechungs-Schutz, falls versehentlich der Netzstecker während des Betriebs herausgezogen wird. Der Automat setzt den Programmablauf sofort nach Einstecken wieder fort. Reinigung und Pflege ● ● ● ● ● ● ● ● ● ● Ziehen Sie den Netzstecker des Brotbackautomaten und lassen Sie das Gerät vollständig abkühlen. Den Backautomaten oder die Außenseite des Backbehälters nicht in Wasser tauchen.
Rezepte (fügen Sie die Zutaten in der auf dem Rezept angegebenen Reihenfolge hinzu).
Schnelles Weißbrot Schnellbacktaste Zutaten 1Kg Wasser, lauwarm (32 – 35°C) 350ml Pflanzliches Öl 1 EL Weizenmehl 600g Milchpulver 2 EL Salz 1 TL Zucker 4 TL Trockenhefe 4 TL 1 Drücken Sie die Taste SCHNELL BACKEN, startet das Programm automatisch.
Kornkammermehl Eine Mischung aus Weizenmehl, Vollkornmehl und Roggenmehl, mit gemälztem Vollkorn, das zusätzlich Struktur und Geschmack verleiht. Es wird allein oder zusammen mit Weizenmehl verwendet. Zutaten Mehl ist die Hauptzutat eines Brotes. Die Wahl des richtigen Mehls ist deshalb sehr wichtig. Weizenmehl Weizenmehl ergibt das beste Brot. Das Weizenkorn besteht aus der äußeren Hülse, der Spelze, und dem inneren Kern mit dem Weizenkeim und dem Endosperma.
● Süßungsmittel Verwenden Sie weißen oder braunen Zucker, Honig, Malzextrakt, Rübensaft (Goldsirup), Ahornsirup, Melasse. ● ● ● ● ● Zucker und flüssige Süßungsmittel sind gut für die Farbe des Brots und verleihen der Kruste eine goldbraune Farbe. Zucker zieht Feuchtigkeit an und verbessert so die Haltbarkeit. Zucker ist Nahrung für die Hefe, wenn auch nicht unbedingt notwendig, da die modernen Trockenhefen sich von den natürlichen Zuckern und Stärken im Mehl ernähren können.
Ihre eigenen Rezepte anpassen Brot entnehmen, schneiden und lagern Vielleicht möchten Sie nach dem Backen einiger mitgelieferter Rezepte ein paar Ihrer eigenen Lieblingsrezepte anpassen, die Sie vorher von Hand gemixt und geknetet haben. Wählen Sie zunächst eines der Rezepte in diesem Heft aus, das Ihrem eigenen Rezept ähnelt und nehmen Sie dieses als Orientierung. ● ● Beachten Sie die folgenden Richtlinien und stellen Sie sich darauf ein, daß Sie das eine oder andere anpassen müssen.
● Allgemeine Tipps und Hinweise Für den Geschmack Gemüse wie geriebene Karotten, Zucchini oder gekochte pürierte Kartoffeln zugegeben werden. Diese sind jedoch wasserhaltig - Sie werden in diesem Fall also die Flüssigkeitsmenge reduzieren müssen. Beginnen Sie mit weniger Wasser und prüfen Sie den Teig, wenn das Kneten beginnt, und geben Sie gegebenenfalls noch etwas Wasser zu. ● Die in den Rezepten angegebenen Mengen nicht überschreiten, damit Ihr Brotbackautomat nicht beschädigt wird.
Fehlersuchanleitung Nachfolgend finden Sie einige typische Probleme, die beim Backen von Brot in Ihrem Brotbackautomaten auftreten können. Die Tabelle enthält die Fehler und die möglichen Ursachen, sowie für jede Ursache eine Maßnahme zur Behebung. PROBLEM 1. Brot geht nicht genug MÖGLICHE URSACHE LÖSUNG GRÖSSE UND FORM DES LAIBS • Vollkornbrote sind niedriger als Weizenbrote, weil sie weniger Gluten enthalten. • Nicht genug Flüssigkeit. • Kein oder zu wenig Zucker.
Fehlersuchanleitung PROBLEM 6. Fällt beim Backen zusammen. 7. Laib an einem Ende ungleichmäßig kürzer. MÖGLICHE URSACHE LÖSUNG • Während des Gehens stand die Maschine im • Backautomaten an anderer Stelle aufstellen. Zug oder wurde geschubst oder gestoßen. • Kapazität des Backbehälters überschritten. • Verwenden Sie für große Brote (max. 1Kg) nicht mehr Zutaten als vorgegeben. • Nicht genug oder kein Salz (Salz hilft, damit • Salzmenge nach Rezept. der Teig nicht zu stark geht). • Zu viel Hefe.
guide de depannage PROBLEM 17. Brotbackgerät nicht in Betrieb / Knethaken bewegt sich nicht. MÖGLICHE URSACHE LÖSUNG MASCHINENMECHANIK • Brotbackautomat ist nicht eingeschaltet • Überprüfen Sie, ob die Taste ein/aus auf EIN steht. • Brotbackbehälter nicht korrekt positioniert. • Prüfen Sie, dass der Brotbackbehälter eingerastet ist. • Timer-Funktion gewählt. • Der Brotbackautomat beginnt erst dann, wenn der Countdown die Startzeit des Programms erreicht hat. 18.
Kundendienst und Service ● ● ● Ein beschädigtes Netzkabel darf aus Sicherheitsgründen nicht selbst repariert werden, sondern muß von KENWOOD oder einer autorisierten KENWOOD-Kundendienststelle ausgetauscht werden. Hinweise zur: Verwendung Ihres Kenwood Gerätes Wartung oder Reparatur Bitte setzen Sie sich mit Ihrem Händler in Verbindung, bei dem Sie das Gerät gekauft haben. WICHTIGER HINWEIS FÜR DIE KORREKTE ENTSORGUNG DES PRODUKTS IN ÜBEREINSTIMMUNG MIT DER EG-RICHTLINIE 2002/96/EG.
Italiano Prima di leggere questo manuale si prega di aprire la prima pagina, al cui interno troverete le illustrazioni ● ● ● prima di utilizzare la vostra apparecchiatura Kenwood Leggere attentamente le presenti istruzioni e conservarle come futuro riferimento. Rimuovere tutto il materiale di imballaggio e le etichette. ● sicurezza ● ● ● ● ● ● ● ● ● ● ● ● ● ● ● Non toccare le superfici calde. Le superfici accessibili potrebbero riscaldarsi durante l’uso.
legenda interruttore acceso/spento manico del coperchio finestrella di ispezione erogatore automatico elemento termico manico della teglia impastatore albero motore accoppiamento motore interruttore acceso/spento misurino doppio misuratore – 1 cucchiaio & 1 cucchiaino ● ● ● Questo apparecchio Kenwood è provvisto di un interruttore di accensione/spegnimento e non entra in funzione a meno che si selezioni “on” (acceso).
18 Il pane deve essere fatto raffreddare per almeno 30 minuti prima di affettarlo, per eliminare tutto il vapore. In caso contrario, affettarlo sarà difficoltoso. 19 Pulire la teglia e l’impastatore immediatamente dopo l’uso (vedere la sezione Cura e pulizia). come usare il Piccolo Fornaio (vedi il pannello illustrativo) 1 2 3 4 7 8 9 10 11 12 13 14 15 16 17 Estrarre la teglia tenendola dal manico e ruotandola verso la parte retrostante dell’apparecchio. Inserire l’impastatore.
● ● consigli & suggerimenti Non tutti gli ingredienti sono idonei per l’uso con l’erogatore automatico, e per i migliori risultati seguire gli orientamenti riportati sotto: Non riempire eccessivamente l’erogatore; attenersi alle quantità consigliate, come specificato nelle ricette fornite. ● Tenere l’erogatore pulito e asciutto, per impedire che gli ingredienti aderiscano alla superficie.
82 Per pane & torte senza lievito Per farine e miscele per pane senza glutine. Peso max. farina: 500g 8 minuti di preriscaldamento Impasto da lavorare a mano e da cuocere in forni tradizionali.
83 Per fare il pane in meno di 1 ora. Occorrono acqua tiepida, più lievito e meno sale. tasto cottura rapida 500g 0:58 0:10 - 1:30 1:30 750g 1Kg Durata totale programma Doratura media - - 1:14 Entrata in funzione dell’erogatore automatico & del tono di avvertimento per l’aggiunta degli ingredienti ✬ 500g 750g 1Kg 60 60 - Riscaldamento ✬✬ ✬ Un tono di avvertimento al termine del 2º ciclo di impasto informa della necessità di aggiungere ingredienti, se previsto dalla ricetta.
timer ritardo ● Il timer Ritardo permette di ritardare la panificazione di fino a 15 ore. La funzione di inizio ritardato non può essere usata con il programma di cottura rapida “RAPID BAKE” o con i programmi da (7) a (13). IMPORTANTE: quando si utilizza l’opzione inizio ritardato non si devono utilizzare ingredienti che “vanno a male” facilmente a temperatura ambiente quali latte, uova, formaggio, yogurt, ecc.
6 Ripetere le fasi dalla 3 alla 5 fino al completamento di tutti gli stadi come desiderato. L’indicatore di stato del programma mostra lo stadio del programma raggiunto. 7 Una volta premuto il tasto CONFIRM (conferma) per l’ultima volta dopo lo stadio di riscaldamento, si sentirà un bip ed il programma sarà salvato automaticamente. 8 Per tornare allo stadio precedente, premere il tasto CANCEL (cancella) per modificare il tempo.
protezione contro l’interruzione della corrente L’apparecchio include un dispositivo di protezione per fino a 8 minuti di interruzione di corrente, se durante il funzionamento si disinserisce accidentalmente la spina dalla presa elettrica. Tuttavia, se la spina viene ricollegata immediatamente l’apparecchio continua a funzionare secondo il programma impostato.
Ricette (aggiungere gli ingredienti nella teglia nell’ordine indicato dalle ricette) Pane bianco standard Ingredienti Acqua Olio vegetale Farina bianca per pane, non sbiancata Latte scremato in polvere Sale Zucchero Lievito in polvere facilmente miscelabile Programma 1 500g 245ml 1C 350g 750g 300ml 11⁄2 C 450g 1Kg 380ml 11⁄2 C 600g 1C 1c 2c 1c 4c 11⁄2 c 1C 11⁄2 c 5c 11⁄2 c 4c 11⁄2 c c = cucchiaino = 5ml C = cucchiaio = 15 ml Pane per brioche (usare doratura con crosta chiara) Ingredienti Latte Uov
Rapid White Bread Tasto cottura rapida Ingredienti 1Kg Acqua, tiepido (32-35ºC) 350ml Olio vegetale 1C Farina per pane bianco non sbiancata 600g Latte scremato in polvere 2C Sale 1c Zucchero 4c Lievito in polvere facilmente miscelabile 4c 1 Premere il tasto di cottura rapida RAPID BAKE: ora il programma parte automaticamente.
Farina integrale forte È possibile usare questo tipo di farina insieme alla farina bianca, oppure da solo. Contiene circa l’80-90% del guscio del frumento, quindi dà un pane più leggero ma comunque gustosissimo. Provate ad usare questa farina con il ciclo di base per il pane bianco, sostituendo il 50% della farina bianca forte con la farina integrale forte. Forse potrebbe essere necessario aggiungere un po’ di liquido in più.
● Dolcificanti Usare zucchero semolato o di canna, miele, estratto di malto, sciroppo di zucchero, sciroppo di acero o melassa. ● ● ● ● ● Lo zucchero e i dolcificanti liquidi contribuiscono alla colorazione finale del pane, per una crosta più dorata. Lo zucchero attira l’umidità, quindi migliora le proprietà di conservazione.
● Come togliere, affettare e conservare il pane È anche in commercio uno speciale tipo di lievito in polvere realizzato proprio per l’uso coi forni per pane. Anche questo tipo di lievito darà buoni risultati, sebbene forse sarà necessario regolare le quantità consigliate. ● Quando il pane è cotto, è meglio toglierlo dal Piccolo Fornaio e dalla teglia, anche se il forno può tenerlo riscaldato per fino ad 1 ora, se desiderate.
● Consigli e suggerimenti generali I risultati ottenibili con la panificazione dipendono da diversi fattori, come la qualità degli ingredienti, la precisa misurazione, la temperatura e l’umidità. Per aiutarvi ad avere ottimi risultati, ecco alcuni utili consigli e suggerimenti. ● Il vostro Piccolo Fornaio non è un apparecchio ermetico e pertanto risente della temperatura.
Guida alla ricerca e soluzione dei problemi Si elencano di seguito alcuni problemi tipici che possono verificarsi quando si fa il pane con il Piccolo Fornaio. Si prega di analizzare i problemi, la loro possibile causa e l’azione correttiva da prendersi a garanzia di ottimi risultati. PROBLEMA 1. La lievitazione del pane è insufficiente 2. 3. 4. 5. POSSIBILE CAUSA SOLUZIONE DIMENSIONI E FORMA DEL PANE • Il pane integrale lievita meno del pane bianco, per via del minore contenuto di glutine.
Guida alla ricerca e soluzione dei problemi PROBLEMA 6. Il pane si affossa durante la cottura. POSSIBILE CAUSA SOLUZIONE DIMENSIONI E FORMA DEL PANE • L’elettrodomestico è stato collocato in una posizione esposta a spifferi, oppure è stato urtato o capovolto durante la lievitazione. • Si è superata la capacità della teglia. • Non si è usato abbastanza sale o lo si è omesso (il sale aiuta a prevenire l’eccessiva lievitazione dell’impasto). • Troppo lievito. • Condizioni atmosferiche calde e umide. 7.
Guida alla ricerca e soluzione dei problemi PROBLEMA POSSIBILE CAUSA SOLUZIONE PROBLEMI CON LA TEGLIA 15. Non è possibile estrarre • Occorre aggiungere acqua nella teglia e il braccio impastatore. lasciare immerso il braccio impastatore prima di poterlo estrarre. 16. Il pane si attacca alla • Questo può accadere con l’uso prolungato. teglia/è difficile staccarlo. • Seguire le istruzioni per la pulizia dopo l’uso.
manutenzione e assistenza tecnica ● ● ● In caso il cavo sia danneggiato, per ragioni di sicurezza deve esser sostituito solo dal fabbricante oppure da un addetto KENWOOD autorizzato alle riparazioni. Se si ha bisogno di assistenza riguardo: uso dell’apparecchio o manutenzione o riparazioni Contattare il negozio dove si è acquistato l’apparecchio. AVVERTENZE PER IL CORRETTO SMALTIMENTO DEL PRODOTTO AI SENSI DELLA DIRETTIVA EUROPEA 2002/96/EC. E DEL DECRETO LEGISLATIVO N.
Dansk Fold forsiden med illustrationerne ud. ● ● ● før Kenwood-apparatet tages i brug Læs denne brugervejledning nøje og opbevar den i tilfælde af, at du får brug for at slå noget op i den. Fjern alt emballage og etiketter. sikkerhed ● ● ● ● ● ● ● ● ● ● ● ● ● ● ● ● ● Rør ikke ved varme overflader. Tilgængelige overflader er tilbøjelige til at blive varme ved brug. Anvend altid grydelapper til at tage den varme bageform ud.
oversigt tænd/sluk-knappen håndtag på låget vindue til ovnkammer automatisk dispenser varmeelement bageformens håndtag dejkrog kørselsakse kørselskobling ’tænd/sluk’-knappen målekop dobbelt måleske 1tsk. & 1spsk. ● ● ● Din Kenwood brødmaskine har en TÆND/SLUK-knap og virker ikke før du har trykket på ’tænd’-knappen ● ● Tilslut strømforsyning og tryk på ON/OFF knappen placeret bagpå brødmaskinen – enheden vil bippe og 1 (3:15) vises i displayet.
sådan anvendes din brødbager belysning (Se illustrationerne) 1 2 3 4 7 8 9 10 11 12 13 14 15 16 17 18 19 ● Fjern brødformen ved at holde på håndtaget og dreje formen mod bagsiden af bagekammeret. Sæt dejkrogen i. Hæld vandet i bageformen. Tilføj resten af ingredienserne i den rækkefølge de forekommer i opskriften. Kontroller at alle ingredienserne er korrekt afvejet/afmålt. Unøjagtigt afmålte ingredienser gør det endelige resultat ringere.
automatisk dispenser brugerdiagram ingredienser egnede til brug med den automatiske dispenser bemærkninger Tørret frugt dvs. sultanaer, rosiner, blandede kirsebær Ja Hakkes groft og ikke for småt. Anvend ikke frugt lagret i sirup eller alkohol. Drys let med mel for at forhindre at frugten sætter sig fast. Stykker, der er hakket for småt, kan sætte sig fast i dispenseren og bliver måske ikke tilsat til dejen. Nødder Ja Hakkes groft og ikke for småt. Store kerner, dvs.
101 Dej uden gær til brød & kager Til brug ved glutenfrit mel samt glutenfri brødblandinger. Maks 500g hvedemel 8 minutters forvarme Ælter dej, sådan at det kan formes i hænderne og bages i din egen ovn. Lang dejcyklus ved forberedelse af håndværkerdej Til at lave syltetøj 8 kage 9 glutenfri 10 dej 11 Håndværkerdej 12 syltetøj Giver en sprødere skorpe og er særligt egnet til brød med lavt indhold af fedt og sukker.
102 Bag kun funktion. Kan også anvendes til at genopvarme eller riste brød, som allerede er bagt og afkølet. Anvend tidsfunktionen for at ændre den ønskede tid. 14 bage 500g 0:58 0:10 - 1:30 1:30 750g 1Kg Samlet programtid - - 1:14 Den automatiske dispenser er brug & manuel alarm for tilsætning af ingredienser ✬ 500g 750g 1Kg 60 60 - Hold varm ✬✬ En alarm lyder før afslutningen af den anden æltningscyklus, således at man, hvis opskriften anbefaler det, husker at tilføre alle ingredienser.
delay-timer ● Delay timeren gør dig i stand til at udsætte brødbagningen i op til 15 timer. Delay-funktionen kan ikke bruges med “HURTIG BAGNING”-programmet eller programmerne (7) til (13). VIGTIGT: Når du anvender denne forsinkede startfunktion, må du ikke anvende let fordærvelige ingredienser – ingredienser der hurtigt bliver ”dårlige” ved stuetemperatur eller over, som f.eks. mælk, æg, ost eller yoghurt.
favorit-program Favorit-programmet gør dig i stand til at danne og gemme op til 5 af dine egne programmer. at danne/modificere eget program 1 Sæt stikket i stikkontaktet og tænd. 2 Tryk på FAVOURITE-knappen for at vælge det program du ønsker at ændre fra P1 til P5. 3 Tryk på (P) PROGRAM-knappen for at begynde med at modificere programmet. 4 Brug DELAY TIMER-knapperne (-) & (+) for at ændre på den nødvendige tidsindstilling for hvert trin.
beskyttelse mod strømafbrydelse Brødbageren har 8 min. beskyttelse mod strømafbrydelse, i tilfælde af, at apparatet tilfældigvis tages ud af stikkontakten under betjening. Apparatet vil fortsætte med at køre programmet, hvis denne sættes i stikkontakten øjeblikkeligt. vedligeholdelse og rengøring ● ● ● ● ● ● ● ● ● ● Tag brødbageren ud af stikkontakten og lad den køle af før rengøring Nedsænk ikkebrødmaskinens motor eller bageformens ydre side i vand.
Opskrifter (tilføj resten af ingredienserne i den rækkefølge de forekommer i opskriften) Almindeligt hvidt brød Program 1 Ingredienser 500g 750g 1Kg Vand 245ml 300ml 380ml Vegetabilsk olie 1spsk. 11⁄2spsk. 11⁄2spsk. 600g Ubleget hvedemel 350g 450g 1spsk. 4tsk. 5tsk. 1tsk. 11⁄2tsk. 11⁄2tsk. Sukker 2tsk. 1spsk. 4tsk. Tørret eller alm.gær 1tsk. 11⁄2tsk. 11⁄2tsk. Mælkepulver Salt tsk. = 5 ml. teske spsk. = 15ml.
Hurtigbagt hvidt brød Hurtig bagningsknap Ingredienser 1Kg Vand, lunken (32-35°C) 350ml Vegetabilsk olie 1spsk. Ubleget hvedemel Mælkepulver 600g 2spsk. Salt 1tsk. Sukker 4tsk. Tørret eller alm.gær 4tsk. 1 Tryk på knappen HURTIG BAGNING og programmet vil automatisk starte. Boller Program 10 Ingredienser Vand 1Kg 240ml Æg Ubleget hvedemel 1 450g Salt 1tsk. Sukker 2tsk. Smør Tørret eller alm. gær 25g 11⁄2tsk. Smøres og pyntes med: Æggeblomme pisket sammen med 15 ml.
Groft brødmel En kombination af hvedemel, usigtet mel og rugmel som er blandet med maltede usigtede hvedemelskerner, der tilfører både struktur og smag. Kan anvendes alene eller kombineret med kraftigt hvedemel. Ingredienser Hovedingrediensen i brød er mel, derfor er det vigtigt at vælge den rette meltype for at opnå et godt resultat. Hvedemel Hvedemel giver det bedste brød.
● Sødemidler Brug hvidt eller brunt sukker, honning, maltekstrakt, gyldent sirup, ahornsirup, molasser eller mørk sirup. ● ● ● ● ● Sukker og fyldende sødemidler medvirker til, at brødet får farve, og hjælper med at give skorpen en gylden farve. Sukker tiltrækker væske, og holder derfor på brødet fugtighed.
tilpasning af dine egne opskrifter Fjernelse, skæring og opbevaring af brød Efter du har prøvet at bage nogle af de medfølgende opskrifter, kan det være at du har lyst til at tilpasse et par af dine egne favoritter, som tidligere skulle blandes og æltes i hånden. Begynd med at vælge en af opskrifterne i dette hæfte, som har lighedspunkter med din opskrift, og brug den som vejledning. ● ● Gennemlæs følgende retningslinjer for at hjælpe dig og vær forbedret på at foretage tilpasninger hen ad vejen.
● gode råd & tips Resultatet af din brødbagning afhænger af flere forskellige faktorer, såsom kvaliteten af de ingredienser du anvender, præcis afmåling, temperatur og fugtighed. For at sikre gode resultater er der her et par tips og ideer, der er værd at tage med. Brødmaskinen er ikke en forseglet enhed og kan blive påvirket af temperaturer. Hvis det er en meget varm dag, eller maskinen anvendes i et varmt køkken, vil brødet hæve mere, end hvis det er koldt.
vejledning til fejlafhjælpning Følgende er en beskrivelse af nogle af de problemer der muligvis kan opstå, når du anvender din brødbager til at bage brød. Gennemgå venligst problemerne, deres mulige årsag og den korrigerrende handling du bør foretage, for at sikre at din bagning bliver vellykket. PROBLEM 1. Brødet hæver ikke nok 2. 3. 4. 5. MULIG ÅRSAG LØSNING BRØDETS STØRRELSE OG FORM • Brød lavet af fuldkornshvedemel bliver tungere (lavere) end brød lavet af hvedemel, pga.
vejledning til fejlafhjælpning (fortsat) PROBLEM 6. Sunket sammen under bagning. MULIG ÅRSAG LØSNING BRØDETS STØRRELSE OG FORM • Maskinen blev anbragt i træk eller kan være blevet skubbet eller stødt under hævning. • Overstiger bageformens kapacitet. • Enten er der for lidt salt i dejen, eller det er helt udeladt. (salt forhindrer dejen i at hæve for meget) • For meget gær tilsat. • Varmt, fugtigt vejr. 7. Brød er ujævne – mindre i den ene ende.
vejledning til fejlafhjælpning (fortsat) PROBLEM 15. Dejkrogen kan ikke tages ud. 16. Brødet hænger fast i formen/ vanskeligt at ryste ud. MULIG ÅRSAG LØSNING PROBLEMER MED BAGEFORMEN • Du skal komme vand i bageformen og lade •Følg rengøringsvejledningen efter brug. For at dejkrogen ligge i blød, før den kan tages ud. løsne den, kan det være nødvendigt at dreje dejkrogen let efter opblødning . • Kan forekomme ved vedvarende brug. • Tør indersiden af bageformen let med vegetabilsk olie.
service og kundepleje ● ● ● Hvis ledningen er beskadiget, skal den af sikkerhedsgrunde udskiftes af KENWOOD eller en autoriseret KENWOOD-reparatør. Hvis du har brug for hjælp med: at bruge apparatet eller servicering eller reparation Kontakt den butik hvor du oprindelig købte dit produkt. VIGTIG INFORMATION ANGÅENDE BORTSKAFFELSE AF PRODUKTET I OVERENSSTEMMELSE MED EF DIREKTIV 2002/96/CE. Ved afslutningen af dets produktive liv må produktet ikke bortskaffes som almindeligt affald.
Svenska Vik ut främre omslaget med bilderna. ● ● ● innan du använder din Kenwood-apparat Läs bruksanvisningen noggrant och spara den för framtida bruk. Avlägsna allt emballage och eventuella etiketter. säkerheten ● ● ● ● ● ● ● ● ● ● ● ● ● ● ● ● Vidrör inga heta ytor. De åtkomliga ytorna kan bli heta under användning. Använd alltid grytlappar /grillvantar för att ta ut det varma tråget. Ta alltid ut tråget ur maskinen innan du tillsätter ingredienser, för att undvika spill inne i ugnen.
delar på/av-knapp handtag till lucka insynsfönster automatisk matare värmarelement handtag till tråg degblandare drivaxel drivkoppling på/av-knapp mätkopp dubbel mätsked, 1 tsk & 1 msk ● ● ● Kenwood-bakmaskinen har en PÅ/AV-knapp och fungerar inte förrän du tryckt på “PÅ”-knappen. ● ● Sätt i stickkontakten och tryck på PÅ/AV-knappen på bakmaskinens baksida. Enheten avger ett pip och 1 (3:15) visas i displayen.
så här använder du din bakmaskin visningsljus (se motsvarande bilder) 1 2 3 4 7 8 9 10 11 12 13 14 15 16 17 18 19 ● Ta bort brödformen genom att hålla i handtaget och vända formen mot ugnens baksida. Sätt in degblandaren. Häll i vattnet i tråget. Tillsätt de övriga ingredienserna i tråget i den ordning de räknas upp i receptet. Se till att alla ingredienser vägs /mäts upp noggrant, eftersom felaktiga mått ger dåliga resultat.
Användningsöversikt för automatisk matare ingredienser lämplig för användning med automatiska mataren kommentarer Torkad frukt, dvs. korinter, russin, suckat och glaserade körsbär Ja Hacka grovt, hacka inte för smått. Använd inte frukt i sockerlag eller alkohol. Täck lätt med mjöl för att minska risken för att ingredienserna fastnar. Bitar som är skurna för smått kan fastna i mataren och tillsätts eventuellt inte i degen. Nötter Ja Hacka grovt, hacka inte för smått. Stora frön, dvs.
120 1:30 5:15 För användning med glutenfritt mjöl och glutenfria brödmixer Max 500 g mjöl: 8 minuter förvärme Deg för manuell formning och gräddning i din egen ugn Långt degprogram för bondbrödsdegar.
121 Endast gräddningsfunktion. Kan även användas för att värma upp limpor eller göra brödskorpan frasig. Ställ in önskad tid med timerknapparna.
fördröjningstidur ● Med fördröjningstimern kan du förskjuta brödbakningen med upp till 15 timmar. Fördröjd start kan inte användas med programmet ”SNABBBAKNING” (RAPID BAKE) eller med programmen (7) till (13). OBS! När du utnyttjar denna fördröjda startfunktion får du inte använda ömtåliga ingredienser, d v s sådant som lätt blir förstört vid rums- eller högre temperatur, t ex mjölk, ägg, ost och joghurt.
favoritprogram Med favoritprogrammet kan du skapa och lagra upp till 5 egna program. skapa/ändra ett eget program 1 Anslut stickproppen och starta maskinen. 2 Tryck på knappen FAVORIT för att välja det program du vill ändra från P1 till P5. 3 Tryck på knappen (P) PROGRAM för att börja ändra programmet. 4 Använd knapparna DELAY TIMER (-) och (+) för att ändra tiden som krävs för varje steg. 5 Tryck på knappen CONFIRM för att spara ändringen och gå till nästa steg i programmet.
strömavbrottsskydd Bakmaskinen har ett 8 minuters strömavbrottsskydd för det fall kontakten av misstag dras ut ur uttaget när maskinen är igång. Den fortsätter programmet, om den ansluts igen omgående. skötsel och rengöring ● ● ● ● ● ● ● ● ● ● Dra ut bakmaskinens kontakt ur uttget och låt den svalna helt fore rengöring. Du får varken doppa bakmaskinen eller utsidan på trågets sockel i vatten. Använd inte slipande eller metallredskap för rengöringen.
Recept (tillsätt ingredienserna i tråget i den ordning de räknas upp i recepten) Grundrecept vitt bröd Program 1 Ingredienser 500g 750g 1Kg Vatten 245ml 300ml 380ml Vegetabilisk olja 1 msk 11⁄2 msk 11⁄2 msk Vetemjöl 350g 450g 600g Skummjölkspulver 1 msk 4 tsk 5 tsk Salt 1 tsk 11⁄2 tsk 11⁄2 tsk Socker 2 tsk 1 msk 4 tsk Torrjäst 1 tsk 11⁄2 tsk 11⁄2 tsk tsk = 5 ml tesked msk = 15 ml matsked Sött bröd (använd ljus färg för brödskorpa) Program 6 Ingredienser 500g 750g 1K
Vitt snabbröd Knapp för snabbgräddning Ingredienser 1Kg Vatten, ljummen (32-35°C) 350ml Vegetabilisk olja 1 msk Vetemjöl 600g Skummjölkspulver 2 msk Salt 1 tsk Socker 4 tsk Torrjäst 4 tsk 1 Tryck på knappen SNABBGRÄDDNING så startas programmet automatiskt.
Mjöl som inte kommer från vete Andra typer av mjöl, t.ex. råg, kan användas tillsammans med vitt mjöl eller fullkornsmjöl vid bakning av traditionella bröd som pumpernickel eller rågbröd. Även en liten tillsats av denna typ av bröd ger en distinkt smak. Använd inte ensamt. Då får du en kletig deg, som ger en mycket tung och kompakt limpa. Andra grödor som hirs, korn, bovete, majsmjöl och havre har lågt proteininnehåll och utvecklar därför inte tillräckligt med gluten för att man ska kunna baka en limpa.
Fetter och oljor En liten mängd fett eller olja tillsätts ofta i bröd för att ge en mjukare skorpa. Det bidrar även till att hålla brödet färskt under en längre tid. Använd smör, margarin eller ister i små mängder upp till 25 g eller 22 ml (11⁄2 msk) vegetabilisk olja. När det krävs större fettmängder i ett recept, så att smaken blir mer framträdande, ger smör det bästa resultatet. ● ● Olivolja eller solrosolja kan användas istället för smör. Anpassa vätskeinnehållet vid mängder över 15 ml (3 tsk).
Anpassa egna recept Ta ut, skiva och förvara bröd När du har prövat några av de medföljande recepten vill du kanske anpassa några av dina egna favoritrecept, som du tidigare tillrett och knådat för hand. Börja med att välja ett av recepten i det här häftet som påminner om ditt eget recept och använd det som en guide. ● ● Läs igenom följande riktlinjer och gör de anpassningar som behövs. ● ● ● ● ● ● ● Se till att du använder rätt mängd av alla ingredienser i bakmaskinen.
● Allmänna tips Resultaten av brödbaket beror på en rad olika faktorer, exempelvis ingrediensernas kvalitet, noggrann uppmätning, temperatur och luftfuktighet. Här följer några tips som garanterar bästa resultat. ● Bakmaskinen är inte en tillsluten enhet och den påverkas av omgivningstemperaturen. Om det är en mycket varm dag eller om maskinen används i ett varmt kök kommer degen troligtvis att jäsa mer än om det är kallt. Den optimala rumstemperaturen ligger mellan 20 ˚C/68 ˚F och 24 ˚C/75 ˚F.
felsökningsschema Här nedan beskrivs några av de vanligaste problem, som kan uppstå när du bakar bröd i bakmaskinen. Läs igenom dessa exempel, de troliga orsakerna och vilka åtgärder du då ska vidta för att lyckas med din bakning. PROBLEM TROLIGA ORSAKER ÅTGÄRD LIMPANS STORLEK OCH FORM 1. Brödet jäser inte tillräckligt 2. 3. 4. 5.
felsökningsschema (forts) PROBLEM TROLIGA ORSAKER ÅTGÄRD LIMPANS STORLEK OCH FORM 6.
felsökningsschema (forts) PROBLEM 15. Det går inte få loss degblandaren TÄNKBARA ORSAKER TRÅGPROBLEM ÅTGÄRD • Du måste hälla vatten i tråget och låta degblandaren ligga i blöt innan den går att lossa • Följ rengöringsanvisningarna efter användning. Du kanske behöver vrida degblandaren något efter blötläggningen för att lossa den • Torka av insidan av tråget försiktigt med vegetabilisk olja • Se avsnittet ”Service och kundtjänst” 16.
service och kundtjänst ● ● ● Om sladden är skadad måste den av säkerhetsskäl bytas ut av KENWOOD eller av en auktoriserad KENWOOD-reparatör. Om du behöver hjälp med: att använda apparaten eller service eller reparationer Kontakta återförsäljaren där du köpte apparaten. VIKTIG INFORMATION FÖR KORREKT BORTSKAFFNING AV PRODUKTEN I ÖVERENSSTÄMMELSE MED EU-DIREKTIV 2002/96/EG. När produktens livslängd är över får den inte slängas i hushållssoporna.
Norsk Brett ut framsiden med illustrasjoner ● ● ● før du tar Kenwood-apparatet i bruk Les nøye gjennom denne bruksanvisningen og ta vare på den slik at du kan slå opp i den senere. Fjern all emballasje og eventuelle etiketter. sikkerhet ● ● ● ● ● ● ● ● ● ● ● ● ● ● ● ● Ikke berør varme overflater. Tilgjengelige overflater kan bli varme ved bruk. Bruk alltid grytekluter til å ta ut den varme brødformen.
deler på/av-bryter lokkhåndtak vindu automatisk dispenser varmeelement brødformhåndtak elteblad drivaksel drivkopling på/av-bryter målebeger dobbel måleskje 1 ts og 1 ss ● ● ● Kenwood brødmaskinen er utstyrt med en PÅ/AVbryter, og fungerer ikke før du har trykket ned ”på”bryteren. ● ● Sett i støpselet og trykk på PÅ/AV-bryteren som finnes bak på brødmaskinen – maskinen piper og 1 (3:15) kommer fram på skjermen.
bruke brødmaskinen tittelys (se illustrasjonspanelet) 1 2 3 4 7 8 9 10 11 12 13 14 15 16 17 18 19 ● Fjern brødformen ved å holde i håndtaket og vri formen til baksiden av bakekammeret. Sett på eltebladet. Hell vannet i brødformen. Ha resten av ingrediensene i formen, i rekkefølgen som er oppgitt i oppskriftene. Sørg for at alle ingrediensene veies nøye da feil mål gir dårlige resultater. Sett brødformen i ovnen ved å plassere brødformen i vinkel mot baksiden av enheten.
tabell for bruk av automatisk dispenser ingredienser passer til bruk i den automatiske dispenseren kommentarer Tørket frukt, f.eks. sultanrosiner, rosiner, blandet skall og glasserte kirsebær Ja Hakk i store biter, ikke for små. Ikke bruk frukt som er lagt i sirup eller alkohol. Ta på litt mel for å hindre at frukten klistrer seg fast. For små biter kan klistre seg til dispenseren og ikke bli tilsatt i deigen. Nøtter Ja Hakk i store biter, ikke for små. Store frø, f.eks.
139 Brød uten gjær, og kaker Til bruk med glutenfritt mel og glutenfrie brødmikser. Maks 500 g melvekt: 8 minutters forvarming Deig til forming for hånd og steking i vanlig ovn. Lang deigsyklus til tilberedelse av spesialdeiger Til sylting 8 kake 9 glutenfritt 10 deig 11 Spesialdeig 12 syltetøy Gir en sprøere skorpe og passer til brød med lite fett og sukker 5 fransk Brødoppskrifter med mye sukker Til bruk med helkornmel og til et raskere grovbrød.
140 Funksjon for kun steking. Kan også brukes til å varme opp igjen eller få sprø skorpe på brød som allerede er stekt og avkjølt. Bruk tidsurknappene til å endre ønsket tid.
utsettelsesfunksjon Med utsettelsesfunksjonen kan du utsette brødbakingsprosessen med opptil 15 timer. Den forsinkede starten kan ikke brukes med programmet "HURTIGBAKING" eller program (7) til (13). VIKTIG: Når du bruker utsettelsesfunksjonen må du ikke bruke lett bedervelige ingredienser – ting som lett blir ”sure” ved romtemperatur eller over, f.eks. melk, egg, ost og yoghurt osv. Bruk DELAY TIMER (utsettelsesfunksjonen) og ha ingrediensene i brødformen og lås formen inn i brødmaskinen.
favorittprogram Favorittprogrammet gjør at du kan opprette og lagre opptil 5 av dine egne programmer. slik oppretter/endrer du ditt eget program 1 Koble til og slå på. 2 Trykk på FAVOURITE-knappen for å velge programmet du ønsker å endre fra P1 til P5. 3 Trykk på (P) PROGRAM-knappen for å begynne å endre programmet. 4 Bruk DELAY TIMER-knappene (-) & (+) til å endre tiden som kreves for hvert trinn. 5 Trykk på CONFIRM-knappen for å lagre og gå til neste trinn på programmet.
beskyttelse mot strømbrudd Brødmaskinen har en 8 min beskyttelse mot strømbrudd i tilfelle støpselet ved en feiltakelse blir trukket ut av kontakten når maskinen er i bruk. Maskinen fortsetter programmet dersom støpselet settes inn igjen med én gang. stell og rengjøring ● ● ● ● ● ● ● ● ● ● Koble fra brødmaskinen og la den kjøle seg helt ned før rengjøring. Ikke legg selve brødmaskinen eller det utvendige understellet på brødformen i vann. Ikke bruk skurekoster eller metallredskap.
Oppskrifter (ha ingrediensene i formen i samme rekkefølgen som de oppgis i oppskriftene) Vanlig loff Program 1 Ingredienser 500g 750g 1Kg Vann 245ml 300ml 380ml Vegetabilsk olje 1 ss 11⁄2 ss 11⁄2 ss Hvetemel 350g 450g 600g Skummet tørrmelk 1 ss 4 ts 5 ts Salt 1 ts 11⁄2 ts 11⁄2 ts Sukker 2 ts 1 ss 4 ts Tørrgjær 1 ts 11⁄2 ts 11⁄2 ts ts = 5 ml teskje ss = 15 ml spiseskje Brioche (bruke lys skorpefarge) Program 6 Ingredienser 500g 750g 1Kg Melk 130ml 200ml 280ml Eg
Rask loff Hurtigbakeknapp Ingredienser Vann, lunken (32-35 °C) 1Kg 350ml Vegetabilsk olje 1 ss Hvetemel 600g Skummet tørrmelk 2 ss Salt 1 ts Sukker 4 ts Tørrgjær 4 ts 1 Trykk på HURTIGBAKE-knappen og programmet starter automatisk.
Ingredienser Hovedingrediensene i brødbaking er mel, så det er viktig å velge riktig mel for å få et vellykket resultat. Hvetemelstyper Hvetemel gir de beste brødene. Hvete består av et ytre skall, som ofte kalles kli, og en indre kjerne, som inneholder hvetekimen og frøhviten som, når det blandes med vann, danner gluten. Gluten strekker seg på samme måte som elastikk, og gassene som avgis av gjæren i hevingen blir fanget opp og gjør at deigen hever seg. Mel uten hvete Annet mel, f.eks.
Fett og oljer Litt fett eller olje er ofte tilsatt brød for å gi mykere konsistens. Det bidrar også til å forlenge brødets holdbarhet. Bruk smør, margarin eller kanskje delfiafett i små mengder inntil 25 g eller 22 ml (11⁄2 ss) vegetabilsk olje. Der en oppskrift bruker større mengder slik at smaken er mer merkbar, gir smør best resultat. ● ● ● ● Olivenolje eller solsikkeolje kan brukes i stedet for smør, men juster væskeinnholdet for mengder over 15 ml (3 ts) tilsvarende.
Tilpasse dine egne oppskrifter Ta ut, skjære og oppbevare brød Når du har bakt noen av oppskriftene som følger med, kan det hende at du vil tilpasse noen av dine favoritter som tidligere har blitt blandet og eltet for hånd. Begynn med å velge en av oppskriftene i dette heftet, som ligner på din oppskrift, og bruk den som veiledning. ● ● Les gjennom følgende retningslinjer og vær forberedt på å foreta justeringer etter som du går fram.
● Generelle råd og vink Resultatene av brødbakingen avhenger av en rekke forskjellige faktorer, f.eks. kvaliteten på ingrediensene, nøyaktig tilmåling, temperatur og fuktighet. For å sikre et vellykket resultat er det verdt å merke seg noen få råd og vink. ● Brødmaskinen er ikke en forseglet enhet og påvirkes av temperaturen. Hvis det er en svært varm dag eller maskinen brukes på et varmt kjøkken, er det sannsynlig at brødet hever seg mer enn når det er kaldt.
feilsøking Nedenfor finner du noen typiske problemer som kan oppstå når du baker brød i brødmaskinen. Gå gjennom problemene, mulige årsaker og tiltak som bør treffes for å sikre vellykket brødsteking. PROBLEM 1. Brødet hever seg ikke nok 2. Flate brød, ikke hevet. 3. Høy på toppen – ser ut som en sopp. 4. Toppen og sidene faller sammen. 5. Brødet er ujevnt oppå. MULIG ÅRSAK LØSNING BRØDSTØRRELSE OG FASONG • Grovbrød er lavere enn loff pga at det er mindre glutendannende protein i sammalt mel.
feilsøking (forts.) PROBLEM MULIG ÅRSAK LØSNING BRØDSTØRRELSE OG FASONG 6. Falt sammen under steking. • Maskinen ble plassert i trekk eller kan ha • Sett brødmaskinen på et annet sted. blitt utsatt for støt eller dunk under hevingen. • For mye deig i brødformen. • Ikke bruk flere ingredienser enn det som er anbefalt for et stort brød (maks 1Kg). • Ikke nok salt eller utelatt salt (salt bidrar til • Bruk saltmengden som anbefales i å hindre at deigen hever seg for mye). oppskriften. • For mye gjær.
feilsøking (forts.) PROBLEM MULIG ÅRSAK LØSNING PROBLEMER MED FORMEN 15. Kan ikke ta ut eltebladet. • Du må ha vann i brødformen og la eltebladet • Følg rengjøringsinstruksene etter bruk. Du ligge i bløt før det kan tas ut. må kanskje vri eltebladet litt etter bløtleggingen for å løsne det. 16. Brødet henger ved • Kan skje ved langvarig bruk. • Tørk innsiden av brødformen lett med formen/vanskelig å vegetabilsk olje. riste ut. • Se delen om “Service og kundetjeneste”. TEKNISKE PROBLEMER 17.
service og kundetjeneste ● ● ● Dersom ledningen er skadet må den av sikkerhetsmessige grunner erstattes av KENWOOD eller en autorisert KENWOOD-reparatør. Hvis du trenger hjelp med å: bruke apparatet eller service eller reparasjoner kontakt forhandleren der du kjøpte apparatet. VIKTIG INFORMASJON FOR KORREKT AVHENDING AV PRODUKTET I SAMSVAR MED EU-DIREKTIV 2002/96/EC. På slutten av levetiden må ikke produktet kastes som vanlig avfall.
Suomi Taita auki etusivun kuvitukset ● ● ennen kuin ryhdyt käyttämään tätä Kenwoodkodinkonetta Lue nämä ohjeet huolella ja säilytä ne myöhempää tarvetta varten. Poista kaikki pakkausmateriaali ja tarrat. ● ● turvallisuus ● ● ● ● ● ● ● ● ● ● ● ● ● ● ● ● ● Älä koske kuumiin pintoihin. Laitteen pinnat saattavat kuumentua käytön aikana. Käytä aina patakintaita poistaessasi kuuman leivän. Voit suojata paistouunia roiskeilta poistamalla leivontaastian laitteesta ennen aineosien lisäämistä.
selitykset virtakytkin kannen kahva katseluikkuna automaattinen annostelija lämpövastus leivonta-astian kahva vatkain käyttöakseli akselin liitos virtakytkin mittakuppi kaksoismittalusikka: 1 teelusikallinen ja 1 ruokalusikallinen ● ● ● Kenwood-leipäkoneessa on virtakytkin. Laite toimii vasta, kun siihen on kytketty virta. ● ● Työnnä pistoke pistorasiaan ja paina laitteen takana sijaitsevaa virtakytkintä . Laitteesta kuuluu äänimerkki ja näyttöön tulee 1 (3:15).
Leipäkoneen käyttäminen valo (Lisätietoja on kuvituksessa.) 1 2 3 4 7 8 9 10 11 12 13 14 15 16 17 18 19 ● Nosta leivonta-astia kahvasta ja kääntämällä sitä paistouunin takaosaan päin. Aseta vatkain paikoilleen. Kaada leivonta-astiaan vettä. Lisää muut aineosat astiaan leivontaohjeessa mainitussa järjestyksessä. Varmista, että kaikki aineosat punnitaan tarkasti. Epätarkat mitat heikentävät tulosta. Aseta leivonta-astia paistouuniin kääntämällä sitä laitteen takaosaa kohti.
automaattisen annostelijan käyttösuositustaulukko aineosat soveltuu lisättäväksi kommentit automaattisen annostelijan avulla Kuivatut hedelmät, kuten rusinat, sekahedelmät tai cocktailkirsikat Kyllä Pilko karkeaksi, älä hienonna liikaa. Älä käytä sokeriliemeen tai alkoholiin säilöttyjä hedelmiä. Jauhota kevyesti, jotta hedelmät eivät tartu toisiinsa. Liian hieno silppu voi tarttua annostelijaan, jolloin sitä ei lisätä taikinaan. Pähkinät Kyllä Pilko karkeaksi, älä hienonna liikaa.
158 Käsin viimeisteltäville ja erillisessä uunissa paistettaville taikinoille Pitkä taikinanvalmistusjakso maalaisleipien valmistamiseksi.
159 Leipä valmistuu alle tunnissa. Edellyttää lämmintä vettä, paljon hiivaa ja vähemmän suolaa. 500g 0:58 0:10 - 1:30 1:30 750g 1Kg Ohjelman kokonaisaika Paistoasteen normaali - - 1:14 Automaattinen annostelija toimii, ja aineosien lisäämisestä käsin kuuluu äänimerkki ✬ 500g 750g 1Kg 60 60 - Lämpimänäpito ✬✬ ✬ Leipäkone antaa äänimerkin toisen vatkaamisvaiheen päätyttyä aineosien lisäämiseksi, jos leivontaohje edellyttää tätä.
ajastin Ajastin mahdollistaa leivonnan ajastamisen enintään 15 tunnin päähän. Ajastamista ei voi käyttää yhdessä pikaleipomisohjelman eikä ohjelmien (7) – (13) kanssa. TÄRKEÄÄ: Käytettäessä ajastinta taikinassa ei saa olla helposti huoneenlämmössä pilaantuvia aineosia, kuten maitoa, kananmunia, juustoa tai jogurttia. Kun käytät ajastinta, lisää aineosat leivonta-astiaan ja kiinnitä astia leipäkoneeseen. Toimi sitten seuraavasti: ● ● ● ● Valitse haluamasi ohjelma painamalla valikkopainiketta .
6 Toista vaiheiden 3 - 5 toimia, kunnes kaikki vaiheet on ohjelmoitu. Ohjelman tilailmaisin näyttää, missä ohjelman vaiheessa olet. 7 Kun CONFIRM-painiketta painetaan viimeisen kerran lämpimänäpitämisvaiheen jälkeen, äänimerkki kuuluu ja ohjelma tallennetaan automaattisesti. 8 Voit palata edelliseen vaiheeseen ja muuttaa aikaa painamalla CANCEL-painiketta. suosikkiohjelma Voit luoda ja tallentaa viisi omaa ohjelmaa suosikkiohjelmaksi.
suojaus virrankatkaisulta Leipäkoneessa on 8 minuutin suojaus virrankatkaisulta siltä varalta, että laitteen pistoke vahingossa irrotetaan pistorasiasta. Ohjelman suorittaminen jatkuu, jos pistoke työnnetään pistorasiaan tämän ajan kuluessa. hoitaminen ja puhdistaminen ● ● ● ● ● ● ● ● ● ● Irrota leipäkoneen pistoke pistorasiasta ja anna laitteen jäähtyä ennen puhdistamista. Älä upota leipäkoneen runkoa tai leivonta-astialle varattua tilaa veteen.
Leivontaohjeet (lisää aineosat leivontaohjeessa mainitussa järjestyksessä) Tavallinen vehnäleipä Ohjelma 1 Aineosat 500g 750g 1Kg Vettä 245ml 300ml 380ml Kasviöljyäl 1 rkl 11⁄2 rkl 11⁄2 rkl Vehnäjauhoja 350g 450g 600g Rasvatonta maitojauhetta 1 rkl 4 tl 5 tl Suolaa 1 tl 11⁄2 tl 11⁄2 tl Sokeria 2 tl 1 rkl 4 tl Kuivahiivaa 1 tl 11⁄2 tl 11⁄2 tl tl = 5 ml:n teelusikallinen rkl = 15 ml:n ruokalusikallinen Briossi (vaalea pinta) Ohjelma 6 Aineosat 500g 750g 1Kg Maitoa 1
Nopeasti valmistuva vehnäleipä pikaleipomispainike Aineosat Vettä kädenlämpöistä (32–35 °C) 1Kg 350ml Kasviöljyäl 1 rkl Vehnäjauhoja 600g Rasvatonta maitojauhetta 2 rkl Suolaa 1 tl Sokeria 4 tl Kuivahiivaa 4 tl 1 Jos painat pikaleipomispainiketta, ohjelma käynnistyy automaattisesti.
Ainesosat Tärkein ainesosa leivänteossa on jauho, joten oikean valitseminen on tärkeää onnistunutta leipää varten. Vehnäjauhot Vehnäjauhoista tulee parhaat leivät. Vehnä koostuu ulkokuoresta, johon viitataan usein leseenä, ja sillä on jyvä, joka sisältää vehnänalkion ja siemenvalkuaisen. Nämä muodostavat veden kanssa gluteenia. Gluteeni venyy kuin kuminauha ja hiivan käymisen aikana tuottamat kaasut jäävät ansaan ja taikina kohoaa.
Rasvat ja öljyt Pieni määrä rasvaa tai öljyä lisätään usein leipään, jotta rakenteesta tulee pehmeämpi. Sen ansiosta leipä pysyy myös pidempään tuoreena. Käytä voita, margariinia tai jopa laardia pieninä määrinä (korkeintaan 25 g) tai 22 ml (11⁄2 rkl) kasviöljyä. Kun leivontaohjeessa on suuria määriä rasvaa, maku on helpommin huomattavissa. Silloin voi tuo parhaan tuloksen. ● ● Oliiviöljyä tai auringonkukkaöljyä voidaan käyttää voin sijaan. Säädä yli 15 ml:n (3 tl) nestemäärää vastaavasti.
Leivontaohjeiden soveltaminen Kun olet käyttänyt laitteen mukana toimitettuja leivontaohjeita, voit käyttää omia suosikkiohjeitasi, joita käyttäessäsi olet aikaisemmin valmistanut taikinan käsin. Aloita valitsemalla valmiiden ohjeiden joukosta ohje, joka muistuttaa omaa ohjettasi, ja käytä sitä perustana. Seuraavista ohjeista on apua, mutta ole valmis tekemään muutoksia tarpeen mukaan. ● ● ● ● ● ● ● Varmista, että käytät leipäkoneelle sopivia määriä. Älä ylitä suositeltua maksimimäärää.
● Yleisiä vihjeitä ja vinkkejä Leivänteon tuloksiin vaikuttaa monet tekijät, kuten ainesosien laatu, mittauksen tarkkuus, lämpötila ja kosteus. Jotta tulokset olisivat onnistuneita, tässä on muutamia huomionarvoisia vihjeitä ja vinkkejä. ● Leipäkone ei ole suljettu yksikkö ja siihen vaikuttaa lämpötila: erittäin kuumana päivänä tai kuumassa keittiössä käytettynä leipä nousee enemmän kuin kylmässä. Ihanteellinen huoneen lämpötila on 20°C/ 68°F ja 24°C/ 75°F välillä.
ongelmatilanteet Seuraavissa taulukoissa on kuvattu tavallisimmin esiintyviä ongelmia, kun leipäkonetta käytetään. Perehdy ongelmiin, niiden mahdollisiin syihin ja korjaustoimiin, jotta leipäkoneen käyttäminen sujuu ongelmitta. ONGELMA MAHDOLLINEN SYY RATKAISU LEIVÄN KOKO JA MUOTO 1. Leipä ei nouse riittävästi. • Kokojyväleipä nousee vehnäleipää vähemmän, • Normaali tilanne, ei ratkaisuehdotusta. sillä kokojyväjauhoissa on vähemmän gluteenia muodostavaa proteiinia. • Liian vähän nestettä.
Ongelmanratkaisu (jatkuu) ONGELMA 6. Leipä painuu kasaan. 7. Leivän toinen pää on lyhyempi. MAHDOLLINEN SYY RATKAISU LEIVÄN KOKO JA MUOTO • Laite on vetoisessa paikassa tai sitä on tönäisty taikinan noustessa. • Taikinaa on liikaa. • Aseta leipäkone toiseen paikkaan. • Älä käytä suositeltua enemmän aineosia leivottaessa suurta leipää (enintään 1Kg). • Liian vähän tai ei ollenkaan suolaa. (Suola • Käytä suolaa leivontaohjeessa suositeltu auttaa estämään taikinaa nousemasta liikaa.) määrä.
ongelmanratkaisu (jatkuu) ONGELMA MAHDOLLINEN SYY RATKAISU LEIVONTA-ASTIAN ONGELMAT 15. Vatkainta ei voi poistaa. • Kaada leivonta-astiaan vettä tai anna vatkaimen liota ennen sen irrottamista. 16. Leipä tarttuu leivonta-astiaan tai sitä ei saa helposti ulos. • Näin voi käydä, kun leipäkone on ollut kauan käytössä. 17. Leipäkone ei toimi tai vatkain ei liiku. • Leipäkoneeseen ei ole kytketty virtaa. • Noudata puhdistusohjeita käytön jälkeen.
huolto ja asiakaspalvelu ● ● ● Jos virtajohto vaurioituu, se on turvallisuussyistä vaihdettava. Vaihtotyön saa tehdä KENWOOD tai KENWOODIN valtuuttama huoltoliike. Jos tarvitset apua laitteen käyttämisessä tai laitteen huolto- tai korjaustöissä, ota yhteys laitteen ostopaikkaan. TÄRKEITÄ OHJEITA TUOTTEEN HÄVITTÄMISEEN EUROOPAN UNIONIN DIREKTIIVIN 2002/96 MUKAISESTI. Tuotetta ei saa hävittää yhdessä tavallisten kotitalousjätteiden kanssa sen lopullisen käytöstä poiston yhteydessä.