COMPACT Hi-Fi COMPONENT SYSTEM C-414 INSTRUCTION MANUAL Declaration of Conformity with regard to the EMC Directive 2004/108/EC Manufacturer: Kenwood Corporation 2967-3 Ishikawa-machi, Hachioji-shi, Tokyo, 192-8525 Japan EU Representative's: Kenwood Electronics Europe BV Amsterdamseweg 37, 1422 AC UITHOORN, The Netherlands © B60-5858-08/00 (E, X)
Before applying power ¤ Caution : Read this page carefully to ensure safe operation. Units are designed for operation as follows. Australia ........................................................... AC 240 V only Europe .............................................................. AC 230 V only Safety precautions WARNING : TO PREVENT FIRE OR ELECTRIC SHOCK, DO NOT EXPOSE THIS APPLIANCE TO RAIN OR MOISTURE.
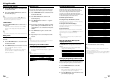
Before use Contents Caution : Read the pages marked ¤ carefully to ensure safe operation. Before applying power...................................2 Safety precautions ......................................................................2 IMPORTANT SAFETY INSTRUCTIONS ............2 Before use .......................................................4 Connections ....................................................6 About MP3 and WMA .....................................8 About USB device ...................
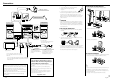
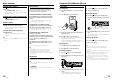
Connections Connecting the FM antenna AM loop antenna 1 Connect the lead to the [FM 75Ω] terminal. 2 Find the location that gives the best reception. 3 Secure the antenna as high up as possible. FM 75Ω Connecting the iPod applied part 1 Connect the iPod applied part to iPod applied part connector • The antenna supplied with the system is a basic antenna for indoor use. For stable signal reception, the use of an outdoor antenna (commercially available) is recommended.
About MP3 and WMA About USB device Handling discs The playable MP3/WMA file (hereafter called Audio file) and the media format have the following limitation. The Audio file, which is not conforming to the specification, may not play normally. Playable file format of USB device/ SD card Notes on use of the USB device Handling precautions • FAT 16/ 32 Hold a CD taking care not to touch the played surface. (The side without the printed label is the playback side.
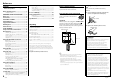
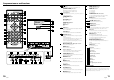
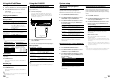
Component names and functions 1 1 button 13 TIMER ON/OFF button To switch the system on or to standby mode. [STANDBY/TIMER] indicator SLEEP BACKLIGHT CONTRAST DISPLAY EQ 1 2 BAND TUNER USB/SD CD D.AUDIO/iPod AUX STOP 22 21 20 2 2 FM R AM D-BASS CD R USB R SD 13 14 D.
Basic function Using the CD/USB device/SD card Switching the system on Sound control Press , TUNER BAND, CD/USB/SD, D.AUDIO/iPod, AUX button. The [STANDBY/TIMER] LED will go out. The system will switch to the last selected source or the selected source. The sound control system feature enables you to enjoy special sound effects; 3D surround effect, preset equalizer settings and bass enhancement, providing the best music reproduction. Press button. [STANDBY/TIMER] indicator is lit.
Using the AUX Using the CD/USB device/SD card Playing a CD/ audio file Press 6 button to start playback. The track/file number and elapsed playing time of the current track/file appear on the display. 4 5 Basic operations Operation type To stop playback To interrupt playback To search for a particular passage during playback Operation Press STOP 7 button. Press 6 button. Press again to resume playback. Press and hold 4 or ¢ button for more than 2 seconds.
Using the radio Tuning in radio stations Manual preset Using Radio Data System Program type table 1 Press TUNER BAND button to select the desired waveband: FM or AM. You can store up to 30 for FM and 10 for AM radio stations in the memory. When a preset radio stations selected, the preset number appears on the display. 2 Press and hold 4 or ¢ button to tune in to the desired frequency. 1 Press TUNER BAND button to select the desired waveband: FM or AM.
Using the iPod/iPhone Using the D.AUDIO System setup Inserting an iPod/iPhone Playback of Digital Audio Player 1 2 Kenwood digital audio player can be connected to play audio files in it. Adjusting the display brightness (BACKLIGHT) Connect a iPod/iPhone to the iPod applied part. Press D.AUDIO/iPod button once or more to select "iPod". The icon "iPod" appears on the display. 1 Playing an iPod/iPhone Press 6 button to start playback. Connect an the player.
Clock/timer operation Clock setting Timer setting 8 1 Press TIMER SET button. 2 Press MULTI CONTROL C or D button to select "CLOCK" and press ENTER button. "CLOCK SETTING" appears on the display. The system can switch on to CD, USB, SD, TUNER or iPod automatically at a preset time, serving as an alarm to wake you up. ⁄ 3 Press ENTER button. The hour indication will start flashing. 4 Press MULTI CONTROL A or B button to set the hours and press ENTER button. The minute indication starts flashing.
In case of difficulty General information Cannot play. Resetting the Microcomputer The microcomputer may malfunction (unit cannot be operated, or shows an erroneous display) if the power cord is unplugged while the power is ON, or due to some other external factor. If this happens, execute the following procedure to reset the microcomputer and return the unit to its normal operating condition. When the power is off (standby mode), press the [SOUND] button on the main unit until "FACTORY RESET " appears.
Specifications Speakers Main unit Amplifier section Rated output power ..............................20 W + 20 W (1 kHz, 10% T.H.D., at 8 Ω) D.AUDIO/ AUX (Sensitivity/ Impedance) .... 500 mV/10 kΩ SUBWOOFER PREOUT (Level/ Impedance) ......1.8 V/10 kΩ Tuner section FM tuner section Tuning frequency range......................87.5 MHz ~ 108.0 MHz AM tuner section Tuning frequency range...........................531 kHz ~ 1,602 kHz Enclosure ...................................................................