
DVD Player User Manual


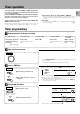
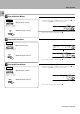
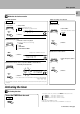
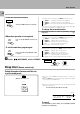

Table Of Contents
- C-V751
- Contents
- Before applying power
- System connection
- Using DVD 6ch INPUT
- Controls and indicators
- Setup of the Graphical Remote Control (GRC) unit
- Remote control of components from the GRC
- Convenient functions
- Speaker settings
- Playing music
- Sound adjustment
- Recording
- Listening to radio broadcasts
- Tuning radio stations
- Functions of RDS (Radio Data System)
- RDS DISPLAY key
- Presetting RDS stations (AUTO MEMORY)
- Storing radio stations manually in preset memory
- Receiving all preset stations in order (P. CALL)
- Receiving a preset station
- Searching for a desired program type (PTY search)
- Reserving the desired information (EON reservation)
- Ambience effects
- Clock adjustment
- Timer operation
- Important items
- In case of difficulty
- Specifications

54
Timer operation
Example: Adjustment to 8:15
CLOCK
÷ Press the CLOCK key. The hour is entered and the minute display
starts to blink.
÷ If you make a mistake, restart from the beginning.
÷ To adjust correct time, press the CLOCK key at the same moment as
a time announcement.
MULTI.CONTROL
LEVEL
MULTI.CONTROL
LEVEL
CLOCK
CLOCK
Clock adjustment
This unit incorporates a clock function. Be sure to adjust the
correct time before using the timer function.
The time display blinks after a power failure or when the power
cord has been unplugged from the AC outlet and plugged in
again. In such a case, adjust the clock again.
Activate the clock adjustment mode.
1 Press the CLOCK key.
Enter the hour.
3 Press the CLOCK key.
To decrease
the figure
To increase
the figure
Enter the minute.
2 Press the CLOCK key.
To decrease
the figure
To increase
the figure
Each press of DISPLAY
switches the displayed
information alternately.
Main unit
Main unit
GRC
Displaying the Time
KHz TIMER 1 2
TAPE2
/
AUTO SOUND
PRO LOGIC
DIGIT
A
3 S
T
MHz SLEEP
DOW
N
DIGIT
A
DTS DOLBY
DIGIT
A
AM 8:
))
KHz TIMER 1 2
TAPE
2
AUTO SOUND
PRO LOGIC
DIGIT
A
3
S
MHz SLEEP
DO
W
DIGIT
A
DTS DOLBY
DIGIT
A
AM 8: 1 5
1
3
2
2 Set the figure of hour.
1 Set the figure of minute.
To switch between the 12-hour/24-hour display
(Main unit only)
1 24-hour display
2 12-hour display
Clock adjustment
(Main unit only)
Press and hold the CLOCK key
1 Press and hold the CLOCK key for
more than 2 seconds. (The time dis-
play starts to blink.)
÷ From the second press, each press switches between 24h and 12h
alternately.
Main unit
Main unit
CLOCK