
Operation Manual


29
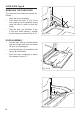
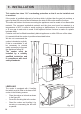
ANTI-TILT BRACKET
Important!
To restrain the appliance and prevent it tipping accidentally, the anti-tilt bracket
supplied must be tted according to the instructions below.
Tottheanti-tiltbracket:
1. After you have located where the cooker is to be positioned, mark on the wall and on
theoortheplacewherethefourscrewsoftheanti-tiltbrackethavetobetted.
Pleasefollowtheindicationsgivening.9.3.
2. Drillfour8mmdiameterholesforthexingscrews(twointhewallandtwointheoor-
seeg.9.3)andinserttheplasticplugssupplied.
Important!
Before drilling the holes, check that you will not damage any pipes or electrical
wires.
3. Attachtheanti-tiltbrackettotheoorandrearwallusingthefourscrewssupplied,as
showning.9.3.
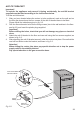
4. After attaching the anti-tilt bracket securely, slide the cooker into place. Ensure that the
rearleftfootslidesunderthebracket,asshowning.9.3.
Attention!
When sliding the cooker into place pay special attention not to trap the power
supply cable in the stability bracket.
Pay special attention to the gas connection hose.
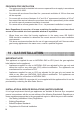
Fig. 9.3
ANTI-TIP STABILITY
DEVICE FIXING
Anti-tip
stability device
Rear left
feet of range