CMOS-740HD UNIVERSAL REAR VIEW CAMERA INSTRUCTION MANUAL CAMÉRA DE VUE ARRIÈRE UNIVERSELLE MANUEL D’UTILISATION UNIVERSAL RÜCKFAHRKAMERA BEDIENUNGSANLEITUNG UNIVERSELE ACHTERUITRIJCAMERA GEBRUIKSAANWIJZING TELECAMERA PER RETROMARCIA UNIVERSALE ISTRUZIONI PER L’USO CÁMARA DE VISTA TRASERA UNIVERSAL MANUAL DE INSTRUCCIONES CÂMARA TRASEIRA UNIVERSAL MANUAL DE INSTRUÇÕES 通用后视摄像头 使用说明书 Take the time to read through this instruction manual.
For U.S.A FCC CAUTION Changes or modifications not expressly approved by the party responsible for compliance could void the user's authority to operate the equipment. For Canada CAN ICES-3(B)/NMB-3(B) For Australia NOTE • This equipment has been tested and found to comply with the limits for a Class B digital device, pursuant to part 15 of the FCC Rules. These limits are designed to provide reasonable protection against harmful interference in a residential installation.
Declaration of Conformity with regard to the EMC Directive 2014/30/EU Declaration of Conformity with regard to the RoHS Directive 2011/65/EU Manufacturer: JVCKENWOOD Corporation 3-12, Moriyacho, Kanagawa-ku, Yokohama-shi, Kanagawa 221-0022, JAPAN EU Representative: JVCKENWOOD Europe B.V.
Before Use/ Installation Procedure WARNING To prevent injury or fire, take the following precautions: • To prevent a short circuit, never put or leave any metallic objects (such as coins or metal tools) inside the unit. • Installation and wiring of this product require specialist skill and experience. To assure your safety, please request a specialist technician to install the unit. • When you make a hole to install the camera, check the location of pipes, tanks and wiring and avoid touching them.
WARNING • If you connect the ignition wire (Red) to the car chassis (Ground), you may cause a short circuit, that in turn may start a fire. Always connect those wires to the power source running through the fuse box. • Do not cut out the fuse from the ignition wire (Red). The power supply must be connected to the wires via the fuse. CAUTION Accessories Camera (3.0 m)..........1 Power cord (6.0 m[1])..........1 Power unit..........1 Camera bracket..........
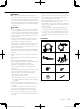
Installation Recommended Installation Position The camera has two securing holes at the side at the top and bottom. Please adjust according to the installation. Examples of correct camera installation on the rear of the vehicle Installation example Installation position 5 Mount so that the “KENWOOD” logo appears at the top. Fix the camera temporarily with tape, etc. Using a piece of tape, etc., fix the camera temporarily.
9 After adjusting the camera angle, tighten the retaining screws firmly. Inspect the retaining screws at times. If they are loose, tighten them firmly. 10 Fix the camera firmly in position. Peel off the paper liner from the double-side adhesive tape on the camera bracket and attach it. After attaching, push the camera bracket with your finger to ensure close adhesion.
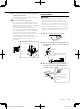
Connections CAUTION • If the engine key of your vehicle does not have the ACC position, branch the wire energized when the engine key is ON and connect it to the accessory power cord. • Before proceeding to connections, make sure that the engine key is not inserted and disconnect the (-) terminal of the battery to prevent the short-circuiting incident. • Do not bend the camera cord to a diameter of 40 mm or a radius of 20 mm or less.
Specifications Camera Unit Lens Wide angle, Focal length: 1.86 mm, F value 2.0 Angles of view : Horizontal: 180° : Vertical: 103° Waterproof and dustproof: IP67 Image sensor: 1/3.8-inch color CMOS sensor Number of pixels : 1.3 Mega pixels Object illuminance : 1.0 lux to 100 k lux Resolution: 1280 × 720 Frame rate: 30 fps Video Output : Wide-angle mirror image (for rearview) Output I/F: HD-TVI Operating temperature : -30 °C to +85 °C Dimensions (W × H × D) : 31.1 × 23.0 × 25.
KENWOOD Warranty Card Y6'aMTe(b 8 Ol)ilBIUlbHOM H.JOH(attMM CepMKHOfO HOMejli!!/ Seriennummer OberprOfen!/ V~ifier si le nunrero de sMe est inscrit!/ Comprobar si el ntimero de serie est.l correctamente escrito./ Comprobar si el numero de serle est.l correctamente escrito./ Certlficar-se que o numero de sMe est.
JVCKENWOOD U.K. Limited JVCKENWOOD Europe B.V. Geachte gebruikef van KENWOOD p,OOuklen, Wij danken Uvoor het kiezen van di! KENWOOD prOOOkt (hot"Produ~·I. lndoen he! ProduM, blj no,maal gebruik, gebrokeo zoo Yertonen, zal het grahs worden hersteld of vervangen overeenkomstig de bepahogeo van deze Garantiekaart.
JVCKENWOOD USA Corporation This warranty will be honored only in the U.S.A. KENWOOD LIMITED WARRANTY FOR CAR STEREO COMPONENTS JVCKENWOOD USA Corporation I " KENWOOD• ) warrants this product for a period alone 11) year from the date of original purchase. WHAT IS COVERED AND WHAT IS NOT COVERED Except as specified below, this warranty covers all defects in material and workmanship in KENWOOD car stereo component s. The following are not covered by the warranty: 1.
JVCKENWOOD Canada Inc KENWOOD WARRANTY JVCKENWOOD Canada Inc. (hereinafter called "KENWOOD" ), gives the following written warranty to the original customer of each new KENWOOD product distributed in Canada by KENWOOD and purchased from a dealer authorized by KENWOOD. KENWOOD warrants that each new KENWOOD product, under normal use, is free from any defects, subject to the terms and conditions set forth below.
Andorra Estimado Usuario de los productos KENWOOD: Gracias por haber elegido este Producto KENWOOD. Si resulta defectuoso bajo condiciones normales de funcionamiento, le rogamos que contacte con su distribuidor autorizado mas abaJo indicado, para informaci6n acerca de la garantia. JVCKENWOOD EUROPE B.V. Sucursal en Espana Carretera de Rubi, 88 008174 Sant Cugat del Valles, Barcelona Tel. + 34-93-507-5252 www.kenwood.