Syntoniseur FM/AM et lecteur de CD/MP3/WMA, “Puisance élevée”, avec contrôleur pour lecteur de CD á chargeur English Multi-CD control High power CD/MP3/WMA player with FM/AM tuner Français Operation Manual DEH-P840MP Mode d’emploi
Section 00 Contents Thank you for buying this Pioneer product. Please read through these operating instructions so you will know how to operate your model properly. After you have finished reading the instructions, put them away in a safe place for future reference.
Section Contents 00 English Français Italiano Initial Settings Adjusting initial settings 44 Setting the time 44 Setting the warning tone 45 Switching the flap auto open 45 Switching the auxiliary setting 45 Switching the dimmer setting 45 Selecting the brightness 46 Setting the rear output and subwoofer controller 46 Switching the telephone muting/ attenuation 47 Switching the motion screen 47 Deutsch Audio Adjustments Introduction of audio adjustments 37 Setting the sound focus equalizer 38 Using ba
Section 00 Contents Other Functions Setting the time display on or off 48 Using different entertainment displays 48 Using the AUX source 48 • Selecting AUX as the source 48 • Setting the AUX title 48 Using the telephone muting/attenuation 49 Introduction of DAB operation 50 • Operation 50 • Changing the label 50 • Operating announcements with the function menu 51 • Available PTY Function 51 • Searching the PTY 51 • Using dynamic label 51 • Displaying dynamic label 51 • Storing and recalling dynamic label
Section 01 Italiano Nederlands En Français Information courtesy of the Deafness Research Foundation. Deutsch Used wisely, your new sound equipment will provide a lifetime of fun and enjoyment. Since hearing damage from loud noise is often undetectable until it is too late, this manufacturer and the Electronic Industries Association’s Consumer Electronics Group recommend you avoid prolonged exposure to excessive noise. This list of sound levels is included for your protection.
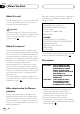
Section 01 Before You Start About this unit The tuner frequencies on this unit are allocated for use in North America. Use in other areas may result in improper reception. Important The serial number is located on the top of this unit. For your own security and convenience, be sure to record this number on the enclosed warranty card. About this manual This unit features a number of sophisticated functions ensuring superior reception and operation.
Section Before You Start Features 01 CD playback Music CD/CD-R/CD-RW playback is possible. This product allows playback of MP3 files on CD-ROM, CD-R and CD-RW discs. Disc recordings compatible with level 1 and level 2 of ISO9660 and with the Romeo and Joliet file system can be played back. Notes • Some applications used to encode WMA files may not operate correctly. • With some applications used to encode WMA files, album names and other text information may not be correctly displayed.
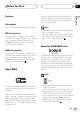
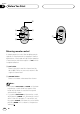
Section 01 Before You Start 1 2 3 - What’s what 4 0 6 5 9 7 8 6 OPEN button Press to open the front panel. When you want to operate buttons inside the front panel, press OPEN to open the front panel. Front panel (close) 1 EJECT button Press to eject a CD from your built-in CD player. 2 EQ button Press to select various equalizer curves. Press and hold for about two seconds to select a natural sound with presence. 3 SOURCE button This unit is switched on by selecting a source.
Section Before You Start English = 01 ~ Español @ ! Deutsch Front panel (open) • These buttons listed below can be operated only when the front panel opened. Français = ENTERTAINMENT button Press to change to the entertainment display. ~ AUDIO button Press to select various sound quality controls. Italiano ! FUNCTION button Press to select functions. @ DISPLAY button Press to select different displays.
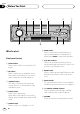
Section 01 Before You Start # 8 3 7 $ ! ~ Steering remote control A steering remote control that enables remote operation of the head unit is supplied. See the explanation of the head unit about the operation of each button with the exception of ATT, which is explained below. # ATT button Press to quickly lower the volume level, by about 90%. Press once more to return to the original volume level. $ VOLUME button Press to increase or decrease the volume.
Section Before You Start Remote control and care Français • Remove the lithium battery. CAUTION • Do not recharge, disassemble, heat or dispose of the battery in a fire. • Use a CR2032 (3 V) lithium battery only. Never use other types of battery with this unit. • Do not handle the battery with metallic tools. • Do not store the lithium battery with metallic materials.
Section 01 Before You Start Display indication Resetting the microprocessor This unit is equipped two types of display indications such as LCD display and OEL display. LCD display contains basic information about the each source and other settings which is visible whenever the front panel is opened or closed. OEL display contains detailed information about the each source and other settings which is visible only when the front panel is opened. This manual mainly explains using OEL display.
Section Before You Start Protecting your unit from theft 2 Slide and remove the front panel toward you. Take care not to grip it tightly or drop it. Español Release button Important Removing the front panel 3 Put the front panel into the protective case provided for safe keeping. Attaching the front panel 1 Make sure the inner cover is closed. 2 Replace the front panel by clipping it into place.
Section 01 Before You Start About the demo mode This product features three demonstration modes: Reverse mode, Feature DEMO and Motion DEMO. Reverse mode If you do not perform an operation within about 30 seconds, screen indications start to reverse, and then continue reversing every 10 seconds. Pressing 5 numbered button when power to this product is switched off while the ignition switch is set to ACC or ON cancels the Reverse mode. Pressing 5 numbered button again to start the Reverse mode.
Section Power ON/OFF Turning the unit on You can select a source you want to listen to. To switch to the built-in CD player, load a disc in this unit (refer to page 19). Turning the unit off Press SOURCE and hold for at least one second to turn the unit off. Français Notes Deutsch Press SOURCE to select a source.
Section 03 Tuner 4 To perform manual tuning, press 2 or 3 with quick presses. The frequencies move up or down step by step. Listening to the radio 1 2 3 4 These are the basic steps necessary to operate the radio. More advanced tuner operation is explained starting on page 17. 1 BAND indicator Shows which band the radio is tuned to, AM or FM. 5 To perform seek tuning, press and hold 2 or 3 for about one second and release.
Section Tuner 03 Storing and recalling broadcast frequencies If you press any of the PRESET TUNING buttons you can easily store up to six broadcast frequencies for later recall with the touch of a button. 1 FUNCTION display Shows the function status. 1 Press OPEN to open the front panel. Note • If you do not operate the function within about 30 seconds, the display is automatically returned to the frequency display.
Section 03 Tuner Tuning in strong signals Local seek tuning lets you tune in only those radio stations with sufficiently strong signals for good reception. 1 Press OPEN to open the front panel. 2 Press FUNCTION to select LOCAL. Press FUNCTION until LOCAL appears in the display. 3 Press 5 to turn local seek tuning on. Local seek sensitivity (e.g., Local 2) appears in the display.
Section Built-in CD Player Playing a CD 04 5 To perform fast forward or reverse, press and hold 2 or 3. 1 2 1 TRACK NUMBER indicator Shows the track currently playing. 1 Press EJECT. CD loading slot appears. CD loading slot • You can eject a CD by pressing EJECT. • If the front panel is in the EJECT position (shown above), buttons other than EJECT, VOLUME, OPEN, and ATT (on the remote control) do not operate.
Section 04 Built-in CD Player Introduction of advanced built-in CD player operation Repeating play Repeat play lets you hear the same track over again. 1 Press OPEN to open the front panel. 1 1 FUNCTION display Shows the function status. 2 Press FUNCTION to select RPT. Press FUNCTION until RPT appears in the display. 3 Press 5 to turn repeat play on. Repeat :ON appears in the display. The track presently playing will play and then repeat. 1 Press OPEN to open the front panel.
Section Built-in CD Player Playing tracks in a random order Note • After scanning of a CD is finished, normal playback of the tracks will begin again. English Random play lets you play back tracks on the CD in a random order. 04 1 Press OPEN to open the front panel. 3 Press 5 to turn random play on. Random :ON appears in the display. Tracks will play in a random order. Pause lets you temporarily stop playback of the CD. 1 Press OPEN to open the front panel. 2 Press FUNCTION to select PAUSE.
Section 04 Built-in CD Player Using disc title functions You can input CD titles and display the title. The next time you insert a CD for which you have entered a title, the title of that CD will be displayed. Entering disc titles Disc title input lets you input CD titles up to 10 letters long and up to 48 disc titles into the builtin CD player. 1 Play a CD that you want to enter the title. 2 Press OPEN to open the front panel. 3 Press FUNCTION and hold until TITLE appears in the display.
Section Built-in CD Player 04 Displaying titles on CD TEXT discs You can display the title of any disc that has had a disc title entered. 1 Press OPEN to open the front panel. 1 Press OPEN to open the front panel. Deutsch 2 Press DISPLAY when playing a CD TEXT disc.
Section 05 MP3/WMA Player Playing a MP3/WMA 12 3 3 After a CD-ROM has been inserted, press SOURCE to select the built-in CD player. Press SOURCE until you see Compact Disc displayed. 4 These are the basic steps necessary to play a MP3/WMA with your built-in CD player. More advanced MP3/WMA operation is explained starting on page 25. 1 MP3 (WMA) indicator Shows when the MP3 (WMA) file is playing. 2 FOLDER NUMBER indicator Shows the folder number currently playing.
Section MP3/WMA Player Introduction of advanced built-in CD player (MP3/WMA) operation English 1 Español 1 FUNCTION display Shows the function status. 1 Press OPEN to open the front panel. 2 Press FUNCTION to display the function names. Press FUNCTION repeatedly to switch between the following functions: PMODE (repeat play)—RDM (random play)— SCAN (scan play)—PAUSE (pause) • To return to the playback display, press BAND.
Section 05 MP3/WMA Player Repeating play Playing tracks in a random order For MP3/WMA playback, there are three repeat play ranges: FOLDER (folder repeat), TRK (onetrack repeat), and DISC (repeat all tracks). Random play lets you play back tracks in a random order within the repeat range,F.RANDOM (folder repeat) and RANDOM (all repeat). 1 Press OPEN to open the front panel. 1 Select the repeat range. Refer to Repeating play on this page. 2 Press FUNCTION to select PMODE.
Section MP3/WMA Player 05 Pausing MP3/WMA playback While you are using T.SCAN (folder repeat), the beginning of each track in the selected folder plays for about 10 seconds. When you are using F.SCAN (all repeat), the beginning of the first track of each folder is played for about 10 seconds. Pause lets you temporarily stop playback of the MP3/WMA. 2 Press OPEN to open the front panel. 4 Press 5 to turn scan play on. Scan :ON appears in the display.
Section 05 MP3/WMA Player • With some applications used to encode WMA files, album names and other text information may not be correctly displayed. • You can only switch to PLAYBACK MODE B when a DAB Tuner (GEX-P700DAB) is connected. Scrolling titles in the display This unit can display the first 16 letters only of Folder Name, File Name, Track Title, Artist Name and Album Title.
Section Multi-CD Player 06 Playing a CD 2 3 2 PLAY TIME indicator Shows the elapsed playing time of the current track. 1 Press SOURCE to select the multi-CD player. Press SOURCE until you see Multi-CD displayed. 50-disc multi-CD player Only those functions described in this manual are supported for 50-disc multi-CD players. Français 3 TRACK NUMBER indicator Shows the track currently playing. • When the multi-CD player performs the preparatory operations, Ready is displayed.
Section 06 Multi-CD Player Introduction of advanced multiCD player operation Repeating play There are three repeat play ranges for the multiCD player: MCD (multi-CD player repeat), TRK (one-track repeat), and DISC (disc repeat). 1 Press OPEN to open the front panel. 1 1 FUNCTION display Shows the function status. 1 Press OPEN to open the front panel. 2 Press FUNCTION to display the function names. Press FUNCTION repeatedly to switch between the following functions: PMODE (repeat play)—T.
Section Multi-CD Player Playing tracks in a random order 2 Press OPEN to open the front panel. 3 Press FUNCTION to select RDM. Press FUNCTION until RDM appears in the display. 5 When you find the desired track (or disc) press ∞ to turn scan play off. Scan :OFF appears in the display. The track (or disc) will continue to play. • If the display has automatically returned to the playback display, select SCAN again by pressing FUNCTION.
Section 06 Multi-CD Player Using ITS playlists ITS (instant track selection) lets you make a playlist of favorite tracks from those in the multiCD player magazine. After you have added your favorite tracks to the playlist you can turn on ITS play and play just those selections. Note • After data for 100 discs has been stored in memory, data for a new disc will overwrite the oldest one.
Section Multi-CD Player Erasing a track from your ITS playlist 2 Press OPEN to open the front panel. 4 Select a desired track by pressing 2 or 3. You can input CD titles and display the title. Then you can easily search for and select a desired disc for play. Entering disc titles Disc title input lets you input CD titles up to 10 letters long and up to 100 disc titles (with ITS playlist) into the multi-CD player. 1 Play a CD that you want to enter the title. Press 5 or ∞ to select a CD.
Section 06 Multi-CD Player 3 Press FUNCTION and hold until TITLE appears in the display. After TITLE is displayed, press FUNCTION repeatedly, the following functions appear in the display: TITLE (disc title input)—ITS (ITS programming) • When playing a CD TEXT disc on a CD TEXT compatible multi-CD player, you cannot switch to TITLE. The disc title will have already been recorded on a CD TEXT disc. 4 Press 1 numbered button to select the desired character type.
Section Multi-CD Player 06 Displaying titles on CD TEXT discs Disc title list lets you see the list of disc titles that have been entered into the multi-CD player and select one of them to playback. 1 Press OPEN to open the front panel. 1 Press OPEN to open the front panel. 3 Press 2 or 3 to scroll through the list of titles that have been entered. • If no title has been entered for a disc, NO DTITLE will be displayed.
Section 06 Multi-CD Player Using compression and bass emphasis You can use these functions only with a multi-CD player that supports them. Using COMP (compression) and DBE (dynamic bass emphasis) functions let you adjust the sound playback quality of the multi-CD player. Each of the functions have a two-step adjustment. The COMP function balances the output of louder and softer sounds at higher volumes. DBE boosts bass levels to give playback a fuller sound.
Section Audio Adjustments 07 Introduction of audio adjustments 3 1 AUDIO display Shows the audio adjustments status. 3 ASL indicator Shows the level of ASL. Deutsch 2 PRESET EQ indicator Shows which equalizer preset is presently selected. Español 2 Français 2 Press AUDIO to display the audio function names.
Section 07 Audio Adjustments Setting the sound focus equalizer Clarifying the sound image of vocals and instruments allows the simple staging of a natural, pleasant sound environment. Even greater listening enjoyment will be obtained if seating positions are chosen carefully. • FRT1 boosts the treble on the front output and the bass on the rear output. FRT2 boosts the treble and the bass on the front output and the bass on the rear output. (The bass boost is the same for both front and rear.
Section Audio Adjustments 07 Adjusting equalizer curves There are seven stored equalizer curves which you can easily recall at any time. Here is a list of the equalizer curves: You can adjust the currently selected equalizer curve setting as desired. Adjusted equalizer curve settings are memorized in CUSTOM1 or CUSTOM2. Equalizer curve SUPER BASS (S.
Section 07 Audio Adjustments Fine adjusting equalizer curve You can adjust the center frequency and the Q factor (curve characteristics) of each currently selected curve band (EQ-Low/EQ-Mid/EQ-High). Adjusting bass You can adjust the cut-off frequency and the bass level. • In FRT1 mode, bass adjustment affects only the rear output: front output cannot be adjusted. 1 Press OPEN to open the front panel. Level (dB) Q=2W Q=2N Center frequency Frequency (Hz) 1 Press OPEN to open the front panel.
Section Audio Adjustments Adjusting loudness Subwoofer output is now on. • You can turn off subwoofer output by pressing ∞. 4 Press 2 or 3 to select the phase of subwoofer output. Press 2 to select reverse phase and Rev. appears in the display. Press 3 to select normal phase and Normal appears in the display. 1 Press OPEN to open the front panel. 2 Press AUDIO to select Loud. Press AUDIO until Loud appears in the display. 5 Press ∞ to turn loudness off. Loud OFF appears in the display.
Section 07 Audio Adjustments Using no fading output Using the high pass filter When the non fading output setting is on, the audio signal does not pass through this unit’s low pass filter (for the subwoofer), but is output through the RCA output. When you do not want low sounds from the subwoofer output frequency range to play from the front or rear speakers, switch the HPF (high pass filter) on. Only frequencies higher than those in the selected range are output from the front and rear speakers.
Section Audio Adjustments 07 SLA (Source level adjustment) lets you adjust the volume level of each source to prevent radical changes in volume when switching between sources. • Settings are based on the volume level of the FM tuner, which remains unchanged. During driving, noise in the car changes according to the driving speed and road conditions. The automatic sound levelizer (ASL) monitors such varying noise and automatically increases the volume level, if this noise becomes greater.
Section 08 Initial Settings Adjusting initial settings Setting the time This is used to set the time on the unit’s clock display. 1 Press OPEN to open the front panel. 1 Initial settings lets you perform initial set up of different settings for this unit. 1 FUNCTION display Shows the function status. 1 Press SOURCE and hold until the unit turns off. 2 Press OPEN to open the front panel. 2 Press FUNCTION to select CLOCK. Press FUNCTION until the time appears in the display.
Section Initial Settings 08 1 Press OPEN to open the front panel. 1 Press OPEN to open the front panel. 2 Press FUNCTION to select WARN. Press FUNCTION until WARN appears in the display. 2 Press FUNCTION to select AUX. Press FUNCTION until AUX appears in the display. 3 Select WARN on or off with 5/∞. Pressing 5/∞ will switch Warning between on and off and that status will be displayed (e.g., Warning :ON). 3 Select AUX on or off with 5/∞.
Section 08 Initial Settings Selecting the brightness You can select the display brightness. Initially this mode is set to 12. 1 Press OPEN to open the front panel. 2 Press FUNCTION to select BRIGHT. Press FUNCTION until BRIGHT appears in the display. Notes • Even if you change this setting, there is no output unless you switch the non fading output (refer to page 42) or subwoofer output (refer to page 41) in the Audio Menu on.
Section Initial Settings 08 English Switching the telephone muting/attenuation Sound from this system is muted or attenuated automatically when a call is mode or received using a cellular telephone connected to this product. Español 1 Press OPEN to open the front panel. 2 Press FUNCTION to select TEL. Press FUNCTION until TEL appears in the display. Deutsch 3 Switch the telephone muting/attenuation with 2/3.
Section 09 Other Functions Setting the time display on or off Using the AUX source You can turn the time display on even when the sources are off. An IP-BUS-RCA Interconnector such as the CD-RB20 or CD-RB10 (sold separately) lets you connect this unit to auxiliary equipment featuring RCA output. For more details, refer to the IP-BUS-RCA Interconnector owner‘s manual. Press CLOCK to select the time display. Each press of CLOCK turns time display on or off. Time display appears on LCD display.
Section Other Functions Using the telephone muting/attenuation Deutsch 5 Press 3 to move the cursor to the next character position. When the letter you want is displayed, press 3 to move the cursor to the next position and then select the next letter. Press 2 to move backwards in the display. Español Sound from this system is muted or attenuated automatically when a call is made or received using a cellular telephone connected to this product.
Section 09 Other Functions Introduction of DAB operation 1 2 3 4 5 6 You can use this product with a separately sold hide-away DAB tuner (GEX-P700DAB). For details concerning operation, refer to the DAB tuner’s operation manuals (This product is a head unit group 1 unit). This section provides information on DAB operations with this product which differs from that described in the DAB tuner’s operation manual. 1 EXTR indicator The currently received Service has a Secondary Service Component.
Section Other Functions When operating with 2/3 at step 2, indications are displayed in the following order: Announce (Announce)—News (News)—Weather (Area Weather Flash)—Traffic (Traffic) Using dynamic label Dynamic label provides character information concerning the service component you’re currently listening to. You can scroll the displayed information.
Section 09 Other Functions 3 Press ∞ to scroll the dynamic label. • When viewing dynamic label, do not operate until you have parked your car safely. • If you press 5, you return to the first line. • If you select the dynamic label mode again after having canceled it, the information may switch to the latest available.
Section Other Functions 09 Display the ID code Operation of the following functions with this product differs. • Switching the display (Refer to this page.) • Switching the channel select mode (Refer to this page.) • Display the ID code (Refer to this page.) Each XM tuner is identified with a unique radio ID. You will need the radio ID when activating XM service or when reporting a problem. How to display the ID code depends on the channel select mode.
Section 10 Additional Information CD player and care CD-R/CD-RW discs • Use only CDs that have either of the two Compact Disc Digital Audio marks as show below. • Playback with this product of CD-R/CD-RW discs recorded with a music CD recorder or PC may not be possible due to disc characteristics, scratches or dirt on the disc, or dirt or condensation on this product’s lens. • Playback of discs recorded with a PC may not be possible depending on the application software setting or environment.
Section Additional Information Action ERROR-11, 12, 17, 30 Dirty disc Clean disc. ERROR-11, 12, 17, 30 Scratched disc Replace disc. ERROR-22, 23 The CD format cannot be played back Replace disc. ERROR-10, 11, 12, 17, 30, 50, A0 Electrical or mechanical Turn the ignition ON and OFF, or switch to a different source, then back to the CD player. ERROR-44 All tracks are skip tracks Replace disc. Français Cause Deutsch Message • An outline of a CD-ROM with MP3 files on it is shown below.
Section 10 Additional Information MP3 files • MP3 is short for MPEG Audio Layer 3 and refers to an audio compression technology standard. • This product allows playback of MP3 files on CD-ROM, CD-R and CD-RW discs. Disc recordings compatible with level 1 and level 2 of ISO9660 and with the Romeo and Joliet file system can be played back. • It is possible to play back multi-session compatible recorded discs. • Files are compatible with the ID3 Tag Ver. 1.0 and Ver. 1.
Section Additional Information 10 First Second Third level level level Notes Nederlands En Italiano • The equipment assigns folder numbers. The user can not assign folder numbers. • When playing discs with WMA and audio data (CD-DA) such as CD-EXTRA and MIXEDMODE CD, both types can be played only by switching mode between WMA and CD-DA with BAND. • It is not possible to check folders that do not include WMA files. (These folders will be skipped without displaying the folder number.
Section 10 Additional Information However, there also is some writing software which permits setting of the playback order. • The sound quality of WMA files generally becomes better with increasing bit rate. This unit can play recordings with bit rates from 48 kbps to 192 kbps, but in order to be able to enjoy a certain sound quality, it is recommended to use discs recorded with a higher bit rate. Precautions • When naming an WMA file, add the corresponding filename extension (.wma).
Section Additional Information Extended formats 10 VBR Playlists created using the “WINAMP” software have a playlist file extension (.m3u). WMA is short for Windows Media Audio and refers to an audio compression technology that is developed by Microsoft Corporation. WMA data can be encoded by using Windows Media Player version 7, 7.1 or Windows Media Player for Windows XP.
Section 10 Additional Information Specifications General Power source ...................... 14.4 V DC (10.8 – 15.1 V allowable) Grounding system .............. Negative type Max. current consumption ............................................. 10.0 A Dimensions (W × H × D): (When closed) (DIN) Chassis ............ 178 × 50 × 157 mm [7 × 2 × 6-1/8 in] Nose .................. 188 × 58 × 28 mm [7-3/8 × 2-1/4 × 1-1/8 in] (D) Chassis ............ 178 × 50 × 162 mm [7 × 2 × 6-3/8 in] Nose ..................
English Español Deutsch Français Italiano Nederlands 61 En
Section 00 Table des matières Nous vous remercions d’avoir acquis cet appareil Pioneer. Veuillez lire attentivement ce mode d’emploi de manière à vous familiariser avec le fonctionnement de l’appareil. Cela fait, conservez ce mode d’emploi afin de pouvoir vous y référer en cas de besoin.
Section Table des matières 00 English Français Italiano Réglages sonores Introduction aux réglages sonores 37 Réglage de l’égaliseur de focalisation sonore 38 Réglage de l’équilibre sonore 38 Utilisation de l’égaliseur 39 • Rappel d’une courbe d’égalisation 39 • Réglage des courbes d’égalisation 39 • Réglage fin de la courbe d’égalisation 40 Réglage des graves 40 Réglage des aigus 40 Réglage de la correction physiologique 41 Utilisation de la sortie pour haut-parleur d’extrêmes graves 41 • Réglages de l
Section 00 Table des matières Réglages initiaux Ajustement des réglages initiaux 44 Réglage de l’heure 44 Mise en service ou hors service du signal sonore d’avertissement 45 Annulation de l’ouverture automatique de la face avant 45 Mise en service ou hors service de l’entrée auxiliaire 45 Mise en service ou hors service de l’atténuateur de luminosité 45 Choix de la luminosité 46 Réglage de la sortie arrière et du contrôleur de l’enceinte d’extrêmes graves 46 Utilisation ou non de la sourdine/atténuation
Section 01 Cher Client: Italiano Nederlands Fr Français Ces informations ont été gracieusement fournies par la Fondation de la Recherche pour les Sourds. Deutsch Utilisé avec sagesse, votre nouvel équipement sonore sera une source de plaisir pendant toute votre vie.
Section 01 Avant de commencer Quelques mots sur cet appareil La plage de fonctionnement du syntoniseur correspond aux fréquences allouées à l’Amérique du Nord. Toute tentative d’utilisation dans une autre région peut conduire à une impossibilité. Important Le numéro de série de trouve sur le fond de l’appareil. Pour votre propre sécurité et votre commodité, pensez bien à noter ce numéro sur la carte de garantie jointe.
Section Avant de commencer Fonctions La lecture de CD/CD-R/CD-RW est possible. Lecture de fichiers MP3 Quelques mots sur la marque XM READY Français Ce produit permet la lecture des fichiers MP3 sur des CD-ROM, CD-R et CD-RW. La lecture des enregistrements de disque compatibles avec le niveau 1 et le niveau 2 de ISO9660 et avec le système de fichiers Romeo et Joliet est possible. Remarques • Certaines applications utilisées pour coder les fichiers WMA peuvent ne pas fonctionner correctement.
Section 01 Avant de commencer 1 2 3 - Description de l’appareil Face avant (fermée) 1 Touche EJECT Appuyez sur cette touche pour éjecter le CD que contient le lecteur de CD intégré. 2 Touche EQ Appuyez sur cette touche pour choisir diverses courbes d’égalisation. Appuyez, pendant au moins deux secondes, sur cette touche pour sélectionner un son naturel avec présence. 3 Touche SOURCE L’appareil est mis en service par le choix d’une source.
Section Avant de commencer English = 01 ~ Français @ ! Deutsch Face avant (ouverte) • Les touches mentionnées ci-dessous ne peuvent être utilisées que lorsque la face avant est ouverte. Français = Touche ENTERTAINMENT Appuyez sur cette touche pour modifier l’affichage divertissant. ~ Touche AUDIO Appuyez sur cette touche pour choisir les diverses commandes de correction sonore. Italiano ! Touche FUNCTION Appuyez sur cette touche pour choisir des fonctions.
Section 01 Avant de commencer # 8 3 7 $ ! ~ Télécommande monté sur le volant Il est fournis un boîtier de télécommande qui peut être monté sur le volant et assure le réglage de l’élément central. Pour connaître le rôle de chacune de ses touches, reportez-vous ci-dessus, à l’exception de celui de la touche ATT qui est évoqué au paragraphe suivant. # Touche ATT Appuyez sur cette touche pour atténuer rapidement le niveau sonore de près de 90%.
Section Avant de commencer Installation de la pile au lithium Français • Retirez la pile au lithium. ATTENTION • Ne pas recharger, démonter. chauffer une pile ni la jeter dans un feu. • N’utiliser qu’une pile au lithium CR2032 (3 V). N’utiliser jamais d’autre type de pile avec cette unité. • Ne pas manipuler la pile avec un outil métallique. • Ne pas ranger une pile au lithium avec des objects métalliques.
Section 01 Avant de commencer Indications affichées Cet appareil est équipé de deux types d’indicateur d’affichage: LCD et OEL. L’afficheur LCD contient des informations de base sur chaque source et d’autres valeurs qui sont visibles que la face avant soit ouverte ou fermée. L’afficheur OEL contient des informations détaillées sur chaque source et d’autres valeurs qui ne sont visibles que si la face avant est ouverte. Ce mode d’emploi traite principalement de l’afficheur OEL.
Section Avant de commencer • N’exercez aucune force excessive, ne saisissez pas l’afficheur ni les touches pour retirer ou fixer la face avant. • Evitez de heurter la face avant. • Conservez la face avant à l’abri des températures élevées et de la lumière directe du soleil. 1 Appuyez sur OPEN pour libérer la face avant. • Lors du retrait du panneau avant, veillez à le saisir par la touche ondulé de libération, à la partie arrière du panneau avant, tout en tirant.
Section 01 Avant de commencer Quelques mots sur la démonstration Cet appareil possède trois modes de démonstration: le mode d’inversion (Reverse mode), le mode de démonstration des possibilités (Feature DEMO) et le mode de démonstration d’ouverture automatique (Motion DEMO). Mode d’inversion Si vous n’effectuez aucune opération pendant environ 30 secondes, les indications s’affichent sur l’écran dans l’ordre inverse et cela à intervalle de 10 secondes.
Section Mise en service, mise hors service Mise en service de l’appareil Vous pouvez choisir la source que vous désirez. Pour écouter un disque, introduisez un disque dans le lecteur de CD intégré (reportez-vous à la page 19). Deutsch Mise hors service de l’appareil Appuyez, pendant au moins une seconde, sur SOURCE pour mettre l’appareil hors service. Français Appuyez sur SOURCE pour choisir une source.
Section 03 Syntoniseur Ecoute de la radio 1 2 3 3 Appuyez sur BAND pour choisir la gamme. Appuyez sur BAND jusqu’à ce que la gamme désirée, FM1, FM2, FM3 en FM ou AM, soit affichée. 4 Voici les opérations de base pour l’écoute de la radio. Le fonctionnement détaillé du syntoniseur est expliqué à partir de la page 17. 1 Indicateur BAND Il signale la gamme d’accord choisie, AM ou FM. 2 Indicateur STEREO (ST) Il signale que la station émet en stéréophonie.
Section Syntoniseur Mise en mémoire et rappel des fréquences des stations Grâce aux touches PRESET TUNING vous pouvez aisément mettre en mémoire six fréquences que vous pourrez ultérieurement rappeler par une simple pression sur la touche convenable. 1 Afficheur FUNCTION Il indique l’état de la fonction. 1 Appuyez sur OPEN pour ouvrir la face avant. • Si vous ne réglez aucun paramètre de la fonction pendant environ 30 secondes, l’afficheur indique à nouveau la fréquence d’accord.
Section 03 Syntoniseur Accord sur les signaux puissants L’accord automatique sur une station locale ne s’intéresse qu’aux émetteurs dont le signal reçu est suffisamment puissant pour garantir une réception de bonne qualité. 1 Appuyez sur OPEN pour ouvrir la face avant. 2 Appuyez sur FUNCTION pour choisir LOCAL. Appuyez sur FUNCTION jusqu’à ce que LOCAL apparaisse sur l’afficheur. 3 Appuyez sur 5 pour mettre en service l’accord automatique sur les stations locales.
Section Lecteur de CD intégré Ecoute d’un CD 4 Utilisez VOLUME pour régler le niveau sonore. Tournez la commande pour augmenter ou diminuer le volume. 2 1 Indicateur TRACK NUMBER Il indique la plage musicale en cours de lecture. 1 Appuyez sur EJECT. La fente de chargement du CD appparaît. Logement pour le CD 3 Après avoir introduit un CD, appuyez sur SOURCE pour choisir le lecteur de CD. Appuyez sur SOURCE jusqu’à ce que Compact Disc s’affiche.
Section 04 Lecteur de CD intégré Introduction au fonctionnement détaillé du lecteur de CD intégré Répétition de la lecture La répétition de la lecture vous permet d’écouter à nouveau la même plage musicale. 1 Appuyez sur OPEN pour ouvrir la face avant. 1 1 Afficheur FUNCTION Il indique l’état de la fonction. 1 Appuyez sur OPEN pour ouvrir la face avant. 2 Appuyez sur FUNCTION pour afficher le nom de chaque fonction.
Section Lecteur de CD intégré Les plages musicales du CD sont joués dans un ordre quelconque, choisi au hasard. 1 Appuyez sur OPEN pour ouvrir la face avant. 3 Appuyez sur 5 pour mettre en service la lecture au hasard. Random :ON apparaît sur l’afficheur. Les plages musicales sont lues dans un ordre quelconque. • Lorsque l’examen du disque est terminé, la lecture normale reprend. Pause de la lecture d’un CD La pause est un arrêt momentané de la lecture du CD.
Section 04 Lecteur de CD intégré Utilisation des fonctions de titrage des disques Vous pouvez taper le titre d’un CD et obtenir son affichage. Lorsque vous introduisez un CD pour lequel vous avez tapé le titre, ce titre s’affiche. Frappe du titre d’un disque Le lecteur de CD intégré peut contenir 48 titres de disque de 10 caractères. 1 Commandez la lecture du CD dont vous désirez frapper le titre. 6 Appuyez sur 3 pour placer le curseur sur la position suivante.
Section Lecteur de CD intégré Affichage du titre d’un disque Affichage du titre d’un disque CD TEXT 1 Appuyez sur OPEN pour ouvrir la face avant. 1 Appuyez sur OPEN pour ouvrir la face avant. 1 Appuyez sur OPEN pour ouvrir la face avant. Fr Nederlands 2 Maintenez la pression d’un doigt sur DISPLAY jusqu’à ce que le titre commence à défiler vers la gauche. La partie masquée du titre s’affiche peu à peu.
Section 05 Lecture MP3/WMA Ecoute d’un MP3/WMA 12 3 4 Voici les opérations de base pour l’écoute d’un MP3/WMA à l’aide du lecteur intégré. Le fonctionnement détaillé du lecteur de MP3/WMA est expliqué à partir de la page 25. 1 Indicateur MP3 (WMA) Il signale la lecture d’un fichier MP3 (WMA). 2 Indicateur FOLDER NUMBER Il indique le numéro du dossier en cours de lecture. 3 Indicateur PLAY TIME Il indique le temps écoulé depuis le début de la plage musicale en cours de lecture.
Section Lecture MP3/WMA Remarques • Il n’y a pas de son lors d’une avance rapide ou d’un retour rapide. • Si le lecteur de CD intégré présente une anomalie, un message d’erreur tel que ERROR-11 peut s’afficher. Reportez-vous à la page 55, Signification des messages d’erreur du lecteur de CD intégré. Français Introduction du fonctionnement évolué (MP3/WMA) du lecteur de CD incorporé English Deutsch 1 1 Afficheur FUNCTION Il indique l’état de la fonction. 1 Appuyez sur OPEN pour ouvrir la face avant.
Section 05 Lecture MP3/WMA Répétition de la lecture Pour la lecture MP3/WMA, il existe trois plages de lecture répétée: FOLDER (répétition d’un dossier), TRK (répétition d’une plage), et DISC (répétition de toutes les plages). Ecoute des plages musicales dans un ordre quelconque Les plages musicales sont jouées dans un ordre quelconque à l’intérieur du mode de répétition adopté: F.RANDOM (répétition d’un dossier) ou RANDOM (répétition totale). 1 Appuyez sur OPEN pour ouvrir la face avant.
Section Lecture MP3/WMA Examen du contenu des dossiers 2 Appuyez sur OPEN pour ouvrir la face avant. Remarques 4 Appuyez sur ∞ pour mettre hors service la pause. Pause :OFF apparaît sur l’afficheur. La lecture reprend là où elle a été interrompue. • Une pression sur PAUSE met également la pause en service ou hors service. Affichage du titre d’un disque MP3/WMA 1 Appuyez sur OPEN pour ouvrir la face avant. 2 Appuyez sur DISPLAY pendant la lecture du disque MP3/WMA.
Section 05 Lecture MP3/WMA • Lors de la lecture de fichiers enregistrés comme fichiers VBR (Variable bit Rate), la valeur de BIT RATE ne s’affiche pas même si vous commutez sur BIT RATE. • Si aucune information spécifique n’a été gravée sur le MP3/WMA, NO XXXX s’affiche (par exemple, NO Artist Name). • Avec certaines applications utilisées pour coder les fichiers WMA, les noms d’album et les autres informations de texte peuvent ne pas être affichés correctement.
Section Lecteur de CD à chargeur Ecoute d’un CD 06 4 Pour déplacer rapidement le capteur dans un sens ou dans l’autre, maintenez la pression d’un doigt sur 2, ou sur 3. 1 2 3 Remarques 1 Appuyez sur SOURCE pour choisir le lecteur de CD à chargeur. Appuyez sur SOURCE jusqu’à ce que Multi-CD s’affiche. Lecteur de CD 50 disques 2 Indicateur PLAY TIME Il indique le temps écoulé depuis le début de la plage musicale en cours de lecture.
Section 06 Lecteur de CD à chargeur Introduction au fonctionnement détaillé du lecteur de CD à chargeur Répétition de la lecture Trois modes de répétition sont prévus pour les disques du lecteur de CD à chargeur: MCD (répétition des disques que contient le lecteur), TRK (répétition d’une plage musicale) et DISC (répétition d’un disque). 1 Appuyez sur OPEN pour ouvrir la face avant. 1 1 Afficheur FUNCTION Il indique l’état de la fonction. 1 Appuyez sur OPEN pour ouvrir la face avant.
Section Lecteur de CD à chargeur 06 Reportez-vous à la page 30, Répétition de la lecture. Les plages musicales sont jouées dans un ordre quelconque à l’intérieur du mode de répétition adopté: RANDOM (répétition des disques que contient le lecteur) ou D.RANDOM (répétition d’un disque). 2 Appuyez sur OPEN pour ouvrir la face avant. 2 Appuyez sur OPEN pour ouvrir la face avant. Remarque • Lorsque l’examen du disque, ou des disques, est terminé, la lecture normale des plages musicales reprend.
Section 06 Lecteur de CD à chargeur 3 Appuyez sur 5 pour mettre en service la pause. Pause :ON apparaît sur l’afficheur. La lecture de la plage musicale marque une pause. 4 Appuyez sur ∞ pour mettre hors service la pause. Pause :OFF apparaît sur l’afficheur. La lecture reprend là où elle a été interrompue. • Une pression sur PAUSE met également la pause en service ou hors service.
Section Lecteur de CD à chargeur 06 5 Appuyez sur ∞ pour mettre hors service ITS. ITS Play :OFF apparaît sur l’afficheur. La lecture se poursuit, dans l’ordre normal et à partir de la plage musicale en cours. 6 Appuyez sur BAND pour revenir à l’affichage des conditions de lecture. 2 Appuyez sur OPEN pour ouvrir la face avant. 2 Appuyez sur OPEN pour ouvrir la face avant.
Section 06 Lecteur de CD à chargeur Utilisation des fonctions de titrage des disques Vous pouvez taper le titre d’un CD et obtenir son affichage. La prochaine fois que vous insérerez un CD pour lequel vous avez entré un titre, le titre de ce CD s’affichera. Frappe du titre d’un disque Le lecteur de CD à chargeur peut contenir 100 titres de disque de 10 caractères (avec liste ITS). 1 Commandez la lecture du CD dont vous désirez frapper le titre. Appuyez sur 5, ou sur ∞, pour choisir le CD.
Section Lecteur de CD à chargeur Choix d’un disque sur la liste des titres 1 Appuyez sur OPEN pour ouvrir la face avant. 3 Appuyez sur 2, ou sur 3, pour faire défiler la liste des titres mis en mémoire. • Si un disque ne porte pas de titre, NO D-TITLE s’affiche. 1 Appuyez sur OPEN pour ouvrir la face avant. 2 Maintenez la pression d’un doigt sur DISPLAY jusqu’à ce que le titre commence à défiler vers la gauche. La partie masquée du titre s’affiche peu à peu.
Section 06 Lecteur de CD à chargeur Utilisation de la compression et de l’accentuation dynamique des graves Vous pouvez utiliser ces fonctions lorsque le lecteur de CD à chargeur en est pourvu. La compression (COMP) et l’accentuation dynamique des graves (DBE) permettent un réglage précis des sons fournis par le lecteur de CD à chargeur. Chaque fonction possède deux niveaux de réglage.
Section Réglages sonores 07 Introduction aux réglages sonores 3 1 Afficheur AUDIO Il indique l’état des réglages sonores. 3 Indicateur ASL Il indique le réglage automatique du niveau sonore. Nederlands Fr Italiano • Si vous ne réglez aucun paramètre de la fonction pendant environ 30 secondes, l’afficheur indique à nouveau l’état de la source. Français Remarque Deutsch 2 Indicateur PRESET EQ Il indique la courbe d’égalisation actuellement sélectionnée.
Section 07 Réglages sonores Réglage de l’égaliseur de focalisation sonore En clarifiant l’image sonore des voix et des instruments il permet une mise en scène simple d’un environnement sonore naturel et plaisant. Un plaisir d’écoute encore plus grand sera obtenu si la position d’écoute est choisie avec attention. • FRT1 accentue les aigus de la sortie avant et les graves de la sortie arrière. FRT2 accentue les aigus et les graves de la sortie avant et les graves de la sortie arrière.
Section Réglages sonores Utilisation de l’égaliseur 07 Réglage des courbes d’égalisation La mémoire contient sept courbes d’égalisation que vous pouvez utiliser à n’importe quel moment. Voici la liste de ces six courbes: Vous pouvez modifier comme bon vous semble la courbe d’égalisation présentement choisie. Les réglages de courbe d’égalisation sont enregistrés en mémoire sous CUSTOM1 ou CUSTOM2. Indication affichée Courbe d’égalisation SUPER BASS (S.
Section 07 Réglages sonores Réglage fin de la courbe d’égalisation Vous pouvez régler la fréquence centrale et le facteur de surtension (caractéristique de la courbe) de chaque courbe présentement sélectionnée par bande (EQ-Low/EQ-Mid/EQHigh). Réglage des graves Vous pouvez ajuster la fréquence de coupure et le niveau des graves. • En mode FRT1, l’ajustement des graves affecte uniquement la sortie arrière: la sortie avant ne peut pas être ajustée. 1 Appuyez sur OPEN pour ouvrir la face avant.
Section Réglages sonores La correction physiologique a pour objet d’accentuer les graves et les aigus à bas niveaux d’écoute. 4 Appuyez sur 2, ou sur 3, pour choisir la phase de la sortie vers le haut-parleur d’extrêmes graves. Appuyez sur 2 pour choisir la phase inverse; Rev. apparaît sur l’afficheur. Appuyez sur 3 pour choisir la phase normale; Normal apparaît sur l’afficheur.
Section 07 Réglages sonores 4 Appuyez sur 5, ou sur ∞, pour régler l’amplitude de sortie du haut-parleur d’extrêmes graves. Chaque pression sur 5, ou sur ∞, augmente ou diminue l’amplitude de sortie du haut-parleur d’extrêmes graves. +6 – –6 sont les valeurs extrêmes que peut prendre le niveau tandis qu’il augmente ou diminue. Appuyez sur 5 ou ∞ jusqu’à ce que la valeur souhaitée s’affiche.
Section Réglages sonores Remarque 1 Appuyez sur OPEN pour ouvrir la face avant. 3 Appuyez sur AUDIO pour choisir SLA. Appuyez sur AUDIO jusqu’à ce que SLA apparaisse sur l’afficheur. 2 Appuyez sur AUDIO pour choisir ASL. Appuyez sur AUDIO jusqu’à ce que ASL apparaisse sur l’afficheur. 4 Appuyez sur 5, ou sur ∞, pour régler le niveau de la source. Chaque pression sur 5, ou sur ∞, augmente ou diminue le niveau sonore de la source.
Section 08 Réglages initiaux Ajustement des réglages initiaux Réglage de l’heure Cette fonction permet de régler l’heure sur l’horloge de l’appareil. 1 Appuyez sur OPEN pour ouvrir la face avant. 1 Les réglages initiaux vous permettent d’établir les conditions de fonctionnement de base de l’appareil. 1 Afficheur FUNCTION Il indique l’état de la fonction. 1 Maintenez la pression d’un doigt sur SOURCE jusqu’à ce que l’appareil s’éteigne. 2 Appuyez sur OPEN pour ouvrir la face avant.
Section Réglages initiaux 08 Mise en service ou hors service de l’entrée auxiliaire Si vous ne retirez pas la face avant de l’appareil central dans les cinq secondes qui suivent la coupure de l’allumage, un signal sonore d’avertissement se fait entendre. Vous pouvez mettre hors service ce signal sonore d’avertissement. Cet appareil accepte le signal d’un équipement auxiliaire. L’entrée auxiliaire doit être en service pour que l’équipement auxiliaire connecté puisse être utilisé.
Section 08 Réglages initiaux Choix de la luminosité Vous pouvez choisir la luminosité de l’afficheur. Initialement, la luminosité a la valeur 12. 1 Appuyez sur OPEN pour ouvrir la face avant. 2 Appuyez sur FUNCTION pour choisir BRIGHT. Appuyez sur FUNCTION jusqu’à ce que BRIGHT apparaisse sur l’afficheur. 3 Choisissez la luminosité souhaitée avec 2/3. • L’afficheur indique 0 – 15.
Section Réglages initiaux 3 Choisissez l’affichage ou non de DISP à l’aide de 5/∞. Mettez Motion en/hors service en appuyant sur 5/∞. L’état s’affiche (par exemple, Motion :ON). Français Utilisation ou non de la sourdine/atténuation audio téléphonique English 4 Changez le contrôleur du haut-parleur d’extrêmes graves avec 2/3. Appuyez sur 2/3 pour alterner entre S.W Control:INT et S.W Control:EXT; l’état s’affiche.
Section 09 Autres fonctions Affichage ou non de l’heure Utilisation de la source AUX Vous pouvez afficher l’heure même lorsque les sources sont hors service. Grâce à un interconnecteur IP-BUS-RCA tel que le modèle CD-RB20 ou CD-RB10 (vendu séparément), vous pouvez relier cet appareil à un équipement auxiliaire doté d’une sortie Cinch (RCA). Pour de plus amples détails, reportezvous au mode d’emploi de l’interconnecteur IPBUS-RCA. Appuyez sur CLOCK pour sélectionner l’affichage de l’heure.
Section Autres fonctions Lorsque vous placez ou recevez un appel au moyen du téléphone de voiture relié à l’appareil, les sons qu’il produit sont momentanément interrompus ou atténués. • Les sons sont interrompus. L’indication MUTE ou ATT s’affiche et aucun réglage sonore n’est possible. • Les conditions de fonctionnement redeviennent normales lorsque la communication téléphonique est terminée. Français Deutsch 5 Appuyez sur 3 pour placer le curseur sur la position suivante.
Section 09 Autres fonctions Introduction au fonctionnement DAB * Si le support d’annonce choisi est reçu, les lettres entre parenthèses s’éclairent. Fonctionnement 1 2 3 4 5 6 Vous pouvez utiliser cet appareil avec un syntoniseur DAB déporté vendu séparément (GEX-P700DAB). Pour de plus amples détails concernant cette question, reportez-vous aux modes d’emploi du DAB (Cet appareil est un élément principal du groupe 1.).
Section Autres fonctions Remarques Fonction des PTY disponibles Vous pouvez choisir le type PTY souhaité par ceux qui peuvent être reçus. 1 Appuyez sur OPEN pour ouvrir la face avant. 2 Appuyez sur FUNCTION pour choisir PTY. 3 Appuyez sur 2 ou 3 pour choisir le type de programme. Affichage de l’étiquette dynamique 1 Appuyez sur PAUSE pendant environ deux secondes pour afficher l’étiquette dynamique. • Appuyez une nouvelle fois sur PAUSE, ou appuyez sur BAND; le mode d’étiquette dynamique s’annule.
Section 09 Autres fonctions • Avant de consulter une étiquette dynamique, prenez soin de garer le véhicule. • Si vous appuyez sur 5 tandis que l’information défile, vous revenez à la première ligne. • Si vous choisissez à nouveau d’afficher l’étiquette dynamique après son abandon, l’information peut être la dernière disponible.
Section Autres fonctions Fonctionnement 1 Appuyez sur OPEN pour ouvrir la face avant. Chaque syntoniseur XM est identifié par un code d’identification (ID) qui lui est propre. Vous devez connaître le code ID de la radio pour pouvoir mettre en service le service XM, ou pour signaler un problème. La façon dont le code ID s’affiche dépend du mode de sélection du canal. Mode de sélection du numéro de canal Si vous sélectionnez CH 000, le code ID s’affiche. Deutsch 2 Appuyez sur DISPLAY.
Section 10 Informations complémentaires Soins à apporter au lecteur de CD • N’utilisez que les disques portant la marque Compact Disc Digital Audio. • N’utilisez que des disques standard circulaires. L’utilisation de disques ayant une forme différente peut provoquer une anomalie du lecteur, ou encore leur lecture peut être impossible. • Vérifiez les disques avant de les écouter. Rejetez tout disque fendu, rayé ou voilé car leur lecture peut être impossible. N’utilisez pas de disque en mauvais état.
Section Informations complémentaires 10 English Signification des messages d’erreur du lecteur de CD intégré ERROR-11, 12, 17, 30 Disque sale. Nettoyez le disque. ERROR-11, 12, 17, 30 Disque rayé. Utilisez un autre disque. ERROR-22, 23 Fichier incorrect. Formatez le disque. ERROR-10, 11, 12, 17, 30, 50, A0 Anomalie électrique ou mécanique. Coupez le contact au moyen de la clé puis rétablissez le contact et choisissez à nouveau le lecteur de CD comme source.
Section 10 Informations complémentaires Fichiers MP3 • MP3 est l’abréviation de “MPEG Audio Layer 3” et il représente une norme de technologie de compression audio. • Ce produit permet la lecture des fichiers MP3 sur des CD-ROM, CD-R et CD-RW. La lecture des enregistrements de disque compatibles avec le niveau 1 et le niveau 2 de ISO9660 et avec le système de fichiers Romeo et Joliet est possible. • Il est possible de lire des disques compatibles multi-session.
Section Informations complémentaires 10 • Il est possible de lire un maximum de 253 dossiers sur un disque. • Nous donnons ci-dessous un aperçu d’un CD-ROM renfermant des fichiers WMA. Les sous-dossiers sont indiqués comme des dossiers dans le dossier actuellement choisi. Fichiers WMA Italiano Nederlands Fr Français • Le système attribue des numéros aux dossiers. L’utilisateur ne peut pas attribuer luimême les numéros aux dossiers.
Section 10 Informations complémentaires • Lorsque vous utilisez des CD-R/CD-RW, la lecture n’est possible qu’avec les disques qui ont été finalisés. • L’ordre de sélection des dossiers pour la lecture et les autres opérations devient l’ordre d’écriture utilisé par le logiciel d’écriture. Pour cette raison, l’ordre attendu au moment de la lecture peut ne pas coïncider avec l’ordre effectif de lecture. Néanmoins, il y a également des logiciels d’écriture qui permettent de régler l’ordre de lecture.
Section Informations complémentaires 10 Il s’agit d’une méthode d’intégration des informations sur les plages musicales dans un fichier MP3. Ces informations intégrées peuvent comprendre le titre des plages musicales, le nom de l’artiste, le titre de l’album, le genre musical, l’année de production, des commentaires et autres données diverses. Le contenu peut être modifié à volonté à l’aide d’un logiciel incorporant des fonctions d’édition de ID3 Tag.
Section 10 Informations complémentaires Caractéristiques techniques Généralités Alimentation ....................... 14,4 V CC (10,8 à 15,1 V possibles) Mise à la masse .................. Pôle négatif Consommation maximale ...... 10,0 A Dimensions (L × H × P): (En position fermée) (DIN)Châssis .............. 178 × 50 × 157 mm Panneau avant ... 188 × 58 × 28 mm (D) Châssis .............. 178 × 50 × 162 mm Panneau avant ... 170 × 44 × 23 mm (En position ouverte) (DIN)Châssis ..............
English Français Deutsch Français Italiano Nederlands 61 Fr
PIONEER CORPORATION 4-1, MEGURO 1-CHOME, MEGURO-KU, TOKYO 153-8654, JAPAN PIONEER ELECTRONICS (USA) INC. P.O. Box 1540, Long Beach, California 90801-1540, U.S.A. TEL: (800) 421-1404 PIONEER EUROPE NV Haven 1087, Keetberglaan 1, B-9120 Melsele, Belgium TEL: (0) 3/570.05.11 PIONEER ELECTRONICS ASIACENTRE PTE. LTD. 253 Alexandra Road, #04-01, Singapore 159936 TEL: 65-472-1111 PIONEER ELECTRONICS AUSTRALIA PTY. LTD.