ENGLISH MONITOR WITH DVD RECEIVER INSTRUCTION MANUAL DDX395 DDX375BT DDX350BT (Region 1 – DVD Region Code 1 Area) (Region 1 – DVD Region Code 1 Area) DDX25BT DDX418BT (Region 1 – DVD Region Code 1 Area) (Region 4 – DVD Region Code 4 Area) (Region 1 – DVD Region Code 1 Area) This instruction manual is used to describe the models listed above. Model availability and features (functions) may differ depending on the country and sales area. Take the time to read through this instruction manual.
Important Notice To ensure proper use, please read through this manual before using this product. It is especially important that you read and observe WARNINGS and CAUTIONS in this manual. Please keep the manual in a safe and accessible place for future reference. WARNINGS To prevent accidents and damages • DO NOT install any unit or wire any cable in a location where; – it may obstruct the steering wheel and gearshift lever operations. – it may obstruct the operation of safety devices such as air bags.
Important Notice For DDX395/DDX375BT/DDX350BT/DDX25BT: CAUTION This equipment complies with FCC/IC radiation exposure limits set forth for an uncontrolled environment and meets the FCC radio frequency (RF) Exposure Guidelines and RSS-102 of the IC radio frequency (RF) Exposure rules. This equipment has very low levels of RF energy that is deemed to comply without maximum permissive exposure evaluation (MPE).
About this manual The displays and panels shown in this manual are examples used to provide clear explanations of the operations. For this reason, they may be different from the actual displays or panels. Illustrations of DDX395 are mainly used for explanation. Contents Component Names and Operations ............... 3 Basic Operations ................................................. 4 Using an external component via ADS adapter— OEM Features ...............................................................
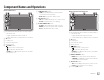
Component Names and Operations DDX395/DDX375BT 1 Reset button/Power indicator/Security indicator • Resets the unit. • Lights up while the unit is turned on. • Flashes when the security function is activated. 2 M button 3 Loading slot 4 Screen (touch panel) 5 Monitor panel 6 HOME button • (Press): Turns on the power. • (Hold): Turns off the power. • HOME (Press): Displays the Home screen while the power is on. 7 CAM/DISP OFF button • CAM (Press): Displays the picture from the connected rear view camera.
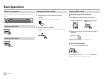
Basic Operations How to reset your unit If the unit fails to operate properly, press the reset button. Putting the unit in standby 1 Display the source/option selection screen. On the Home screen, touch as follows: Turning on the power 2 Turning off the screen On the pop-up short-cut menu 1 Display the pop-up short-cut menu. DDX395/DDX375BT DDX350BT/DDX25BT/ DDX418BT Put the unit in standby.
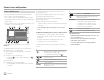
Basic Operations Getting Started Adjusting the volume Initial settings DDX395/DDX375BT When you power on the unit for the first time or reset the unit, the screen appears. Perform the initial settings. Initial Setup Demonstration You can adjust the volume (00 to 35) by turning the knob to the right to increase and to the left to decrease. DDX350BT/DDX25BT/DDX418BT Language ON OFF English Rear Camera Enter User Customize Enter Viewing Angle Enter Finish E.g.
Getting Started Setting the security function 4 Registering a security code (Only for DDX418BT) 1 2 Display the Home screen. Display the screen. On the Home screen, touch as follows: Repeat step 3 to confirm your security code. Now, your security code is registered. To clear the registered security code: touch [CLR] for in step 2. Then, enter the current security code to clear and touch [Enter].
Various Screens and Operations You can display or change to other screens at any time to show information, change the AV source, change the settings, etc. Available playback sources and options Touch 1 to display the source/option selection screen. Home screen When you turn on the power for the first time, the Home screen appears. • You can customize the Home screen. (Page 44) • To display the Home screen from other screens, press HOME.
Various Screens and Operations Source control screen You can perform the playback operation from the source control screen during playback. • The operation keys and information displayed vary depending on the selected source/disc type/file type being played. • If the operation keys are not displayed on the screen, touch the screen to show them.
Various Screens and Operations Using the pop-up short-cut menu While displaying the source control screen, you can jump to another screen by touching the operation keys on the pop-up short-cut menu. 1 Display the pop-up short-cut menu. DDX395/DDX375BT 2 Using touch screen operation during playback DDX350BT/DDX25BT/ DDX418BT Select an item to jump to by touching as follows. [TEL] Displays the phone control screen. [Screen Adjustment] Displays the picture adjustment screen.
Disc • If a disc does not have a disc menu, all tracks on it will be played repeatedly until you change the source or eject the disc. • For playable disc types, file types and other information, see pages 57 and 58. • If “ ” appears on the screen, the unit cannot accept the operation you have tried to do. – In some cases, without showing “ ”, operations will not be accepted. • When playing back a multi-channel encoded disc, the multi-channel signals are downmixed.
Video Disc 2 Make the settings. DISC Mode Menu Language English SET Subtitle Language English SET Audio Language English SET Dynamic Range Control Down Mix Screen Ratio Dialog Dolby Surround Stereo 16:9
*1 Select the initial disc menu language. (Initial: English) *1 Select the initial subtitle language or turn subtitles off (Off). (Initial: English) *1 Select the initial audio language. Video Video menu control operations You can display the video menu control during video playback. • Available operation keys differ depend on the selected disc type and file type. Touching the operation keys performs the following actions: [ZOOM]*1 Displays the picture size selection screen. 1 Touch [ Zoom] to change the magnification level of the picture (Zoom1, Zoom2, Zoom3, Full: Initial). 2 Touch [J] [K] [H] [I] to move the zooming frame. [Aspect] Displays the aspect ratio selection screen.
USB Video 2 [ MENU] [T MENU] Displays the disc menu (DVD). Displays the disc menu (DVD). [Highlight] Switches to the direct disc menu mode. Touch the target item to select. [CUR] Displays the menu/scene selection screen. • [J] [K] [H] [I]: Selects an item. • [Enter]: Confirms the selection. • [Return]: Returns to the previous screen. Video playback for VCD Touching the operation keys performs the following actions: 1 [ZOOM] [Aspect] [Picture Adjust] Refer to “Video playback except VCD” on page 12.
USB Playback operations Playback information and key operation • For playback information, see “Source control screen” on page 8. • For key operations on the touch panel, see “Common operation keys on source control screen” on page 8. Selecting the file type to play You can specify the file type to play. USB File type Selecting a folder/track on the list 1 Display the folder/track list. On the source control screen, touch as follows: 2 Select the folder (1), then the item (2) in the selected folder.
Android This unit supports the Android™ application, KENWOOD Music Play. When you use KENWOOD Music Play via this unit, you can search for audio files by genre, artist, album, playlist and song. • For more information about KENWOOD Music Play, visit
Android iPod/iPhone Settings for Android playback Connecting an iPod/iPhone 1 Display the screen. On the source control screen, touch as follows: • For playable iPod/iPhone types and other information, see page 60. • You cannot watch video. Bluetooth connection Pair the iPod/iPhone with this unit via Bluetooth.
iPod/iPhone Radio 2 Listening to the radio Select a category (1), then select a desired item (2). iPod Playlists Artist 000000001 Artist Artist 000000002 Album Artist 000000003 Songs Artist 000000004 Podcasts Artist 000000005 Playback information on the source control screen Radio Touching the operation keys performs the following actions: 6 Select an item in each layer until you reach and select the desired file. • Available categories differ depending on the type of iPod/iPhone.
Radio p Presetting stations in the memory [PTY]* (For FM RBDS features) Enters PTY search mode. 1 Touch [PTY]. 2 Touch and hold a PTY code to search for. If there is a station broadcasting a program of the same PTY code as you have selected, that station is tuned in. Changes the seek mode for [S]/[T]. • AUTO1 (Initial): Auto search • AUTO2: Tunes in preset stations one after another • MANU: Manual search [SEEK] [S]/[T] Searches for a station.
SiriusXM® Satellite Radio Only SiriusXM® brings you more of what you love to listen to, all in one place. Get over 140 channels, including commercial-free music plus the best sports, news, talk, comedy and entertainment. Welcome to the world of satellite radio. A SiriusXM Connect Vehicle Tuner and subscription are required. For more information, visit .
SiriusXM® Satellite Radio Operation keys on source control screen • See also “Common operation keys on source control screen” on page 8. Touching the operation keys performs the following actions: 1 [MODE] ] (Hold) Registers the current artist to the alert contents. [ ] (Hold) Registers the current song to the alert contents. ] Activates or deactivates the content alert for traffic and weather. [SEEK] Changes the seek mode for [CHJ]/ [CHK]. • SEEK1 (Initial): Skips to another available channel.
SiriusXM® Satellite Radio Selecting a preset channel 1 Replaying content Select the band, then display the preset channel window. On the source control screen, touch as follows: 2 You can pause, rewind and replay the contents from the currently tuned channel. • The SiriusXM Connect Vehicle Tuner continually buffers up to 60 minutes of audio. • If you change to another channel during playback, the buffered contents will be lost. • The time code is updated every second. 1 Select a preset channel.
SiriusXM® Satellite Radio When you select a SmartFavorites channel, you can listen to the current song from the beginning. 1 Display the screen. For teams Content Alert TuneStart™ The unit informs you when receiving the content you are interested in, such as music, information about a sports team, weather and traffic information. 1 Display the screen.
SiriusXM® Satellite Radio Selecting items for Content Alert You can select items (artists/songs/teams) from the registered items on the list to inform you once the unit receives the information. For artists/songs/teams 1 Display the screen. On the source control screen, touch as follows: To delete the registered items: Touch and hold the item you want to delete in step 2. The [ ] icon and a check mark appear beside the selected item. Touch the [ ] icon to delete.
SiriusXM® Satellite Radio Switching to registered content When an artist/song/team registered for Content Alert is being broadcasted, an alert appears on the screen. Setting reception restrictions You can limit access to SiriusXM channels, such as those with mature content. Touch [Jump], then select the item to jump to on the screen.
SiriusXM® Satellite Radio Parental Lock channel selection This option allows you to manually select the channels to be locked by the parental control feature. • You can only change the setting if is set to [User]. 1 Display the screen. On the source control screen, touch as follows: To deactivate parental lock for all locked channels: Select [All Clear] for in step 1, then enter the parental code.
Pandora® (Only for DDX395/DDX375BT/DDX350BT/DDX25BT) You can stream Pandora from iPhone/iPod touch or Android devices. • Pandora is only available in certain countries. For more information, visit . • Because Pandora is a third-party service, the specifications are subject to change without prior notice. Accordingly, compatibility may be impaired or some or all of the services may become unavailable. • Some functions of Pandora cannot be operated from this unit.
Pandora® Operation keys on source control screen • The appearance of the operation keys may differ, however the similar operation keys have the same operations. • See also “Common operation keys on source control screen” on page 8. Selecting a station from the list 1 3 Select a station from the list. On the station list Display the list selection screen.
iHeartRadio (Only for DDX395/DDX375BT/DDX350BT/DDX25BT) iHeartRadio is a free, all-in-one digital radio service that lets you listen to your favorite live stations or create commercial-free, all-music custom stations featuring songs from the artists you select and similar music. You can stream iHeartRadio from iPhone/iPod touch or Android devices. • Because iHeartRadio is a third-party service, the specifications are subject to change without prior notice.
iHeartRadio Operation keys on source control screen • The appearance of the operation keys may differ, however the similar operation keys have the same operations. • See also “Common operation keys on source control screen” on page 8. *1 Appears only for the custom station screen. *2 Appears only for the live station screen.
iHeartRadio Editing the list 1 Display the screen. On the source control screen, touch as follows: Then, on the screen, touch as follows: 2 Select stations (1), then delete the selected stations (2). • A check mark appears beside the selected station. Spotify With Spotify, your music is everywhere. Working out, partying or relaxing, the right music is always at your fingertips. There are millions of songs on Spotify—from old favorites to the latest hits.
Spotify Playback operations Playback information and key operation Spotify Operation keys on source control screen • The appearance of the operation keys may differ, however the similar operation keys have the same operations. • See also “Common operation keys on source control screen” on page 8. Touching the operation keys performs the following actions: 1 [ [ You can also operate Spotify with a remote controller, RC-DV340*1. You can only control play, pause and skip with the remote controller.
Spotify Selecting a track 1 Display the Spotify menu screen. Other External Components AV-IN Rear view camera (Only for DDX418BT) Connecting an external component On the source control screen, touch as follows: See page 57 for more information. Install the rear view camera (separately purchased) in the appropriate position according to the instructions supplied with the rear view camera. Connecting a rear view camera Starting playback 2 Select the list type, then select a desired item.
Other External Components Operations while the camera screen is displayed To adjust the picture Touch the area shown below. Video menu control is shown. For details, see “Video menu control operations” on page 12. • To exit video menu control, touch the same area again. To display parking guide line Set to [ON] (Page 45) or touch the area shown below.
Bluetooth® Information Bluetooth is a short-range wireless radio communication technology for mobile devices such as mobile phones, portable PCs and other devices. Bluetooth devices can be connected without cables and communicate with each other. Note • While driving, do not perform complicated operations such as dialing numbers, using the phone book, etc. When you perform these operations, stop your car in a safe place.
Bluetooth® Pairing a Bluetooth device using a PIN code (for Bluetooth 2.0) 1 • If a PIN code is required, enter “0000” (initial) or new PIN code you have entered in step 2. • When pairing is completed, the device is registered on the screen. Display the screen.
Bluetooth® To delete the registered device: Perform step 1, select the device you want to delete in step 2, then touch [Remove]. • A confirmation message appears. Touch [Yes]. During a call... 1 Device Name 1 DTMF Name 1234XXXXXX Touching the operation keys performs the following actions: ] [ 0 + EC LEVEL – 0 + MIC LEVEL – 0 + Touching the operation keys performs the following actions: [ Ends a call. ] ]/ ] Rejects a call. • Call information is displayed if acquired.
Bluetooth® 3 Select a contact (1), then make a call (2). When item 1, 2 or 3 is selected in step 2: 1 Device Name 1 2 Device Name 2 Name 1 1234XXXXXX Name 2 2345XXXXXX Name 3 3456XXXXXX Name 4 4567XXXXXX Name 5 8901XXXXXX When item 4 is selected in step 2: Enter the phone number (1), then make a call (2). 1 Device Name 1 2 Device Name 2 To use alphabet search in the phone book 1 Touch [ A-Z ]. 2 Touch the first letter you want to search for on the keypad. To search for a number, touch [1,2,3...].
Bluetooth® Bluetooth audio player Presetting phone numbers You can preset up to five phone numbers. 1 Display the phone control screen. On the Home screen, touch as follows: 2 * Available only for devices compatible with AVRCP 1.3. 2 Device Name 2 Name 1 1234XXXXXX Name 2 2345XXXXXX Name 3 3456XXXXXX Name 4 4567XXXXXX Name 5 8901XXXXXX Playback information and key operation • For playback information, see “Source control screen” on page 8.
Bluetooth® Selecting an audio file from the menu 1 Display the audio menu. On the source control screen, touch as follows: Bluetooth settings You can change various settings for using Bluetooth devices on the screen. 1 Display the screen. On the Home screen, touch as follows: 2 Select a category (1), then select a desired item (2).
Settings Audio settings Display the screen. On the Home screen, touch as follows: Then, on the screen, touch [Audio]. Setup Audio Equalizer Enter Display Sound Effect Enter Input Fader / Balance Enter System Speaker / X’over Time Alignment Enter Enter E.g. Audio settings screen for DDX395 You cannot change the screen in the following situations: • When the AV source is turned off.
Settings Adjust the sound effect. Adjusts loudness. • OFF (Initial)/Low/High Selects the bass boost level. • OFF (Initial)/Level 1/Level 2/Level 3/Level 4/ Level 5 Reduces the driving noise by raising the bandwidth. • OFF (Initial)/ON *1 Virtually enhances the sound space using the Digital Signal Processor (DSP) system. Select the enhance level.
Settings 3 Adjust the crossover frequency of the selected speaker. • Adjustable items vary depending on the selected speaker type/speaker size/crossover settings. / Adjusts the output volume of the tweeter (left/ right). Adjusts the crossover frequency for the tweeter. Make fine adjustments to the delay time of the speaker output to create a more suitable environment for your car.
Settings Adjust and store the auto-adjustment volume level for each source. If the source is a disc, the adjustment is stored for each of the following categories: • DVD/VCD • CD • DivX*/MPEG1/MPEG2/MP3/WMA/WAV/AAC/FLAC The volume level will automatically increase or decrease when you change the source. • –15 to +6 (Initial: 00) • Auto (Initial): Dims the screen and button illumination when you turn on the headlights. – The ILLUMI lead connection is required.
Settings 3 Adjust the image (1), then capture the image (2). Capture Cancel • ON (Initial): Activates the display demonstration. • OFF: Deactivates the display demonstration. Adjust the brightness and blackness of the screen. Select [DIM ON] (dimmer on) or [DIM OFF] (dimmer off), then change the following settings: Adjusts brightness. • –15 to +15 (Initial: 0 for dimmer on, +15 for dimmer off) • ON (Initial): Scrolls the displayed information repeatedly.
Settings Input settings Display the Adjust the parking guidelines according to the size of the car, parking space and so on. When adjusting the parking guidelines, make sure to use the parking brake to prevent the car from moving. mark (1), then adjust the position of the Select the selected mark (2). Then, on the screen, touch [Input].
Settings [USB 1 Wire] Select this when the device is connected via the USB input terminal (cable from the rear panel). Specify the connection method of Android/iPod/ iPhone. 1 Select the device type (1), then touch [Change] (2). [Bluetooth] Select this when the device is connected via Bluetooth. (Go to step 3.
Settings (Only for DDX418BT) Adjust the touch positions of the buttons on the screen. This unit has its own Registration Code. Once you have played back a file with the Registration Code recorded, this unit’s Registration Code is overwritten for copyright protection. • Touch [Enter] to display the information. • To return to the previous screen, touch [OK]. 2 Press and hold a button on the steering remote controller to register or change.
Settings Update the system by connecting a USB device containing an update file. • To obtain the update file, visit
Remote Controller Preparation Battery installation Use two “AAA”/“R03”-size batteries. Insert the batteries with the + and – poles aligned properly, following the illustration inside the case. • Always insert batteries from – poles to avoid bending the springs. • If the Remote Controller operates only over shorter distances or does not operate at all, it is possible that the batteries are depleted. In such instances, replace both batteries with new ones.
Remote Controller DVD/VCD (DVD mode) J/K/H/I Moves the cursor when displaying a menu. S/T Selects a track. I/W Starts/pauses playback. o Stops and memorizes the point where the disc stops. 0–9 • Specifies the number to search for in direct search. • 1/2: Fast forwards/backwards. – Fast forward/backward speed changes each time you press this key. • 4/5: Slow forwards/backwards during pause. S /T Selects music/videos. I/W Starts/pauses playback.
Remote Controller Basic operations for KNA-RCDV331 (optionally purchased) MAP DIR/OPEN Not used for this unit. * +/CLEAR Deletes a character while in direct search mode. NAV/DISP Not used for this unit. ZOOM OUT/IN Not used for this unit. # BS/DIRECT Enters direct search mode. 2 ZONE Not used for this unit. ROUTE M/ MODE/ TOP MENU Shows the disc top menu. R.VOL Not used for this unit. VOICE/FNC/ MENU/PBC • Shows the disc menu. • Turns the playback control on or off while playing VCD.
Remote Controller Music Disc/Audio file/Video file/Picture file (AUD mode) J/FM+ / K/AM− Selects a folder. iPod/Android (AUD mode) H/S / T/I Selects music/videos. POSITION/IW Starts/pauses playback. Searching for an item directly While listening to the radio or during disc playback, you can search for a station frequency/chapter/title/ folder/file/track directly using the number buttons. • To search for a track from the VCD menu, perform during PBC playback. H/S / T/I Selects a track/file.
Remote Controller KENWOOD Remote APP KENWOOD Remote is an application that connects and controls compatible KENWOOD car receivers via Bluetooth® like a wireless remote control. You can also operate this unit from a Smartphone using KENWOOD Remote APP. This application can display the source information of this unit on the smartphone’s screen, and enables the user to make an audio setting using the graphic user interface of this application.
Installation and Connection • If your car’s ignition does not have an ACC position, connect the ignition wires to a power source that can be turned on and off with the ignition key. If you connect the ignition wire to a power source with a constant voltage supply, such as with battery wires, the battery may be drained. • If the fuse blows, first make sure the wires are not touching to cause a short circuit, then replace the old fuse with one with the same rating.
Installation and Connection Installing the unit (Only for DDX395/DDX418BT) Installing the unit using the mounting bracket removed from the car Remove from the upper two catches of the trim plate (]). ] π/[ π/[ 2 Installing the trim plate The frame can be removed from the top side in the same manner. Car bracket Note: Select the appropriate screws (supplied) for the mounting bracket.
Installation and Connection Wiring connection 10 A fuse *1 Only for DDX395/DDX375BT/DDX25BT. *2 Only for DDX395/DDX375BT. *3 Only for DDX418BT.
References Installation and Connection Connecting external components 7 Rear view camera input (R-CAM) 8 Output terminals*5 • Left output (White) • Right output (Red) REAR: Rear speaker preouts FRONT: Front speaker preouts SW: Subwoofer preouts *1 *2 *3 *4 1 Expansion port for connecting SiriusXM Connect Vehicle Tuner (EXT I/F) (commercially available)*1 2 iDatalink input for connecting an ADS adapter (commercially available)*2 3 Steering wheel remote controller input (REMO-IN)*3 • Connect to the car’s s
References • This unit can play back files that meet the conditions below: – Bit rate: MP3: 8 kbps – 320 kbps WMA: For disc: 5 kbps – 320 kbps For USB : 32 kbps – 192 kbps AAC: 16 kbps – 320 kbps – Sampling frequency: MP3: 16 kHz – 48 kHz WMA: 8 kHz – 48 kHz WAV: 44.1 kHz AAC: 32 kHz – 48 kHz FLAC: 8 kHz – 96 kHz – Files recorded in VBR (variable bit rate), and have a discrepancy in elapsed time indication • This unit can show or display the following: – Tag: MP3: ID3 Tag (version 1.0/1.1/2.2/2.3/2.
References – This unit can recognize a total of 5 000 files and 250 folders (a maximum of 999 files per folder) in a recordable/rewritable disc. – Use only “finalized” recordable/rewritable discs. – This unit can play back multi-session recordable/ rewritable discs; however, unclosed sessions will be skipped while playing. Unplayable disc types and formats • DVD-Audio/DVD-ROM discs • SVCD (Super Video CD), CD-ROM, CD-I (CD-I Ready), DTS-CD • MPEG4/DivX*/AAC (.
References About USB playback Important Make sure all important data has been backed up to avoid losing the data. We bear no responsibility for any loss of data stored in the devices while using this unit. Playable files on a USB device • This unit can play the following types of files stored in a USB mass storage class device. – JPEG/Divx*/MPEG1/MPEG2/MP3/WMA/WAV/AAC (.aac/.
References Notes on using an iPod/iPhone • When operating an iPod/iPhone, some operations may not be performed correctly or as intended. In this case, visit the following KENWOOD web site:
Troubleshooting “Region Code Error” appears. A You have inserted a DVD Video disc of an incorrect region code. Insert a correct region code disc. USB “Reading” does not disappear from the screen. A Turn the power off and on again. While playing a track, sound is sometimes interrupted. A The tracks are not properly copied into the USB device. Copy the tracks again, and try again. Tracks are not played back as you have intended them to play.
Troubleshooting Pandora*/iHeartRadio*/Spotify The application does not work. A The application on your iPod touch/iPhone/ Android is not the latest version. Update the application. “Please update Pandora App” appears. A The Pandora application on your iPod touch/ iPhone/Android is not the latest version. Update the application. “Please check device.” appears. A The Pandora application on your iPod touch/ iPhone/Android has not started up. A The Pandora application is not installed on the connected device.
Specifications Troubleshooting Bluetooth Phone sound quality is poor. A Reduce the distance between the unit and the Bluetooth mobile phone. A Move the car to a place where you can get a better signal reception. The sound is interrupted or skipped while using a Bluetooth audio player. A Reduce the distance between the unit and the Bluetooth audio player. Disconnect the device connected for Bluetooth phone. A Turn off, then turn on the unit. (When the sound is not yet restored) connect the player again.
Specifications DVD player section Bluetooth section D/A Converter 24 bit Technology Bluetooth 3.0 Audio Decoder Linear PCM/Dolby Audio/ MP3/WMA/WAV/AAC (.m4a) Frequency 2.402 GHz to 2.480 GHz Output Power +4 dBm (MAX), 0 dBm (AVE), Power Class 2 Maximum Communication Range Line of sight approx. 10 m (32.8 ft) Audio Codec SBC/AAC Profile HFP (Hands Free Profile) 1.6 A2DP (Advanced Audio Distribution Profile) 1.3 AVRCP (Audio/Video Remote Control Profile) 1.
Specifications FM tuner section Video section General DDX395/DDX375BT/ DDX350BT/DDX25BT: 87.9 MHz to 107.9 MHz (200 kHz) Color System of External Video Input NTSC/PAL Operating Voltage 14.4 V (10.5 V to 16 V allowable) External Video Input Level (mini jack)* 1 Vp-p/75 Ω Maximum Current Consumption 10 A DDX418BT: 87.5 MHz to 108.0 MHz (50 kHz) External Audio Max Input Level (mini jack)* 2 V/25 kΩ Installation Dimensions (W × H × D) Usable Sensitivity (S/N: 30 dB) 7.2 dBf (0.
Specifications Trademarks and licenses • Dolby, Dolby Audio and the double-D symbol are trademarks of Dolby Laboratories. • “DVD Logo” is a trademark of DVD Format/Logo Licensing Corporation registered in the US, Japan and other countries. • The “AAC” logo is a trademark of Dolby Laboratories. • Microsoft and Windows Media are either registered trademarks or trademarks of Microsoft Corporation in the United States and/or other countries.
For updated information (the latest Instruction Manual, system updates, new functions, etc.), please visit the following website:
MILITARY Units purchased through the U.S.A. military exchange service overseas may be serviced under warranty in the continental U.SA. subject to the following conditions. 1) The original warranty is in effect. 2) Proof of purchase is provided to the servicer. WARRANTY FOR MILITARY MARKET JVC KENWOOD corporatiOn 1s proud of the quafily and workmanship of itsaudi oequipment. This unit has beenproperJy designed, tested and inspected before it was shipped to you.
U .S.A. JVCKENWOOD USA Corporation This warranty wilt be honored only in the U.S.A. KENWOOD LIMITED WARRANTY FOR CAR STEREO COMPONENTS EXCLUSION OF DAMAGES KENWOOD WARRANTY This warranty is enforceable only by the original purchaser. KENWOOD'S LIABILITY FOR ANY DEFECTIVE PRODUCT IS LIMITEDTO THEREPAIRORREPLACEMENTOFTHEPRODUCT AT OUR OPTION. KENWOOD SHALL NOT BE LIABLEFOR: 1. INSTALLATION OR REMOVAL CHARGES. DAMAGE TO OTHER PROPERTY CAUSED BY ANY DEFECTS IN KENWOOD CAR STEREO COMPONENTS.