
Owner's Manual


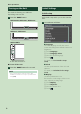
Table Of Contents
- Instruction Manual
- Quick Start Guide
- Contents
- Before Use
- Basic Operations
- Disc
- USB/iPod
- HD Radio™ Tuner/Radio
- Bluetooth Control
- Controlling Audio
- Connection/Installation
- Before Installation
- Installing the unit
- Non-Japanese cars (Except DDX819WBTL)
- Japanese cars
- Trim plate (Except DDX819WBTL)
- GPS antenna (Except DDX819WBTL)
- Microphone unit
- Removing the trim plate (Except DDX819WBTL)
- Removing the unit (Except DDX819WBTL)
- Connecting wires to terminals
- 3-way speaker system setup
- Connecting the system and external components
- Securing the USB extension cable
- Connecting a USB device
- Connecting an iPod/iPhone
- Connecting an Android smartphone
- Connecting the camera
- To set up the cameraassignment settings
- Appendix
- Warranty

Before Use
5English
Ñ Acquiring GPS signal
The first time you turn on this unit, you must
wait while the system acquires satellite signals
for the first time. This process could take up
to several minutes. Make sure your vehicle
is outdoors in an open area away from tall
buildings and trees for fastest acquisition.
After the system acquires satellites for the first
time, it will acquire satellites quickly each time
thereafter.
Ñ About GLONASS
This unit uses Global Navigation Satellite System
(GLONASS) in addition to GPS.
Combining GPS and GLONASS can refine
positioning accuracy than using GPS only.
Ñ Caution for Smartphone Users
Simultaneously running multiple applications
on your smartphone while screen sharing places
heavy demand on the microprocessor of the
phone, potentially affecting communication and
performance.
For best results while pairing with your Kenwood
receiver, please be sure to close any unused
applications.
How to read this manual
• The screens and panels shown in this manual are
examples used to provide a clear explanation of
operations.
For this reason, they may be different from the actual
screens or panels, or some display patterns may be
different from the actual ones.
• Display language: English is used for the purpose
of explanation. You can select a display language
from the [SETUP] menu. See User Interface Setup
(P.84).