
Owner's Manual


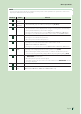
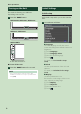
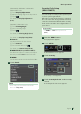
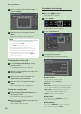
Table Of Contents
- Instruction Manual
- Quick Start Guide
- Contents
- Before Use
- Basic Operations
- Disc
- USB/iPod
- HD Radio™ Tuner/Radio
- Bluetooth Control
- Controlling Audio
- Connection/Installation
- Before Installation
- Installing the unit
- Non-Japanese cars (Except DDX819WBTL)
- Japanese cars
- Trim plate (Except DDX819WBTL)
- GPS antenna (Except DDX819WBTL)
- Microphone unit
- Removing the trim plate (Except DDX819WBTL)
- Removing the unit (Except DDX819WBTL)
- Connecting wires to terminals
- 3-way speaker system setup
- Connecting the system and external components
- Securing the USB extension cable
- Connecting a USB device
- Connecting an iPod/iPhone
- Connecting an Android smartphone
- Connecting the camera
- To set up the cameraassignment settings
- Appendix
- Warranty

Basic Operations
8
Turning on the Unit
The method of turning on is different
depending on the model.
1
Press the [HOME] button.
DDX9906XR / DDX8906S / DDX8706S
DMX906S / DMX9706S
DDX819WBTL
The unit is turned on.
● To turn off the unit:
1
Press the [HOME] button for 1 second.
NOTE
• If it is your first time to turn the unit on after
installation, it will be necessary to perform Initial
setup (P.8).
Initial Settings
Initial setup
Perform this setup when you use this unit first
time.
1
Set each item as follows.
■ [Language]
Select the language used for the control
screen and setting items. Default is “American
English(en)”.
1 Touch [Language].
2 Touch [Language Select].
3 Select the desired language.
4 Touch [
].
For details, see User Interface Setup
(P.84).
■ [Clock]
Sets the synchronization of the clock and
adjusts it.
For details, see Calendar/clock settings
(P.10).
■ [Display]
Set the key illumination color.
If it is hard to see the image on the screen
even, adjust the viewing angle.
1 Touch [Display].
2 Touch [Key Color].
3 Select the desired color.
4 Touch [
].