
Owner's Manual


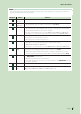
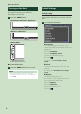
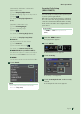

Table Of Contents
- Instruction Manual
- Quick Start Guide
- Contents
- Before Use
- Basic Operations
- Disc
- USB/iPod
- HD Radio™ Tuner/Radio
- Bluetooth Control
- Controlling Audio
- Connection/Installation
- Before Installation
- Installing the unit
- Non-Japanese cars (Except DDX819WBTL)
- Japanese cars
- Trim plate (Except DDX819WBTL)
- GPS antenna (Except DDX819WBTL)
- Microphone unit
- Removing the trim plate (Except DDX819WBTL)
- Removing the unit (Except DDX819WBTL)
- Connecting wires to terminals
- 3-way speaker system setup
- Connecting the system and external components
- Securing the USB extension cable
- Connecting a USB device
- Connecting an iPod/iPhone
- Connecting an Android smartphone
- Connecting the camera
- To set up the cameraassignment settings
- Appendix
- Warranty

Basic Operations
10
5
Enter a security code with 4 to 8 digits
and touch [Enter].
6
Enter the same code again and touch
[Enter].
Now, your security code is registered.
NOTE
• This setting is available when demonstration
mode is set to “OFF”. (P.86)
• Touch [BS] to delete the last entry.
• If you enter a different security code, the
procedure returns to step 5 (for first code entry).
• If you have disconnected the Receiver from the
battery, enter the correct security code as that
you have entered in step 5 and touch [Enter]. You
can use your receiver.
To change the security code:
1
Touch [Security Code Change] on the
Security screen.
Security Code Set screen appears.
2
Enter the current registered security code
and touch [Enter].
3
Enter a new security code with 4 to 8
digit number and touch [Enter].
4
Enter the same code again and touch
[Enter].
The new security code is registered.
To clear the security code:
1
Touch [Security Code Cancellation] on
the Security screen.
Security Code Set screen appears.
2
Enter the current registered security code
and touch [Enter].
The security code is cleared.
Calendar/clock settings
1
Press the [MENU] button.
Popup menu appears.
2
Touch [SETUP].
SETUP Menu screen appears.
3
Touch [User Interface].
User Interface screen appears.
4
Set each item as follows.
Scroll the page to show hidden items.
■ [Time Format]
Select the time display format.
[12-Hour ](Default)/24-Hour]
■ [Clock]
[GPS-SYNC ](Default): Synchronizes the clock
time with the GPS. (Except DDX819WBTL)
[RDS-SYNC]: Synchronizes the clock time
with the RDS. (DDX819WBTL only)
[Manual]: Set the clock manually.
■ [Time Zone]
If you have selected [Manual] for Clock,
select the time zone.
■ [Clock Adjust]
If you select [Manual] for Clock, adjust the
date and time manually. (P.84)