DMX100BT ÉCRAN AVEC RÉCEPTEUR MODE D'EMPLOI MONITOR MIT EMPFÄNGER BEDIENUNGSANLEITUNG MONITOR MET ONTVANGER GEBRUIKSAANWIJZING MONITOR CON RICEVITORE ISTRUZIONI PER L’USO MONITOR COM RECETOR MANUAL DE INSTRUÇÕES • Des informations actualisées (le dernier mode d'emploi, etc.) sont disponibles sur le site . • Aktualisierte Informationen (die aktuellste Bedienungsanleitung usw.) finden Sie unter .
Table des matières Avant l'utilisation.......................................................................2 Comment lire ce manuel.......................................................................................2 Précautions.....................................................................................................................2 Mise en route...............................................................................3 Paramètres de l'horloge..........................................
Mise en route 1 Tournez la clé de contact de votre véhicule sur la 2 3 position ACC. L'appareil se met en marche. Appuyez sur le bouton
Les bases Les bases Fonctions des boutons en façade Opérations courantes ÑÑAllumer le courant 1 Appuyez sur le bouton . ÑÑÉteindre le courant 1 Appuyer et tenir le bouton . 1 2 3 4 5 6 7 8 1 s (Réinit) • Si l'appareil ou l'appareil qui y est connecté ne fonctionne pas correctement, appuyer sur ce bouton pour que l'appareil retrouve les réglages d'usine. 2 MUTE • Coupe le son. 3 R , S (Volume) • Règle le volume. Le volume augmentera jusqu'à 15 tant que vous maintiendrez [ R ] enfoncé.
Les bases Descriptions de l'écran MENU PRINCIPAL Descriptions de l'écran de commande de source Vous pouvez effectuer des opérations de lecture de la source sur l'écran de contrôle de la source. 1 Appuyez sur le bouton
USB USB Préparation ÑÑConnecter un périphérique USB 1 Retirer le capuchon de la borne USB. 2 Branchez le périphérique USB avec le câble USB. Options de lecture ÑÑL'écran de commande de la source vous permet de gérer la musique que vous écoutez. 6 1 2 L'appareil lit le périphérique et la lecture commence. ÑÑPour débrancher le périphérique USB : 1 Appuyez sur le bouton
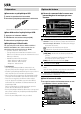
USB 1 Les boutons de commande disparaissent lorsque 1 est touché ou quand aucune action n'est effectuée pendant environ 5 secondes. 2 Pour changer les boutons de commande. 3 [Zoom] : Sélectionner le taux de zoom. « Off » (arrêt), « x2 », « x3 », « 1/2 », « 1/3 », « 1/4 » [R] [S] [T] [U] : Faire défiler l'écran. 4 Sélectionner le mode d'écran. Rapport 16:9, rapport 4:3 ÑÑMenu de fonction 1 Toucher [FNC]. L'écran de fonction s'affiche. 2 Réglez chaque option comme suit.
iPod/iPhone iPod/iPhone Préparation ÑÑConnexion d'un iPod/iPhone • Pour les modèles de paratonnerre : Utiliser le câble Audio USB pour iPod/iPhone—KCA-iP103 (accessoire optionnel). • Pour en savoir plus sur la connexion iPod/iPhone, voir page 21. 1 Retirer le capuchon de la borne USB. 2 Branchez l'iPod/iPhone. L'appareil lit le périphérique et la lecture commence. ÑÑPour débrancher l'iPod/iPhone 1 Appuyez sur le bouton
iPod/iPhone ÑÑSélectionner un contenu dans la liste ÑÑMenu de fonction 1 Touchez [ ]. 2 Touchez la catégorie de votre choix. 1 Toucher [FNC]. La liste est classée dans l'ordre de la catégorie sélectionnée. 3 Touchez l'élément de votre choix. La lecture commence. • Toucher [6] pour aller au niveau hiérarchique supérieur. ✎✎REMARQUE • Touchez [6] pour faire apparaître l'écran de contrôle source en haut de page. L'écran de fonction s'affiche. 2 Réglez chaque option comme suit.
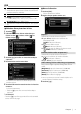
Radio Radio ÑÑRappel de la station prédéfinie Utilisation de base de la radio 1 Toucher [#] (#:1-6). 1 Appuyez sur le bouton
Composants Externes Radio Area *3 N.America (par défaut) : Pour l'Amérique du Nord/ Centre/Sud, intervalles AM/FM : 10 kHz/200 kHz. S.America : Pour certains pays d'Amérique du Sud, intervalles AM/FM : 10 kHz/50 kHz. Europe : Pour l'Europe, intervalles AM/FM : 9 kHz/50 kHz. Local ON : Recherche uniquement les stations ayant une intensité suffisante de signal. (L'indicateur LOCAL s'allume.) OFF (par défaut): Désactive la fonction. RDS *2 Active ou désactive la fonction RDS.
Smartphone Bluetooth Smartphone Bluetooth ÑÑÀ propos du Smartphone Bluetooth et du lecteur audio Bluetooth Cet appareil est conforme aux caractéristiques techniques suivantes de la norme Bluetooth : Version Bluetooth Version 3.0 Profil Smartphone/téléphone cellulaire : HFP (V1.6) (Profil mains libres) PBAP (V1.1.1) (Profil d'Accès au Répertoire Téléphonique) Lecteur audio : A2DP (V1.3) (Profil Avancé de Distribution Audio) AVRCP (V1.
Smartphone Bluetooth Passer un appel 1 Appuyez sur le bouton
Smartphone Bluetooth ÑÑSélection d'une piste dans la liste Utilisation d'un appareil audio Bluetooth en lecture 1 Touchez [ ]. 2 Toucher [6] pour aller au niveau hiérarchique 1 Appuyez sur le bouton
Contrôle de l'audio Contrôle de l’audio en général Contrôle d'égaliseur 1 Appuyez sur le bouton
Télécommande Cet appareil peut être utilisé avec une télécommande. Pour la zone de ventes d'Amérique Latine, la télécommande est fournie avec l'unité. Pour la zone de ventes d'Europe, la télécommande KNA-RCDV331 (accessoire en option) peut être utilisée. Mettre en mode de fonctionnement « DVD » avant utilisation. !!AVERTISSEMENT • Ne pas ingérer la batterie, Danger de brûlure chimique La télécommande fournie avec cet appareil contient une pile bouton.
Installation Installation Avant l'installation Avant d'installer cet appareil, veuillez prendre les mesures de précaution suivantes. #AVERTISSEMENTS • Si vous branchez le câble d'allumage (rouge) et le câble de la batterie (jaune) au châssis de la voiture (masse), il peut y avoir un court-circuit entraînant, à son tour, un incendie. Il faut toujours brancher ces câbles à la source d'alimentation fonctionnant via le boîtier de fusibles.
Installation ÑÑProcédure d'installation ÑÑPlaque de garniture 1) Pour éviter les courts-circuits, retirez la clé de contact, puis débranchez la borne ¤ de la batterie. 2) Veillez à effectuer correctement les connexions des câbles d'entrée et de sortie pour chaque appareil. 3) Branchez le câble sur le faisceau de fils. 4) Prenez le connecteur B sur le faisceau de fils, puis branchez-le au connecteur de l'enceinte dans votre véhicule.
Installation ÑÑRetrait de la plaque de garniture ÑÑRetrait de l'appareil 1) Utiliser la clé d'extraction (accessoire 3) pour sortir les quatre languettes (deux sur la partie haute, deux sur la partie basse) en effectuant un mouvement de levier. 1) Retirez la plaque de garniture en vous référant à l' étape 1 dans “Retrait de la plaque de garniture”. 2) Insérez les deux clés d'extraction (accessoire2) profondément dans les logements de chaque côté, comme illustré.
Installation ÑÑConnexion des câbles sur les contacts électriques Périphérique USB[2] 5V=1A Capuchon Accessoire 4: microphone Bluetooth Vert clair (Câble du détecteur de stationnement) (Rallonge de câble) PARKING BRAKE Borne USB (0,8 m) [1] MIC REVERSE GEAR SIGNAL Violet/Blanc (Câble du détecteur de marche arrière) Connexion au faisceau du feu de marche arrière du véhicule lors de l'utilisation de la vue arrière de la caméra.
Installation Seulement dans les secteurs de vente d'Amérique Latine ÑÑBranchement d'un iPod/iPhone iPod/iPhone[2] Connecteur lumineux KCA-iP103 (0,8 m)[3] 1 3 5 7 2 4 6 8 1 3 5 7 2 4 6 8 Borne USB[1] (0,8 m) Accessoire 5 Accessoire 6 5V=1A Impédance d'enceinte : 4-8 Ω Blanc Au haut-parleur avant gauche Blanc/Noir Gris Au haut-parleur avant droit Gris/Noir Vert Au haut-parleur arrière gauche Vert/Noir Violet Au haut-parleur arrière droit Violet/Noir P.
À propos cet appareil À propos de cet de appareil Plus d'informations Dépannage ÑÑFichiers audio lisibles Format audio MP3 (.mp3) Débit binaire Fréquence d'échantillonnage 16 – 320kbps, 16 – 48 kHz VBR WMA (.wma 16 – 320kbps 16 – 48 kHz AAC-LC (.m4a) 16 – 320kbps 16 – 48 kHz • Cette unité peut montrer ID3 Tag Version 1.0/1.1/2.2/2.3/2.4 (pour MP3). • Nombre maximum de caractères : ––Marqueur : 30 caractères ✎✎REMARQUE • Les formats WMA et AAC protégés par GDN ne peuvent pas être lus.
À propos de cet appareil ÑÑRadio Le préréglage automatique AME ne fonctionne pas. • Mémoriser les stations manuellement. (P.10) Bruit statique pendant l'écoute de la radio. • Connecter l'antenne fermement. ÑÑAV-IN Aucune image n'apparaît sur l'écran. • Allumer le composant de la vidéo si il n'est pas en marche. • Connecter le composant de la vidéo correctement. ÑÑBluetooth Le son du téléphone est de mauvaise qualité. • Réduire la distance entre l'appareil et le téléphone portable Bluetooth.
À propos de cet appareil Spécifications ÑÑSection moniteur Taille de l'image : 6,75 pouces de large (diagonale) : 151,8 mm (L) × 79,7 mm (H) Système d'affichage : Panneau LCD TN transparent Système de lecture : Écran TFT à matrice active Nombre de pixels : 1 152 000 (800H x 480V x RGB) Pixels efficaces : 99,99 % Disposition des pixels : Disposition RGB en rayures Rétroéclairage : LED ÑÑSection interface USB Norme USB : USB 2.
À propos de cet appareil ÑÑSection Syntoniseur AM Bande de fréquences (step) MW : 531 – 1611 kHz (9 kHz) (Zones de vente d'Europe) MW : 530 – 1700 kHz (10 kHz) (Zones de vente d'Amérique Latine) Sensibilité utilisable MW : 29μV ÑÑSection vidéo Système de couleur de l'entrée vidéo externe : NTSC/PAL Niveau d'entrée vidéo externe (jacks RCA) : 1,0 Vp-p/75 Ω Niveau d'entrée maxi audio externe (jacks RCA) : 1,8 V/ 10 kΩ Niveau d’entrée vidéo (jacks RCA) : 1,0 Vp-p/75 Ω Niveau de sortie vidéo (jacks RCA) : 1,
Inhalt Vor Verwendung..................................................................... 26 Hinweise zu diesem Handbuch.....................................................................26 Vorsichtsmaßnahmen...........................................................................................26 Erste Schritte............................................................................. 27 Uhreinstellungen...............................................................................................
Erste Schritte 1 Stellen Sie den Zündschlüssel Ihres Autos auf 2 3 "ACC". Das Gerät ist eingeschaltet. Drücken Sie die
Grundlagen Grundlagen Tastenfunktionen auf dem Frontpanel Allgemeine Funktionen ÑÑDas Gerät einschalten 1 Drücken Sie die -Taste. ÑÑDas Gerät ausschalten 1 Halten Sie die Taste gedrückt. 1 2 3 4 5 6 7 8 1 s (Rücksetzen) • Wenn das Gerät oder das angeschlossene Gerät nicht richtig funktioniert, wird das Gerät auf die Werkseinstellungen zurückgesetzt, sobald diese Taste gedrückt wird. 2 STUMM • Schaltet den Ton stumm. 3 R , S (Lautstärke) • Lautstärkeregelung.
Grundlagen HAUPTMENÜBildschirmbeschreibungen QuellsteuerungsbildschirmBeschreibungen Sie können Quellwiedergabevorgänge auf dem Quellsteuerungsbildschirm durchführen. 1 Drücken Sie die
USB USB Vorbereitung ÑÑAnschluss eines USB-Geräts 1 Nehmen Sie den Deckel des USB-Anschlusses ab. 2 USB-Gerät und USB-Kabel verbinden. Wiedergabefunktionen ÑÑSteuern Sie die Wiedergabe der Musik am Quellensteuerungsbildschirm. 6 1 2 Das Gerät liest das Gerät und die Wiedergabe wird gestartet. ÑÑZum Trennen der USB-Geräteverbindung: 1 Drücken Sie die
USB 1 Die Bedientasten werden ausgeblendet, wenn 1 berührt wird oder wenn 5 Sekunden lang keine Bedienung erfolgt. 2 Zum Umschalten der Bedientasten. 3 [Zoom] : Wählen Sie das Zoomverhältnis. „Off“ (Aus), „x2“, „x3“, „x4“, „1/2“, „1/3“, „1/4“ [R] [S] [T] [U] : Scrollt den Bildschirm. 4 Wählen Sie den Bildschirmmodus aus. Verhältnis 16:9, Verhältnis 4:3 ÑÑFunktionsmenü 1 Berühren Sie [FNC]. Der Funktionsbildschirm erscheint. 2 Jedes Element wie folgt einstellen.
iPod/iPhone iPod/iPhone Vorbereitung ÑÑAnschluss des iPods/iPhones • Für Lightning-Anschlussmodelle: Nutzen Sie das USB-Audiokabel für iPod/iPhone—KCA-iP103 (optionales Zubehör). • Für Details zum Anschluss eines iPods/iPhones siehe Seite 45. 1 Nehmen Sie den Deckel des USB-Anschlusses ab. 2 Schließen Sie das iPod/iPhone an. Das Gerät liest das Gerät und die Wiedergabe wird gestartet. ÑÑZum Trennen des iPods/iPhones 1 Drücken Sie die
iPod/iPhone ÑÑEinen Inhalt in einer Liste auswählen ÑÑFunktionsmenü 1 Drücken Sie [ ]. 2 Berühren Sie die gewünschte Kategorie. 1 Berühren Sie [FNC]. Der Funktionsbildschirm erscheint. 2 Jedes Element wie folgt einstellen. Die Liste ist nach gewählter Kategorie sortiert. 3 Drücken Sie auf die gewünschte Option. Startet Wiedergabe. • Berühren Sie [6], um in die obere Hierarchie zu gelangen. ✎✎HINWEIS • Wenn Sie [6] in der obersten Hierarchie berühren, erscheint der Quellensteuerungsbildschirm.
Radio Radio ÑÑManuelle Speicherung Radio-Grundfunktionen Sie können den aktuell empfangenen Sender oder Service speichern. 1 Drücken Sie die
Radio Tuner-Einstellungen ÑÑFunktionsmenü 1 Berühren Sie [FNC]. Der Funktionsbildschirm erscheint. 2 Jedes Element wie folgt einstellen. Externe Komponenten Nutzung von externen Audio-/ Videoplayern ÑÑWiedergabe starten 1 Schließen Sie eine externe Komponente an den AV-IN-Eingangsanschluss an. (S.44) 2 Drücken Sie die
Bluetooth-Smartphone Bluetooth-Smartphone ÑÑÜber Bluetooth-Smartphone und Bluetooth-Audioplayer Dieses Gerät entspricht den folgenden BluetoothSpezifikationen: Version Bluetooth Ver. 3.0 Profil Smartphone/Handy: HFP (V1.6) (Hands Free Profile) PBAP (V1.1.1) (Phonebook Access Profile) Audioplayer : A2DP (V1.3) (Advanced Audio Distribution Profile) AVRCP (V1.
Bluetooth-Smartphone Telefonanrufe tätigen 1 Drücken Sie die
Bluetooth-Smartphone Wiedergabe mit einem BluetoothAudiogerät 1 Drücken Sie die
Audio-Steuerung Allgemeine Audio-Steuerung Equalizer-Steuerung 1 Drücken Sie die
Fernbedienung Dieses Gerät kann mit der Fernbedienung gesteuert werden. Im Verkaufsgebiet Lateinamerika liegt die Fernbedienung dem Gerät bei. Im Verkaufsgebiet Europa kann die Fernbedienung KNA-RCDV331 (optionales Zubehör) verwendet werden. Schalten Sie vor der Verwendung ihren Betriebsmodusschalter auf „DVD“. !!WARNUNG • Nehmen Sie die Batterie nicht auseinander, Verätzungsgefahr Die diesem Produkt beiliegende Fernbedienung enthält eine Knopfzelle.
Installation Installation Vor der Installation Vor der Installation dieses Geräts beachten Sie bitte die folgenden Vorsichtsmaßnahmen. #WARNHINWEISE • Verbinden Sie Zünddraht (rot) und Batteriekabel (gelb) mit dem Fahrzeugchassis (Erde), so könnte dies zu einem Kurzschluss führen, der ein Feuer entzündet. Schließen Sie diese Drähte nur an eine Stromquelle an, die durch den Sicherungskasten geführt wird.
Installation ÑÑInstallationsvorgang ÑÑZiertafel 1) Um einem Kurzschluss vorzubeugen, ziehen Sie bitte den Schlüssel aus dem Zündschloss und trennen Sie die ¤-Klemme der Batterie ab. 2) Schließen Sie die Eingangs- und Ausgangskabel jedes Gerätes richtig an. 3) Schließen Sie alle Kabel am Kabelbaum an. 4) Schließen Sie den Steckverbinder B des Kabelbaums am Lautsprecheranschluss Ihres Fahrzeugs an. 5) Schließen Sie den Steckverbinder A des Kabelbaums am externen Stromanschluss Ihres Fahrzeugs an.
Installation ÑÑEntfernen der Ziertafel ÑÑAusbauen des Geräts 1) Nutzen Sie den Entnahmeschlüssel (Zubehör 3), um die vier Laschen auszuhebeln (zwei am oberen Teil, zwei am unteren Teil). 1) Entfernen Sie wie unter Schritt 1 von “Entfernen der Ziertafel” beschrieben die Ziertafel. 2) Schieben Sie die beiden Entnahmewerkzeuge (Zubehör2) wie gezeigt tief in die Schlitze zu beiden Seiten. (Der vorstehende Teil an der Spitze des Entnahmeschlüssels muss zum Gerät zeigen.
Installation ÑÑAnschließen der Kabel an die Anschlüsse USB-Gerät[2] 5V=1A Deckel Zubehör 4: Bluetooth-Mikrofon Aus Sicherheitsgründen muss der FeststellbremsenSensor unbedingt angeschlossen werden. Lila/Weiß (Rückwärtsgangsensorkabel) An den Rückfahrlicht-Kabelbaum des Fahrzeugs anschließen bei Verwendung der optionalen Rückspiegelkamera.
Installation ÑÑAnschluss eines iPods/iPhones Verkaufsgebiet Lateinamerika Nur iPod/iPhone[2] Lightning-Anschluss KCA-iP103 (0,8 m)[3] 1 3 5 7 2 4 6 8 1 3 5 7 2 4 6 8 USB-Anschluss[1] (0,8 m) Zubehör 5 Zubehör 6 5V=1A Lautsprecherimpedanz: 4-8 Ω White Zum vorderen linken Lautsprecher Weiß/Schwarz Grau Zum vorderen rechten Lautsprecher Grau/Schwarz Grün Zum hinteren linken Lautsprecher Grün/Schwarz Lila Zum hinteren rechten Lautsprecher Lila/Schwarz P.CONT Max.
Wissenswertes über Wissenswertes über dieses Gerät dieses Gerät Weitere Informationen ÑÑAbspielbare Audiodateien Audioformat Bitrate MP3 (.mp3) 16 – 320 kbps, VBR WMA (.wma) 16 – 320 kbps AAC-LC (.m4a) 16 – 320 kbps Abtastfrequenz 16 – 48 kHz 16 – 48 kHz 16 – 48 kHz • Dieses Gerät kann den ID3-Tag der Version 1.0/1.1/2.2/2.3/2.4 (für MP3) anzeigen. • Die maximale Anzahl an Zeichen: ––Tag: 30 Zeichen ✎✎HINWEIS • Mit DRM gesicherte WMA- und AAC-Dateien können nicht abgespielt werden.
Wissenswertes über dieses Gerät ÑÑRadio Die AME automatische Voreinstellung funktioniert nicht. • Speichern Sie die Sender manuell. (S.34) Statisches Rauschen beim Radiohören. • Stecken Sie die Antenne fest hinein. ÑÑAV-IN Auf dem Bildschirm wird kein Bild angezeigt. • Schalten Sie die Videokomponente ein, wenn sie noch nicht eingeschaltet ist. • Schließen Sie die Videokomponente richtig an. ÑÑBluetooth Die Telefontonqualität ist schlecht.
Wissenswertes über dieses Gerät Technische Daten ÑÑMonitor Bildgröße : Breite 6,75 Zoll (Diagonale) : 151,8 mm (B) × 79,7 mm (H) Anzeigesystem : Transparentes TN LCD-Panel Laufwerkssystem : TFT aktives Matrixsystem Pixelanzahl : 1.152.000 (800H x 480V x RGB) Effektive Pixel : 99,99 % Pixelanordnung : RGB streifenförmige Anordnung Hintergrundbeleuchtung : LED ÑÑUSB-Schnittstelle USB-Standard : USB 2.
Wissenswertes über dieses Gerät ÑÑAM-Tuner Frequenzbereich (Raster) MW: 531 – 1611 kHz (9 kHz) (Verkaufsgebiet Europa) MW: 530 – 1700 kHz (10 kHz) (Verkaufsgebiet Lateinamerika) Empfindlichkeit MW: 29 μV ÑÑVideo Farbsystem des externen Videoeingangs : NTSC/PAL Externer Video-Eingangspegel (RCA-Stecker) : 1,0 Vp-p /75 Ω Max.
Inhoud Voor ingebruikname.............................................................. 50 De handleiding gebruiken................................................................................50 Voorzorgsmaatregelen........................................................................................50 Aan de Slag................................................................................ 51 Klokinstellingen...........................................................................................
Aan de Slag 1 2 3 Draai de contactsleutel van uw auto in de stand ACC. Het toestel wordt ingeschakeld. Druk op de knop
Basisinstellingen Basisinstellingen Functies van de knoppen op het voorpaneel Basisbediening ÑÑHet inschakelen van de stroom 1 Druk op de knop . ÑÑUitschakelen van de stroom 1 Druk in en houd de -knop ingedrukt. 1 2 3 4 5 6 7 8 1 s (Resetten) • Als de eenheid of de hiermee verbonden eenheid niet correct werkt, dan zal de eenheid terugkeren naar de fabrieksinstellingen wanneer er op deze knop wordt gedrukt. 2 MUTE • Dempt het geluid. 3 R, S (Volume) • Regelt het volume.
Basisinstellingen BOVENSTE MENU-scherm beschrijvingen Beschrijvingen bronbedieningsscherm U kunt de bron-afspeelbedieningen uitvoeren op het bron-bedieningsscherm. 1 Druk op de knop
USB USB Voorbereiding ÑÑEen USB-apparaat aansluiten Weergaveopties ÑÑRegel de muziek op het bronregelscherm. 1 Verwijder de dop van het USB-aansluitpunt. 2 Sluit het USB-apparaat via de USB-kabel aan. 6 1 2 Het toestel leest de disk en het afspelen begint. ÑÑHet USB-apparaat loskoppelen: 1 Druk op de knop
USB 1 De bedieningsknoppen verdwijnen wanneer 1 wordt aangeraakt of wanneer er geen handelingen worden uitgevoerd gedurende ongeveer 5 seconden. 2 Het wijzigen van de bedieningsknoppen. ÑÑFunctiemenu 1 Raak [FNC] aan. Functiescherm verschijnt. 2 Stel de verschillende items als volgt in. 3 [Zoom] : Selecteert de inzoomratio. „Off” (Uit), „x2”, „x3”, „x4”, „1/2”, „1/3”, „1/4” [R] [S] [T] [U] : Scrolt het scherm. 4 Selecteer de schermmodus.
iPod/iPhone iPod/iPhone Voorbereiding ÑÑAansluiten iPod/iPhone • Voor Lightning aansluitingsmodellen: Gebruik USB-audiokabel voor iPod/iPhone—KCA-iP103 (optionele accessoire). • Voor meer informatie over het aansluiten van iPod/ iPhone, zie pagina 69. 1 Verwijder de dop van het USB-aansluitpunt. 2 Sluit de iPod/iPhone aan. Het toestel leest de disk en het afspelen begint. ÑÑDe iPod/iPhone loskoppelen 1 Druk op de knop
iPod/iPhone ÑÑSelecteren van inhoud in een lijst ÑÑFunctiemenu 1 Raak [ ] aan. 2 Raak de gewenste categorie aan. 1 Raak [FNC] aan. De lijst wordt gesorteerd op de geselecteerde categorie. 3 Raak het gewenste onderdeel aan. Het afspelen begint. • Raak [6] aan om een niveau omhoog te gaan. ✎✎OPMERKING • Het bronbedieningsscherm verschijnt wanneer u [6] aanraakt op het hoogste niveau. Functiescherm verschijnt. 2 Stel de verschillende items als volgt in. Repeat *1 Selecteer Herhaling-afspeelmodus.
Radio Radio ÑÑOproepen van voorkeurzenders Basisbediening van de radio 1 Raak [#] (#:1-6) aan. 1 Druk op de knop
Externe Componenten Radio Area *3 N.America (Standaard): Voor Noord/Centraal/ZuidAmerika, AM/FM-intervallen: 10 kHz/200 kHz. S.America: Voor sommige Zuid-Amerikaanse landen, AM/FM-intervallen 10 kHz/50 kHz. Europe: Voor Europa, AM/FM-intervallen: 9 kHz/50 kHz. Local ON: Stemt alleen af op de zenders met voldoende signaalsterkte. (LOCAL-indicator licht op.) OFF (Standaard): Deactiveert de functie. RDS * Schakelt de RDS-functie in of uit.
Bluetooth-smartphone Bluetooth-smartphone ÑÑInfo over de Bluetooth-smartphone en Bluetooth-audiospeler Dit toestel voldoet aan de volgende Bluetoothspecificaties: Versie Bluetooth Ver.3.0 Profiel Smartphone/mobiele telefoon: HFP (V1.6) (Hands Free Profile) PBAP (V1.1.1) (Telefoonboek Toegang Profiel) Audiospeler: A2DP (V1.3) (Geavanceerd Audio Distributie Profiel) AVRCP (V1.
Bluetooth-smartphone Voer een telefoongesprek uit 1 Druk op de knop
Bluetooth-smartphone Bluetooth-audioapparaat afspelen ÑÑEen liedje in een lijst selecteren 1 Raak [ ] aan. 2 Raak [6] aan om een niveau omhoog te gaan. 3 Raak de gewenste map aan. 1 Druk op de knop
Audio regelen Algemene audio regelen Equalizerregeling 1 Druk op de knop
Afstandsbediening Dit toestel kan met de afstandsbediening worden bediend. Voor Latijns-Amerikaans verkoopgebied, wordt de afstandsbediening meegeleverd met het apparaat. Voor Europees verkoopgebied, kan de afstandsbediening KNA-RCDV331 (optionele accessoire) worden gebruikt. Zet de bedieningsmodus-schakelaar op „DVD” voor gebruik. !!WAARSCHUWING • Slik de batterij niet in, Gevaar voor Chemische Brandwonden De afstandsbediening die wordt meegeleverd bij dit product bevat een knoopcelbatterij.
Installatie Installatie Vóór de installatie Neem vóór de installatie van dit toestel de volgende voorzorgsmaatregelen in acht. #WAARSCHUWINGEN • Als u de ontstekingskabel (rood) en de accukabel (geel) op het chassis van de auto (massa) aansluit, kunt u kortsluiting veroorzaken waardoor brand kan ontstaan. Sluit deze kabels altijd aan op de voedingsbron die door de zekeringkast loopt. • Verwijder niet de zekering van de ontstekingskabel (rood) en de accukabel (geel).
Installatie ÑÑInstallatieprocedure ÑÑAfwerkingsplaat 1) Voorkom kortsluiting door de sleutel uit het contactslot te verwijderen en de ¤ aansluiting van de accu los te koppelen. 2) Verbind de juiste in- en uitgangskabels van elk toestel. 3) Sluit de kabel op de bedradingsbundel aan. 4) Neem connector B op de bedradingsbundel en sluit deze aan op de luidsprekerconnector van uw auto. 5) Neem connector A op de bedradingsbundel en sluit deze aan op de externe spanningsconnector op uw auto.
Installatie ÑÑVerwijderen van de afwerkingsplaat ÑÑDe eenheid verwijderen 1) Gebruik de extractiesleutel (accessoire 3) om de vier lipjes los te wippen (twee aan de bovenkant, twee aan de onderkant). 1) Zie stap 1 in “Het inbouwframe verwijderen” voor het verwijderen van het inbouwframe. 2) Steek de twee uitbouwsleutels (accessoire2) diep in de openingen aan beide kanten, zoals wordt getoond. (Het uitsteeksel aan het eind van de extractiesleutel moet naar de eenheid toe wijzen.
Installatie ÑÑVerbinden van kabels met aansluitingen USB-apparaat[2] 5V=1A Afdekking Accessoire 4: Bluetooth-microfoon Lichtgroen (Kabel van parkeersensor) (Uitbreidingskabel) PARKING BRAKE USB-aansluiting (0,8 m) [1] MIC Uit het oogpunt van veiligheid is het beslist noodzakelijk om de kabel van de parkeersensor aan te sluiten. Verbinden met de bedradingsbundel van de parkeerremdetectieschakelaar.
Installatie ÑÑAansluiten van een iPod/iPhone Latijns-Amerikaans verkoopgebied Alleen iPod/iPhone[2] Verlichtingsconnector KCA-iP102 (0,8 m)[3] 1 3 5 7 2 4 6 8 1 3 5 7 2 4 6 8 USB-aansluiting[1] (0,8 m) Toebehoren 5 Toebehoren 6 5V=1A Luidsprekerimpedantie: 4-8 Ω Wit Naar voorste linkerluidspreker Wit/zwart Grijs Naar voorste rechterluidspreker Grijs/zwart Groen Naar achterste linkerluidspreker Groen/zwart Paars Naar achterste rechterluidspreker Paars/zwart P.
Informatie Informatie over ditover toestel dit toestel Meer informatie Problemen oplossen ÑÑAfspeelbare audiobestanden Audioformaat Bitssnelheid MP3 (.mp3) WMA (.wma AAC-LC (.m4a) 16 – 320kbps, VBR 16 – 320kbps 16 – 320kbps Bemonsteringsfrequentie 16 – 48 kHz 16 – 48 kHz 16 – 48 kHz • Dit apparaat kan ID3 Label Versie 1.0/1.1/2.2/2.3/2.4 (voor MP3) tonen. • Het maximum aantal tekens: ––Label : 30 tekens ✎✎OPMERKING Wat een probleem lijkt te zijn is niet altijd ernstig.
Informatie over dit toestel ÑÑRadio AME automatische voorinstelling werkt niet. • Sla zenders handmatig op. (P.58) Statische ruis bij het luisteren naar de radio. • Sluit de antenne stevig aan. ÑÑAV-IN Er verschijnt geen afbeelding op het scherm. • Zet het video-component aan als dit nog niet het geval is. • Sluit het video-component correct aan. ÑÑBluetooth Geluidskwaliteit van de telefoon is slecht. • Verklein de afstand tussen de eenheid en de Bluetooth mobiele telefoon.
Informatie over dit toestel Technische gegevens ÑÑMonitorgedeelte Beeldformaat : 6,75 inch breed (diagonaal) : 151,8 mm (B) × 79,7 mm (H) Weergavesysteem : Transparent TN LCD-paneel Aandrijfsysteem : TFT actief matrixsystem Aantal pixels : 1.152.000 (800H x 480V x RGB) Effectieve pixels : 99,99 % Pixelverdeling : RGB gestreepte verdeling Achtergrondverlichting : LED ÑÑUSB-interfacegedeelte USB-standaard : USB 2.
Informatie over dit toestel ÑÑAM-tunergedeelte Frequentiebereik (stap) MW: 531 – 1611 kHz (9 kHz) (Europees verkoopgebied) MW: 530 – 1700 kHz (10 kHz) (Latijns-Amerikaans verkoopgebied) Bruikbare gevoeligheid MW: 29 µV ÑÑVideogedeelte Kleursysteem of externe video-ingang : NTSC/PAL Extern video-ingangsniveau (RCA-stekkers) : 1,0 Vp-p/75 Ω Extern max.
Indice Prima dell'uso............................................................................74 Come utilizzare questo manuale.................................................................. 74 Precauzioni................................................................................................................... 74 Per iniziare................................................................................. 75 Impostazioni orologio...............................................................
Per iniziare 1 Ruotare la chiave di accensione dell'automobile 2 3 in posizione ACC. L'unità si accende. Premere il tasto
Di base Di base Funzioni dei pulsanti sul pannello frontale Operazioni comuni ÑÑAccensione 1 Premere il pulsante . ÑÑSpegnimento 1 Premere e tenere premuto il pulsante . 1 2 3 4 5 6 7 8 1 s (Reset) • Se l’unità o l’unità collegata non funzionano correttamente, premendo questo pulsante l’unità ritorna alle impostazioni predefinite. 2 MUTE • Silenzia il suono. 3 R, S (Volume) • Regola il volume. Il volume aumenta fino a 15 quando si tiene premuto [ R ].
Di base descrizioni della schermata MENU PRINCIPALE Descrizioni schermata di controllo sorgente È possibile eseguire le operazioni di riproduzione della sorgente sulla schermata di controllo della sorgente. 1 Premere il tasto
USB USB Preparazione 6 ÑÑConnessione di un dispositivo USB 1 1 Togliere il cappuccio al terminale USB. 2 Collegare il dispositivo USB con l'apposito cavo. 2 3 L'Unità legge il dispositivo e inizia la riproduzione. ÑÑPer scollegare il dispositivo USB: 1 Premere il tasto
USB 2 Per commutare tra i pulsanti funzione. ÑÑMenu funzione 3 [Zoom] : selezionare il rapporto zoom. “Off” (Spento), “x2”, “x3”, “x4”, “1/2”, “1/3”, “1/4” [R] [S] [T] [U] : Fa scorrere la schermata. 4 Selezionare la modalità di visualizzazione della schermata. Rapporto 16:9, rapporto 4:3 1 Toccare [FNC]. Viene visualizzata la schermata Funzione. 2 Impostare ogni voce come segue. ÑÑSelezione di un brano da un elenco 1 Sfiorare [ ].
iPod/iPhone iPod/iPhone Preparazione ÑÑConnessione di un iPod/iPhone • Per i modelli con connettore luminoso: utilizzare un cavo audio USB per iPod/iPhone—KCA-iP103 (accessorio opzionale). • Per i dettagli sulla connessione di iPod/iPhone, vedere a pagina 93. 1 Togliere il cappuccio al terminale USB. 2 Collegare l'iPod/iPhone. L'Unità legge il dispositivo e inizia la riproduzione. ÑÑPer disconnettere l’iPod/iPhone 1 Premere il tasto
iPod/iPhone ÑÑSelezione di un contenuto in un elenco ÑÑMenu funzione 1 Sfiorare [ ]. 2 Sfiorare la categoria desiderata. 1 Toccare [FNC]. L'elenco viene ordinato in base alla categoria selezionata. 3 Sfiorare la voce desiderata. Inizia la riproduzione. • Toccare [6] per spostarsi al livello gerarchico superiore. ✎✎NOTA • Viene visualizzata la schermata di controllo della sorgente quando si tocca [6] al livello gerarchico superiore. Viene visualizzata la schermata Funzione.
Radio Radio ÑÑMemorizzazione manuale Funzioni di base della radio È possibile memorizzare la stazione o il servizio di ricezione corrente nella memoria. 1 Premere il tasto
Radio Componenti esterni Impostazione sintonizzatore Utilizzo di lettori audio/video esterni ÑÑMenu funzione 1 Toccare [FNC]. Viene visualizzata la schermata Funzione. 2 Impostare ogni voce come segue. ÑÑInizio della riproduzione 1 Connettere un componente esterno al terminale di ingresso AV-IN. (P.92) 2 Premere il tasto
Smartphone Bluetooth Smartphone Bluetooth ÑÑInformazioni sullo smartphone Bluetooth e sul lettore audio Bluetooth Quest'unità è conforme alle seguenti specifiche Bluetooth: Versione Bluetooth Ver.3.0 Profilo Smartphone/telefono cellulare: HFP (V1.6) (Hands Free Profile) PBAP (V1.1.1) (Phonebook Access Profile) Lettore audio : A2DP (V1.3) (Advanced Audio Distribution Profile) AVRCP (V1.5) (Audio/Video Remote Control Profile) • compare quando è connesso lo smartphone dotato di Bluetooth.
Smartphone Bluetooth Effettuare una telefonata 1 Premere il tasto
Smartphone Bluetooth Riproduzione del dispositivo audio Bluetooth 1 Premere il tasto
Regolazione audio Regolazione generale dell'audio Controllo equalizzatore 1 Premere il tasto
Telecomando Questa unità può essere attivata utilizzando il telecomando. Per le aree commerciali in America Latina, il telecomando viene fornito con l’unità. Per le aree commerciali in Europa, può essere utilizzato il telecomando KNA-RCDV331 (accessorio opzionale). Ruotare il selettore di modalità di funzionamento su “DVD” prima dell’uso. !!AVVERTENZA • Non ingerire la batteria, pericolo di ustioni chimiche Il telecomando fornito in dotazione con questo prodotto contiene una batteria a bottone.
Installazione Installazione Prima dell'installazione Prima dell'installazione di quest'unità, osservare le seguenti precauzioni. #AVVERTENZE • Se si collega il cavo di accensione (rosso) e il cavo della batteria (giallo) al telaio della vettura (massa), si potrebbe provocare un cortocircuito, dal quale potrebbe scaturire un incendio. Collegare sempre questi cavi all'alimentazione passante per la scatola fusibili. • Non escludere il fusibile dal cavo di accensione (rosso) e dal cavo della batteria (giallo).
Installazione ÑÑProcedura di installazione ÑÑPiastra di taglio 1) Per evitare cortocircuiti, estrarre la chiave dall'accensione e scollegare il ¤ morsetto della batteria. 2) Effettuare le corrette connessioni dei cavi in ingresso e in uscita da ciascuna unità. 3) Collegare il cavo al cablaggio. 4) Prendere il connettore B dal cablaggio e collegarlo al connettore dell'altoparlante sul veicolo. 5) Prendere il connettore A dal cablaggio e collegarlo al connettore dell'alimentazione esterna sul veicolo.
Installazione ÑÑRimozione della piastra di taglio ÑÑRimozione dell’unità 1) Utilizzare la chiave di estrazione (accessorio 3) per estrarre le quattro tavole (due sulla parte superiore, due su quella inferiore). 1) Rimuovere la piastra di taglio facendo riferimento alpassaggio 1 in “Rimuovere la piastra di taglio”. 2) Inserire le due chiavi di estrazione (accessorio2) in profondità nelle fessure su ognuno dei lati, come mostrato in figura.
Installazione ÑÑCollegare i fili ai terminali Dispositivo USB[2] 5V=1A Cappuccio Accessorio 4: Microfono Bluetooth Verde chiaro (cavo sensore di parcheggio) (Prolunga) PARKING BRAKE Terminale USB (0,8 m) [1] Per la massima sicurezza, collegare il sensore di parcheggio. MIC Collegare il cablaggio dell'interruttore di rilevamento posizione del freno di stazionamento del veicolo.
Installazione ÑÑConnessione di un iPod/iPhone aree commerciali in America Latina Solo iPod/iPhone[2] Connettore Lightning KCA-iP103 (0,8 m)[3] 1 3 5 7 2 4 6 8 1 3 5 7 2 4 6 8 Terminale USB[1] (0,8 m) Accessorio 5 Accessorio 6 5V=1A Impedenza altoparlante: 4-8 Ω Bianco All’altoparlante anteriore sinistro Bianco/nero Grigio All’altoparlante anteriore destro Grigio/nero Verde All’altoparlante posteriore sinistro Verde/nero Viola All’altoparlante posteriore destro Viola/nero P.
Informazioni questa unità Informazioni su questasu unità Ulteriori informazioni Risoluzione dei problemi ÑÑFile audio riproducibili Formato audio MP3 (.mp3) Velocità di trasferimento 16 – 320 kbps, VBR WMA (.wma 16 – 320 kbps AAC-LC (.m4a) 16 – 320 kbps Frequenza di campionamento 16 – 48 kHz 16 – 48 kHz 16 – 48 kHz • Questa unità può visualizzare la versione Tag ID3 1.0/1.1/2.2/2.3/2.4 (per MP3).
Informazioni su questa unità ÑÑRadio La preimpostazione automatica AME non funziona. • Memorizzare le stazioni manualmente. (P.82) Rumore statico durante l’ascolto della radio. • Connettere l’antenna saldamente. ÑÑAV-IN Sulla schermata non appare alcuna immagine. • Accendere il componente video se non fosse acceso. • Connettere il componente video correttamente. ÑÑBluetooth La qualità del suono del telefono è scarsa. • Ridurre la distanza fra l’unità e il telefono cellulare dotato di Bluetooth.
Informazioni su questa unità Specifiche ÑÑSezione monitor Dimensioni dell'immagine : 6,75 pollici (diagonale) : 151,8 mm (L) × 79,7 mm (A) Sistema di visualizzazione : Pannello LCD TN trasparente Sistema di trasmissione : Matrice attiva TFT Numero di pixel : 1.152.000 (800H x 480V x RGB) Pixel effettivi : 99,99 % Disposizione dei pixel : Strisce verticali RGB Retroilluminazione : LED ÑÑSezione interfaccia USB Standard USB : USB 2.
Informazioni su questa unità ÑÑSezione sintonizzatore AM Gamma di frequenza (incrementi) MW: 531 – 1.611 kHz (9 kHz) (aree commerciali in Europa) MW: 530 – 1.
Índice Antes de utilizar....................................................................... 98 Como ler este manual...........................................................................................98 Precauções...................................................................................................................98 Primeiros Passos...................................................................... 99 Definições do Relógio...........................................................
Primeiros Passos 1 Rode a chave de ignição do seu carro para ACC. 6 Toque em [ 6 ]. 2 3 Definições do Relógio A unidade está ligada. Pressione o botão
Básicos Básicos Funções dos botões no painel frontal Operações comuns ÑÑLigar a alimentação 1 Pressione o botão . ÑÑDesligar a alimentação 1 Pressione e segure o botão . 1 2 3 4 5 6 7 8 1 s (Reinicializar) • Se a unidade ou a unidade ligada não funcionar corretamente, esta repõe as definições iniciais quando este botão é pressionado. 2 MUTE • Silencia o som. 3 R , S (Volume) • Ajusta o volume. O volume vai até ao nível 15 quando premir [ R ] continuamente.
Básicos Descrições do ecrã MENU INICIAL 1 Pressione o botão
USB USB Preparativos ÑÑConectar a um dispositivo USB 1 Remova a tampa do terminal USB. 2 Ligue o dispositivo USB com o cabo USB. Operações de reprodução ÑÑControle a música que está a ouvir no ecrã de controlo das fontes. 6 1 2 A unidade lê o dispositivo e inicia a reprodução. 3 ÑÑPara desligar o dispositivo USB: 1 Pressione o botão
USB 1 Os botões de operação desaparecem quando se toca em 1 ou quando não é efetuada nenhuma operação durante cerca de 5 segundos. 2 Para mudar os botões de operação. 3 [Zoom] : Selecionar a taxa de zoom. “Off” (Desligado), “x2”, “x3”, “x4”, “1/2”, “1/3”, “1/4” [R] [S] [T] [U] : Percorre o ecrã. 4 Selecione o modo de ecrã. Proporção de 16:9, proporção de 4:3 ÑÑMenu de função 1 Toque em [FNC]. É apresentado o ecrã Função. 2 Defina cada item da seguinte forma.
iPod/iPhone iPod/iPhone Preparativos ÑÑConectar a iPod/iPhone • Para modelos com conector Lightning: Use o cabo USB Áudio para iPod/iPhone—KCA-iP103 (acessório opcional). • Para detalhes sobre conectar a iPod/iPhone, consulte a página 117. 1 Remova a tampa do terminal USB. 2 Ligue o iPod / iPhone. A unidade lê o dispositivo e inicia a reprodução. ÑÑPara desconectar o iPod/iPhone 1 Pressione o botão
iPod/iPhone ÑÑSelecionar conteúdos numa lista ÑÑMenu de função 1 Toque em [ ]. 2 Toque na categoria pretendida. 1 Toque em [FNC]. É apresentado o ecrã Função. 2 Defina cada item da seguinte forma. A lista é ordenada pela categoria selecionada. 3 Toque no item pretendido. Inicia-se a reprodução. • Toque em [6] para se deslocar para a hierarquia superior. ✎✎NOTA • O ecrã de controlo da fonte aparece quando toca em [6], na hierarquia superior. Repeat *1 Seleciona o modo de reprodução em Repetição.
Rádio Rádio ÑÑRecuperar a estação predefinida Operação básica do rádio 1 Toque em [#] (#:1-6). 1 Pressione o botão
Rádio Area *3 N.America (Padrão): Para a América do Norte/Central/ do Sul, intervalos AM/FM: 10 kHz/200 kHz. S.America: Para alguns países da América do Sul, intervalos AM/FM: 10 kHz/50 kHz. Europe: Para a Europa, intervalos AM/FM: 9 kHz/50 kHz. Local ON: sintoniza apenas nas estações com força de sinal suficiente. (O indicador LOCAL acende-se.) OFF (Padrão): Desativa a função. RDS *2 Liga e desliga a função RDS. “ON” (Padrão), “OFF” PTY List *1 *2 Selecione o Tipo de Programa disponível.
Smartphone com bluetooth Smartphone com bluetooth ÑÑSobre o smartphone Bluetooth e o leitor de áudio Bluetooth Esta unidade está em conformidade com as seguintes especificações Bluetooth: Versão Bluetooth Ver.3.0 Perfil Smartphone/ Telemóvel: HFP (V1.6) (Perfil mãos-livres) PBAP (V1.1.1) (Phonebook Access Profile, Perfil de Acesso à Lista Telefónica) Leitor de áudio: A2DP (V1.3) (Advanced Audio Distribution Profile) AVRCP (V1.
Smartphone com bluetooth Fazer uma chamada 1 Pressione o botão
Smartphone com bluetooth Reproduzir um dispositivo de áudio Bluetooth 1 Pressione o botão
Controlar o Áudio Controlar o áudio geral Controlo do equalizador 1 Pressione o botão
Controlo remoto Esta unidade pode ser operada através do controlo remoto. Para a área de vendas da América Latina, o controlo remoto é fornecido com a unidade. Para a área de vendas da Europa, poderá ser usado o controlo remoto KNA-RCDV331 (acessório opcional). Altere o seu interruptor de modo de funcionamento para “DVD”, antes de utilizar. !!ADVERTÊNCIA • Não ingira a pilha, Risco de Queimadura Química O controlo remoto, fornecido juntamente com este produto, contém uma pilha tipo moeda/botão.
Instalação Instalação Antes da instalação Antes da instalação desta unidade, tenha em consideração as seguintes precauções. #AVISOS • Se ligar o fio de ignição (vermelho e o fio da bateria (amarelo) ao chassis do automóvel (terra), pode causar um curto-circuito, que por sua vez pode causar um incêndio. Ligue esses fios sempre à fonte de energia que passa através da caixa de fusíveis. • Não elimine o fusível do cabo de ignição (vermelho) e do cabo da bateria (amarelo).
Instalação ÑÑMétodo de instalação ÑÑMoldura 1) Para prevenir um curto-circuito, remova a chave da ignição e desligue o terminal ¤ da bateria. 2) Faça as ligações apropriadas dos cabos de entrada e saída de cada unidade. 3) Ligue o fio à cablagem. 4) Ligue o conector B da cablagem ao conector do altifalante do seu veículo. 5) Ligue o conector A da cablagem ao conector de energia externa do seu veículo. 6) Ligue o conector da cablagem à unidade. 7) Instale o aparelho no seu carro.
Instalação ÑÑRetirar a moldura ÑÑRetirar a unidade 1) Use a chave de extração (acessório 3) para levantar as quatro abas (duas na parte superior e duas na parte inferior). 1) Retire a moldura seguindo o passo 1 em “Retirar a moldura”. 2) Insira as duas chaves de remoção (acessório2) profundamente nas ranhuras de cada lado, conforme indicado. (A saliência na ponta da chave de extração deve estar virada para a unidade.) 3 2) Puxe a moldura para a frente. 2 3) Puxe a unidade para fora até meio.
Instalação ÑÑLigar os cabos aos terminais Dispositivo USB[2] 5V=1A Tampa Acessório 4: Microfone Bluetooth Verde-claro (Fio do sensor de estacionamento) (Cabo de extensão) PARKING BRAKE Terminal USB (0,8 m) [1] MIC REVERSE GEAR SIGNAL Roxo/Branco (Fio do sensor de marcha-atrás) Ligue à cablagem de luz de marcha-atrás quando utilizar a câmara de visão traseira opcional.
Instalação ÑÑLigar um iPod/iPhone. área de vendas da América Latina Apenas iPod/iPhone[2] Conector Lightning KCA-iP103 (0,8 m)[3] 1 3 5 7 2 4 6 8 1 3 5 7 2 4 6 8 Terminal USB[1] (0,8 m) Acessório 5 Acessório 6 5V=1A Impedância do altifalante: 4-8 Ω Branco Para o altifalante frontal esquerdo Branco/preto Cinza Para o altifalante frontal direito Cinza/preto Verde Para o altifalante traseiro esquerdo Verde/preto Púrpura Para o altifalante traseiro direito Púrpura/preto P.CONT ANT.
Sobre Sobre esta esta unidadeunidade Mais informação Resolução de problemas ÑÑFicheiros áudio reproduzíveis Formato áudio MP3 (.mp3) Taxa de bits 16 – 320kbps, VBR WMA (.wma 16 – 320kbps AAC-LC (.m4a) 16 – 320kbps Frequência de amostragem 16 – 48 kHz 16 – 48 kHz 16 – 48 kHz • Esta unidade pode mostrar a Versão 1.0/1.1/2.2/2.3/2.4 da Etiqueta ID3 (para MP3). • O número máximo de caracteres: ––Etiqueta: 30 caracteres ✎✎NOTA • WMA e AAC abrangido por DRM, não pode ser reproduzido.
Sobre esta unidade ÑÑAV-IN Não aparece nenhuma imagem no ecrã. • Ligue o componente de vídeo se não estiver ligado. • Conecte o componente de vídeo corretamente. ÑÑBluetooth A qualidade de som do telefone é fraca. • Reduza a distância entre a unidade e o telemóvel Bluetooth. • Mova o carro para um local onde consiga uma receção de sinal melhor. O som é interrompido ou falha enquanto usa um leitor de áudio Bluetooth. • Reduza a distância entre a unidade e o leitor de áudio Bluetooth.
Sobre esta unidade Especificações ÑÑSecção Monitor Tamanho da imagem : 6.75 polegadas (diagonal) largura : 151,8 mm (L) × 79,7 mm (A) Sistema de visualização : Painel transparente TN LCD Sistema da unidade : Sistema de matriz ativa TFT Número de pixels : 1 152 000 (800H x 480V x RGB) Pixels efetivos : 99,99 % Disposição dos pixels : Disposição em linha RGB Luz de fundo : LED ÑÑSecção Interface USB Padrão USB : USB 2.
Sobre esta unidade ÑÑSecção Sintonizador AM Gama de frequência (passo) MW : 531 – 1611 kHz (9 kHz) (área de vendas da Europa) MW : 530 – 1700 kHz (10 kHz) (área de vendas da América Latina) Sensibilidade utilizável MW: 29 μV ÑÑSecção Vídeo Sistema de cor da entrada de vídeo externa : NTSC/PAL Nível de saída de vídeo externa (fichas RCA) : 1,0 Vp-p /75 Ω Nível de saída de áudio externa (fichas RCA) : 1,8 V / 10 kΩ Nível de saída de vídeo (fichas RCA) : 1,0 Vp-p /75 Ω Nível de saída vídeo (fichas RCA) : 1,
Pour les zones de vente d’Europe Déclaration de Conformité se rapportant à la directive RE 2014/53/EU Déclaration de conformité se rapportant à la directive RoHS 2011/65/UE Fabricant: JVC KENWOOD Corporation 3-12, Moriyacho, Kanagawa-ku, Yokohama-shi, Kanagawa 221-0022, JAPON Représentant dans l’UE : JVCKENWOOD NEDERLAND B.V.
English Hereby, JVC KENWOOD declares that the radio equipment DMX100BT is in compliance with Directive 2014/53/EU. The full text of the EU declaration of conformity is available at the following internet address: Français Par la présente, JVC KENWOOD déclare que l’équipement radio DMX100BT est conforme à la directive 2014/53/UE.