DRV-N520 Dashboard camera INSTRUCTION MANUAL For your records Record the serial number, found on the back of the unit, in the spaces designated on the warranty card, and in the space provided below. Refer to the model and serial numbers whenever you call upon your Kenwood dealer for information or service on the product. Model DRV-N520 Serial number US Residents Only Register Online Register your Kenwood product at www.Kenwoodusa.com © 2017 JVC KENWOOD Corporation DRV-N520W_EN301.
Contents Precautions and notices.................... 3 Precautions for Use............................. 4 Accessories............................................ 6 Names and Functions of Parts........ 7 How to Install........................................ 8 LED Indications..................................12 Initial settings.....................................12 Basic Operation..................................13 Display the Dashboard camera screen....................................................
Precautions and notices • Warning! Do not operate the device while driving. Using this product does not change the requirement for a driver to take full responsibility for his or her behavior. This responsibility includes observing all traffic rules and regulations in order to avoid accidents, personal injury or property damage. • For your own safety, do not operate the controls of the product while driving. • A window mount is needed when using the recorder in a car.
FCC WARNING This equipment may generate or use radio frequency energy. Changes or modifications to this equipment may cause harmful interference unless the modifications are expressly approved in the instruction manual. The user could lose the authority to operate this equipment if an unauthorized change or modification is made. FCC NOTE This equipment has been tested and found to comply with the limits for a Class B digital device, pursuant to Part 15 of the FCC Rules.
bracket to improve. Failing to do so may result in the adhesion of the mount bracket becoming weak and the device falling. • Fix the cord in place with tape or the like so that it does not interfere with driving. Precautions for Use • Do not block the camera lens, get dirt on it, or place a reflective object near it. • When LED traffic lights are recorded, video in which they appear to be flickering or flashing may be recorded.
Requests Regarding Disposal or Transferring Ownership of an SD Card Accessories • Using the SD card format and deletion functions of this device or formatting with a function of a PC just changes the file management information and does not completely delete the data in an SD card. We recommend either physically destroying the actual SD card or using commercially available PC data deletion software or the like to completely delete the data in the SD card before disposal or transfer of ownership.
Names and Functions of Parts ① ⑥ ⑦ ⑧ ② ③ ④ ⑤ 1 Camera lens 2 REC LED Lights (blue) while recording is in progress. 3 MIC LED Lights (green) when audio recording is turned on. button 4 –– Audio recording toggles between enabled and disable states each time this button is pressed. –– Hold down this button to turn on or off the power of the device. 5 button –– Take a photo. –– The automatic still image capture function turns on automatically when this button is pressed and held .
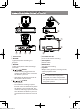
How to Install 4. Perform the cord wiring work. Installation Procedure 5. Adjust the installation angle of Check that the vehicle is parked on a level surface. 1. Attach the device to the mount bracket (accessory 2). Insert the mount bracket into the bracket attachment part of the device and attach it to the device. Mount bracket 2 Camera lens side Refer to "How to Wire" and then perform the wiring work.(P.10) the device and then fix the device in place.
ce n ow. e, he se h Recommended installation position • Install the device in a position where it will not block the front view of the driver (position where hidden by the rear-view mirror). • Install the device so that it is within the wiping range of the wiper. • Mounting the device to the center of the windshield behind the rear-view mirror will facilitate optimal video recording.
How to Wire CAUTION To prevent a short circuit, remove the key from the ignition and disconnect the ¤ terminal of the battery. 1. Connect the power cord (accessory 1) to the Dashboard camera. Power cord 1 Camera lens 2. Mount the cable holder (accessory 3) in position by inserting it into the slot in the Dashboard camera and also inserting its claw into the connector of the Dashboard camera. Cable holder3 Slot Claw Slot Cable holder3 3.
Connect the Dashboard camera and power cord. Power cord(3.5 m) (Accessory1) Dashboard camera GPS NAVIGATION SYSTEM/ MONITOR WITH RECEIVER Video input (Yellow) CA-C3AV (Optional Accessory) Video output AV-IN /Dashboard camera input Front view camera/ Dashboard camera video input (Yellow) Dashboard camera interface Dashboard camera interface Interface Ignition key switch Fuse Accessory power supply Accessory cord (Red) Connect to a power supply that can be turned on and off with the switch.
LED Indications Initial settings • Set the time zone before use. If you use the driving support function, complete the setting as described on page 16 as well. • Configure the Dashboard camera in advance using the receiver to which the Dashboard camera is to be connected. 1. Press the [MENU] button on the MIC LED(Green) monitor panel. 2. Touch [Camera].
6. Set the following items. Item Time Zone Explanation Select the Time Zone. UTC-12:00 to UTC+14:00 UTC+0:00* Daylight OFF*/+1 hr./+30 min Saving Time Set daylight saving time.
Display the Dashboard camera screen 1 2 34 1. Press the [MENU] button. 2. Touc [Camera]. 5 Display the Dashboard camera screen. 1 Recording mode/Remaining manual recording or event recording time 2 HDR recording/Resolution 3 Audio recording ON /OFF ④ Automatic still image capture mode ON / OFF 5 Number of recording files (number of files that can be recorded) While the rear camera view is displayed, a touch screen is displayed in the upper center of the Dashboard camera screen.
Turn off the Dashboard camera screen 1. Touch the lower center of the screen DRV-N520W_EN301.
Using the Driving Support function CAUTION • The driving support function is for providing driving support to drivers and not for preventing accidents. Furthermore, it does not provide notifications of all hazards. • Please observe the traffic rules to ensure safe driving by paying attention to the distance to the vehicle in front, your surroundings and driving conditions, and applying the brakes when necessary.
6. Touch [Mounting Height Settings]. 7. Select the mounting height from the road surface. Windshield Angle adjustment knob 10. Touch [ Rear-view mirror ] to adjust the blue point line to the actual horizon using [ ]/[ ]. Blue point line 8. Touch [Detection Range Settings]. 11. Touch [ ] to adjust the white point line to the top of the engine hood using [ ]/[ ]. 9. Adjust the installation angle. Turn the angle adjustment knob clockwise before adjustment.
Settings the driving support function 1. Touch . 2. Touch [Driving Support Settings]. 3. Touch items to set. ■■ Forward Collision Warning Detects the distance between your vehicle and the vehicle in front and notifies with a warning sound and a warning sign to prevent a collision with the vehicle in front if a safe distance is not maintained. This operates at 30 km/h and faster.
Recording Recording Times Recording quality 8GB Card capacity 16GB 32GB 3M(2304 x 1296) 50 minutes 100 minutes 210 minutes 1920x1080 / 1920x1080+HDR 70 minutes 140 minutes 280 minutes 1280x720 / 1280x720+HDR 100 minutes 200 minutes 400 minutes Note • If you wish to change recording quality, make changes to the setting of [Resolution + HDR Recording](P.29). • Still images are saved with the same resolution as set by [Resolution + HDR recording] (P.29).
Recording Modes The device has five recording modes. Turning on the power of the device starts continuous recording. The recorded video is recorded as files to the SD card. The recording files are sorted into a separate folder for each recording mode.
Manual recording Pressing the [REC] button on the device or touch [ ] on the screen during continuous recording starts manual recording. The recording time of manual recording is the 12 seconds before manual recording plus the time set in [Manual Recording Time] (P.29). If you wish to extend the recording time(to the preset time), press the [REC] button or touch [ ] on the screen again. When manual recording ends, the mode returns to continuous recording.
Still Image Recording/Automatic Still Image Recording Pressing the [AUTO] button on the device or [ ] on the screen during continuous recording allows you to take a photo whenever you wish. Holding down the [AUTO] button on the device turns ON the automatic still image capture function. The automatic still image capture function records still images automatically according to the preset count and interval of time.
Note • The recording data is saved to the "PARKING (Parking Recordings)" folder. • Parking recording starts a few seconds after the vehicle is subjected to a collision. • If parking recording is performed, a notification alert tone (pong) sounds and a message ("A Parking Recording has occurred.") is displayed to inform you that parking recording has been performed since the power turned on. • You can turn off the alert tone sounding and message display function.(P.
Playing a Recording File 1. Press the MENU button 2. Touch [Camera]. 3. Touch 6. Select the recording file you want played. . The recording file starts playing. Note 4. Touch . • The operating buttons will clear after a certain period of time. • Recording halts while a folder or file is being selected or is playing. Manual recording is also disabled. 1 2 3 4 5 67 5. Select the recording file folder from which you want a recording file played.
Button / UH A/ B Explanation Adjusts the audio volume. Starts playback/pauses. Touch while playing a file to toggle the playback speed between fastforward and fast-rewinding. Touch while a file is paused to forward or reverse the file frame by frame. Continue touching while a file is paused to play the file at a slow speed. Plays the previous or next file. E/ F [Delete] Deletes the file that is playing. Protects or unprotects the file that is playing.
Protecting or Deleting Files Protecting Files Note • Continuous recording files cannot be protected. 1. Play the file you want protected. 2. Touch . Deleting Files/Folders Deleting a file 1. Play the file you want deleted. 2. Touch [Delete]. A confirmation message appears. 3. Touch [Yes]. A confirmation message appears. 3. Touch [Yes]. The file that is playing is deleted. The protected file is identified by a “ ” appearing at the beginning of the file name. Unprotecting a file 1.
Deleting a folder as a whole 1. Press the MENU button 2. Touch [Camera]. 3. Touch 6. Select the folder you want deleted. . A confirmation message appears. 7. Touch [Yes]. All the files in the selected folder are deleted. Note 4. Touch . • Before deleting a protected file, unprotect it first. 5. Touch [Delete]. DRV-N520W_EN301.
Various Settings Note 5. Select setup items. • Recording halts while the setup menu is on display. Manual recording is also disabled. 1. Press the MENU button. 2. Touch[Camera] . 6. Set individual items. 3. Touch . Displays the operating buttons on the screen. 4. Touch . 28 DRV-N520W_EN301.
* Factory default settings Recording Settings [Resolution + HDR Recording] [1280×720]/[1280×720+HDR]/[1920×1080]/[1920×1080+HDR*]/[3M](2304×1296) Sets the recording resolution. Set to (HDR) to record a subject with overexposure/ underexposure suppressed even in a situation involving large differences in brightness. (The image quality cannot be set by recording mode.) [Audio Recording] ON*/OFF Set whether or not to record audio with the microphone during recording.
[Sensitivity Settings] 1(Low)/2/3(Mid)*/4/5(High) Set the sensitivity for detecting a vehicle collision while parked. 1: Detects large collisions, 3: Standard, 5: Detects small collisions [Exit Time after ACC OFF] OFF/30 sec*/1 min/3 min Turn off the ignition key and then set the period of time for which parking recording is disabled. [Entry Time before ACC ON] OFF/30 sec*/1 min/3 min Set the period of time for which parking recording is disabled before the ignition key is turned on.
Updating the system Update the system firmware of the device. For information regarding updates, visit the JVCKENWOOD website at http://www. kenwood.com/cs/ce/. Using the PC Application KENWOOD DRIVE REVIEWER is a PC application for displaying video recorded with the device. The application can be downloaded from the JVC KENWOOD website at http://www. kenwood.com/cs/ce/ System Requirements for KENWOOD DRIVE REVIEWER OS: Microsoft Windows 10, Windows 8.
Screen operations 1 2 3 4 5 6 7 8 9 0 = ~ ! @ # 1 FILE SELECT FOLDER EXPORT kmz/kml* BACKUP EXIT Select the folder containing the file to be read. Output a driving information file (kml/kmz) that can be used with the GoogleMapsTM map service or GoogleEarthTM map service. Back up the SD card data to the hard disk of a PC, etc. Exit the PC application. *The kmz file or kml file contains data to be loaded into Google Earth. 2 Drive list Select a drive. 3 LANGUAGE Select a display language.
8 Move the displayed frame to display an arbitrary location enlarged to a maximum of five times the size. Press [RESET] to display at actual size (1x). 9 File list 1 2 3 1 Lists all movies. 2 Lists manual recording, event recording and parking recording files. 3 Lists still image files and automatically recorded still image files. 0 Video screen - Track Bar/Playback Time/Remaining Playback Time = Operation buttons Displays the previous or next frame of the video. / Displays the previous or next file.
Outputting a Still Image from Video Capture video at any location from the video currently playing as a still image. 1. Select and play the file you wish to play. 2. Press the [ ] button. 3. Select the backup destination folder and enter a file name. Backing Up Files Back up the SD card data to the hard disk of a PC, etc. 1. Select from FILE (F). 2. Select the backup destination folder. 3. Select the files to back up by selecting check boxes for the files you wish to save. 4.
Formatting an SD Card If an error appears when playing a video or saving a file, the SD card data may have been corrupted. Format the SD card. 5. Touch [System Settings]. Note • Basically, SD cards essentially do not require formatting. Format an SD card only if errors occur when writing to or reading from the SD card. • Do format SD cards on other than this device. • Formatting an SD card will erase all the data stored on that card, including protected files.
Troubleshooting Common Symptom Power does not turn on. Cause/Solution ååTurn on the accessories power (ACC) switch of the vehicle or start the engine of the vehicle. ・ The fuse has blown. ååCheck the cords are not shorted and then replace the fuse with one of the same capacity. Cannot record. ・ The connections of the power cord are incorrect. ååConfirm the connections with the dealer. ・ An SD card is not inserted. ・ An SD card of a capacity other than 8 GB to 32 GB is inserted.
message Formatting failed Cause/Solution • The SD card has malfunctioned. åå Replace the SD card with a new one. SD cards have a product lifespan, such as the number of times that writing can be performed. Uncompatible SD card • An SD card with a capacity less than 8 GB or more than 32 GB is inserted. ååRefer to "Cards supported by this device" and then insert an SD card that can be used with the device into the SD card slot. Dashboard camera has stopped recording. Please check the SD card.
message Dashboard camera has stopped recording due to high temperature. Cause/Solution • Recording was not possible due the temperature of the device rising. ååReduce the temperature inside the vehicle. The protection circuit operation will be canceled and recording will become possible. Dashboard camera will turn off due to high temperature. • The power was turned off for safety reasons due to the temperature of the device rising. ååReduce the temperature inside the vehicle.
Symptom Cause/Solution Video corrupted or audio disrupted while playing Verify whether your PC meets requirements for the recommended operating environment (P.31). Video or audio might be disrupted if your PC is functionally deficient or any other application is running. Wrong own vehicle position GPS information may not be received properly, leaving the own vehicle position out of sync depending on where the vehicle runs, e.g.
Specifications Image sensor 1/3-inch color CMOS Maximum recording angles of view Horizontal: Approx. 117 degrees, Vertical: Approx. 63 degrees (Diagonal 128 degrees) Lens Wide-angle, F-number 2.0 Recording resolution (maximum) Video maximum 2.98 million pixels 2304x1296 (1296P) 1920x1080 (1080P) 1280x720 (720P) External dimensions (W) x (H) x (D) W:79mm x H:22mm (with Mounting kit:66mm) x D:48mm W:3-1/8 x H:7/8 (with Mounting kit 2-5/8inch) x D:1-7/8 inch Weight Approx. 2.
Important Notices Regarding Trademarks and Software microSDHC logo is a trademark of SD-3C, LLC. @2015 Google Inc. All rights reserved. GoogleMapsTM and GoogleEarthTM are registered trademarks of Google Inc. This product is licensed only for the following applications based on the AVC Patent Portfolio License. 1) Consumers recording video (hereinafter referred to as AVC Video) compliant with the MPEG-4 AVC standard for personal use and non-profit purposes.
The license and distribution terms for any publically available version or derivative of this code cannot be changed. i.e. this code cannot simply be copied and put under another distribution license [including the GNU Public License.] -------------------------------------------------------CRC utility COPYRIGHT (C) 1986 Gary S. Brown. You may use this program, or code or tables extracted from it, as desired without restriction. First, the polynomial itself and its table of feedback terms.
■ ■מידע בדבר השלכה לאשפה של ציוד חשמלי ואלקטרוני ישן וכן סוללות (רלוונטי למדינות שמשתמשות במערכת איסוף .)אשפה מופרדת Information on Disposal of Old Electrical and Electronic Equipment and Batteries (applicable for countries that have adopted separate waste collection systems) Products and batteries with the symbol (crossedout wheeled bin) cannot be disposed as household waste.
DRV-N520W_EN301.
DRV-N520W_EN301.
Declaration of Conformity with regard to the RE Directive 2014/53/EU Declaration of Conformity with regard to the RoHS Directive 2011/65/EU Manufacturer: JVC KENWOOD Corporation 3-12, Moriya-cho, Kanagawa-ku, Yokohama-shi, Kanagawa, 221-0022, Japan EU Representative: JVCKENWOOD NEDERLAND B.V. Amsterdamseweg 37, 1422 AC UITHOORN, The Netherlands English Hereby, JVCKENWOOD declares that the radio equipment “DRV-N520” is in compliance with Directive 2014/53/EU.
Slovensko S tem JVCKENWOOD izjavlja, da je radijska oprema »DRV-N520« v skladu z Direktivo 2014/53/EU. Celotno besedilo direktive EU o skladnosti je dostopno na tem spletnem naslovu: http://www.kenwood.com/cs/ce/eudoc/ Malti B’dan, JVCKENWOOD jiddikjara li t-tagħmir tar-radju “DRV-N520” huwa konformi mad-Direttiva 2014/53/UE. It-test kollu tad-dikjarazzjoni ta’ konformità huwa disponibbli fl-indirizz intranet li ġej: http://www.kenwood.
KENWOOD DRV-N520W_EN301.
CE English CORRECTION/BERICHTIGUNG/CORRECTIE/CORREZIONE/CORRECCION/CORREC<;AO BSH-0173-00 Incorrect English Correct Declaration of Conformity with regard to the RE Directive 2014/53/EU Declaration of Conformity with regard to the EMC Directive 2014/30/EU Declaration of Conformity with regard to the RoHS Directive 2011/65/EU Declaration of Conformity with regard to the RoHS Directive 2011/65/EU Manufacturer: JVC KENWOOD Corporation 3-12, Moriya-cho, Kanagawa-ku, Yokohama-shi, Kanagawa, 221-0022, Jap
Andorra Estimado Kenwood . Usuario de los productos Iceland Malta Kreri notandi Kenwood tffi kta. Chatiz Klitent tai-Prodottr Kenwood. Ti l hamingju m&> n"yja Kenwood t;;ekiO Pin Gracras per haber elegid o este Producto Si resulta delectuoso ba1o condic iones normales de l uncionamiento. le rogamos Que contacte con su distnbu,dor autorizado mils abajo indicado, para rnformac i6n acerca de tagarantia JVCKENWOOD IBERICA, S.A. 0081711 Sant Cugllt del Valles, Barcelona Tel.
JVCKENWOOD NEDERLAND B.V. Nederland Geactl te gebroikel ~an Kefiwood prOOukten WrrcankeaU\'Oorn?l kiflell\13ndnKenwoedp:OOukt (hei "Prooukl"). l'ldienheiProaukt.Oij l)()lmaalgebcuik.geb."ekenzou vertOflell. lalhetgratiswor(leflllersleld ci vervongenoveroookornsl ig oebeoai
KENWOOD USA CORPORATION This warranty will be honored only in the U.S.A. KENWOOD LIMITED WARRANTY FOR CAR STEREO COMPONENTS MILITARY Units purchasedthrough the U S.A. military exch ange ser~ i ce overseasmay be se r~iced underwarranty inthecontinenL:li U.SA.. subject tothelollowingconditions l )Theori ginalwarranty is ineffect. 2)Prool of purchaseis provi dedtothe servicer.
MALAYSIA JVCKENWOOD MALAYSIA SON. BHD. The warran ty will only be honoured in the country in which the unit was origi nally purchased. EXPRESS WARRANTY STATEMENT FOR CAR STEREO AND PERSONAl AUDIO COMPONENTS JVCKENWOOD MALAYSIA SON. BHD. is proud oft he quality and workmanship of its audio equipment. This unit has been properly designed, tested and inspected before it was shipped to you.