DVD RECEIVER DVR-8100 INSTRUCTION MANUAL KENWOOD CORPORATION COMPACT DIGITAL VIDEO B60-5290-08 00 (E/T/X) WS 02/07
Before applying power DVR-8100 (EN) Caution : Read this page carefully to ensure safe operation. Units are designed for operation as follows. U.S.A. and Canada ................ AC 120 V only Australia ................................ AC 240 V only Europe and U.K. .................... AC 230 V only China and Russia ................... AC 220 V only Other countries ................... AC 220 - 240 V For the United Kingdom Factory fitted moulded mains plug Preparations 1.
Contents 3 DVR-8100 (EN) Caution : Read the pages marked Preparations Operations Let's put out some sound ............................................................. 17 Basic use method ................................................................... 17 Adjusting the sound ...................................................................... 18 Selecting a LISTEN mode ...................................................... 18 ACTIVE EQ. ..............................................................
DVR-8100 (EN) Unpacking Unpack the unit carefully and make sure that all accessories are present. If any accessories are missing, or if the unit is damaged or fails to operate, notify your dealer immediately. If your unit was shipped to you directly, notify the shipper immediately. KENWOOD recommends that you retain the original carton and packing materials in case you need to move or ship the unit in the future. Keep this manual handy for future reference.
IMPORTANT SAFEGUARDS Caution : Read this page carefully to ensure safe operation. 5 DVR-8100 (EN) Please read all of the safety and operating instructions before operating this appliance. Adhere to all warnings on the appliance and in the instruction manual. Follow all the safety and operating instructions. These safety and operating instructions should be retained for future reference. 1.
Special features DVR-8100 (EN) Special features This document classifies the applications of each feature using the following marks DVD : Description of a feature that can be used with DVD. : Description of a feature that can be used with CD. VCD : Description of a feature that can be used with VCD.
Maintenance 7 DVR-8100 (EN) Maintenance of the Set When the front panel, the case, etc. becomes dirty, wipe with a soft, dry cloth. Do not use thinner, alcohol, etc., as these can cause discoloration. Disc handling precautions Label side Playing side Sticker Do not attach paper or tape to either the playing side or the label side of the discs.
Discs information DVR-8100 (EN) Types of playable discs The system using this unit does not only play music from CD but can also play the discs listed below to offer you high-quality entertainment of video of movies and live concerts. marking on the label surface.
Region codes 9 DVR-8100 (EN) Every player of this model has a certain region code assigned to it based on the country where the player is used. When the player is used to play back DVD discs, it can only play the DVD discs carrying the region codes matching the region code of the player. The region code for this player is described on the rear panel of the player.
Video formats DVR-8100 (EN) The video signals used to display TV pictures and video disc pictures are mainly based on two types of signal formats (PAL and NTSC), which are assigned to each country or area as shown on the right. As a result, it is required to select discs according to the video format used with your TV monitor (in your country or area). TV formats of major countries TV Format NTSC PAL Major Countries & Areas Japan, Taiwan, Korea, U.S.A., Canada, Mexico, Philippines, Chile, etc.
Caution : System Connections Make connections as shown below. When connecting the related system components, refer also to the instruction manuals of the related components. Read this page carefully to ensure safe operation. DVR-8100 (EN) Caution: Do not plug in the power lead until all connections are completed. Caution Malfunction of microcomputer Be sure to adhere followings. Or proper ventilation will be blocked causing damage or fire hazard.
System Connections DVR-8100 (EN) Caution : Read this page carefully to ensure safe operation. AM loop antenna Preparations AM loop antenna connection The supplied antenna is for indoor use. Place it as far as possible from the main system, TV set, speaker cords and power cord, and set it to a direction which provides the best reception. White ANTENNA VIDEO OUT OUT MON. DVD COMPONENT VIDELO OUT S-VIDEO IN VCR IN OUT SAT/ CABLE MON.
System Connections 13 DVR-8100 (EN) Connecting to a TV TV Depending on the input switching, the output from the MONITOR OUT terminal will be one of the following signals. Please note that a different signal type will not be put out. S-VIDEO terminal : S-video signals from the internal DVD player, from the component connected to the (VIDEO) VCR IN or the (VIDEO) SAT/CABLE terminal.
System Connections DVR-8100 (EN) Connecting to Audio video equipments In case of digital recording with an MD recorder or a CD recorder Note Preparations This unit's digital out does not convert DVD bit stream data to PCM format. When playing Dolby Digital or DTS format DVDs, bit stream data is output from the digital out. To make digital recordings, play PCM format discs. Analog recording of DTS-encoded discs is not possible.
Controls and indicators 15 DVR-8100 (EN) DOLBY DIGITAL indicator CS II indicator DTS indicator DSP indicator Pro Logic indicator RDM (Random) indicator PGM (Program) indicator AUTO indicator TUNED indicator ST. (Stereo) indicator CLIP indicator PLAY/PAUSE indicator DIGITAL AUTO ST. CS DTS TUNED CLIP DSP Pro Logic 192 kHz fs 96 kHz fs DVD DIRECT RDM PGM 1 A-B TITLE P.B.C. CHAP RDS TRACK P.B.C. indicator RDS indicator (only for Europe and U.K.
Operation of remote control unit DVR-8100 (EN) The keys on the remote control unit with the same names as on the main unit have the same function as the keys on the main unit. 1 2 SOURCE POWER SAT INPUT MODE DISPLAY DVD/CD TUNER RANDOM BAND 3 4 VCR 5 CABLE TV 1 2 3 4 5 6 7 8 9 PGM CLEAR +100 0 Preparations 6 +10 ( SET 7 & * + AUDIO + VOLUME MUTE – TV INPUT REPEAT CH. ) A-B TOP MENU/P.B.C. – MENU/PTY ¡ 8 ™ ENTER 9 £ RETURN ON SCREEN 0 RDS P.
Let's put out some sound 17 DVR-8100 (EN) Preparation POWER MAIN UNIT POWER ON VOLUME CONTROL INPUT INPUT SELECTOR OFF VOLUME ÷ set the POWER switch to the ON ( MUTE ) position. POWER PHONES Basic use method 1Selecting the desired input MAIN UNIT REMOTE DVD/CD TUNER SAT BAND INPUT VCR CABLE Switching is done as follows when the INPUT key of the main unit is pressed. (The parenthesized part shows an operating example.
Adjusting the sound DVR-8100 (EN) Selecting a LISTEN mode 1 Press the Listen mode key repeatedly Each press switches the mode (For PCM sources) 1 Pro Logic II modes ÷ DOLBY PL II MOVIE ÷ DOLBY PL II MUSIC (For DOLBY DIGITAL sources) ÷ DOLBY PRO LOGIC 2 CS II modes 1 DOLBY DIGITAL ÷ CS II MUSIC 2 STEREO ÷ CS II MONO ÷ CS II CINEMA 3 DSP modes ÷ ARENA ÷ JAZZ CLUB ÷ THEATER ÷ STADIUM ÷ DISCO 4 STEREO (For DTS sources) 1 DTS 2 DTS STEREO REMOTE Listen mode The indicator for the presently selected LIST
Adjusting the sound 19 DVR-8100 (EN) What are LISTEN modes? You can experience true home-theater sound with your new system. This system incorporates several listen modes to let you enjoy surround sound with a wide variety of program sources. Each produces multiple channels of surround-sound, but each does it differently. ● Dolby Digital: Dolby Digital uses an encode/decode process based on its theatrical digital surround sound technology.
Adjusting the sound DVR-8100 (EN) ACTIVE EQ. You can enjoy more impressive sound effect when ACTIVE EQ is turned on during Dolby Digital and DTS playback and, when in PCM and analog stereo mode. This function provides the best equalization for your speakers. Press the ACTIVE EQ key repeatedly MAIN UNIT REMOTE 5 ACTIVE EQ TRIM Active EQ./ SOUND ∞ Each press switches the ACTIVE EQ. 1 CINEMA: effective when watching a movie (ACTIVE EQ.
Adjusting the sound 21 DVR-8100 (EN) Adjusting the Pro Logic II MUSIC mode the Listen mode key repeatedly 1Press and select Pro Logic ll mode REMOTE Select a Pro Logic II mode. 1 Pro Logic II modes 2 CS II modes 3 DSP modes 4 STEREO Listen mode 2 Press TRIM (5/∞) to select DOLBY PL ll MUSIC. 5 DVD AUDIO DVD VIDEO AUTO DETECT ACTIVE EQ SOUND EQ Pro Logic L C SW LS R LFE S RS Operation is only possible in Pro Logic II MUSIC mode.
Display DVR-8100 (EN) Changing the display Press the DISPLAY key. Each press switches the display. REMOTE When playing a DVD DISPLAY 1 Track/chapter 2 Time When playing a CD (VCD) 1 Track 2 Time When playing a MP3 disc 1 Track 2 Title 3 Time Dimmer Operations The brightness of the display can be changed in 3 levels. Adjust the brightness as you like by pressing the DISPLAY key.
Receiving broadcast station 23 DVR-8100 (EN) It is also possible to receive them by one-touch operations by storing up to 30 stations in the preset memory. (¢) TUNER/ BAND 4, ¢ AUTO/ MONO 4, ¢ INPUT 1, ¡ 1Select the TUNER input MAIN UNIT When using the main unit, press INPUT repeatedly to select the tuner. When the BAND key on the remote is pressed, this unit will be switched on automatically.
Receiving broadcast station DVR-8100 (EN) You can store up to 30 stations in the memory and recall with a single touch of the key. 4, ¢ PRESET Storing the broadcast stations (one-by-one presetting) a station (auto tuning or manual 1Select tuning) £ Presetting can be done with mixing of FM and AM stations. (Example) 01: FM 90.00 02: AM 810 03: FM 88.
Receiving broadcast station 25 DVR-8100 (EN) RDS is a system which transmits useful information (digital data) for FM broadcasts together with the broadcast signal. Tuners and receivers designed for RDS reception can extract the information from the broadcast signal for use with various functions such as automatic display of the station name. TUNER/ BAND RDS 4, ¢ 1, ¡ Using RDS function ( for U.K.
Receiving broadcast station DVR-8100 (EN) PTY function (for U.K. and Europe only) The PTY information is composed of an identification symbol, which helps the FM radio to recognize the program type of each FM station. TUNER/ BAND The 29 PTY modes are shown in the display by pressing the PTY key. PTY 1, ¡ Using the PTY search function 1Select the FM band £ TUNER BAND 2Press the PTY key MENU/PTY RDS Program types Operations ÷ The PTY MODE (POP M, ROCK M etc.) appears on the display.
Playback of disc 27 DVR-8100 (EN) 6 DVD/CD 7 3 0 INPUT 8 Basic play Label side 1 Load a disc 1 Open the tray. 2 Place a disc. 3 Close the tray. MAIN UNIT 0 ÷ When the 6 (play/pause) key on the main unit is pressed instead of the 0 (open/close) key in step 3, the tray will close and playback will start automatically.
Playback of disc DVR-8100 (EN) Disc playback features Numeric keys Notes ÷ You won’t hear the sound (audio) on the DVD when you’re using the Skip, Search, Step or Slow motion features. ÷ Playback features are not available during the opening credits of a movie. DVD CD VCD Skipping chapters or tracks MAIN UNIT REMOTE 4, ¢ SLOW 1, ¡ 4, ¢ STEP DVD CD VCD Searching REMOTE TUNE/TV VOL.
Using the On-screen banner display 29 DVR-8100 (EN) The on-screen Banner Display contains many playback features. To see the Banner Display, press the ON SCREEN key while a disc is playing. Use the Cursor (Up/Down/Left/Right) keys to move through the different features in the Banner Display. Each feature is illustrated with an icon. 1 During playback, press the ON SCREEN key.
Using the On-screen banner display DVR-8100 (EN) DVD Selecting a Title DVD CD VCD Some discs contain more than one title. For example, there might be four movies on one disc (each movie might be considered a title). 1 During playback, press the ON SCREEN key. MAIN UNIT REMOTE 1 During playback, press the ON SCREEN key. MAIN UNIT MAIN UNIT REMOTE ON SCREEN ON SCREEN 2 Press the Cursor left/right (2/3) keys until the TITLE icon is highlighted.
Using the On-screen banner display 31 DVR-8100 (EN) DVD Changing the Audio Language DVD Changing the Subtitle Language If the disc was created with different language tracks, you can use the Banner Display to temporarily change the DVD player’s Audio setting. You can change the Subtitle language while you’re watching a disc (but only if the disc was created with subtitles). Using the on-screen banner display Using the on-screen banner display 1 During playback, press the ON SCREEN key.
Using the On-screen banner display DVR-8100 (EN) DVD Changing the Camera angle CD VCD Using IntroScan function Some disc contains multiple angles in particular scene or sequence. If the disc only has one angle, this feature won’t work. IntroScan plays the first few seconds of each track on only one disc similar to the scan feature that’s on many car radios. Using the on-screen banner display Using the on-screen banner display 1 During playback, press the ON SCREEN key.
Using the On-screen banner display 33 DVR-8100 (EN) DVD CD VCD Using Bookmarks The bookmark feature lets you mark a point on the disc that you can go to quickly. You can store up to 9 bookmarks. Create the bookmark Recalling a bookmarked scene 1 During playback, press the ON SCREEN key. MAIN UNIT REMOTE ON SCREEN MAIN UNIT ON SCREEN 2 Press the Cursor left/right (2/3) keys until the BOOKMARK icon is highlighted. MAIN UNIT 1 During playback, press the ON SCREEN key.
Using the On-screen banner display DVR-8100 (EN) DVD CD VCD Repeat play Desired titles or discs can be played back repeatedly. ÷ Repeat Disc – Repeat the disc that is playing. ÷ Repeat Title – Repeat the title that is playing. ÷ Repeat Chapter – Repeat the chapter that is playing. ÷ Repeat Track – Repeat the track that is playing. DVD CD VCD A-B Repeat play The A-B repeat function lets you mark a segment to repeat between the beginning “A” and the end “B” of the segment you want to replay.
Using the On-screen banner display 35 DVR-8100 (EN) CD VCD Random play The tracks of disc are played in random order. During playback or stop mode, press RANDOM key on the remote. INPUT MODE RANDOM Display ÷ When the RANDOM key is pressed during playback, the tracks of the disc being played will be selected in random order for playback. ÷ After all tracks of a disc have been played in random order, playback will stop. (Random mode will be cancelled.
DVD CD VCD Program play DVR-8100 (EN) You can listen to the desired tracks or chapters of the current disc in any desired order. Registering and playing the program Insert the disc to be used in programming in the tray, close it and press the 3(PLAY) key so that the player reads the disc information by playing disc until display “READING” disappears. (If the tray is opened after this, the above procedure should be repeated so that the player reads disc information again.
Program play 37 DVR-8100 (EN) Insert chapter or track During stop mode, press the PGM key on the remote 1 Select a specific title/chapter or track to insert by pressing Cursor up/down (5/∞) keys or numeric keys (0-9). ENTER PROGRAM EDIT 2 Move the cursor with the Cursor right (‰) key to the "Playlist" and select the column to be added with the Cursor up/down (5/∞) keys.
Menu playback DVR-8100 (EN) VCD Hierarchical structure of VCD menus When an item is selected on the menu screen during playback of a P.B.C.-compatible VCD, another menu with more details items may be displayed. When a number of menus are connected in multiple layers in this way, it is said that the menus have a hierarchical structure. In this structure, the desired scene can be reached by repeating item selections on the menu screens.
Menu playback 39 DVR-8100 (EN) VCD Playback without using the menu playback function (In case of a P.B.C.-compatible VCD) (To P.B.C. On or Off) Press the P.B.C. key on the remote control unit. ÷ For the track numbers, refer to the disc jacket or other material. ÷ P.B.C. off mode : Without using menu playback function. P.B.C. off mode Goes off DVD AUDIO DVD VIDEO ACTIVE EQ P.B.C. SOUND EQ TOP MENU/P.B.C. To return to menu playback Press the P.B.C. key again. P.B.C. on mode Lit ACTIVE EQ P.B.C.
MP3 function DVR-8100 (EN) Guidance of MP3 Media that can be played back with this equipment Usable media : CD-ROM, CD-R, CD-RW Usable format : ISO9660 level 1. Files that can be played back : MP3 files Creating media for playing back on this equipment Compressing MP3 Please set up the transfer bit rate setting for the compression software when compressing MP3 files as follow. MP3 Files : 128kbps recommended (32kbps-320kbps) ÷ This unit is compatible with 32 kHz, 44.
MP3 function 41 DVR-8100 (EN) Playing back MP3 ÷ It is not possible to play back folders and files (up to 223) that exceed the maximum limitations of the media. ÷ A certain amount of time is required for the player to confirm the media on which MP3 files have been recorded before playback will commence. ÷ The files will be played back in the sequence in which they were recorded (written). ÷ For the basic operation, refer to “Playback of disc”.
MP3 function DVR-8100 (EN) Selecting MP3 files ÷ The files and folders in the selected folder appear. 1 Select the desired folder and press the ENTER key. q M P3 LIKE-1 Standard Play 1 0:05:34 HALLOW-1 LIKE-1 LUCKY-1 LET IT-1 YESTERDA TRUE-1 OPEN-1 WHIHE-1 2 Press Cursor up/down (5/∞) keys to select the file, then press the ENTER key. MAIN UNIT 25 ∞3 Press ENTER key on RETURN folder icon to move to the upper layer.
MP3 function 43 DVR-8100 (EN) MP3 Repeat play Desired folders or discs can be played back repeatedly. ÷ “Repeat 1 Disc”: Repeat the disc that is playing. ÷ “Repeat 1 Folder”: Repeat the folder that is playing. ÷ “Repeat Track”: Repeat the file that is playing. During playback, press the REPEAT key on the remote. Each press the key switches the REPEAT mode.
MP3 function DVR-8100 (EN) MP3 Program play You can listen to the desired files of the current MP3 disc in any desired order. Program Edit 1 During stop mode, press the PGM key on the remote. Lit PGM +100 DVD AUDIO DVD VIDEO ACTIVE EQ SOUND EQ 2 Press Cursor up/down (5/∞) keys on the remote to select the file, then press the ENTER key. Operations ENTER PGM Display ENTER ÷ The selected file go to program window. ÷ You can select maximum of about 100 files by repeating step 2.
Set Up functions 45 DVR-8100 (EN) Set up menu The initial setup of the player, which has been made at the factory, can be changed to the desired setup. 1 During stop mode or resume mode, press the MENU key. MAIN UNIT REMOTE MENU MENU Current setup menu display appears on the screen.
Set Up functions DVR-8100 (EN) DVD Select Audio Language DVD 1 Press Cursor up/down (5/∞) keys to select Audio on the set up menu display, then press the ENTER key. MAIN UNIT 25 ∞3 MULTI CONTROL / ÷ ENTER REMOTE Select Subtitle Language 1 Press Cursor up/down (5/∞) keys to select Subtitle on the set up menu display, then press the ENTER key.
Set Up functions 47 DVR-8100 (EN) DVD Select Menu Language DVD 1 Press Cursor up/down (5/∞) keys to select Menus on the set up menu display, then press the ENTER key. MAIN UNIT 25 ∞3 MULTI CONTROL / ÷ ENTER REMOTE 25 ∞3 MULTI CONTROL / ÷ ENTER ENTER ENTER Select Rating This part of DVD rating lets you determine how your player will react discs that contain movies that are rated (in the U.S.A. the Motion Pictures Association of America rates movies as G, PG, PG-13, etc.).
Set Up functions DVR-8100 (EN) DVD Password Input password 1 Press Cursor up/down (5/∞) keys to select Password on the set up menu display, then press the ENTER key. MAIN UNIT 25 ∞3 MULTI CONTROL / ÷ ENTER 4 Press ENTER key to finish password input (Confirm Password display appears below Enter Password display). REMOTE 25 ∞3 MULTI CONTROL / ÷ ENTER ENTER ENTER Operations (Password menu appears.
Set Up functions 49 DVR-8100 (EN) DVD Password (continued) Change password 1 Press Cursor up/down (5/∞) keys to select Password on the set up menu display, then press the ENTER key. 4 Press Cursor up/down (5/∞) keys (or numeric keys on the remote) to enter password.
Set Up functions DVR-8100 (EN) DVD Password (continued) DVD Clear password 1 Press Cursor up/down (5/∞) keys to select Password on the set up menu display, then press the ENTER key. TV aspect 1 Press Cursor up/down (5/∞) keys to select TV Aspect on the set up menu display, then press the ENTER key.
Speaker setting 51 DVR-8100 (EN) Positioning the speakers To achieve the optimum effects obtainable with this SURROUND SOUND system, it is important to position the speakers properly. Refer to the following illustration to find the best location in your room. Center speaker Preparation 1 Play a disc marked ”Dolby Digital”. ¶ 3 C L R SW LS RS Front speaker Sub woofer Front speaker 2 Stop the playback.
Speaker setting DVR-8100 (EN) The ideal listening position for 6-channel surround playback is the point at equal distance from all speakers. By setting the delay time for the center and surround speakers, this item realizes the ideal listening position virtually. (The center and surround speakers can be set as if they are laid out on the dotted line circle shown below.
Changing the INPUT MODE 53 Speaker setting DVR-8100 (EN) Level setting using a music source A music source can be used for speaker level setting and subwoofer level setting. 1 Play a disc marked “Dolby Digital”. 3 2 Select the speaker. FRONT CENTER REAR SW The speaker level can be changed in the range from -10 dB to +10 dB. 5 TRIM ∞ Changing the INPUT MODE The input mode can be switched with SAT/CABLE and VCR.
Control of a different device with the accessory remote controller DVR-8100 (EN) Register the setup codes for your audio and video The devices which can be set up are TV, VCR, SAT (satellite tuner), and CABLE. 1 Press and hold the SOURCE ( ) key. You must hold down the SOURCE ( ) key until you reach step 4. ÷ SAT and CABLE both switch this unit to the SAT/CABLE input. SOURCE 2 Use the numeric keys to enter the setup code.
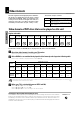
Control of a different device with the accessory remote controller 55 DVR-8100 (EN) Setup code table TV VCR BRAND PHILIPS PIONEER SABA SAMSUNG SANYO SCHNEIDER SELECO SHARP SONY TELEFUNKEN THOMSON TOSHIBA UNIVERSUM Notes 100 102 104 105 106 108 111 113 115 116 118 120 123 127 128 130 132 133 102 134 138 139 141 142 143 147 151 153 155 158 159 133 161 126 167 168 169 159 172 176 177 102 181 183 185 189 171 193 194 196 101 103 107 109 112 114 117 119 121 124 AIWA AKAI BAIRD BLAUPUNKT CGM COLTINA DAE
Control of a different device with the accessory remote controller DVR-8100 (EN) Keys which can be used to operate connected devices Operation of the dark-colored keys in the figure is possible.
Knowledge 57 DVR-8100 (EN) DVD menu language code list Cord No. Afar Abkhazian Afrikaans Amharic Arabic Assamese Aymara Azerbaijani Bashkir Byelorussian Bulgarian Bihari Bengali; Bangla Tibetan Breton Catalan Corsican Czech Welsh Danish German Bhutani Greek English Esperanto Spanish Estonian Basque Persian Finnish Fiji Faroese French Frisian Irish Scots Gaelic Galician Guarani Gujarati Hausa Hindi Cord No.
In case of difficulty DVR-8100 (EN) What seems to be a malfunction is not always so. Before calling for service, check the following table according to the symptom of your trouble. Operation to reset The microcomputer may fall into malfunction (impossibility to operate, erroneous display, etc.) when the power cord is unplugged while power is ON or due to an external factor. In this case, execute the following procedure to reset the microcomputer and return it to normal condition.
In case of difficulty 59 DVR-8100 (EN) Remote control unit Symptom Remote control operation is not possible. Cause Remedy ÷ Batteries are exhausted. ÷ The remote control is too far away from the system, the controlling angle is deviated or there is an obstacle in between. ÷ There is no disc set in the component to be played. ÷ Replace with new batteries. ÷ Operate the unit inside the remote controllable range. ÷ Operation has been performed with the keys of the main unit.
In case of difficulty DVR-8100 (EN) DVD / CD player unit Symptom The viewing angle cannot be changed. Cause ÷ The DVD disc being played does not contain the recording of more than one angle. ÷ You are attempting to switch the angle in a DVD section where more than one angle is not recorded. Remedy ÷ The viewing angle cannot be changed when the DVD disc being played does not contain the recording of more than one angle. ÷ More than one viewing angle may be recorded only in limited sections in a disc.
Specifications 61 DVR-8100 (EN) Main unit KSW-8100 Speakers [ Amplifier section ] (Front/Center/Rear) Effective output power during STEREO operation 1 kHz, 10 % T.H.D. at 6 Ω ................................................ 75 W + 75 W Effective output power during SURROUND operation Front (1 kHz, 10 % T.H.D. at 6 Ω) ............................... 75 W + 75 W Center (1 kHz, 10 % T.H.D. at 6 Ω) ......................................... 75 W Subwoofer (100 Hz, 10 % T.H.D. at 6 Ω) ......................
For your records Record the serial number, found on the back of the unit, in the spaces designated on the warranty card, and in the space provided below. Refer to the model and serial numbers whenever you call upon your dealer for information or service on this product.