CD-RECEIVER KDC-X689 INSTRUCTION MANUAL Take the time to read through this instruction manual. Familiarity with installation and operation procedures will help you obtain the best performance from your new CD-receiver. For your records Record the serial number, found on the back of the unit, in the spaces designated on the warranty card, and in the space provided below. Refer to the model and serial numbers whenever you call upon your Kenwood dealer for information or service on the product.
Contents Safety precautions 4 Notes 5 Warning 6 About CDs 7 About AAC, MP3 and WMA 8 General features 9 Power Hiding the Control Panel Selecting the Source Volume Attenuator System Q Speaker Setting Audio Control Audio Setup Subwoofer Output Display Setting Text Selection for Display Text Display Switching Graphic part/ Spectrum Analyzer Display Switching Station/Disc Naming (SNPS/DNPS) Faceplate Angle Adjustment Theft Deterrent Faceplate TEL Mute Tuner features Tuning Tuning Mode Direct Access
Basic Operations of remote control 36 Accessories/ Installation Procedure 39 Connecting Wires to Terminals 40 Installation 41 Removing the Unit 43 Troubleshooting Guide 44 Specifications 47 The "AAC" logo is trademark of Dolby Laboratories. English | B64-3147-00_K_English.indd 3 3 05.5.
Safety precautions 2WARNING To prevent injury or fire, take the following precautions: • To prevent a short circuit, never put or leave any metallic objects (such as coins or metal tools) inside the unit. 2CAUTION To prevent damage to the machine, take the following precautions: • Make sure to ground the unit to a negative 12V DC power supply. • Do not install the unit in a spot exposed to direct sunlight or excessive heat or humidity.
Notes • If you experience problems during installation, consult your Kenwood dealer. • If the unit fails to operate properly, press the Reset button to restore factory settings. • Press the reset button if the disc auto changer fails to operate correctly. Normal operation should be restored. Before using this unit for the first time This unit is initially set on the Demonstration mode. When using this unit for the first time, cancel the (page 35).
Notes 2Warning About DAB Tuner control 2CAUTION Refer to A group on the Instruction manual of DAB Tuner KTC-9090DAB (optional accessory) for the control method of DAB Tuner function. However, the following control methods of the function for this unit may be differed from the Instruction manual; therefore, refer to the following supplemental instruction. 1. Select the preset band for Auto Ensemble Memory Entry. 2. Press the [AME] button for at least 2 seconds.
About CDs Handling CDs Removing CDs • Do not touch the recording surface of the CD. When removing CDs from this unit pull them out horizontally. CDs that cannot be used • CDs that are not round cannot be used. • CD-R and CD-RW are easier to damage than a normal music CD. Use a CD-R or a CD-RW after reading the caution items on the package etc. • Do not stick tape etc. on the CD, or use a CD with tape stuck on it.
About AAC, MP3 and WMA The playable AAC/MP3/WMA file (hereafter called Audio file) and the media format has the following limitation. The Audio file, which is not comforming to the specification, may not play normally, or the file and folder names may not display correctly. • Attach the correct extension for the Audio file (AAC: ".M4A", MP3: ".MP3", WMA: ".WMA") • Do not attach the extensions to files other than the Audio file.
General features ATT ANG VOL Q/MENU SRC Control knob FM1-6ch 98.1 12:34 01-Jan-05 Sat Power Turning ON the Power Turn the vehicle ignition ON. The control panel appears. Turing OFF the Power Turn the vehicle ignition OFF or press the [SRC] button for at least 1 second. The control panel is hidden. • Do not apply force to the control panel during this operation. It can cause damage. Hiding the Control Panel Prevents tampering with the unit while your car is being serviced etc.
General features Selecting the Source Press the [SRC] button.
Audio Control 1 Select the source to adjust Press the [SRC] button. 2 Enter Audio Control mode Press the [VOL] knob. 3 Select the Basic Audio item to adjust Press the [VOL] knob. Each time you press the knob, the item to be adjusted alternates between the items shown in the table below. 4 Adjust the Basic Audio item Turn the [VOL] knob.
General features Audio Setup Setting the Sound system, such as Cross over Network. 1 Select the source to adjust • You can use the Dual Zone System with the Auxiliary input sources listed below. - Internal auxiliary input 5 Exit Audio Setup mode Press [VOL] knob for at least 1 second. Press the [SRC] button. 2 Enter Audio Setup mode Press the [VOL] knob for at least 1 second. 3 Select the Audio Setup item to adjust Press the [VOL] knob.
1 Upper text display part 2 Middle text display part 3 Lower text display part 4 Text display part 5 Graphic display part • You can display the information that will be shown in the Upper text display part, the Lower text display part or the Level meter display part according to the setting of Display mode. Refer to the following pages for how to select the mode.
General features Display Type B In Auxiliary input source Text Selection for Display Selecting the text display. 1 Enter display control mode Press the Control knob for at least 1 second. "Display Control" is displayed. 2 Select the display Type Press the Control knob. Select the "Display Type B" display. 3 Select the text display part Push the Control knob towards [FM] or [AM]. The selected text display part blinks. 4 Push the Control knob towards [4] or [¢].
Display Type C Text Display Switching Changing the text display. 1 Enter display control mode Press the Control knob for at least 1 second. "Display Control" is displayed. 2 Select the display Type Press the Control knob. Select the "Display Type C" display. 3 Select the text display part Push the Control knob towards [FM] or [AM]. The selected text display part blinks. Select the text Push the Control knob towards [4] or [¢]. Refer to the table described later for setting items.
General features The text display in the Upper text display part In Tuner source Information Station name Frequency Spectrum Analyzer & Clock Date Display "BAND+ch+SNPS"* "BAND+ch+FREQ" "Speana/Clock" "Date" In CD & External disc source Information Disc title Track title Track number & Play time Disc name Spectrum Analyzer & Clock Date Display "Disc Title"* "Track Title"* "P-Time" "DNPS" "Speana/Clock" "Date" In Audio file source Information Song title & Artist name Album name & Artist name Folder name
In Standby Information Clock Date Blank Display "Clock" "Date" "Blank" In Auxiliary input source Information Spectrum Analyzer & Clock Date Blank Display "Speana/Clock" "Date" "Blank" In HD Radio source Information Spectrum Analyzer & Clock Date Blank Title Display "Speana/Clock" "Date" "Blank" "Title"* In SIRIUS tuner source Information Spectrum Analyzer & Clock Date Blank Channel Name Song Title Artist Name Composer name Category Name Label Comment Display "Speana/Clock" "Date" "Blank" "Channel Nam
General features The text display in the Lower text display part In Tuner source Information Indicator Spectrum Analyzer & Clock Date Blank Display "Indicator" "Speana/Clock" "Date" "Blank" In CD & External disc source Information Indicator Spectrum Analyzer & Clock Date Blank Disc title Track title Disc name Display "Indicator" "Speana/Clock" "Date" "Blank" "Disc Title"* "Track Title"* "DNPS" In Audio file source Information Indicator Spectrum Analyzer & Clock Date Blank Song title & Artist name Album
4 Select the graphic/ spectrum analyzer display part display Push the Control knob towards [4] or [¢]. Each time you push the knob, the display alternates between the display names shown in the table below. Graphic display/ Spectrum Analyzer display Wallpaper 1 – 5 Spectrum analyzer 1 – 5 5 Exit Display control mode Press the Control knob for at least 1 second. 7 Select the characters Push the Control knob towards [FM] or [AM]. • Enter characters by using a remote control with numbers buttons.
General features Theft Deterrent Faceplate TEL Mute The faceplate of the unit can be detached and taken with you, helping to deter theft. The audio system automatically mutes when a call comes in. Removing the Faceplate When a call comes in "CALL" is displayed. The audio system pauses. 1 Turn the ignition OFF or press the [SRC] button for at least 1 second. The power turns OFF and the faceplate slides open. 2 Holding the center part of the faceplate pull it out.
Tuner features AUTO/AME 1—6 SRC Band display Frequency display FM1-6ch SNPS ST 98.1 ST indicator Control knob Preset station number Tuning Tuning Mode Selecting the station. Choose the tuning mode. 1 Select tuner source Press the [SRC] button. Select the "TUNER" display. 2 Select the band Push the Control knob towards [FM] or [AM]. Each time you push the knob toward [FM], it switches between the FM1, FM2, and FM3 bands. 3 Tune up or down band Push the Control knob towards [4] or [¢].
Tuner features Function of remote control Direct Access Tuning Auto Memory Entry Entering the frequency and tuning. Putting stations with good reception in the memory automatically. 1 Select the band 1 Select the band for Auto Memory Entry Press the [FM] or [AM] button. 2 Enter Direct Access Tuning mode Press the [DIRECT] button on the remote control. "– – – –" is displayed. Push the Control knob towards [FM] or [AM]. 2 Open Auto Memory Entry Press the [AME] button for at least 2 seconds.
CD/Audio file/External disc control features 0 S.MODE RDM/3/ F.SEL SCAN D.RDM REP M.RDM Track number SRC Control knob Track time MP3 T-01 0:12 Title/Artist IN IN indicator Playing CD & Audio file When there is no disc inserted 1 Open the panel Press the [0] button. 2 Insert a disc. • When the faceplate slides open, it might interfere with the shift lever or other vehicle function.
CD/Audio file/External disc control features Playing External Disc Playing discs set in the optional accessory disc player connected to this unit. Press the [SRC] button. Select the display for the disc player you want. Display examples: Display "CD Changer" "MD Changer" Disc player CD changer MD changer Pause and play Press the Control knob. Each time you press the knob, the audio pauses or plays.
Track/File/Disc/Folder Repeat Replaying the song, disc in the Disc changer or Audio file folder you are listening to. Press the [REP] button. Each time you press the button, the Repeat Play alternates between the modes shown in the tables below.
CD/Audio file/External disc control features Function of Audio file Function of ACDrive disc Folder Select Switching the Play mode Quickly selecting the folder you want to hear. Arrange the playing orders of the songs by categories. 1 Enter Folder Select mode Press the [F.SEL] button. "Select Mode" is displayed. During Select mode the folder information is displayed as shown below. Folder number display Displays the number in the folder belonging to the currently selected folder.
2 Start the Letter Seek Push the Control knob towards [4] or [¢]. The initial of Genre name, Artist name, or Album name is displayed and announced in order. • The announcement of the initial can be canceled by (page34). • When you push the Control knob to the reverse [4] or [¢] during Letter Seek, the initial is displayed and announced in the reversed order. • Once Letter Seek starts, it cannot be cancelled.
HD Radio control features AUTO/AME 1—6 Band display SRC Control knob Frequency display HF1-6ch 98.1 Station Name Title Preset station number Tuning • When you connect an HD Radio, Tuner features of the unit are disabled and changed to HD Radio tuner features. A portion of the setting methods including the Tuning Mode will change. • With the HD Radio tuner, you can use the similar functions to , , and of Tuner features.
Menu system MENU SRC Control knob Clock Adjust Beep:ON Security Menu System Setting beep sound during operation, etc. functions. The Menu system basic operation method is explained here. The reference for the Menu items and their setting content is after this operation explanation. 1 Enter Menu mode Press the [MENU] button for at least 1 second. "Menu" is displayed. 2 Select the menu item Push the Control knob towards [FM] or [AM].
Menu system In Standby mode Security Code Because authorization by the Security Code is required when the audio unit is removed from the vehicle, personalizing this unit by using the Security Code is helpful in preventing theft. • Setup Security Code when the (page 35) is set as OFF. • When you activate the Security Code function, the code cannot be changed and the function cannot be released. Note, you can set the Security Code with a 4 digit number of your choice.
In Standby mode In Standby mode Date Adjustment OFF Wait Time Setting 1 Select Date Adjust mode Setting the time until the faceplate hiding operation starts after the power is turned OFF. You can only remove the faceplate during the set time period. Press the Control knob for at least 1 second. The date display blinks. 3 Selecting the item (day, month, or year) to adjust Push the Control knob towards [4] or [¢]. The items that are blinking are items that you can adjust.
Menu system Other than Standby mode B.M.S. (Bass Management System) Adjust the bass boost level of the external amplifier using the main unit. 4 Adjust the AMP Control item Push the Control knob towards [4] or [¢]. 5 Exit AMP Control mode Press the [MENU] button. Display "AMP Bass:Flat" "AMP Bass:+6" "AMP Bass:+12" "AMP Bass:+18" Setting Bass boost level is flat. Bass boost level is low (+6dB). Bass boost level is mid (+12dB). Bass boost level is high (+18dB).
Receive mode Auto mode Digital Analog Display "Auto" "Digital" "Analog" Operation Analog broadcasts and digital broadcasts will be switched automatically. When both are being transmitted, the digital broadcast will have priority. Digital broadcasts only. Analog broadcasts only. 4 Exit Receive mode Press the [MENU] button.
Menu system In Standby mode In CD mode Built-in Auxiliary input Setting Unique ID display Set the Built-in Auxiliary Input function. Displaying the serial number for each product. Display Setting "Builtin AUX:OFF" When selecting the source there’s no Auxiliary Input. "Builtin AUX:ON" When selecting the source there’s Auxiliary Input. 1 Select the unique ID display mode Push the Control knob towards [FM] or [AM]. Select the "ACD Unique ID" display.
Audio Preset Call Recalling the sound setup registered by
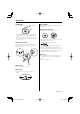
Basic Operations of remote control 43$ 70- 32# "55 !44 6/, "6% !5$ &D '. ". o D !-n :/.% $)2%#4 /+ !"# $%& '() *+, -./ 023 456 789 %*3&$5 1: 2 6/, Loading and Replacing the battery Use two "AA"-size batteries. Slide the cover while pressing downwards to remove it as illustrated. Insert the batteries with the + and – poles aligned properly, following the illustration inside the case. Basic operations [VOL] buttons Adjusts the volume.
Audio Control In Disc source [AUD] button Selects the Audio item to be adjusted. [4]/ [¢] buttons Going forwards and backwards between track/ files. [VOL] buttons Adjusts the Audio item. • Refer to
Basic Operations of remote control In HD Radio source [FM] button Selects the HD FM band. Each time you press the [FM] button, the band alternates between the HF1, HF2, and HF3 bands. [AM] button Selects the HD AM band. [4]/ [¢] buttons Tunes up or down bands. [0] — [9] buttons Press buttons [1] — [6] to recall preset stations. 38 | English B64-3147-00_K_English.indd 38 05.5.
Accessories/ Installation Procedure Accessories Installation Procedure 1 ..........1 2 ..........2 3 ..........2 4 ..........2 5 ..........1 6 ..........2 7 ..........1 8 ..........1 1. To prevent a short circuit, remove the key from the ignition and disconnect the - battery. 2. Make the proper input and output wire connections for each unit. 3. Connect the speaker wires of the wiring harness. 4. Connect the wiring harness wires in the following order: ground, battery, ignition. 5.
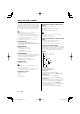
-1 7"" , , , Front left output (White) Front right output (Red) 18Ê AUX left input (White) AUX right input (Red) ," / Connecting Wires to Terminals Sub Woofer left output (White) Sub Woofer right output (Red) Rear left output (White) Rear right output (Red) To Kenwood disc changer/ External optional accessory To connect these leads, refer to the relevant instruction manuals. FM/AM antenna input Fuse (10A) If no connections are made, do not let the wire come out from the tab.
Installation non-Japanese cars Japanese cars Metal mounting strap (commercially available) Factory-installed Radio Bracket Accessory6 (follow indications for L/R) Firewall or metal support Factory-installed Radio Bracket L R Bend the tabs of the mounting sleeve with a screwdriver or similar utensil and attach it in place.
Installation Screwing the Faceplate on the Unit If you want to fasten the faceplate to the main unit so that it does not fall off, screw in the provided screws in the holes shown below. 1 Refer to the function 2 (page 20) and remove the faceplate. Insert the provided screw into the hole at the center of the bottom side of the faceplate which you have removed from the unit.
Removing the Unit Removing the hard rubber frame Insert the removal tool into the indentations in the hard rubber frame, and pull it gently until the lock is released. Removing the Unit 1 Refer to the section (page 43) and then remove the hard rubber frame. Remove the screw (M4 × 8) on the back panel. Insert the two removal tools deeply into the slots on each side, as shown.
Troubleshooting Guide What might seem to be a malfunction in your unit may just be the result of slight misoperation or miswiring. Before calling service, first check the following table for possible problems. ? No sound can be heard, or the volume is low. ✔ The fader or balance settings are set all the way to one side. ☞ Center the fader and balance settings. ✔ The input/output wires or wiring harness are connected incorrectly. ☞ Reconnect the input/output wires or the wiring harness correctly.
Tuner source ? ? Radio reception is poor. ✔ The car antenna is not extended. ☞ Pull the antenna out all the way. ✔ The antenna control wire is not connected. ☞ Connect the wire correctly, referring to the section on . The desired frequency can’t be entered with the Direct Access Tuning. ✔ A station that can’t be received is being entered. ☞ Enter a station that can be received. ✔ You’re trying to enter a frequency with a 0.01 MHz unit.
Troubleshooting Guide The messages shown below display your systems condition. Eject: No disc magazine has been loaded in the changer. The disc magazine is not completely loaded. ➪ Load the disc magazine properly. No CD in the unit. ➪ Insert the CD. No Disc: No disc has been loaded in the disc magazine. ➪ Load a disc into the disc magazine. TOC Error: No disc has been loaded in the disc magazine. ➪ Load a disc into the disc magazine. The CD is quite dirty. The CD is upsidedown.
Specifications Specifications subject to change without notice. FM tuner section Frequency range (200 kHz space) : 87.9 MHz – 107.9 MHz Usable sensitivity (S/N = 30dB) : 9.3dBf (0.8 μV/75 Ω) Quieting Sensitivity (S/N = 50dB) : 15.2dBf (1.6 μV/75 Ω) Frequency response (±3.
B64-3147-00_K_English.indd 48 05.5.