DNX7380BT DNX7380BTM DNX5380BT DNX5380 DNX5380M GPS NAVIGATION SYSTEM INSTRUCTION MANUAL Before reading this manual, click the button below to check the latest edition and the modified pages. Check the latest edition © 2010 Kenwood Corporation All Rights Reserved.
What Do You Want To Do? Thank you for purchasing the KENWOOD GPS NAVIGATION SYSTEM. In this manual, you will learn various convenient functions of the system. Click the icon of the media you want to play.
Contents Before Use 4 Bluetooth Control How To Read This Manual 5 Registering And Connecting Bluetooth Unit_ _____________________ 53 Basic Operations 6 Playing Bluetooth Audio Device (models other than DNX5380BT only)____ 56 Functions Of The Buttons On The Front Panel___________________ 6 53 Using Hands-Free Unit________________ 57 Turning On The Unit__________________ 10 Bluetooth Setup_____________________ 60 How To Play Media___________________ 13 Hands-Free Control_ _________________ 61
Troubleshooting 92 Problems And Solutions_______________ 92 Error Messages______________________ 93 Resetting The Unit_ __________________ 94 Appendix 95 Playable Media And Files______________ 95 Status Bar Indicator Items_ ____________ 98 Region Codes In The World_ ___________ 100 DVD Language Codes_ _______________ 101 Specifications_______________________ 102 About This Unit______________________ 104 3
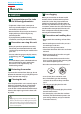
Return to the Top page Before Use Before Use 2 WARNING To prevent injury or fire, take the following precautions: • To prevent a short circuit, never put or leave any metallic objects (such as coins or metal tools) inside the unit. • Do not watch or fix your eyes on the unit’s display when you are driving for any extended period. • If you experience problems during installation, consult your Kenwood dealer.
Return to the Top page How To Read This Manual How To Read This Manual Return to the Top page CD, Disc, iPod, USB device Search Operation You can search the music, video, or picture file by some operations. NOTE • If you use a remote controller, you can jump directly to the desired track/file with entering the track/folder/file number, play time, etc. For details, see “Direct search mode” (p.81). List search You can search tracks, folders, and files according to hierarchy.
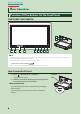
Return to the Top page Basic Operations Basic Operations Functions Of The Buttons On The Front Panel DNX7380BT/ DNX7380BTM 10 11 1 2 3 4 5 6 7 8 9 NOTE • The panels shown in this guide are examples used to provide clear explanations of the operations. For this reason, they may be different from the actual panels. • In this manual, each model name is abbreviated as follows. DNX7380BT and DNX7380BTM: If above icon is showed, read the article applicable to the unit you use.
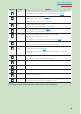
Return to the Top page Basic Operations Number Name fi (Reset) Motion • If the unit or the connected unit fails to operate properly, the unit returns to factory settings when this button is pressed (P.94). 2 ATT • Switches attenuation of the volume on/off. 3 ∞, 5 (Vol) Adjusts volume. Holding down a key turns up the volume in series up to 25. For more than 25, pressing the key turns up the volume one by one. 4 AUD • Displays Graphic Equalizer screen (P.84).
Return to the Top page Basic Operations DNX5380BT/DNX5380/DNX5380M 1 7 8 9 2 3 4 5 6 10 11 12 13 NOTE • The panels shown in this guide are examples used to provide clear explanations of the operations. For this reason, they may be different from the actual panels. • In this manual, each model name is abbreviated as follows. DNX5380BT, DNX5380, and DNX5380M: If above icons are showed, read the article applicable to the unit you use.
Return to the Top page Basic Operations Number Name fi (Reset) Motion • If the unit or the connected unit fails to operate properly, the unit returns to factory settings when this button is pressed (P.94). 2 MENU • Displays the Top Menu screen (P.16). 3 NAV 4 TEL 5 Volume Knob • Pressing switches attenuation of the volume on/off. 1 • Pressing for 1 second turns the power off. • When the power off, turns the power on. • Displays the navigation screen.
Return to the Top page Basic Operations Turning On The Unit The method of turning on is different depending on the model. 1 Press the
Return to the Top page Basic Operations Initial setup Perform this setup when you use this unit first time or when you reset the unit (P.94). 1 Set each item as follows. Language Select the language used for the control screen and setting items. Default is “British English (en)” for models with region code 2/3/4 and “Chinese“ for model with region code 6. 1 Touch [SET]. 2 Touch [2] or [3] to select the desired language. 3 Touch [Enter]. For detailed operation, see Language setup (P.70).
Return to the Top page Basic Operations 2 Touch [Finish]. NOTE • These settings can be set from the SETUP menu. See Setting Up (P.68).
Return to the Top page Basic Operations How To Play Media ●● To eject the disc: Press the <0> button. Music CD and disc media 1 Press the <0> button for 1 second. USB device 1 2 Connect the USB device with the USB cable. The panel opens. Insert the disc into the slot. The unit reads the device and playback starts. The panel closes automatically. The unit loads the disc and playback starts. ●● To eject the disc: Press the <0> button for 1 second.
Return to the Top page Basic Operations External device 1 Insert the plug into the AV-IN jack. 2 Detach the panel as the diagrams below. 3 2 1 Detaching The Front Panel 4 You can detach the front panel to prevent theft. 1 Press the <0> button for 3 seconds to open the front panel. 0 NOTE • You can set the front panel to open automatically when the ignition is turned off. See Monitor angle control (P.74).
Return to the Top page Basic Operations 1 Attaching the front panel Detach the panel as the diagrams below. 2 1 Hold the panel securely so as not to drop it accidentally, and fit it onto the attaching plate until it is firmly locked. 1 1 1 2 ●● After detaching: Put the panel in the protective bag supplied with the unit. 3 2 1 3 NOTE • To prevent deterioration, do not touch the terminals of the unit and faceplate with your fingers.
Return to the Top page Basic Operations Operating With The Top Menu Screen Most functions can be performed from the Top Menu screen. 1 Touch [Menu] on any screen. NOTE • If [Menu] is not displayed during video/picture playback, press the
Return to the Top page Basic Operations ●● Customizing Top Menu screen Drag the icon you want to register to the upper line. You can move up to three icons.
Return to the Top page Basic Operations Common Operations Introduces the common operations. General There are some functions which can be operated from most screens. [Menu] Returns to the Top Menu screen. (RETURN) Returns to previous screen. (common menu key) Touch to display the common menu. The contents of the menu are as follows. : Displays the EXT SW Control screen. : Displays the SETUP Menu screen. : Displays the Audio Control Menu screen. : Displays the control screen of current source.
Return to the Top page Basic Operations Flick scrolling You can scroll the list screen by flicking the screen up/down or right/left.
Return to the Top page Basic Operations Navigation Operation For details on the navigation function, please refer to the Navigation Instruction Manual. Display the navigation screen 1 Press the
Return to the Top page Basic Operations 2 Touch [ ] or [ ] in the navigation screen. Touching this area displays the audio screen. : Displays the navigation and control keys of the current source. : Displays the navigation and current video/picture playback display. NOTE • The screen switches between playback screen and camera view each time the viewing area is touched. • Touching the source icon in the bottom of the screen displays the full audio screen.
Return to the Top page DVD, VCD DVD/Video CD (VCD) Operation DVD/VCD Basic Operation Most functions can be controlled from the source control screen and playback screen. NOTE • Set the remote controller mode switch to DVD mode before starting operation, see Switching the operation mode (P.89). • The screen shot below is for DVD. It may be different from the one for VCD. Control screen 1 Video screen 6 6 5 2 3 4 7 8 1 Information display Displays the following information.
Return to the Top page DVD, VCD 5 Sub function menu The following functions can be performed by using keys in this area. • Repeats the current content: Touch [ ]. Each time you touch the key, repeat mode switches in the following sequence; DVD: "title repeat" , "chapter repeat" , "function off" VCD (PBC On): Does not repeat VCD (PBC Off ): "track repeat" , "function off" • Hides all keys: Touch [ ]. • Fast forward or fast backward: Touch [1] or [¡].
Return to the Top page DVD, VCD Multi function menu DVD VCD The functions of each key are as follows. [4] [¢] Searches the previous/next content. [38] Plays or pauses. [ ] or [ ] (DVD only) Plays in slow motion forward or backward. [7] Stops playback. When touched twice, the disc is played from the beginning when you play it the next time. [PBC] (VCD only) Turn PBC on or off. [ SETUP] Touch to display the SETUP Menu screen. See Setting Up (P.68). [ AUDIO] Touch to display the Audio Control screen.
Return to the Top page DVD, VCD Highlight control DVD Disc Menu Operation You can set up some items in the DVD-VIDEO disc menu. 1 Touch illustrated area during playback. Highlight control lets you control the DVD menu by touching the menu key directly on the screen. 1 Touch [Highlight] in the Menu Control screen. 2 Touch desired item on the screen. Menu Control screen appears. 2 Perform desired operation as follows.
Return to the Top page DVD, VCD 2 Touch the key which corresponds to desired setting item. NOTE • For DVD, please refer to DVD Play Mode Setting (P.25) to display the Zoom Control screen. 2 Perform desired operation as follows. Switches the subtitle language Touch [Subtitle]. Each time you touch this key, language is switched. Switches the audio language Touch [Audio]. Each time you touch this key, language is switched. Controls zoom ratio Touch [Zoom].
Return to the Top page DVD, VCD DVD Setup You can set up the DVD playback functions. NOTE • Each operation in this section can be started from the Top Menu screen. For details, see Operating With The Top Menu Screen (P.16). 1 Touch [ ] in the control screen. Multi function menu appears. 2 Touch [SETUP]. SETUP Menu screen appears. 3 Touch [Source]. Source SETUP Menu screen appears. 4 5 Touch [DVD SETUP] in the list. DVD SETUP screen appears. Set each item as follows.
Return to the Top page DVD, VCD Language setup This setting is for the language used in the menu, subtitle, and voice. You cannot setup these items during DVD playback. 1 2 Touch [SET] of the desired item; [Menu Language], [Subtitle Language], [Audio Language]. Language Set screen appears. Enter the desired language code and touch [Enter]. Parental level Sets a parental level. You cannot setup this item during DVD playback. 1 Touch [SET] of [Parental Level]. Parental Pass screen appears.
Return to the Top page DVD, VCD Disc setup Performs setup when using disc media. 1 Touch [SET] of [DISC SETUP]. DISC SETUP screen appears. 2 Select an option as follows. CD Read Sets the motion of this unit when a music CD is played. 1 (Default): Automatically recognizes and plays back an audio file disc, a DVD or a music CD. 2: Forcibly plays back a disc as a music CD. Select [2] if you wish to play a music CD having a special format or if you cannot play a disc in [1] position.
Return to the Top page CD, Disc, iPod, USB device CD/Audio And Visual Files/iPod Operation Music/Video/Picture Basic Operation Most functions can be controlled from the source control screen and playback screen. NOTE • Set the remote controller mode switch to AUD mode before starting operation, see Switching the operation mode (P.89). • To connect iPod to this unit, optional accessory KCA-iP202/KCA-iP22F is necessary. See the following sections for each source operation. • Music CD (P.30) • USB device (P.
Return to the Top page CD, Disc, iPod, USB device 4 Multi function menu Various functions can be performed by using keys in this area. For details on the menu, see Multi function menu (P.34). 5 Sub function key Touch to display “Sub function menu” (7 in this table). 6 Track information Displays the information of the current track. For music CD and disc media, you can switch the current track information and the current folder list by touching the list switching key (8 in this table).
Return to the Top page CD, Disc, iPod, USB device USB device and iPod NOTE • The screen shot below is for USB device. It may be different from the one for iPod. Simple Control screen 1 List Control screen 2 6 2 7 3 4 5 3 4 8 1 Information display Displays the following information. • Current file name: Each time you touch this area, display switches between file number/folder number and file name. • 3, ¡, etc.
Return to the Top page CD, Disc, iPod, USB device Picture/video screen 9 9 10 9 Searching file area (picture/video file only) • Touch to search the next/previous file. • During slide show in USB mode, touching each area searches the next/previous music file. • Scrolling from center of display to left or right performs fast backward or fast forward. To stop fast backward/forward, touch center of the display. This function is not available when there is no music file in the current folder.
Return to the Top page CD, Disc, iPod, USB device Multi function menu Music CD Disc media iPod USB device The following functions can be performed by using keys in this area. [ ] (Disc media, iPod, USB device only) Searches track/file. For details on search operation, see Search Operation (P.36). [4] [¢] Searches the previous/next track/file. [38] Plays or pauses. [7] (music CD and disc media only) Stops playback. [0] (iPod and USB device only) Touch for 1 second to disconnect the device.
Return to the Top page CD, Disc, iPod, USB device Sub function menu Music CD Disc media iPod USB device The following functions can be performed by using keys in this area. [ ] Repeats the current track/folder. Each time you touch the key, repeat mode switches in the following sequence; CD, iPod: "track repeat" , "repeat off" Disc media, USB device: "file repeat" , "folder repeat" , "repeat off" [ ] (USB device and iPod only) Searches track from the album artwork list.
Return to the Top page CD, Disc, iPod, USB device Other search Search Operation You can search music, video or picture files by the following operations. NOTE • If you use a remote controller, you can jump directly to the desired track/file with entering the track/folder/file number, play time, etc. For details, see Direct search mode (P.89). List search When you want to narrow the list down, there are other search ways. This function is not available when music CD is the current source.
Return to the Top page CD, Disc, iPod, USB device Category search (USB device and iPod only) Link search (USB device and iPod only) 1 Touch the desired category from the left part of the screen. 1 2 3 The list is sorted by selected category. Touch desired item. Playback starts. NOTE Touch the desired item from the left part of the screen. You can select from artist, album, genre and composer. The list corresponding to your selection appears. NOTE • The list is sorted by the way you selected.
Return to the Top page CD, Disc, iPod, USB device Folder search (USB device and disc media only) 1 Touch the desired folder. Contents of the folder are displayed in the right area of the screen. 2 Touch desired item from the content list. Playback starts. NOTE • For operations in the list screen, see Common Operations (P.18). 38 Picture search (USB device only) 1 Touch the desired picture. The selected picture appears in full screen. See number 9-10 in USB device and iPod (P.
Return to the Top page CD, Disc, iPod, USB device Search from album artwork (USB device and iPod only) You can search music files by selecting the album artwork. 1 Touch [ ]. Sub function menu appears. 2 Touch [ ]. 4 Touch [ 3 ] on the selected artwork. The first song in the album is played. In addition, you can create your original playlist from this screen. For details, see Favorite list (P.40). NOTE • After all tracks in the album are played, the same album is played again from the first track.
Return to the Top page CD, Disc, iPod, USB device Favorite list You can create an original playlist of your favorite 10 albums by selecting album artworks. 1 2 Touch the desired artwork in the favorite list. Touch and drag the desired album artwork in the lower line to the upper line. Selected album is played and the control screen appears. NOTE Selected album is registered to the favorite list. • The favorite list is played to the right starting with the selected album.
Return to the Top page CD, Disc, iPod, USB device Movie Control You can adjust the movie playback from a disc media. 1 In the playback screen, touch illustrated area. USB/iPod/DivX Setup You can perform setup when using USB/ iPod/DivX. NOTE • Each operation in this section can be started from the Top Menu screen. For details, see Operating With The Top Menu Screen (P.16). 1 Touch [ ] in the control screen. Multi function menu appears. 2 Touch [SETUP]. SETUP Menu screen appears. 3 Touch [Source].
Return to the Top page CD, Disc, iPod, USB device USB setup 1 Set each item as follows. Picture Display Time Selects length of time to display JPEG picture file in the screen. Select from [Short], [Middle], and [Long] (default). On Screen USB Sets how to display the information of the USB device. Auto (Default): Information appears for 5 seconds when updated. OFF: Does not display any information.. iPod setup 1 Set each item as follows. AudioBook Speed Sets the audio book playback speed.
Return to the Top page CD, Disc, iPod, USB device DivX setup 1 Set each item as follows. DivX(R) Registration Code Checks the registration code. This code is needed when making a disc which has DRM (Digital Rights Management). DivX(R) Deactivation Deregisters the unit which is already registered. After you touch the key, a confirmation message appears. Follow the message and complete the operation. NOTE • [DivX(R) Registration Code] is disabled when a DVD is being played.
Return to the Top page Radio, TV Radio And TV Operation Radio Basic Operation Most functions can be controlled from the source control screen. NOTE • Set the remote controller mode switch to AUD mode before starting operation, see Switching the operation mode (P.89). Simple Control screen List Control screen 1 2 2 6 7 3 4 5 3 4 8 1 PS name display Displays the PS name. 2 Information display/Control switching area Displays the following information. • [FM1], [AM], [MW], etc.
Return to the Top page Radio, TV 7 Sub function menu The following functions can be performed by using keys in this area. • Switches the band: Touch the desired band name. • Tunes in a station: Touch [1] [ ]. The method of frequency switching can be changed. See Multi function menu (P.45). The bar in center (tuner only) shows the current frequency location. 8 List switching key Touch to switch between the preset list and the information list.
Return to the Top page Radio, TV TV Basic Operation Most functions can be controlled from the source control screen and TV screen. NOTE • Set the remote controller mode switch to TV mode before starting operation, see Switching the operation mode (P.89). • You can only operate TV with the optional accessory TV tuner KTC-V500N/PV300/N/P connected. • During playback, press the
Return to the Top page Radio, TV TV screen 6 6 7 8 6 Switching channel area Touch to switch the channel. 7 Switching band area Touch to switch the band. 8 Key display area Touch to display the last control screen. Multi function menu The functions of each key are as follows. [P1] - [P6] Selects the preset channel. Touch for 2 seconds to store the current channel into the preset memory. ] [ Displays the list of preset channels. [4] [¢] Switches the channel. [BAND] Touch to switch the band.
Return to the Top page Radio, TV Memory Operation TV (For models with region code 2 or 3) 1 Touch illustrated area during playback to switch the band you want to store in memory. 2 Touch illustrated area. Auto memory You can store stations with good reception in memory automatically. This function is for tuner and TV only. NOTE • Auto memory terminates when 6 stations are stored or when all stations are tuned in. • The operation ends automatically if you do not operate within 10 seconds.
Return to the Top page Radio, TV Manual memory You can store the current receiving station or channel in memory. 1 Select a station or channel you wish to store in memory. NOTE • For TV, touch center bottom area of the screen if source control screen is not displayed. 2 Touch [P#] (#:1-6) in which you want to store the station or channel for 2 seconds until a beep sounds. Search by program type (FM tuner only) You can tune to a station with a specific program type when listening to FM.
Return to the Top page Radio, TV Traffic Information (FM tuner only) You can listen and watch the traffic information automatically when a traffic bulletin starts. However, this feature requires a Radio Data System that includes the TI information. 1 Touch [ ] in the control screen. The multi function menu appears. 2 Touch [TI] in the multi function menu. Traffic information mode is set. When the traffic bulletin starts The Traffic Information screen appears automatically.
Return to the Top page Radio, TV 5 Set each item as follows. TV Setup You can set the TV signal receiving areas. NOTE • Each operation in this section can be started from the Top Menu screen. For details, see Operating With The Top Menu Screen (P.16). NEWS Sets a news bulletin interrupt time. Default is “OFF.” AF When station reception is poor, automatically switches to the station that is broadcasting the same program over the same Radio Data System network. Default is “ON.
Return to the Top page Radio, TV 5 Set each item as follows. TV1 Area/TV2 Area Sets the present TV1 or TV2 receiving area. Touch [SET], and select the area and number. This function is available only when KTC-V500N/ PV300/N/P optional accessory is connected. On Screen TV Sets how to display the information of the TV. Auto (Default): Information appears for 5 seconds when updated. OFF: Does not display any information.
Return to the Top page Bluetooth Operation Bluetooth Control Using the Bluetooth function, various functions can be used: listening to the audio file, making/receiving a call. NOTE • To use Bluetooth function of DNX5380/ DNX5380M, the optional accessory (KCA-BT300) is necessary. Registering And Connecting Bluetooth Unit It is necessary to register the Bluetooth audio player or cell-phone to this unit before using the Bluetooth function. You can register up to 5 Bluetooth unit. 1 Press the button.
Return to the Top page Bluetooth Operation Registering the Bluetooth Unit 1 Touch [SET] of [Regist New Device]. Searched Device List screen appears. NOTE • A new device cannot be registered if there are 5 registered Bluetooth units. Delete unnecessary registration. See Connecting the Bluetooth unit (P.54). Connecting the Bluetooth unit 1 Touch [SET] of [Paired Device List]. Connection Device List screen appears. 2 Touch the device name you want to connect.
Return to the Top page Bluetooth Operation Registering special Bluetooth unit If registering cannot be completed by normal operation, there is another method. 1 Touch [SP DEV] in the Searched Device List screen. Special Device List screen appears. 2 Select the device name you want to register from the list. Special Device Select Confirm screen appears. 3 Confirm the device name and touch [Yes]. NOTE • If you touch [No], operation is cancelled. • The devices not listed cannot be registered.
Return to the Top page Bluetooth Operation Playing Bluetooth Audio Device (models other than DNX5380BT only) Bluetooth basic operation Simple Control screen 1 List Control screen 5 4 2 3 2 3 1 Information display Displays the name of the track information. If the information is not available, device name is displayed. 2 Multi function key Touch to switch the multi function menu. 3 Multi function menu The functions of each key are as follows. • [4] [¢]: Searches the previous/next content.
Return to the Top page Bluetooth Operation Making a call Using Hands-Free Unit You can use telephone function by connecting the Bluetooth telephone to this unit. 1 Press the button. Downloading the phonebook If you want to use your phonebook data, it is necessary to download the data from the cell-phone to this unit in advance. 1 Operate the cell-phone to send the phonebook data to this unit. 2 Operate the cell-phone to start the hands-free connection.
Return to the Top page Bluetooth Operation 2 Select a dialing method. See the following table for each method. *1 You can sort the list to begin with touched character. Call by entering a phone number • Characters with no corresponding name will not appear. 1 Touch [Direct Number]. 2 Enter a phone number with number keys. ]. 3 Touch [ • During search, a non-accent character such as “u” is searched for instead of an accent character such as “ü”.
Return to the Top page Bluetooth Operation Receiving a call 1 Operations during a call Adjust the receiver volume Touch [ ] to answer a phone call or [ ] to reject an incoming call. Press the <∞> or <5> button. Turn the volume knob. NOTE • While monitoring the camera view, this screen does not appear even if a call comes in. To display this screen, press the button or return the shift knob of car to the driver position.
Return to the Top page Bluetooth Operation Muting Audio Volume upon Reception of Phone Call (DNX5380 and DNX5380M only) When a call is received or you answer a call, the Call Interrupt screen appears and system is paused. Bluetooth Setup You can register PIN code, select the device to connect, and perform output setup. 1 Press the button. The system resumes playing automatically when the call ends and hang up the phone.
Return to the Top page Bluetooth Operation Registering Bluetooth unit PIN code You can set the PIN code to the Bluetooth unit. The code is acquired when registering (pairing) from the cell-phone or audio player side. 1 Touch [SET] of [Receiver PIN Code] in the Bluetooth SETUP screen. Receiver PIN Code Set screen appears. 2 Enter a code number and touch [Enter]. Hands-Free Control You can perform various setup about handsfree function. 1 Press the button. Hands Free screen appears.
Return to the Top page Bluetooth Operation Setting up the Hands-Free phone 1 2 Touch [TEL SETUP] in the Hands Free screen. Hands Free SETUP screen appears. Set each item as follows. Phone Information Use Sets whether to download phonebook for outgoing, incoming and missed calls list. ON (Default): Yes. OFF: No. SMS Use Select whether to use SMS. ON (Default): Uses SMS. OFF: Not uses SMS. Sort Order Sets how to arrange the cell-phone phonebook. First: Arranges in the order of first name.
Return to the Top page Bluetooth Operation SMS (Short Message Service) Operations in the message list screen You can use SMS function. 1 Touch [SMS] in the Hands Free screen. SMS Select screen appears. 2 Select desired function from the list. Calls the number in the message Select desired message from the message list. Displays message Touch [DISP] to display the selected message. [Create Message] Creates a message. For details, see Creating a new message (P.64).
Return to the Top page Bluetooth Operation Creating a new message 1 Touch [Create Message] in the SMS Select screen. SMS Create Menu screen appears. 2 Touch [ ] or [Direct Number]. Changes the layout of the character keys [abc]: Alphabetical layout [qwe]: Qwerty layout [ALT]: Alternate key Erases the entered character Touch [Clear]. To erase all the input characters, touch for 2 seconds. Enters a space Touch [Space] at desired position. 5 Touch [Send]. The message is sent.
Return to the Top page Bluetooth Operation Using templates You can create a message easily by selecting the desired sentence from the template list. 1 Touch [Create Message] in the SMS Select screen. SMS Create Menu screen appears. 2 Touch [Template]. 2 Touch desired key and enter the number you want to register. See the table below for explanations for each key. Register from received SMS messages Touch [ ]. Template list screen appears. 3 Touch the desired template.
Return to the Top page Bluetooth Operation Voice registration 4 Say the name within 2 seconds after a beep and touch [Record]. (1st try) 5 Say the name again within 2 seconds after a beep. (2nd try) If successful, the message appears and the voice registration ends. You can register your voice for the voice recognition feature which links to the phonebook information. Up to 35 voice memory positions can be registered for each paired cell phone. 1 Touch [Phonebook] in the Hands Free screen.
Return to the Top page Bluetooth Operation Key word voice registration 3 Say the phone category within 2 seconds after a beep and touch [Record]. (1st try) 4 Say the phone category again within 2 seconds after a beep. (2nd try) If successful, the message appears and the voice registration ends. You can register your voice for the voice recognition feature which links to the phonebook category information. 1 Touch [SET] of [Key Word] in the Hands Free SETUP screen. Key Word List screen appears.
Return to the Top page Setting Up Setting Up Monitor Screen Setup You can adjust image quality in iPod video, picture file, menu screen, etc. 1 Press the button instructed in each diagram when the desired screen is displayed. Press for 1 second Bright/Tint/Color/Contrast/Black/ Sharpness Adjusts each item. Dimmer Select dimmer mode. ON: The display and buttons dim. OFF: The display and buttons do not dim.
Return to the Top page Setting Up User interface System Setup You can setup user interface parameters. NOTE • Each operation in this section can be started from the multi function menu. 1 Touch [Menu] on any screen. TOP Menu screen appears. 2 3 Touch [SETUP]. 1 Touch [User Interface] in the list. User Interface screen appears. 2 Set each item as follows. Touch [System]. System Menu screen appears. See the following section for each setting. • Set up the user interface (P.
Return to the Top page Setting Up Language setup Drawer Close Sets whether to close the common menu (P.18) automatically. Default is “Auto”. Animation Sets whether to display animation. Default is “ON”. Secondary Sets whether to display the navigation information in the audio screen or vice versa. Default is “ON”. Panel Switch Sensitivity Adjusts the sensitivity of the front panel button (ATT button, etc.) High: Sets sensitivity to high. Middle (Default): Sets sensitivity to middle.
Return to the Top page Setting Up Touch panel adjustment Learning function of steering remote This function is available only when your vehicle is equipped with the electrical steering remote controller. If your steering remote controller is not compliant, learning may not be completed and error message may appear. 1 Touch [SET] of [Steering Remote Controller]. Steering Remote Controller Setting screen appears. 2 Press the steering remote controller button you want to set the function.
Return to the Top page Setting Up 2 EXT SW setup Touch [ON] of [SI]. Set up the external switch power mode. 1 Touch [EXT SW] in the System Menu screen. EXT SW screen appears. 2 Set each item as follows. NOTE • If “SI” is turned on, the SI indicator on the sub panel flashes when the vehicle ignition is off and the panel is detached. Default is “ON.” 3 Touch [SET] of [Security Code Set]. NOTE • If you have already completed the code registration, [CLR] is displayed.
Return to the Top page Setting Up Setup memory 3 Follow the instruction on the screen. Audio Control, AV-IN SETUP, Navigation, Camera, and Audio SETUP settings can be memorized. The memorized settings can be recalled at any time. For example, even when the settings are cleared due to replacement of the battery, the settings can be restored. 1 Touch [SETUP Memory] in the System Menu screen. SETUP Memory screen appears. 2 Follow the instruction on the screen. Recall Recalls the memorized settings.
Return to the Top page Setting Up Monitor angle control You can adjust the position of the monitor. 1 Touch [Angle] in the Display Menu screen. Angle setup screen appears. 2 Select a below number that represents your desired angle setting. Panel color coordinate You can set the screen and button illumination color. The selectable items differ depending on the unit. 1 Touch [Color] in the Display Menu screen. Color screen appears. 2 Touch [SET] of [Panel Color Coordinate]. Default is “0”.
Return to the Top page Setting Up Changing background image Registering original color You can register your original color. 1 Touch [Adjust] in the Panel Color Coordinate screen. Panel Color RGB Coordinate screen appears. 2 Use [2] and [3] to adjust each color value. 3 You can load an image from the connected USB device and set it for the background image. Before operating this procedure, it is necessary to connect the device which has the image to load.
Return to the Top page Setting Up 5 Touch [Enter]. Navigation Setup You can set navigation parameters. 1 2 Touch [Menu] on any screen. 3 Touch [Navigation]. Touch [SETUP]. SETUP Menu screen appears. The selected image is loaded and the display returns to the Background screen. NOTE • Touching [ ] rotates counter clockwise. • Touching [ ] rotates clockwise. 6 Touch [Change] of [Background Change] in the Background screen. 7 Select an image for background and touch [Enter].
Return to the Top page Setting Up Camera Setup You can set camera parameters. 1 2 Touch [Menu] on any screen. 3 Touch [Camera]. Touch [SETUP]. SETUP Menu screen appears. R-CAM Interruption Sets a method for switching the display. Setting values are ON and OFF. ON: Switches to the rear view camera video display when shifting to reverse or pressing the or button for 1 second.
Return to the Top page Setting Up Software Information AV Input Setup Check the software version of this unit. You can set AV input parameters. 1 2 Touch [Menu] on any screen. 1 2 Touch [Menu] on any screen. 3 Touch [Software]. 3 Touch [Source]. Software Information screen appears. 4 Touch [AV-IN SETUP] in the list. AV-IN SETUP screen appears. 5 Set each item as follows. 4 Touch [SETUP]. SETUP Menu screen appears. Confirm the software version. Touch [Update] as necessary.
Return to the Top page Setting Up AV Output Interface Setup You can select an AV source to be output at the AV OUTPUT port. Default is “OFF.” 1 2 Touch [Menu] on any screen. 3 Touch [AV-OUT]. External Device Control Control the external device power supply. 1 Touch [EXT SW] in the Source Control screen. Touch [SETUP]. SETUP Menu screen appears. EXT SW Control screen appears. NOTE • If [EXT SW] is not displayed, touch [ AV-OUT Interface screen appears.
Return to the Top page Audio Setting Up Controlling Audio • Set up speakers (P.80) NOTE • Each operation in this section can be started from the multi function menu. You can adjust the various settings such as audio balance or subwoofer level. 1 2 • Set up your car type (DTA) (P.82) • Select DSP (P.83) Speaker Select screen appears. • Set up speakers (P.80) Touch [Menu] on any screen. Touch [Audio]. Audio screen appears. See the following section for each setting. • Setting audio (P.
Return to the Top page Audio Setting Up 3 Select a speaker size using [2] and [3]. The speaker size is different depending on the speaker type and the unit. Front OEM, 10 cm, 13 cm, 16 cm, 17 cm, 18 cm, 4x6, 5x7, 6x8, 6x9, 7x10 Rear None, OEM, 10 cm, 13 cm, 16 cm, 17 cm, 18 cm, 4x6, 5x7, 6x8, 6x9, 7x10 Crossover network setup You can set a crossover frequency of speakers. 1 Touch the speaker to set the crossover in the Speaker Select screen. 2 Touch [X’over]. X’over screen appears.
Return to the Top page Audio Setting Up Car type (DTA) setup You can setup the car type and speaker network, etc. 1 2 Touch [Car Type] in the Audio SETUP screen. Car Type screen appears. Select your car type from the list. Car type adjust You can manually set the sound output timing of each channel. 1 In the Car Type screen, touch [Adjust]. Car Type Adjust screen appears. 2 Touch the speaker you wish to adjust and set a delay time using [2] and [3] or slider bar.
Return to the Top page Audio Setting Up DSP select 2 Set each item as follows. You can select whether using DSP (Digital Signal Processor) System. 1 Touch [Bypass] or [Through] of [DSP Select] in the Audio SETUP screen. Bypass There is no effect by DSP. Through There is an effect by DSP. NOTE • When the mode is set to [Bypass], DSP System cannot be adjusted. Controlling General Audio 1 Touch [Audio Control]. Fader #/Balance # Adjust the volume balance around the touched area.
Return to the Top page Audio Setting Up Equalizer Control You can adjust equalizer by selecting the optimized setting for each category. If you use , you can also adjust equalizer manually. 1 Touch [Equalizer]. Equalizer screen appears. operation Controlling EQ curves 1 Select EQ curve from [Natural], [Rock], [Pops], [Easy], [Top40], [Jazz], [Game], [iPod], and [User]. Controlling equalizer manually This setting cannot be performed when you select [iPod] in the Equalizer screen.
Return to the Top page Audio Setting Up operation Controlling EQ curves 1 Select EQ curve from [Natural], [Rock], [Pops], [Easy], [Top40], [Jazz], and [User] using [2] and [3]. Controlling SystemQ-Ex Selects items to be adjusted for tone curve setup. If you turn off this setting, only Level can be set up for tone curves. 1 Touch [ON] or [OFF] of [SystemQ-Ex]. Controlling equalizer manually 1 2 Touch [Tone] in the Equalizer screen. Set each item as follows.
Return to the Top page Audio Setting Up Zone Control NOTE You can select different sources for both front and rear positions in the vehicle. • When the rear speaker sound is switched, the audio source that is output at the AV OUTPUT terminal is also switched to the same source. 1 • When the dual zone function is set to on, the following functions are not available. Touch [Zone Control]. • Output from the subwoofer • Subwoofer Level/Bass Boost (P.
Return to the Top page Audio Setting Up Position DTA Control Listening Position You can adjust the sound effects according to your listening position. 1 Touch [Position]. You can fine-adjust your listening position. 1 2 In Position screen, touch [DTA]. 3 Set DTA as follows. Select the speaker you wish to adjust by touching speaker icon. Position screen appears.
Return to the Top page Remote Controller Operation Remote Controller This unit can be operated using the remote controller. The remote controller is supplied with the unit. 2CAUTION • Put the remote controller in a place where it will not move during braking or other operations. A dangerous situation could result, if the remote controller falls down and gets wedged under the pedals while driving. • Do not leave the battery near fire or under direct sunlight.
Return to the Top page Remote Controller Operation Functions Of The Remote Controller Buttons Switching the operation mode The functions operated from the remote controller differ depending on the position of the mode switch. AUD • DVD • TV• • NAV Direct search mode Using the remote controller, you can jump directly to the desired file, track chapter, etc. with entering the number corresponding to the content. NOTE • This operation cannot be performed for USB device and iPod.
Return to the Top page Remote Controller Operation 4 1 2 3 5 6 7 9 11 8 10 12 13 17 19 18 20 21 22 23 24 14 25 15 16 1 2 3 4 5 6 7 8 90 Key Name SRC 26 Location of Function the mode switch − Switches to the source to be played. In hands-free mode, hangs up the phone. NAV − Switches between the navigation and the source screens. MENU DVD Stops playing and memorizes the last point where the disc stopped. The last point is deleted by pressing twice. NAV Displays Main menu.
Return to the Top page Remote Controller Operation 9 Key Name VOICE 10 VIEW 11 MAP DIR Location of Function the mode switch AUD, TV Switches navigation display on/off. DVD Displays the DVD menu. Turns the playback control on or off while playing VCD. NAV Speaks the voice guidance. AUD, DVD, TV Switches the AV source to be output. NAV Switches between 2D and 3D map displays. AUD, DVD, TV Switches the display angle each time it is pressed.
Return to the Top page Troubleshooting Troubleshooting Problems And Solutions If any trouble occurs, first check the following table for possible problems. • Some functions of this unit may be disabled by some settings made on this unit. • What might seem to be a malfunction in your unit may just be the result of slight misoperation or miswiring. About settings Problem • Cannot set up the subwoofer. • Cannot set up subwoofer phase. • No output from the subwoofer. • Cannot set up the low pass filter.
Return to the Top page Troubleshooting Other Problem The Touch Sensor Tone doesn’t sound. Reason Solution The preout jack is being The Touch Sensor Tone cannot be output used. from the preout jack. Error Messages When you fail to operate the unit correctly, the cause of the failure appears as the message on the screen. Error Message Cause Protect Protective circuit has been activated because a speaker cord has shorted or it has come in contact with the car chassis.
Return to the Top page Troubleshooting Error Message Cause USB Device The connected USB device is rated Error!! a current capacity higher than the allowable limit. Authorization Error Connection to the iPod has failed. Update your iPod The iPod’s software is an older version which the unit can not support. Navigation Error. Please turn on power again later. The communication error has occurred due to severely cold temperature. Solution Check the USB device.
Return to the Top page Appendix Appendix Playable Media And Files You can play various kinds of media and files on this unit.
Return to the Top page Appendix ■■Use of DualDisc ■■Video files When playing a “DualDisc” on this unit, the surface of the disc that is not played may be scratched while the disc is inserted or ejected. Since the music CD surface does not conform to the CD standard, playback may be impossible. (A “DualDisc” is a disc with one surface containing DVD standard signals and the other surface containing music CD signals.) • MPEG1 (.mpg, .mpeg, .
Return to the Top page Appendix Connectable iPod/iPhone The following models can be connected to this unit. You can control an iPod/iPhone from this unit by connecting an iPod/iPhone (commercial product) with Dock connector using an optional accessory iPod connection cable (KCA-iP202/KCA-iP22F). The word “iPod” appearing in this manual indicates the iPod/ iPhone connected with the KCA-iP202/KCAiP22F (optional accessory).
Return to the Top page Appendix Status Bar Indicator Items Shown below is a list of indicators displayed on the status bar in the screen. Current status of this unit is displayed on the bar. Status bar ■■General ATT The attenuator is active. DUAL The dual zone function is on. TEL Indicates the connection state of the Bluetooth hands-free unit. • White: Connected • Orange: Not connected LOUD The loudness control function is on. ■■DVD/CD FO-REP Folder repeat function is on. IN A disc is inserted.
Return to the Top page Appendix ■■USB FO-REP The folder repeat function is on. VIDEO Identifies the video file. MUSIC Identifies the music file. NEWS*1 News bulletin interruption is in progress. RDS*1 Indicates the state of the Radio Data System station when the AF function is on. • White: Radio Data System is being received. • Orange: Radio Data System is not being received. PICTURE Identifies the picture file. MANUAL Seek mode is set to MANUAL. RDM The random function is on.
Return to the Top page Appendix Region Codes In The World The DVD players are given a region code according to the country or area it is marketed, as shown in the following map. 1 5 2 6 1 2 3 1 4 5 2 4 ■■DVD disc marks ALL Indicates a region number. The discs with this mark can be played with any DVD player. 8 ■■Operation regulatory marks With this DVD, some functions of this unit such as the play function may be restricted depending on the location where the DVD is playing.
Return to the Top page Appendix DVD Language Codes Code aa ab af am ar as ay az ba be bg bh bi bn bo br ca co cs cy da de dz el en eo es et eu fa fi fj fo fr fy ga gd gl gn gu ha he hi hr hu hy Language Afar Abkhazian Afrikaans Amharic Arabic Assamese Aymara Azerbaijani Bashkir Byelorussian Bulgarian Bihari Bislama Bengali, Bangla Tibetan Breton Catalan Corsican Czech Welsh Danish German Bhutani Greek English Esperanto Spanish Estonian Basque Persian Finnish Fiji Faroese French Frisian Irish Scots Gaelic
Return to the Top page Appendix Specifications ■■Monitor section Picture Size DNX7380BT, DNX7380BTM : 6.95 inches (diagonal) wide : 156.6 mm (W) x 81.6 mm (H) DNX5380BT, DNX5380, DNX5380M : 6.1 inches (diagonal) wide :136.2 mm (W) x 72 mm (H) Display System : Transparent TN LCD panel Drive System : TFT active matrix system Number of Pixels : 1,152,000 (800H x 480V x RGB) Effective Pixels : 99.
Return to the Top page Appendix ■■FM tuner section ■■Video section Frequency Range DNX7380BT, DNX7380BTM, DNX5380, DNX5380M : 87.5 MHz – 108.0 MHz (50 kHz) DNX7380BT, DNX5380BT, DNX5380 (Region code 6) : 87.5 MHz - 108.0 MHz (50 kHz) : 87.9 MHz - 107.9 MHz (200 kHz) Color System of External Video Input : NTSC/PAL External Video Input Level (RCA/mini jack) : 1 Vp-p/ 75 Ω External Audio Max Input Level (RCA/mini jack) : 2 V/ 25 kΩ Usable Sensitivity (S/N : 26 dB) DNX7380BT, DNX7380BTM : 9.3 dBf (0.
Return to the Top page Appendix Position : 0 – 1.7 m (0.02 m Step) Subwoofer level : -50 – +10 dB ■■Navigation section Receiver : High-sensitivity GPS receiver Reception Frequency : 1575.42 MHz (C/A code) Acquisition Times Cold : 38 seconds (typ) (On average for a stationary receiver with a clear view of the sky) Accuracy Position : < 10 meters, typical Velocity : 0.05 m/sec.
Return to the Top page Appendix ■■The marking of products using lasers DNX7380BTM, DNX5380M: CLASS 1 LASER PRODUCT The label is attached to the chassis/case and says that the component uses laser beams that have been classified as Class 1. It means that the unit is utilizing laser beams that are of a weaker class. There is no danger of hazardous radiation outside the unit.