
User's Manual


60
23(5$725&219(1,(1&(6
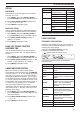
Q &KDQJLQJ0HVVDJH3OD\EDFN9ROXPH
Turning the AF control does not change the
volume for the message playback. To change the
message playback volume , access Menu No. 05
to select the playback volume level from “1” to “9”
or “oFF”.
&2167$175(&25',1*
By utilizing the digital recording capability of the
VGS-1, you can configure the VGS-1 to store the last
30 seconds of communications (transmitted signals
and received signals when the squelch opens). You
can play back the last 30 seconds of communications
to confirm what has been heard.
To activate the Constant Recording function, access
Menu No. 55 and select “on” (default). “
” appears
and the the transceiver starts recording the signal in
the background. When you press and hold [RX/4
(REC)], the VGS-1 stores the last 30 seconds
(maximum) of the reception audio signal to the flash
memory. While writing the audio signal data to the
flash memory, “WRITING” appears.
To play back the stored reception signal, press [RX/4
(REC)]. To quit, press [CLR].
Note:
X While Menu No. 55 is ON, you cannot use channel 4 (RX/4)
to record and playback a voice message. However, the
message in channel 4 is not erased. When the Constant
Recording function is turned OFF (Menu No. 55 is OFF), you
can playback the message on channel 4.
X While “ ” is not displayed, such as the VGS-1 is playing
back a message or the Voice Guide function is working, the
Constant Recording function temporarily pauses.
X When you record a new message to the VGS-1, the 30
second Constant Recording buffer is cleared.
X You cannot transmit a stored audio signal that is recorded
with the Constant Recording function.
92,&(*8,'(
When the optional VGS-1 is installed, each time
you change the transceiver mode such as VFO A/
B or Memory Recall, the transceiver automatically
announces the new mode. In addition, you can
program the front panel [PF A] or [PF B] key so
that pressing it makes the transceiver announce the
displayed information. If you are using the optional
MC-47 microphone, you can program one of the Mic
[PF] keys for this function as well.
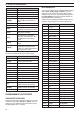
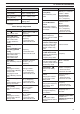
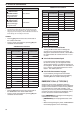
The tables below indicate the transceiver
announcements when the settings are changed.
Additionally, pressing the
[PF] key will perform
specific announcements depending on whether
VOICE1, VOICE2, or VOICE3 is selected.
VOICE1:
• When VOICE 1 auto announcement is ON (Menu
No. 09), the transceiver settings are automatically
announced any time the settings are changed.
• Pressing
[PF] will announce the currently
displayed settings.
• During a voice announcement, pressing
[PF] will
cancel the announcement.
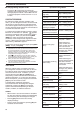
Operations using VOICE1
Operation Announcement
IF filter selection
(High Cut)
“High” + Setting value
1
IF filter selection
(Low Cut)
“Low” + Setting value
1
IF filter selection (Width) “Width” + Setting value
1
IF filter selection (Shift) “Shift” + Setting value
1
Tone frequency
selection/ when tone ID
scanning is complete
“Tone” + Setting value
1
CTCSS frequency
selection/ when CTCSS
ID scanning is complete
“CTCSS” + Setting value
1
NR1 level setup “NR1” + Setting value
1
NR2 level setup “NR2” + Setting value
1
Memory scan group
setup
“Memory scan group” +
Group No. + “Off/On”
• When selecting a
group number, the
group number and “Off/
On” is announced.
• When the settings are
changed, only “Off/On”
is announced.
Program/VFO scanning
section setup
“VFO” + “Scan” + “Group”
+ Section defined No. +
“Off/On”
• When selecting the
section defined number,
the section defined
number and “Off/On” is
announced.
• When the settings are
changed, only “Off/On”
is announced.
VOX gain level setup
“VOX gain” + Setting
value
1
Speech processor input
level setup
“Processor in” + Setting
value
1
Speech processor
output level setup
“Processor out” + Setting
value
1
Noise Blanker “1” or “2”
level setup
“Noise blanker” “1” or “2”
+ Setting value
1
Mic Gain adjustment
“Mic gain” + Setting
value
1
Keying Speed selection
“Keying Speed” + Setting
value
1
TX power adjustment
“TX power” + Setting
value
1
VOX Delay time setup
“VOX delay” + Setting
value
1
Break-in Delay time
setup
“Break-in delay” + Setting
value
1
TX Monitor volume
adjustment
“TX monitor” + Setting
value
1