MICRO HI-FI COMPONENT SYSTEM HM-381MD INSTRUCTION MANUAL KENWOOD CORPORATION COMPACT DIGITAL AUDIO TEXT B60-4129-00 00 CH (T/M/X) OC 9901
Before applying power Caution : Read this page carefully to ensure safe operation. Units are designed for operation as follows. Europe and U.K. .................................................. AC 230V only *Other countries ........... AC 110-120 / 220-240 V switchable AC voltage selection The AC voltage selector switch on the rear panel is set to the voltage that prevails in the area to which the unit is shipped.
Caution : Read this page carefully to ensure safe operation. Before applying power 3 HM-381MD (En) Contents Preparation section Before applying power ............................... 2 Safety precautions ........................................................... 2 IMPORTANT SAFEGUARDS ............................................. 4 Special features ................................................................. 6 In regard to demonstration ...............................................
IMPORTANT SAFEGUARDS Please read all of the safety and operating instructions before operating this appliance. Adhere to all warnings on the appliance and in the instruction manual. Follow all the safety and operating instructions. These safety and operating instructions should be retained for future reference. Preparation section 1. Power sources – The appliance should be connected to a power supply only of the type described in the instruction manual or as marked on the appliance.
Caution : Read this page carefully to ensure safe operation. IMPORTANT SAFEGUARDS 5 HM-381MD (En) 13.Lightning – For added protection for this appliance during a lightning storm, or when it is left unattended and unused for long periods of time, unplug it from the wall outlet and disconnect the antenna or cable system. This will prevent damage to the appliance due to lightning and power-line surges. 14.
Before applying power Special features An MD recorder is standard equipment An MD recorder with high digital sound quality is standard equipment. Digital copying from a CD is also easy. This recorder has many functions like recording and display of names for discs and titles, changing the sequence of tracks, etc.
HM-381MD (En) Unpacking Unpack the unit carefully and make sure that all accessories are put aside so they will not be lost. Examine the unit for any possibility of shipping damage. If your unit is damaged or fails to operate, notify your dealer immediately. If your unit was shipped to you directly, notify the shipping company without delay. Only the consignee (the person or company receiving the unit) can file a claim against the carrier for shipping damage.
Before applying power Handling of discs Disc handling precautions Handling Hold the discs so that you do not touch the playing surface. Discs which can be played with this unit CD (12 cm, 8 cm), and the audio part of CDV, CD-G, CD-EG and CD-EXTRA. Use discs that comply with the IEC standard, for example marking on the label surface.
Before applying power 9 HM-381MD (En) Notes on cassette tape Safety tab (accidental erasure prevention tab) To store cassette tapes After an important recording has been finished, break the safety tab, to prevent the recorded contents from being erased or recorded on accidentally. Do not store the tapes in a place which is subject to direct sunlight, or near equipment that generates heat. Keep the cassette tapes away from any magnetic field.
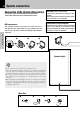
System connection Connection of the System Accessories This figure shows the method of connection between the main unit and provided accessories. Connect the components as shown in the diagram. Only plug the power cord into a power outlet once connections are completed. If operation is not possible or erroneous display appears even though all connections have been made properly, reset the microcomputer referring to “In case of difficulty”. ∏ The supplied antenna is for indoor use.
System connection 11 HM-381MD (En) FM indoor antenna The accessory antenna is for temporary indoor use only. For stable signal reception we recommend using an outdoor antenna. Remove the indoor antenna if you connect one outdoors. 1Remove the insulation from the end of the cord end. (Except for Europe, and U.K.) 2Connect it to the antenna terminal. 3Locate the position providing good reception condition. 4Fix the antenna. Europe, and U.K.
System connection Connection of Other Accessories (Commercially Available Parts) CAUTION Note on Connection Connect the components as shown in the diagram. Only plug the power cord into a power outlet once connections are completed. FM outdoor antenna Lead the 75Ω coaxial cable connected to the FM outdoor antenna into the room and connect it to the FM 75Ω terminal. Please remove the indoor antenna after an outdoor antenna has been installed.
Controls and indicators 13 HM-381MD (En) Display (The displays given in this manual are approximations only. They may differ from what actually appears on the display.) Shows character information including the input selection, volume level and disc/track title. 3 Character information display section Frequency indication, time indication, track No., program No., etc. 4 O.T.E. (ONE TOUCH EDIT) indication Appears during one-touch recording.
Controls and indicators Main unit 0 push open Preparation section 1 # 2 3 $ CD 4 4 4 5 menu set / demo 1 TAPE / preset TUNER / band % MD rec TAPE rec 1 TAPE AUX repeat ^ & * sound open / close 6 0 panel VOLUME / multi control ( 7 8 CD MD 6 6 2 direction 2 TAPE ) on/standby STOP ¡ 7 do wn up 0 9 ™ push open 0 ! Auto Reverse @ phones About the one-touch operation function This unit incorporates the one-touch operation function for the user's convenience.
Controls and indicators 15 HM-381MD (En) 1 CD cover open (0) Press to skip tracks in the forward or backward direction. ¶ During TAPE operation : Press to open the CD player cover. 2 Display 3 Tape record key (TAPE rec) Press to search in the forward or backward direction. ‹ During TUNER operation : Press to start recording. Pressing the key during recording stops it after leaving a non-recorded space (blank) of about 4 seconds.
Controls and indicators The keys on the remote control unit with the same names as on the main unit have the same function as the keys on the main unit. Remote control unit POWER 1 3 VOLUME CONTROL (%,fi) keys MUTE key TIMER 7 1 2 3 TITLE SEARCH 4 5 6 TITLE INPUT 7 8 9 TRACK EDIT +10 0 TAPE EQ QUICK MOVE TONE SOUND TAPE O.T.E. MD 4 TAPE 2 3 key MD 6 key CD 6 key Stop key (7) AUX key TUNER BAND key 5 RDS-related keys (Only some areas) TA/NEWS key 8 9 ¢ P.
Operation of remote control unit 17 HM-381MD (En) Loading batteries 1 Remove the cover. 2 Insert batteries. 3 Close the cover. ÷ Insert two R6 (“AA”-size) batteries following the polarity indications. Preparation section Operation After plugging the power cord of this unit, press the POWER ( ) key of the remote control unit to turn the system ON. When the system is turned ON, press the key of the function to be operated. Operating range (approx.
Let's put out some sound HM-381MD (En) Basic use method Bass and treble compensation Bass and treble compensation 2 2 2 3 1 Basic section Muting the sound temporarily Listening through headphones 1. Set the “on/standby” key to ON (STANDBY). on/standby When the “on/standby” key ( the unit is switched off.
Let's put out some sound 19 HM-381MD (En) Listening through headphones Bass and treble compensation Insert the headphone plug into the “phones” jack. sound LOUD EX.BASS or phones ÷ Headphones with a stereo mini plug can be connected. ÷ The sounds from all speakers are cut off. Muting the sound temporarily (Remote control unit only) Blinks MUTE RANDOM PGM REPEAT ALL S Each press switches the modes as follows. 1 “EX.BASS” (Extra Bass) lights.
Let's put out some sound HM-381MD (En) When a disc is placed into the CD player in advance, the unit will be switched on automatically by pressing the CD 6 key, and playback will start. Playback of CD 0 push open 1BIT DUAL D/A CONVEATER To fast forward and backward 1 Skipping tracks To stop playback Playback from desired track Skipping tracks Start playback/ To pause playback 2 2 Basic section 2 To stop playback Start playback/ To pause playback 1. Load a disc. Open the CD cover.
Let's put out some sound 21 HM-381MD (En) Skipping tracks Playback from desired track Select the desired track No. To skip backward To skip forward 4 1 1 2 3 4 5 6 7 8 9 +10 0 4 TAPE / preset 1 ÷ The track in the direction of the key pressed is skipped, and the selected track will be played from the beginning. ÷ When the 4 key is pressed once during playback, the track being played will be played from the beginning.
Let's put out some sound HM-381MD (En) When a disc is placed into the MD recorder in advance, the unit will be switched on automatically by pressing the MD 6 key, and playback will start. Playback of Mini Disc Start playback/To pause playback Playback from desired track Skipping tracks Skipping tracks To fast forward and backward Ejecting the disc 2 2 Basic section 2 Start playback/ To pause playback 1 To stop playback To stop playback 1. Load a Mini Disc.
Let's put out some sound 23 HM-381MD (En) Skipping tracks To pause playback To skip backward To skip forward MD 4 1 6 4 1 TAPE / preset ÷ Each press pauses and plays the MD alternately. ÷ The track in the direction of the key pressed is skipped, and the selected track will be played from the beginning. ÷ When the 4 key is pressed once during playback, the track being played will be played from the beginning. ÷ Operation also is possible with the keys 4 and ¢ of the remote control unit.
Let's put out some sound HM-381MD (En) Searching a desired track by its title (TITLE SEARCH) When the titles of the tracks recorded on a minidisc for recording are entered in advance, search by title is possible for the tracks to be played. p 1 Select the “MD” input. MD 6 2 To stop playback. 7 3 Confirm that the “PGM” indicator is not lit. PGM ÷ When the “PGM” indicatior is lit, press the PGM key on the remote control unit to switch it off. Goes off RANDOM PGM REPEAT Basic section TRACK NO.
Let's put out some sound 25 HM-381MD (En) In regard to the DOT/ CHARA. key DOT/CHARA. When a title recorded in a CD-TEXT or MD disc is too long to be displayed in the dot display, press this key to scroll the display and view the characters which has not be displayed. With an MD, this key is also used to switch the dot display modes. With a CD-TEXT or MD disc (When pressed during stop) (When pressed during playback) Scrolls the track title display. Scrolls the disc title display.
Let's put out some sound HM-381MD (En) If you load a tape in the cassette deck in advance while the power is off. pressing the TAPE key turns power on automatically and starts the tape playback. Playback of tape To wind tape at high speed Selection of reverse mode Selection of TAPE EQ. To wind tape at high speed 2 2 2 Basic section 1 Start playback To stop playback To stop playback 1. Load a cassette tape. A 1 Open the door. 2 Insert a tape and close the door.
Let's put out some sound 27 HM-381MD (En) To wind tape at high speed To fast wind in direction | 1 To stop playback To fast wind in direction \ ¡ STOP ÷ Do not take out the cassette tape until the tape transport has stopped completely. 7 Selection of reverse mode (Main unit only) ÷ Press the 7 key to stop fast winding. 1Select “TAPE RVS. ?”. VOLUME / multi control menu Selection of TAPE equalizer (TAPE EQ.
Let's put out some sound HM-381MD (En) Receiving broadcast station It is also possible to receive them by one-touch operations by storing up to 40 stations in the preset memory. When the “TUNER band” key is pressed, the unit will automatically be switched on and reception status will be reached. Collective presetting of stations Preset call Auto/manual station switching 2 Preset call 2 2 1 Basic section 2 One-by-one presetting 1. Select the broadcast band.
Let's put out some sound 29 HM-381MD (En) Collective presetting of stations (auto preset) One-by-one presetting (manual preset) Keep the ENTER key depressed (about 2 seconds). 1 Receive a broadcast. 1 Press the ENTER key during reception. ENTER 2 Select “A. MEMORY ?”. TRACK NO. VOLUME / multi control menu TOTAL AUTO TUNED FM AM PM (Proceed to step 2 while “MEMORY” is lit.) STEREO --118900 MEMORYEMOR kHz MHz BEST HIT “MEMORY” lights (for approx. 5 sec.
Let's recording HM-381MD (En) Recording on MD This unit cannot record audio in monaural mode. MD recording is possible as “digital recording”, where the digital signal of the CD is used as it is, and as “analog recording”, where the analog signal of a broadcast etc. is converted to a digital signal. 3 Stop the recording 2 4 Basic section 2 Pause the recording Stop the recording 1 2 Pause the recording 1. Make the preparations for recording.
Let's recording 31 HM-381MD (En) In regard to track numbers at the time of recording Pause the recording MD 6 Lights RANDOM PGM REPEAT TRACK NO. ALL SLEEP A.P.S. O.T.T. PROG. 1 2 TOTAL AUTO TUNED FM AM PM R·D·S EON EON TP TA PTY STEREO 0018P000 001WR54:32• kHz MHz BEST HITS O.T.E. NR T.E. TITLE SEARCH MD EDIT When a part without sound continues for 2 sec. or more during recording, the track number is automatically increased by “1” when the next sound enters.
Let's recording HM-381MD (En) Recording on TAPE Note 5 Note that this cassette deck cannot record onto Metal tapes. 3 3 4 2 2 2 Basic section Stop the recording Pause the recording 1 Stop the recording 1. Load a tape in deck. 0 push open 1 1 Open the door of deck. 2 Insert a tape. 3 Close the door. ÷ Differentiation between normal (TYPE ) and high (TYPE ) tape is set automatically. ÷ Remove tape slack before loading. 2. Select the tape transport direction.
Let's recording 33 HM-381MD (En) Pause the recording Points in CD recording CD TAPE TAPE rec Blinks REC When recording CD tracks onto a tape, if you leave the cassette deck in record-pause mode beforehand, the cassette deck recording can be started at the CD starts to be played. (Synchro recording function) 1 Put the CD player in pause mode. 2 Select the track to be recorded with the skip (w2, 3∑) keys. (The CD player pauses at the beginning of the selected track.
Playback of CD HM-381MD (En) Listening in the desired sequence (program playback) Use the following procedure to program desired tracks in a desired order. (up to 32 tracks) Select the “CD” input. 1 Let the “PGM” indicator light. Lights Press in stop mode RANDOM PGM REPEAT PGM FM AM PM ALL SLEEP A.P.S. O TOTAL AUTO TUNED S 80180000 kH MH TRACK NO. 2 Select track numbers in the order you want to play them. Selection of tracks PGM REPEAT ALL SLEEP 1 Select the track.
Playback of CD 35 HM-381MD (En) Repeated playback You can repeatedly listen to a favorite track or disc. Select the “CD” input. Setup for repeating a single track 1 Confirm that the “PGM” indicator is not lit. Confirm that this is not lit. RANDOM PGM REPEAT TRACK NO ALL SLE TOTAL AUTO (If the “PGM” indicator is lit, press the PGM key to turn it off.) 2 Select “REPEAT”. REPEAT Each press switches the repeat mode. 1 REPEAT Lights 2 REPEAT ALL 3 Off....
Playback of CD HM-381MD (En) Listening to an unexpected title sequence (random playback) As the titles each time are selected randomly, the music can be enjoyed without getting tired of it. Select the “CD” input. 1 Confirm that the “PGM” indicator is not lit. (If the “PGM” indicator is lit, press the PGM key to turn it off.) Confirm that this is not lit. RANDOM PGM REPEAT TRACK NO. ALL SLEE TOTAL AUTO PGM 2 Press the RANDOM key. Each press switches the modes as follows. 1 “RANDOM” on ...
Playback of MD 37 HM-381MD (En) Listening in the desired sequence (program playback) Use the following procedure to program desired tracks in a desired order. (up to 32 tracks) Select the “MD” input. 1 Let the “PGM” indicator light. Lights Press in stop mode RANDOM PGM REPEAT TRACK NO. FM AM PM PGM ALL SLEEP A.P.S. O.T.T. P TOTAL AUTO TUNED ---8P-01 STEREO kHz MHz BE 2 Select track numbers in the order you want to play them. Selection of tracks 1 Select the track. TRACK NO.
Playback of MD HM-381MD (En) Repeated playback You can repeatedly listen to a favorite track or disc. Select the “MD” input. Setup for repeating all tracks in a disc 1 Confirm that the “PGM” indicator is not lit. Confirm that this is not lit. RANDOM PGM REPEAT TRACK NO. (If the “PGM” indicator is lit, press the PGM key to turn it off.) 2 Select “REPEAT ALL”. ALL SLEEP A.P.S. O.T.T. PR TOTAL AUTO TUNED STEREO Each press switches the repeat mode. 1 REPEAT ALL 2 Off....
R.D.S. (Radio Data System) (Except for some areas) 39 HM-381MD (En) RDS is a system which transmits useful information (digital data) for FM broadcasts together with the broadcast signal. Tuners and receivers designed for RDS reception can extract the information from the broadcast signal for use with various functions such as automatic display of the station name.
R.D.S. (Radio Data System) (Except for some areas) HM-381MD (En) Searching for a desired program type (PTY search) By specifying the type of program (genre) you want to listen to, the tuner automatically searches for a station which is currently broadcasting a program of the specified type. ª Set the reception band to FM. Preset RDS stations with the auto preset function. 1 Select the PTY search mode. RANDOM ALL SLEEP A.P.S. O.T.T. PROG.
R.D.S. (Radio Data System) (Except for some areas) 41 HM-381MD (En) 3 Start the search. When searching for a Rock Music broadcast PTY Display while the tuner is searching. Blinks RANDOM PGM REPEAT TRACK NO. ALL SLEEP A.P.S. O.T.T. PROG. 1 2 TOTAL AUTO TUNED FM AM PM R·D·S EON EON TP TA PTY STEREO 01110250 ROCKRM••••• kHz MHz BEST HITS O.T.E. NR T.E. TITLE SEARCH MD EDIT Program type name display. When a station is received. ÷ No sound is heard while “PTY” is blinking.
R.D.S. (Radio Data System) (Except for some areas) HM-381MD (En) To be able to listen to the desired information at any time (EON) By using the EON function, which manages the information of other stations, listening to desired information like traffic information or news etc. can be reserved even when it is not being transmitted at the present.
R.D.S. (Radio Data System) (Except for some areas) 43 HM-381MD (En) 3 Receive an RDS station. Select a station where “RDS” and “EON” are lit. “RDS” and “EON” are lit. RANDOM PGM TRACK NO. FM AM PM 4 P.CALL ¢ REPEAT ALL SLEEP A.P.S. O.T.T. PROG. 1 2 TOTAL AUTO TUNED R·D·S EON NEWS TP TA PTY STEREO 02119000 TUNER•••••• kHz MHz BEST HITS O.T.E. NR T.E. TITLE SEARCH MD EDIT ÷ When “EON” does not light although an RDS station is received, that station is not transmitting EON data.
Convenient Recording Methods HM-381MD (En) Selection of the Recording Type This unit provides the following recording features in addition to normal recording. Select the appropriate method according to the purpose of recording. Note Note that this cassette deck cannot record onto Metal tapes. To record CD with a simplified method t One-touch recording (CD=MD/ CD=TAPE) One-touch recording (all-track recording) One-touch recording (single-track recording) \ One-touch recording of an entire CD on
Convenient Recording Methods 45 HM-381MD (En) One-touch recording (CD=MD /CD=TAPE) The one-touch recording can record all tracks in a CD with a one-touch operation (all-track recording). It can also record the current CD track being played from the beginning (single-track recording). 1 Make the preparations for recording. CD =MD 1 Insert a recordable disc into the MD recorder. 2 Insert disc in the CD player.
Convenient Recording Methods HM-381MD (En) Twin recording onto MD and tape (TWIN REC) (Main unit only) All the tracks on a CD can be recorded simultaneously onto an MD and tape. (All-track twin recording) The current track can be recorded from the beginning simultaneously onto an MD and tape. (singletrack twin recording) Be sure to put the MD recorder and cassette deck in stop mode. 1 Make the preparations for recording. º ¤ 1 MD : Perform steps 1. of the procedure in ”Recording on MD”.
Convenient Recording Methods 47 HM-381MD (En) Program recording (CD =MD / CD =TAPE) Desired CD tracks can be programmed in the desired sequence and recorded onto an MD or tape. Recording preparation is required.º¤ (Be sure to put the MD recorder and cassette deck in stop mode.) CD =MD Perform steps 1 and 2 of the procedure in ”Listening in the desired sequence (Program playback)”. › ○ ○ ○ ○ ○ ○ ○ ○ ○ ○ ○ 1 Program the desired sequence of CD tracks.
Convenient Recording Methods HM-381MD (En) Program recording (MD =TAPE) Desired MD tracks can be programmed in the desired sequence and recorded onto a tape. Recording preparation is required. ¤ (Be sure to put the cassette deck in stop mode.) 1 Program the desired sequence of MD tracks. MD =TAPE Perform steps1 and 2 of the procedure in ”Listening in the desired sequence (Program playback)”. ‡ ÷ When the PGM key is pressed to cancel the edited contents, the entire editing contents will be erased.
MD Edit Functions 49 HM-381MD (En) Selecting the editing function type When a commercially available Mini Disc fabricated for user recording is used, various editing operations can be applied after recording. Note that editing is not possible with commercially available prerecorded Mini Disc software designed for playback only.
MD Edit Functions HM-381MD (En) Assigning a title to a disc or track When titles are assigned to a disc and its tracks, the titles cannot only be displayed during playback but title search (searching a track by the title) is also made possible. The assigned titles can be changed or deleted with the same procedure. The MD operates on the basis of the information read from the disk into memory. Always remove the minidisc after title input or editing.
MD Edit Functions 51 HM-381MD (En) 2 Input the title. 1 Select the group of the characters used in the title. DOT/CHARA. The following types of characters, numbers, and symbols can be selected. Press the DOT/CHARA. key as often as required to display the desired group of characters. ÷ A~Z, space (1 blank character) ÷ a~z, space ÷ 0~9, symbols, space 2 Select a desired character by placing the selection cursor on it. To return To advance 4 P.
MD Edit Functions HM-381MD (En) Changing or deleting a title The MD operates on the basis of the information read from the disk into memory. Always remove the minidisc after title input or editing. 1 Perform step 1 of “Assigning a title to a disc or track”. 2 Change or delete characters one by one. 1 Move the cursor to the desired character (the character to be changed). 1 ¡ 2 Select the character group. DOT/CHARA. 3 Select overwrite or insert mode. TITLE SEARCH 4 Select the correct character.
MD Edit Functions 53 HM-381MD (En) Moving several tracks at a time (QUICK MOVE) Use the following procedure to change the current order of tracks by selecting a desired order and moving the tracks together. 20 continuous tracks within the specified range can be reordered at a time. Perform the operations in the following procedure while the display is blinking. Please execute operation in stopped condition. 1 Press the QUICK MOVE key. To abort operation, press the QUICK MOVE key again.
MD Edit Functions HM-381MD (En) 3 Select tracks numbers in the desired order. 1 Select a track number. To decrease track No. To increase track No. Moving the present track No. 7 to track No. 5 Target track No. 4 P.CALL ¢ RANDOM PGM TRACK NO. FM AM PM REPEAT ALL SLEEP A.P.S. O.T.T. PR TOTAL AUTO TUNED RANDOM STEREO 005-0007 TI T L E 7 R E A ? kHz MHz BEST PGM TRACK NO. FM AM PM REPEAT ALL SLEEP A.P.S. O.T.T. PROG.
MD Edit Functions 55 HM-381MD (En) Moving a single track (TRACK MOVE) This procedure shows you how to select and move (insert) a track to the track number you desire. The surrounding tracks are renumbered automatically. Repeating this procedure lets you arrange the tracks in the order you desire. Perform the operations in the following procedure while the display is blinking. Please execute operation in stopped condition. 1 Select “MOVE ?”. 1 Select “MOVE ?”. Each press switches the operation.
MD Edit Functions HM-381MD (En) 3 Select the moving destination track. 1 Select a track number. To decrease To increase track No. track No. 4 P.CALL ¢ 2 Set it. Destination track No. TRACK NO. FM AM PM TOTAL AUTO TUNED STEREO dISCP052 00 2 = > 0 0 5 O ? • kHz MHz BEST HITS O.T.E. NR T.E. TITLE SEARCH MD EDIT SET 4 Execute the track move operation. Application section ENTER 006 0008 CO M P L E T E E ! • PM MHz BEST HITS O.T.E 5 After editing, eject and remove the mini disc.
MD Edit Functions 57 HM-381MD (En) Dividing a track (TRACK DIVIDE) Use the following procedure to divide a track into two by inserting a track number in its middle. For example, by inserting an additional track number before the passage you are specially fond of, it is easy to skip to there when you play the disc later. Note that the track numbers of the tracks located after the divided track are automatically incremented. Always remove the minidisc after title input or editing.
MD Edit Functions HM-381MD (En) Combining two tracks (TRACK COMBINE) Use the following procedure to combine two tracks into one by deleting a track number. This operation allows to connect several tracks or a piece of music divided into several parts. After this operation, the track numbers of tracks located after the combined tracks are decreased automatically. Always remove the minidisc after title input or editing.
MD Edit Functions 59 HM-381MD (En) Erasing a single track (TRACK ERASE) or erasing all tracks on a disc (ALL ERASE) TRACK ERASE During playback, it is possible to erase only the track being played. The track numbers of the tracks after the erased track will be adjusted. Be careful in using this operation because a track cannot be recovered once it has been erased. ALL ERASE During stop, all tracks can be erased.
MD Edit Functions HM-381MD (En) The MD operates on the basis of the information read from the disk into memory. Always remove the minidisc after title input or editing. “WRITING” displayed during the minidisc ejection operation indicates that the data associated with recording or editing is being written on the disc. Do not apply vibration or shock to the unit while this message is displayed. 4 After editing, eject and remove the mini disc.
Tone adjustment 61 HM-381MD (En) Tone adjustment The lowest and highest frequency bands can be adjusted independently. (Remote control only) 1 Select the frequency band. Each press switches the operation. 1 “BASS” (low frequency) adjustment BASSTC--6• TONE 2 “TREBLE” (high frequency) adjustment TREBLE-+4• (Go to step 2 within 5 seconds.) 3 Normal mode 2 Adjust. OL E CONTR LUM % fi VO (To adjust the other frequency band, repeat steps 1 and 2 for it.
Tone adjustment HM-381MD (En) Adjusting the AUX Input Level This adjusts the input level for the external equipment (video deck etc.) connected to the AUX input terminal. Adjust so that the volume of the AUX input source sounds at an equivalent level to the CD or MD. (Main unit operation only) 1 Select AUX (external input). 1 Select AUX (external input). AUX 2 2 2 Play the connected equipment. 2 Select “AUX LEVEL ?”. VOLUME / multi control menu 2 2 set/demo 2 2 3 Adjust.
Adjust the clock before setting the timer. Clock adjustment 63 HM-381MD (En) 1 Activate the clock adjustment mode. (Hold for more than 2 sec.) ÷ The “CLOCK” display starts to blink during time setting. RANDOM PGM REPEAT TRACK NO. 2 ALL SLEEP A.P.S. O.T.T. PROG. 1 2 TOTAL AUTO TUNED FM AM PM 80181200 ADJUST+2••• 2 menu R·D·S EON EON TP TA PTY STEREO kHz MHz BEST HITS O.T.E. NR T.E. TITLE SEARCH MD EDIT ÷ The time display starts to blink. 2 Enter the figure of hour.
Adjust the clock before setting the timer. Timer operation HM-381MD (En) Operate easy To use Timer (O.T.T.) Playback of the selected input source starts at the specified time, and the unit is switched off after one hour. This timer operates only once directly after setting. Timer playback, timer recording (PROG.1, PROG.2) With each of the two timer programs, a selected source can be played (or radio broadcast can be recorded) in the previously set time period. AI timer playback (PROG.1, PROG.
Adjust the clock before setting the timer. Timer operation 65 HM-381MD (En) Setting the Program Timer Two 24-hour timer systems (PROG.1, PROG.2) (which can be used every day) are available. In each of PROG.1 and PROG.2, the timer data including the operating period and played contents can be set and selected to be activated or not as required. 1 Make preparations for the play (recording). To listen to CD To listen to MD Insert a disc. (Program playback is not possible.) Load a disc.
Adjust the clock before setting the timer. 66 Timer operation HM-381MD (En) 4 Set the ON time then the OFF time. RANDOM 1 Adjust the time. PGM REPEAT TRACK NO. The time is returned. The time is advanced. ALL SLEEP A.P.S. O.T.T. PROG. 1 2 TOTAL AUTO TUNED FM AM PM R RANDOM 80181700 ONNTIME2••• kHz MHz BEST HITS O.T.E PGM TRACK NO. STEREO REPEAT ALL SLEEP A.P.S. O.T.T. PROG. 1 2 TOTAL AUTO TUNED FM AM PM STEREO 80181800 OFFTTIME••• kHz MHz BEST HITS O.
Adjust the clock before setting the timer. Timer operation 67 HM-381MD (En) Activating or deactivating the O.T.T. or program timer execution 1 Select the timer program No. to be used. (Remote control unit only) Each press of the key switches the program numbers as follows. 1O.T.T. ......... Executes O.T.T. only. 2PROG.1 ...... Execution of program 1 only. 3PROG.2 ...... Execution of program 2 only. 4PROG.1, 2 .. Execution of programs 1 and 2. 5Off .............. Timer off.
Important Items HM-381MD (En) Maintenance Cleaning the heads and peripheral components Cleaning the head section For maintaining the best condition of the deck and for longer service life, always keep the heads (recording / playback / erase), capstan and pinch roller clean. To clean them, perform the following: 1.Open the cassette holder. 2.Using a cotton swab dipped in alcohol, clean the head (recording / playback / erase), capstan and pinch roller carefully.
Important Items 69 HM-381MD (En) Reference Caution on condensation Memory backup function Condensation (of dew) may occur inside the unit when there is a great difference in temperature between this unit and the outside. This unit may not function properly if condensation occurs. In this case, leave the unit for a few hours with the power left ON, and restart the operation after the condensation has dried up.
In case of difficulty HM-381MD (En) What seems to be a malfunction is not always so. Before calling for service, check the following table according to the symptom of your trouble. Operation to reset The microcomputer may fall into malfunction (impossibility to operate, erroneous display, etc.) when the power cord is unplugged while unit is ON or due to an external factor. In this case, execute the following procedure to reset the microcomputer and return it to normal condition.
In case of difficulty 71 HM-381MD (En) Symptoms related to MD standard Symptom Cause “DISC FULL” is displayed while the disc still ÷ More than 255 tracks (track No. 256 or more) cannot be recorded. (There may be also cases in which recording is impossible while the track number has a remaining recordable time. is less than 256.) In such a case, the REMAIN time display shows “0:00”.
In case of difficulty HM-381MD (En) MD recorder section (Displayed messages and actions to be taken against them) Displayed Message Meaning Action NO DISC ÷ No disc is placed on the tray. CAN'T COPY ÷ An attempt is made to record digital ÷ Switch to analog recording. signal from a source while its digital copy has been prohibited by SCMS. DISC FULL ÷ There is no recordable area on the disc. ÷ Use another recordable disc.
In case of difficulty 73 HM-381MD (En) CD player section Symptom Cause A CD is placed in the player but ÷ The disc is placed upside down. it cannot be played. ÷ The disc position is displaced. ÷ The disc is extremely dirty. ÷ The disc is scratched. ÷ Dew is condensed on the optics lens. Sound is not produced. ÷ The disc has not been placed. ÷ The player is not put to the play mode. ÷ The disc is extremely dirty. ÷ The disc is scratched. Sound skips. ÷ The disc is dirty. ÷ The disc is scratched.
In case of difficulty HM-381MD (En) Cassette deck Symptom Sound cannot be produced by pressing the play key. Cause ÷ The head is dirty. ÷ The tape is wound too tight due to irregular winding. ÷ A nonrecorded tape is played. No operation occurs even when an operation key is pressed. ÷ Clean the head referring to “Maintenance”. ÷ Try another tape. ˆ ÷ Play a recorded tape. § ÷ The cassette holder is not closed completely.
Specifications Caution : Read this page carefully to ensure safe operation. 75 HM-381MD (En) Main unit Speakers [[Amplifier section] Enclosure ...... Book shelf type, magnetically shielded Speaker configuration Woofer ....................................... 100 mm, cone type Tweeter ....................................... 50 mm, cone type Impedance ................................................................ 6 Ω Maximum input level ............................................. 20 W Dimensions ...
For your records Record the serial number, found on the back of the unit, in the spaces designated on the warranty card, and in the space provided below. Refer to the model and serial numbers whenever you call upon your dealer for information or service on this product.