MICRO HI-FI COMPONENT SYSTEM HM-383MD INSTRUCTION MANUAL KENWOOD CORPORATION COMPACT COMPACT DIGITAL DIGITALAUDIO AUDIO TEXT B60-4931-10 02 MA (M, I, X, T) 0011
Before applying power Before applying power Caution : Read this page carefully to ensure safe operation. Units are designed for operation as follows. Europe and U.K. ............................... AC 230 V only Australia ........................................... AC 240 V only Other countries ....................................... AC 230 V For the United Kingdom Preparation section Factory fitted moulded mains plug 1. The mains plug contains a fuse.
Before applying power 3 Special features MD Long Play modes With the long-hour recording/playback modes (LP2, LP4) based on ATRAC3 (MDLP), digital long-hour recording/playback for twice (about 160 minutes*) or 4 times (about 320 minutes*) the normal recording/ playback time is now available. (* Data using a 80-minute disc.) CD = MD high-speed dubbing This convenient feature enables simple, quick dubbing from a CD to an MD (either single track or all tracks in a CD).
Before applying power Unpacking Unpack the unit carefully and make sure that all the accessories are present. If any accessories are missing, or if the unit is damaged or fails to operate, notify your dealer immediately. If the unit was shipped to you directly, notify your shipper immediately. Kenwood recommends that you retain the original carton and packing materials in case you need to move or ship the unit in the future. Keep this manual handy for future reference.
Before applying power 5 Contents Caution : Read this pages marked carefully to ensure safe operation. Preparation section Before applying power .......................................2 Safety precautions ........................................................ 2 Special features .................................................................... 3 System connection ....................................................6 Controls and indicators .............................................9 Display ....
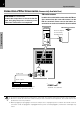
System connection System connection Connection of the System Accessories This figure shows the method of connection between the main unit and provided accessories. CAUTION Note on Connection Connect the components as shown in the diagram. Only plug the power cord into a power outlet once connections are completed. AM loop antenna The supplied antenna is for indoor use.
System connection 7 FM indoor antenna Malfunction of microcomputer If operation is not possible or erroneous display appears even though all connections have been made properly, reset the microcomputer referring to "In case of difficulty". ; The accessory antenna is for temporary indoor use only. For stable signal reception we recommend using an outdoor antenna. Remove the indoor antenna if you connect one outdoors. 1 Connect the antenna to the antenna terminal.
System connection Connection of Other Accessories (Commercially Available Parts) FM outdoor antenna CAUTION Note on Connection Lead the 75Ω coaxial cable connected to the FM outdoor antenna into the room and connect it to the FM 75Ω terminal. Please remove the indoor antenna after an outdoor antenna has been installed. Connect the components as shown in the diagram. Only plug the power cord into a power outlet once connections are completed.
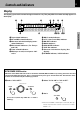
Controls and indicators System connection 9 Display The displays given in this manual are approximations only. They may differ from what actually appears on the display. 1 2 4 3 5 6 7 00000000000 # 1 Tape-related indicators 2 CD and MD-related indicators 3 Character information display/tunerrelated indicators 4 RDS-related indicators (For Europe and U.K.) 5 Timer-related indicators 6 MD/tape record/record-pause indicators @! 0 98 7 MD LP mode indicators 8 O.T.E.
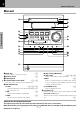
Controls System andconnection indicators Main unit 0 0 CD remote 1 2 3 ! Preparation section @ volume / multi control standby / timer TUNER CD MD TAPE FM/AM 6 6 23 AUX 4 7 ¢ # 4 stop Tuning Mode 5 Power $ % sound repeat MD rec TAPE rec 0 MD menu ^ & * set / demo 0 6 push open 7 8 9 ( 1 0 CD key ^ Press to open or close the CD tray. 2 Remote sensor 3 Display panel * 4 volume/multi control knob # !$ Normally, this is used for volume adjustment.
Controls System andconnection indicators 7 Cassette holder ™ Press to reproduce the external source component connected to the AUX (analog auxiliary input) jacks. Pressing this key while the unit is off turns it on at the same time as selecting the AUX input. !∏ Press to switch the function of the volume/multi control knob to the menu select mode. This key is also used when setting the time of the day. 9 0 MD key @ standby/timer indicator Lights up when the unit is set to the Standby mode of power.
Controls System andconnection indicators Operation of remote control unit The keys on the remote control unit with the same names as on the main unit have the same function as the keys on the main unit. 6 Basic operation keys (Common keys shared by CD and MD function for CD or MD according to the input selection.) 4 P.
Controls System andconnection indicators dh TIMER key Press to reserve the timer operation. a SLEEP key Press to set the sleep timer. 9 VOLUME keys $% Press to adjust the volume. These key are also used to adjust the tone. t Press to start recording CD onto an MD with onetouch operation. Pressing this key during CD playback records only the track being played onto MD. Pressing it during CD stop records all the CD tracks onto MD.
Basic use method Basic use method Bass and treble compensation The system is switched ON and STANDBY 1 Bass and treble compensation 2 Muting the sound temporarily Basic section Pressing the of power). 1 Listening through headphones Tone adjustment 1. Set the 3 key to ON. key when the unit is ON turns it off (Standby mode ÷ Pressing the TUNER FM/AM, CD 6, MD 6, TAPE 2 3 or AUX key also turns power on and starts playback (reception) of the corresponding input.
Basic use method Listening through headphones Insert the headphone plug into the headphone jack. 15 Tone adjustment Remote control unit only The lowest and highest frequency bands can be adjusted independently. ÷ Headphones with a stereo mini plug can be connected. ÷ The sounds from all speakers are cut off. 1 Select the frequency band. TONE Muting the sound temporarily Remote control unit only Each press switches the operation.
Playback of CD Basic use method When a disc is placed into the CD player in advance, the unit will be switched on automatically by pressing the CD 6 key, and playback will start. Start playback/ To pause playback To stop playback Skipping tracks Playback from desired track 1 2 To fast forward and backward Basic section To stop playback Skipping tracks Start playback/ To pause playback 1. Load a disc. 0 1 Press the 0 CD key. 2 Place a disc. 3 Press the 0 CD key.
Basic Playback use method of CD Start playback/ To pause playback 17 To fast forward and backward Remote control unit only TUNING DOWN TUNING UP 1 1 CD 6 Backward search ÷ Each press pauses and plays the CD alternately. To stop playback Forward search ÷ Press and hold one of the keys during playback. Normal playback resumes at the point where the key is released. Skipping tracks P.
Basic Playback use method of CD Time display on CD player Each press of the TIME DISPLAY key changes the displayed contents. Remote control unit only 1 Elapsed time of track being played 2 Remaining time of track being played ÷ PTY ÷ TIME DISPLAY TIME DISPLAY or 3 Elapsed time of entire disc ("TOTAL" lights up) (For U.K. and Europe) (For other countries) ÷ Only time information 1 and 2 can be displayed during single-track repeated playback or random playback.
Playback of Mini Disc Basic use method 19 When a disc is placed into the MD recorder in advance, the unit will be switched on automatically by pressing the MD 6 key, and playback will start. Tracks in MD are played according to the record mode used in recording (MDLP2 recording, etc.) Start playback/ To pause playback To stop playback Skipping tracks Playback from desired track 2 To fast forward and backward 1 To stop playback Start playback/ To pause playback Skipping tracks 1. Load a Mini Disc.
Playback Basicof use Mini method Disc Start playback/ To pause playback To fast forward and backward Remote control unit only TUNING DOWN MD 6 Backward search ÷ Each press pauses and plays the MD alternately. To stop playback TUNING UP 1 1 Forward search ÷ Press and hold one of the keys during playback. Normal playback resumes at the point where the key is released. Skipping tracks P.
Playback Basicof use Mini method Disc 21 Time display on MD recorder Each press of the TIME DISPLAY key changes the displayed contents. 1 Elapsed time of track being played Remote control unit only 2 Remaining time of track being played ÷ PTY ÷ TIME DISPLAY TIME DISPLAY or 3 Elapsed time of entire disc ("TOTAL" lights up) (For U.K. and Europe) (For other countries) ÷ Only time information 1 and 2 can be displayed during single-track repeated playback or random playback.
Playback of tape Playback of tape If you load a tape in the cassette deck in advance while the power is off. pressing the TAPE 2 3 key turns power on automatically and starts the tape playback. Start playback To stop playback To stop playback 2 To wind tape at high speed 1 Selection of reverse mode Basic section Start playback Selection of TAPE equalizer (TAPE EQ.) To wind tape at high speed 1. Load a cassette tape.
Playback of tape To wind tape at high speed To fast wind in direction | Selection of reverse mode To fast wind in direction \ TUNING DOWN Main unit only 1 Select "TAPE RVS. ?". TUNING UP 1 1 volume / multi control menu set / demo \ ÷ Press the STOP 7 key to stop fast winding. ÷ The same operation is also available with the 4 and ¢ keys on the main unit. \ (Press the set/demo key while the "?" mark is blinking) volume / multi control Selection of TAPE equalizer (TAPE EQ.) 2 Select.
Receiving broadcast station Playback of tape When the TUNER FM/AM key is pressed, the unit will automatically be switched on and reception status will be reached. One-by-one presetting (3)§ Tuning a nonpreset radio station (2)§ One-by-one presetting (2,4)§ Collective presetting of stations 1 3 Tuning a non-preset radio station (1)§ TUNER FM/AM 1 1. Select the tuner input. Each press of the TUNER FM/AM key switches the band as follows. FM AM Basic section 2. Preset a radio station in memory.
Receiving broadcast Playback station of tape 25 Collective presetting of stations AUTO MEMORY ............ For the U.K. and Europe AUTO PRESET .................... For other countries Main unit only 1 Receive a broadcast. TUNER FM/AM 2 Select "AUTO MEMORY" (or "AUTO PRESET"). volume / multi control menu AUTO MEMORY set / demo \ \ Channel space setting (Except for U.K.
Receiving broadcast Playback station of tape Tuning a non-preset radio station (Auto tuning, Manual tuning) Select the tuning mode according to the radio wave receiving condition. When the receiving condition is good: AUTO mode When it is poor due to weak radio waves: MANUAL mode 1 Select the AUTO or MANUAL mode. AUTO/MONO STOP 7 ÷ In MANUAL mode, FM stations are received in monaural. Each press alternates the mode.
R.D.S. (Radio Data System) (For U.K. and Europe) Receiving broadcast Playback station of tape 27 RDS is a system which transmits useful information (digital data) for FM broadcasts together with the broadcast signal. Tuners and receivers designed for RDS reception can extract the information from the broadcast signal for use with various functions such as automatic display of the station name.
R.D.S. (Radio Playback Data System) of tape Searching for a desired program type (PTY search) By specifying the type of program (genre) you want to listen to, the tuner automatically searches for a station which is currently broadcasting a program of the specified type. Set the reception band to FM. Preset RDS stations with the auto memory function. ∞ 1 Select the PTY search mode.
R.D.S. (Radio Playback Data System) of tape 3 Start the search. 29 When searching for a Rock Music broadcast Display while the tuner is searching. ÷ PTY ÷ TIME DISPLAY ROCK M Program type name display. To change to a different program type : Repeat steps 1, 2, 3. When a station is received. Goes off BBC Station name display. Basic section ÷ No sound is heard while "PTY" is blinking.
Recording on MD Recording on MD Recording in LP modes based on ATRAC3 (MDLP) is possible with all of the MD recording functions of the unit. For recording playback of a CD onto an MD, see "Convenient recording Methods". q Pause the recording Pause the recording 2 4 1 5 Basic section Stop the recording Stop the recording 1. Make the preparations for recording. 1 Open the write protect tab of the Mini Disc to make it recordable. l 2 Load the Mini Disc.
Recording on MD 31 3. Prepare the recording source. TUNER (Radio) CD : Receive a station. : Put the CD player in record-pause mode at the beginning of the track to be recorded. TAPE : Search the beginning of the section to be recorded and put the tape deck in recordpause mode there. AUX (Auxiliary input) : Make the source component ready for reception or playback. Ø 4. Set the recording mode.
Recording on MD Pause the recording Stop the recording 7 stop MD Tuning Mode 6 ÷ Press the key again to resume recording. At this time, the track number is incremented by “1”. Recording can also be started by pressing the MD rec key. ÷ Do not turn power off or apply shock or impact while "MD WRITING" is displayed. If the power cord is unplugged before "MD WRITING" disappears, the recorded or edited data will be lost. ÷ When the key is pressed during recording of CD, the CD player is also stopped.
Recording on MD 33 Stereo long play recording/playback of MD The MD recorder of this unit is compatible with stereo long play of MD (MDLP compatible equipment). The available recording modes include the stereo, monaural LP, stereo LP2 and stereo LP4 modes. It is possible to accommodate tracks recorded in different recording modes in a single MD. Be sure to select the recording mode before starting recording of MD.
Recording on TAPE Recording on MD The tape deck of the unit can record signals only on Normal (Type ) and High (Type ) tapes. It cannot record on Metal (Type ) tapes. Stop the recording 2 4 3 Basic section 5 Stop the recording 1 Start recording/ Pause the recording 1. Load a tape in deck. 0 push open 1 1 Press the area marked 0 push open to open the cassette holder. 2 Insert a tape. 3 Press the area marked 0 push open to close the cassette holder.
Recording Recording onon TAPE MD menu 35 3. Set the recording condition. \ volume / multi control Select the reverse mode. £ \ set / demo ÷ Check the tape transport direction before starting recording. If it is set to the reverse direction, only one side of tape can be recorded regardless of the reverse mode setting made here. ÷ The tape equalizer is defeated during recording. 3 Select an input source other than "TAPE" 4. Select the source to be recorded.
Recording Recording onon TAPE MD Points in CD recording When recording CD tracks onto a tape, if you leave the cassette deck in record-pause mode beforehand, the cassette deck recording can be started at the CD starts to be played. 1 Put the CD player in pause mode. 2 Select the track to be recorded with the skip (4, ¢) keys. (The CD player pauses at the beginning of the selected track.) 3 Put the cassette deck in Record-pause mode. (Press TAPE rec key twice) Basic section 4 Start playing the CD.
Various CD/MD playback features Various CD/MD playback features 37 Listening to the desired sequence (program playback) Use the following procedure to program desired tracks in a desired order. (up to 32 tracks) Select the CD or MD input. 1 Let the “PGM” indicator light. Press in stop mode Lights PGM PGM CD 2 Select track numbers in the order you want to play them. 1 Select the track. Selection of tracks 1 Program position of the track to be selected next.
Various CD/MD playback features To add a track to an existing program 1 Select the track number to be added with the numeric keys. Press in stop mode 1 2 ABC 3 DEF 4 GHI 5 JKL 6 MNO 7 PRS 8 TUV 9 WXY 0 QZ 10 Press the numeric keys as shown below.... To select track No. 23 : +10 X 2, 3 To select track No. 40 : +10 X 4, 0 To select track No. 102 : +10 X 10, 2 &( )- 2 Press the SET key. SET ÷ Track No. 100 or more can be selected only with MD. ÷ Up to 32 tracks can be programmed.
Various CD/MD playback features 39 Repeated playback You can repeatedly listen to a favorite track or disc. Select the CD or MD input. Setup for repeating a single track 1 Confirm that the "PGM" indicator is not lit. ÷ If the "PGM" indicator is lit, turn it off by pressing the PGM key in stop mode to cancel the program mode. Confirm that this is not lit. PGM CD 2 Play the track to be repeated. MD 6 CD 6 or 3 Select "ONE REPEAT". Each press switches the repeat mode.
Various CD/MD playback features Setup for repeating selected tracks 1 Program the track sequence according to steps 1 to 2 of "Listening to the desired sequence (program playback)". ‡ Each press switches the repeat mode. 1 "REPEAT" 2 Off.... Repeat deactivated 2 Select "REPEAT". REPEAT CD ÷ All selected tracks will be repeated. 3 Start playback. To stop repeated playback MD 6 CD 6 or Press the REPEAT key repeatedly until the repeat mode is switched off.
Convenient recording methods Convenient recording methods 41 This unit provides the following recording features in addition to normal recording. Select the appropriate method according to the purpose of recording. Long play recording based on ATRAC3 (MDLP) is available with any of the following MD recording functions. The tape deck of the unit can record signals only on Normal (Type ) and High (Type ) tapes. It cannot record on ) tapes.
Convenient recording methods High-speed recording (CD = MD) All tracks in a CD can be recorded onto an MD at twice the normal speed. (All-track high-speed recording) During listening to a CD, only the track being played can be recorded with a one-touch operation. (Singletrack high-speed recording) Make sure to put the MD recorder to stop mode. 1 Make preparation for recording. 1 Select the CD input. 2 Ensure that the "PGM" and "RANDOM" indicators are not lit.
Convenient recording methods 43 4 Check the current play mode of the CD player. All-track high-speed recording If it is in play mode, stop it. 7 stop Tuning Mode Single-track high-speed recording Select the desired CD track and play it. ÷ When step 5 is performed in the middle of CD playback, the current track will be recorded from the beginning. (To record other tracks, repeat steps 4 and 5 for each track) 5 Start recording. 1 Press the menu key.
Convenient recording methods One-touch edit recording (CD =MD/ CD =TAPE) Records all tracks in a CD with a simple operation. (All-track recording) Records a single CD track being played from the beginning. (Single-track recording) The tape deck of the unit can record signals only on Normal (Type ) and High (Type ) tapes. It cannot record on ) tapes. Metal (Type Make sure to put the MD recorder or cassette deck to stop mode. 1 Make preparation for recording. CD = MD CD = TAPE 1 Select the CD input.
Convenient recording methods 45 3 Check the current play mode of the CD player. All-track recording If it is in play mode, stop it. Single-track recording Select the desired CD track and play it. ÷ When step 4 is performed in the middle of CD playback, the current track will be recorded from the beginning. 7 stop (To record other tracks, repeat steps 3 and 4 for each track) Tuning Mode 4 Start recording. TAPE O.T.E. MD O.T.E.
Convenient recording methods Twin recording onto MD and tape (TWIN REC) All the tracks on a CD can be recorded simultaneously onto an MD and tape. (All-track twin recording) The current track can be recorded from the beginning simultaneously onto an MD and tape. (single-track twin recording) The tape deck of the unit can record signals only on Normal (Type ) and High (Type ) tapes. It cannot record on Metal (Type ) tapes. Make sure to put the MD recorder or cassette deck to stop mode.
Convenient recording methods 47 3 Check the current play mode of the CD player. All-track twin recording If it is in play mode, stop it. Single-track twin recording Select the desired CD track and play it. 7 stop Tuning Mode ÷ When step 4 is performed in the middle of CD playback, the current track will be recorded from the beginning. (To record other tracks, repeat steps 3 and 4 for each track) 4 Start recording. 1 Press the menu key.
Convenient recording methods Program recording (CD =MD / CD =TAPE / TWIN REC) Desired CD tracks can be programmed in the desired sequence and recorded onto an MD or tape. The tape deck of the unit can record signals only on Normal (Type ) and High (Type ) tapes. It cannot record on ) tapes. Metal (Type Make sure to put the MD recorder or cassette deck to stop mode. 1 Make preparation for recording. 1 Select the CD input. 2 Ensure that the "RANDOM" indicators are not lit.
Convenient recording methods 49 3 Program the desired sequence of CD tracks. Perform steps 1 and 2 of the procedure in "Listening to the desired sequence (Program playback)". ‡ 4 Start recording. ÷ When the PGM key is pressed to cancel the edited contents, the entire editing contents will be erased. ° ÷ Tracks programmed beyond the available MD or tape recording time will be interrupted in the middle. 1 Press the menu key.
Convenient recording methods Program recording (MD =TAPE) Desired MD tracks can be programmed in the desired sequence and recorded onto a tape. The tape deck of the unit can record signals only on Normal (Type ) and High (Type ) tapes. It cannot record on ) tapes. Metal (Type Make sure to put the MD recorder or cassette deck to stop mode. 1 Make the preparations for recording. 1 Select the MD input. 2 MD : Insert a disc into the MD recorder.
MD Edit Functions MD Edit Functions 51 When a commercially available Mini Disc fabricated for user recording is used, various editing operations can be applied after recording. ÷ Note that editing is not possible with commercially available prerecorded Mini Disc software designed for playback only. ÷ For editing, set the write protect tab of the mini disc to "Write enable" side. l Function Limitations because of the MD Standard Some of the functions are limited because of the MD standard.
MD Edit Functions Moving multiple tracks (QUICK MOVE) The following procedure shows you how to select tracks (track numbers) in the order you like and move them at once to change their order. After the tracks have been moved, their track numbers will be adjusted automatically in the new order. Before starting MD editing, be sure to cancel the program mode by pressing the PGM key in stop mode. Select the MD input and execute operation in stop mode. 1 Select " 3 Q. MOVE ?".
MD Edit Functions 3 Select the move destination track number. 1 Select the move destination. 53 ÷ É^ÉCÉgÉãǙdžÇÈÇ Ç´ÇÕÉXÉNÉçÅ[ÉãÇµÇ‹Ç ÅB Example for moving between tracks No. 4 and No. 5 P.CALL 4 ¢ 004/ 4/005 2 Set it Number of selected tracks SET 4 Execute the track reordering operation. Display after execution "EDIT NOW" = "COMPLETE !" (When editing is completed successfully) ENTER 5 After editing, eject and remove the mini disc.
MD Edit Functions Moving a single track (MOVE) The following procedure shows you how to select a single tracks (track number) and move (insert) it at the desired destination position in the series of track numbers. After the tracks have been moved, the track numbers before and after them will be adjusted automatically. By repeating this operation, you can reorder the tracks in the desired order. Before starting MD editing, be sure to cancel the program mode by pressing the PGM key in stop mode.
MD Edit Functions 3 Execute track move. 55 Display after execution "EDIT NOW" = "COMPLETE !" (When editing is completed successfully) ENTER "EDIT NOW" = "CAN' T EDIT !" (When editing is impossible) 4 After editing, eject and remove the mini disc. The MD editing is established finally at the moment the MD disc is ejected. To cancel the editing contents, perform the operation described in "To delete the edited contents (EDIT CANCEL)" before ejecting the disc.
MD Edit Functions Erasing multiple tracks (QUICK ERASE) or erasing all tracks in disc (ALL ERASE) The selected track can be erased while the player is stop mode. Be careful in using this operation because the erased tracks may not be recovered once it has been erased. Before starting MD editing, be sure to cancel the program mode by pressing the PGM key in stop mode. Select the MD input and execute operation in stop mode. 1 Select " 3 Q.ERASE ?". 1 Press the TRACK EDIT key repeatedly until "3 Q.
MD Edit Functions 3 Execute the track erasure operation. ENTER 57 Display after execution "EDIT NOW" = "COMPLETE !" (When editing is completed successfully) "EDIT NOW" = "CAN' T EDIT !" (When editing is impossible) 4 After editing, eject and remove the mini disc. The MD editing is established finally at the moment the MD disc is ejected. To cancel the editing contents, perform the operation described in "To delete the edited contents (EDIT CANCEL)" before ejecting the disc.
MD Edit Functions Erasing a single track (ERASE) The following procedure shows you how to erase a single track which is being played. After the track has been erased, the track numbers after it will be adjusted automatically. Be careful in using this operation for a track may sometimes be unable to be recovered once it has been deleted. Before starting MD editing, be sure to cancel the program mode by pressing the PGM key in stop mode. Execute operation in play or pause mode.
MD Edit Functions 59 Combining two tracks (COMBINE) The following procedure shows you how to combine two tracks into a single track. It is also possible to combine more than two tracks or a piece of music composed of several tracks into a single track. After the two tracks have been combined, the track numbers after them will be adjusted automatically. Before starting MD editing, be sure to cancel the program mode by pressing the PGM key in stop mode.
MD Edit Functions Dividing a track (DIVIDE) The following procedure shows how to divide a track by assigning a track number in the desired position in the track. For example, by inserting an additional track number before the passage you are specially fond of, it is easy to skip to there when you play the disc later. After the track number has been divided, the track numbers after it will be adjusted automatically.
MD Edit Functions 4 Execute the track divide operation. 61 Display after execution "EDIT NOW" = "COMPLETE !" (When editing is completed successfully) "EDIT NOW" = "CAN' T EDIT !" (When editing is impossible) ENTER Up to 255 track numbers can be inserted additionally by repeating 1 to 4 for each of them. ÷ There is no blank space left between the two tracks. ÷ Track division may sometimes be impossible due to the limitations of the MD standard. 5 After editing, eject and remove the mini disc.
MD Edit Functions Assigning a title to a disc or track When titles are input in discs and tracks, the titles can be displayed when they are played back. The following procedure can also be used to modify or erase input titles. Before starting MD editing, be sure to cancel the program mode by pressing the PGM key in stop mode. Select the MD input. 1 Activate the title input mode. 1 Press the TITLE INPUT key. TITLE INPUT 2 Select the title (disc title or track title) to be edited. P.
MD Edit Functions 63 2 Input the title. Characters can be selected either in the "character input key mode" or "skip key mode". To enter a character using the character input keys (Character input key mode) If "Aa" or "12" is not displayed, press any character input key. The character group which can be used in the "character input key mode" are as follows. 1 Press the CHARAC. key repeatedly to select "Aa" group : A to z, symbols plug title memos ([1], [2], [3]) "12" group : 0 to 9 and symbols.
MD Edit Functions Selecting characters using the 4 or ¢ key (Skip key mode) If "Aa" or "12" is displayed, press the 4 or ¢ key. 1 Press the CHARAC. key repeatedly to select a character group. CHARAC. The character group which can be used in the "skip key mode" are as follows.
MD Edit Functions 65 3 Executing title input 1 Press the ENTER key to set the title input. ÷ If power is switched off (to STANDBY mode) or the TITLE INPUT key is pressed to cancel setting before the ENTER key is pressed here, the inputs made until then will be cleared. ÷ When the ENTER key is pressed , the selection of the next title (disc title or track title) to be edited can be restarted. To continue editing of another title, repeat the above procedure from step 1-2.
MD Edit Functions Entering characters in Title Memo (TITLE MEMO) To save labor required for character input, up to three frequently-used sets of characters can be stored in title memo "[ 1 ]", "[ 2 ]" and "[ 3 ]". Before starting MD editing, be sure to cancel the program mode by pressing the PGM key in stop mode. Select the MD input. 1 Select the title memo number to be used as the entry destination. 1 Press the TITLE INPUT key so that "MD - EDIT" blinks.
MD Edit Functions Copying a title 67 (TITLE COPY) A set of title characters, disc title (Mini Disc name) or track title stored under a title memo number ("[ 1 ]", "[ 2 ]" or "[ 3 ]") can be copied in another title memo number, disc or track. Before starting MD editing, be sure to cancel the program mode by pressing the PGM key in stop mode. Select the MD input. 1 Select the disc title, track title or title memo you want to assign as the copy destination.
MD Edit Functions To delete the edited contents (EDIT CANCEL) The following procedure allows you to cancel the editing operations performed since the disc was inserted. Remember that the edited contents can be canceled only before the disc is ejected. Once the MD disc is ejected or subjected to another recording session after editing, the edited contents can no longer be canceled. Before starting MD editing, be sure to cancel the program mode by pressing the PGM key in stop mode.
Listening to an AUX input source Timer operation 69 1 Select AUX (external input). AUX AUX 2 Play the connected equipment. 3 Adjust the volume. volume / multi control Adjusting the AUX Input Level This adjusts the input level for the external equipment (video deck etc.) connected to the AUX input terminal. Adjust so that the volume of the AUX input source sounds at an equivalent level to the CD or MD. (Main unit operation only) Turning the knob switches the display contents. 1 Press the AUX key.
Clock adjustment Timer operation As the clock is not used to show the time of the day but is also used in timer operations, be sure to set the clock in advance. 1 Activate the clock adjustment mode. Press and hold for more than 2 sec. when the power is ON. menu ADJUST ÷ The time display starts to blink. 2 Enter the figure of hour. 1 Enter the figure of hour. Example: Adjustment to 8:07 volume / multi control To decrease hour To increase hour ADJUST 2 Set it.
Timer operation Timer operation 71 Sleep timer (SLEEP) The unit is turned OFF automatically after the specified period has elapsed. Operate easy To use Timer (O.T.T.) s Playback of the selected input source starts at the specified time, and the unit is switched off after one hour. This timer operates only once directly after setting. Timer playback, timer recording (PROG.1, PROG.2) f Playback of the selected input source or recording of the TUNER or AUX input starts at the specified time.
Timer operation Setting the O.T.T. timer Timer playback which occurs only once and only for an hour can be programmed by simply setting the start time. The timer playback reproduces the source selected at the last time the unit is turned off at the last set volume. Adjust the clock before setting the timer ∏ Connect the related equipment under reference to “System connection” 6~8 1 Select the O.T.T. timer. 1 Select "TIMER SET ?". Turning the knob switches the display contents. "T A P E R V S .
Timer operation 73 2 Set the time at which you want to start playback or reception (On time). 1 Adjust the time. volume / multi control The time is returned The time is advancexd 2 Set it. set / demo CD ÷ In other areas than the U.K. and Europe the clock shows the time of the day in the 12-hour system. ÷ The ON time can be set in steps of 5 minutes. ÷ If you make a mistake, press the menu key and restart from step 1.
Timer operation Setting an everyday timer program (PROG. TIMER) In each of PROG.1 and PROG.2, the timer data including the operating period and played contents can be set and selected to be activated or not as required. Adjust the clock before setting the timer ∏ Connect the related equipment under reference to “System connection” 6~8 1 Make preparations for the play (recording). To listen to CD To listen to MD Insert a disc. (Program playback is not possible.) Load a disc.
Timer operation 75 3 Set the ON time then the OFF time. 1 Adjust the time. volume / multi control The time is returned 2 Set it. The time is advanced set / demo 4 Make the desired reservation. ON TIME ÷ In other areas than the U.K. and Europe the clock shows the time of the day in the 12-hour system. ÷ For each of the ON time and OFF time, enter the figure of “hour” by performing steps 1 and 2 then enter the figure of “minute” in the same manner.
Timer operation 3 Select the broadcast station (only when TUNER is selected above). 3 Select the broadcast station (only when TUNER is selected above). (1) Select the preset station No. \ \ set / demo (1) Select the preset station No. (2) Set it. set / demo (2) Set it. 4 Select the recording equipment. (1) Select. \ set / demo 1 "TAPE REC" 2 "MD REC" (2) Set it. ÷ When the timer setting is completed by pressing the set/demo key, "COMPLETE !" is displayed.
Important Items Important Items 77 Maintenance Cleaning the head section Cleaning the heads and peripheral components Cotton swab Capstan Head Pinch roller Tape guides Cleaning the heads and peripheral components For maintaining the best condition of the deck and for longer service life, always keep the heads, capstan and pinch roller clean. To clean them, perform the following: 1. Open the cassette holder. 2. Using a cotton swab dipped in alcohol, clean the head, capstan and pinch roller carefully.
Important Items Disc handling precautions Never play a cracked or warped disc Handling Hold the discs so that you do not touch the playing surface. Do not attach paper or tape to either the playing side or the label side of the discs. During playback, the disc rotates at high speed in the player. Therefore, to avoid danger, never use a cracked or deformed disc or a disc repaired with tape or adhesive agent. Please do not use discs which are not round because they may cause a malfunction.
Important Items 79 Handling of MD As the MD is accommodated inside a cartridge, it can be handled without caring about dust or fingerprint. However, stained or soiled cartridge may cause malfunction. To enjoy beautiful sound for extended period of time, take care on the following points. Do not touch the disc directly. Do not touch the disc by opening the shutter with your hand. The cartridge will be damaged if it is forced open.
In case of difficulty Important Items What seems to be a malfunction is not always so. Before calling for service, check the following table according to the symptom of your trouble. Operation to reset The microcomputer may fall into malfunction (impossibility to operate, erroneous display, etc.) when the power cord is unplugged while unit is ON or due to an external factor. In this case, execute the following procedure to reset the microcomputer and return it to normal condition.
In case Important of difficulty Items 81 Symptoms related to MD standard Symptom Cause "DISC FULL" is displayed while the disc still has a remaining recordable time. ÷ More than 255 tracks (track No. 256 or more) cannot be recorded. (There may be also cases in which recording is impossible while the track number is less than 256.) In such a case, the REMAIN time display shows "0:00". The possible recording time does not increase even when a short track is erased.
In case Important of difficulty Items CD player section Symptom Remedy A CD is placed in the player but it cannot be played. ÷ Place the disc properly, with the label side facing upward. ÷ Clean the disc referring to "Disc handling precautions". k ÷ Refer to "Caution on condensation" and remove the condensation by evaporation. j Sound is not produced. ÷ Press the CD 6 key. ÷ Clean the disc referring to "Disc handling precautions". ÷ Clean the disc referring to "Disc handling precautions".
In case Important of difficulty Items 83 Displayed messages and actions to be taken against them Displayed Message Meaning BLANK DISC ÷ The MD contains no recording at all. BUFFER OVER ÷ An attempt is made to record more than 100 CD tracks within 74 minutes with high-speed recording. CAN'T EDIT ÷ An attempt is made to edit a track which is too short. DISC ERROR ÷ The contents of UTOC* is abnormal. Perform "ALL ERASE". Y If this is impossible, use another MD.
Specifications Important Items Main unit [Amplifier section] [Cassette deck section] (For U.K. and Europe) Effective output power during STEREO operation (1 kHz, 10 % T.H.D., at 6 Ω) ................ 25 W + 25 W Rated output power during STEREO operation (1 kHz, 0.7 % T.H.D., at 6 Ω) ............... 18 W + 18 W (For Australia and Malaysia) Rated output power during STEREO operation (1 kHz, 10 % T.H.D., at 6 Ω) .............. 25 W + 25 W Track 4-track, 2-channel stereo Recording system .............