MICRO HI-FI COMPONENT SYSTEM HM-V655MP INSTRUCTION MANUAL KENWOOD CORPORATION B60-5281-00 00 MA (M,X) FE 0204
Before applying power Before applying power Caution : Read this page carefully to ensure safe operation. Units are designed for operation as follows. U.S.A. and Canada ............................... AC 120 V only Australia .............................................. AC 240 V only Europe and U.K.................................... AC 230 V only For the United Kingdom China and Russia ................................. AC 220 V only Other countries ................
Before applying power Special features This unit can playback CD-DA, VIDEO CD and MP3 file. Playback capability of CD-R and CD-RW discs This unit can playback music data recorded in CD-R (Compact Disc Recordable) and CD-RW (Compact Disc Rewritable). However, some CD-R and CD-RW discs may not be playable on the CD player depending on the recording characteristics of the recording equipment (including the pick-up), properties of the CD-R or CD-RW in use, its recording condition and so on.
Before applying power Accessories Unpacking Unpack the unit carefully and make sure that all the accessories are present. Remote control unit (1) AM loop antenna (1) Batteries (R6/AA) (2) FM indoor antenna (1) Video Cord (1) AC plug adaptor (1) Use to adapt the plug on the power cord to the shape of the wall outlet. (Accessory only for regions where use is necessary.) If any accessories are missing, or if the unit is damaged or fails to operate, notify your dealer immediately.
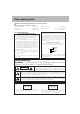
Before applying power Contents Caution : Read the pages marked carefully to ensure safe operation. Preparation section Before applying power .......................................2 Safety precautions ......................................................... 2 Special features ..................................................................... 3 Accessories ............................................................................ 4 System connection .................................................
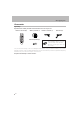
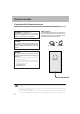
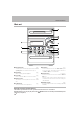
System connection System connection Connection of the System Accessories This figure shows the method of connection between the main unit and provided accessories. CAUTION Note on Connection Connect the components as shown in the diagram. Only plug the power cord into a power outlet once connections are completed. AM loop antenna The supplied antenna is for indoor use.
System connection FM indoor antenna Malfunction of microcomputer If operation is not possible or erroneous display appears even though all connections have been made properly, reset the microcomputer by referring to "In case of difficulty". E The supplied antenna is for temporary indoor use only. For stable signal reception, we recommend to use an outdoor antenna. Remove the indoor antenna if you connect to an outdoor antenna. 1 Connect the antenna to the antenna terminal.
System connection Connection of Other Accessories (Commercially Available Parts) CAUTION Note on Connection FM outdoor antenna Connect the components as shown in the diagram. Only plug the power cord into a power outlet once connections are completed. Lead the 75Ω coaxial cable connected to the FM outdoor antenna into the room and connect it to the FM 75Ω terminal. Please remove the indoor antenna after an outdoor antenna has been installed.
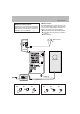
Controls and indicators System connection Display The displays given in this manual are approximations only. They may differ from what actually appears on the display. 1 2 5 4 3 6 ! 0 8 9 7 1 TAPE EQ. indicator 6 VIDEO CD player-related indicator 2 CD-DA (CD, CD-R, CD-RW), VIDEO CD 7 Character information display and MP3 file -related indicators 3 MUTE indicator, APS indicator 4 Tuner-related indicators/Numeric information display 8 Time display indicators 9 EX.
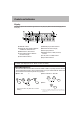
Controls System andconnection indicators Main unit 1 2 3 4 # 5 $ 6 7 % ^ 8 9 0 ! @ 1 Cassette holder ¡ To load or eject a cassette tape, press the area marked ) push open on the cassette holder to open it. 2 repeat key ⁄ & Press to select EX. BASS or LOUD sound effect. 4 Remote sensor # This window receives signals from the remote control unit. 5 volume knob Turn this knob for volume adjustment. ^ 9 Press to switch the function of the 4 and ¢ keys to menu select mode.
Controls System andconnection indicators 9 rec key ¶ 7 Tuning Mode key Press to start tape recording. Pressing this key during recording initiates record-pause after leaving a nosound blank of about 4 seconds. 0 O.T.E. key CD-DA, VIDEO CD, MP3 file and TAPE: Press to stop a disc or tape operation. (™ Press to stop recording. ¶ During VIDEO CD (with PBC ON) or MP3 file operating, press to return to the higher layer of the hierarchy.
Controls System andconnection indicators Operation of remote control unit The keys on the remote control unit with the same names as on the main unit have the same function as the keys on the main unit. 3 1 TUNING ¡ keys POWER AUX O.T.E. 7 CD TUNER/BAND SELECT TAPE REC TAPE EQ. 1 2 STOP/ RETURN 4 P.CALL ¢ keys NEXT PREV. P.CALL VOLUME MUTE 8 9 3 ENTER SLEEP SOUND REPEAT RANDOM TONE 1 2 3 PGM 4 5 6 SET 7 8 9 CLEAR 10 0 STEP 4 ° PREV.
Controls System andconnection indicators *° AUTO PBC key Press to activate or deactivate the playback control (PBC) functions of a VIDEO CD. ‚ SLOW key Use for slow-motion playback of a VIDEO CD. ‚ STEP key Press to advance the picture of a VIDEO CD frame by frame. ‚ FREEZE key ‚ Press to change the audio output channel of a VIDEO CD or MP3 files. 7 O.T.E. key ›fi Use for recording of CD-DA or VIDEO CD (with PBC OFF) onto tape with a one-touch operation.
Before playing a disc Before playing a disc Discs which can be played with this unit This unit can play CD-DA (8cm, 12cm), VCD, finalized CD-R and CD-RW, disc media of MP3 files which have been finalized or contains a closed session, and the audio part of CD-G/CD-EG (CD graphics) discs and CDV discs. ÷ This unit is suitable for the NTSC/PAL format. Discs recorded with other television format (SECAM) cannot be played back with this unit.
Before playing a disc Switching AUTO/PAL/NTSC The TV screen display and disc signal formats can be classified roughly into two types (NTSC, PAL) depending on the countries and regions. Therefore, it is necessary to set the NTSC/PAL switch of this unit according to the TV format (country or region) and disc. TV formats of major countries 1 Check the display format of your TV. 2 Press the key to scroll the current TV format display.
Basic use method Basic use method Enhancement of bass The system is switched ON or STANDBY Muting the sound temporarily Listening through headphone Tone adjustment Enhancement of bass 1. Set the Pressing the of power). key to ON. key when the unit is ON turns it off (Standby mode ÷ Pressing the TUNER/band, CD 6, TAPE 2 3 or AUX key also turns power on and starts playback (reception) of the corresponding input.
Basic use method Listening through headphone Insert the headphone plug into the headphone jack. Tone adjustment Remote control unit only The lowest and highest frequency bands can be adjusted independently. 1 Select the frequency band. ÷ Headphone with a stereo mini plug can be connected. ÷ The sound from all speakers are cut off. TONE Muting the sound temporarily Remote control unit only Each press switches the operation.
Playback of CD-DA, MP3 file and the audio of VIDEO CD Basic use method This section describes you how to play CD-DA and the audio of VIDEO CD from the first track and MP3 file of the order in which it was written. For details on VIDEO CD menu playback, see "Playback of VIDEO CD". °~e For details on selecting MP3 file playback, see "Playback of MP3 file". fl~‡ When a disc is placed into the CD player in advance, the unit will be switched on automatically by pressing the CD 6 key, and playback will start.
Playback of CD-DA, MP3 file and the audio Basicofuse VIDEO method CD Start playback/ To pause playback To fast forward and backward Remote control unit only CD SELECT Backward search ÷ Each press pauses and plays the CD alternately. To stop playback STOP/ RETURN Forward search TUNING ÷ When the 1 or ¡ key is pressed during CD playback or in pause mode, search begins. There are four search speeds. With each press of the key for the current search direction, the next higher speed is selected.
Playback of CD-DA, MP3 file and the audio Basicofuse VIDEO method CD Notes on playback of CD-R and CD-RW This unit cannot playback the following types of CD-R and CD-RW discs. ÷ This unit cannot playback a CD-R or CD-RW disc which has not been finalized. ÷ This unit cannot play other data than audio signal data, such as data signal in a CD-ROM. When a disc containing various data, for example a CD Graphic or CD-TEXT is loaded in the unit, the unit cannot play other data than the audio signal data.
Playback of TAPE Receiving broadcast station If you load a tape in the cassette deck in advance while the power is off, pressing the TAPE 2 3 key will turns the power on automatically and starts the tape playback. Selection of TAPE equalizer (TAPE EQ.) To stop playback Start playback Start playback To stop playback To wind tape at high speed To wind tape at high speed 1. Load a cassette tape. 1 Press the area marked ) push open to open the cassette holder. 2 Insert a tape.
Receiving Playback broadcastofstation TAPE To wind tape at high speed To fast wind in direction | Selection of reverse mode To fast wind in direction \ Main unit only 1 Select "TAPE RVS". TUNING \ ÷ Press the STOP 7 key to stop fast winding. ÷ The same operation is also available with the 4 and ¢ keys on the main unit. \ 2 Select. Selection of TAPE equalizer (TAPE EQ.) When playing a tape prerecorded with Noise Reduction system (such as the DOLBY NR) ON, be sure to set the "TAPE EQ.
Receiving broadcast station Receiving broadcast station When the TUNER/band key is pressed, the unit will automatically be switched on and reception status will be reached. One-by-one presetting (2,4) ∞ Tuning to a non-preset radio station (1) ∞ Collective presetting of stations One-by-one presetting (3) ∞ Tuning to a non-preset radio station (2) ∞ 1. Select the tuner input. Each press of the TUNER/band key switches the band as follows. FM AM 2. Preset a radio station in memory.
Receiving broadcast station Collective presetting of stations Main unit only 1 Select the tuner input. 2 Select "AUTO PRESET ?". \ \ ÷ A maximum of 30 stations of the band presently being received will be preset. ÷ When there are many stations and the intended station has not been preset, please also use "One-by-one presetting (Manual preset)".
Receiving broadcast station Tuning to a non-preset radio station (Auto tuning, Manual tuning) Remote control unit only Select the tuning mode according to the radio wave receiving condition. When the receiving condition is good: AUTO mode When it is poor due to weak radio waves: MANUAL mode 1 Select the AUTO or MANUAL mode. STOP/ RETURN ÷ In MANUAL mode, FM stations are received in monaural. Each press alternates the mode.
Recording on TAPE Recording on TAPE The tape deck of the unit can record signals only on Normal (Type ) tapes. It cannot record on High (Type ) and Metal (Type ) tapes. Stop the recording Stop the recording Start recording/ Pause the recording 1. Load a tape in deck. 1 Press the area marked ) push open to open the cassette holder. 2 Insert a tape. 3 Press the area marked ) push open to close the cassette holder.
Recording on TAPE 3. Set the recording condition. \ Select the reverse mode. ™ \ ÷ Check the tape transport direction before starting recording. If it is set to the reverse direction (2), only one side of tape can be recorded regardless of the reverse mode setting made here. ÷ The tape equalizer is defeated during recording. Select an input source other than "TAPE" 4. Select the source to be recorded.
Recording on TAPE Points in CD recording (CD-DA and VIDEO CD with PBC OFF only) When recording CD tracks onto a tape, if you leave the cassette deck in record-pause mode beforehand, the cassette deck recording can be started when the CD starts to be played. 1 Put the CD player in pause mode. 2 Select the track to be recorded with the skip (4, ¢) keys. (The CD player pauses at the beginning of the selected track.) 3 Put the cassette deck in Record-pause mode. (Press rec key twice) 4 Start playing the CD.
Various CD (CD-DA, VIDEO CD and MP3 file) playback features Various CD (CD-DA, VIDEO CD and MP3 file) playback features Symbols CD-DA VIDEO CD MP3 file in the text indicate the disc media that can be played back. Listening to the desired sequence (PGM ) CD-DA VIDEO CD (with PBC OFF *) MP3 file Use the following procedure to program desired tracks in a desired order. (up to 32 tracks) A non-finalized CD-R or CD-RW cannot be played back. Select the CD input. 1 Select "PGM" mode.
Various CD (CD-DA, VIDEO CD and MP3 file) playback features To clear the entire program Press in stop mode Goes off PGM The program mode is canceled when the unit is turned off, change to other selector or the programed disc is ejected. The set program is cleared entirely at this time.
Various CD (CD-DA, VIDEO CD and MP3 file) playback features Repeated playback (REPEAT) You can repeatedly listen to a favorite track or disc. A non-finalized CD-R, CD-RW and MP3 files cannot be played back. Select the CD input. Setup for repeating a single track CD-DA VIDEO CD (with PBC OFF *) MP3 file 1 Confirm that the "PGM" indicator is not lit. ÷ If the "PGM" indicator is lit, turn it off by pressing the PGM key in stop mode to cancel the program mode. Confirm that this is not lit.
Various CD (CD-DA, VIDEO CD and MP3 file) playback features Setup for repeating selected tracks CD-DA VIDEO CD (with PBC OFF *) MP3 file Each press switches the repeat mode. 1 Program the track sequence according to steps 1 to 2 of "Listening to the desired sequence (PGM)". ª 2 Select " 1" 1" one repeat 2 " " all repeat 3 Off.... Repeat deactivated ". REPEAT ÷ All selected tracks will be repeated. 3 Start playback.
Convenient recording methods Convenient recording methods This unit provides the following recording features in addition to normal recording. Select the appropriate method according to the purpose of recording. The tape deck of the unit can record signals only on Normal (Type ) tapes. It cannot record on High (Type ) and Metal (Type ) tapes. To record CD with a simplified method ( CD-DA VIDEO CD (with PBC OFF *) = TAPE) › All-track recording \ Records all tracks in a CD onto a tape.
Convenient recording methods One-touch edit recording ( CD-DA VIDEO CD (with PBC OFF *) =TAPE) Records all tracks in a CD with a simple operation. (All-track recording) Records a single CD track being played from the beginning. (Single-track recording) The tape deck of the unit can record signals only on Normal (Type ) tapes. It cannot record on High (Type ) and Metal (Type ) tapes. Be sure to put the cassette deck in stop mode. 1 Make preparation for recording.
Convenient recording methods Program recording ( CD-DA VIDEO CD (with PBC OFF *) =TAPE) Desired CD tracks can be programed in the desired sequence and recorded onto a tape. The tape deck of the unit can record signals only on Normal (Type ) tapes. It cannot record on High (Type ) and Metal (Type ) tapes. Be sure to put the cassette deck in stop mode. 1 Make preparation for recording. 1 Select the CD input. 2 Ensure that the "RDM" indicators are not lit.
Playback of MP3 file Playback of MP3 file This unit can play MP3 file. Please refer to the "Important notes on the MP3 file" below before playback of MP3 file. What is MP3? MP3 is the abbreviation of "MPEG1 Audio Layer 3". MPEG Audio is a compression specification that compresses the audio portion only. This audio compression method is used in DVD or Video CD, etc. The audio data has been compressed into about 1/10.
Playback of MP3 file Selecting MP3 file playback Selects the files to be played back directly regardless of the order in which it was written. To playback files in the order they were recorded, see "Playback of CD-DA, MP3 file and the audio of VIDEO CD". * The file search may take a while depending on the number of files and the state of the folder hierarchy. A disc medium containing a non-closed session or a non-finalized disc medium cannot be played back.
Playback of VIDEO CD Playback of VIDEO CD Playing back a VIDEO CD using the menu With a disc incorporating PBC, a menu is displayed on the TV screen so that you can select the desired tracks to be played with simple interactive operations. Before operating, set the NTSC/PAL switch of this unit according to the TV format (country or region) and disc. % Key error display If a wrong key is pressed when operating the unit, a hand mark is displayed at the top left corner of the TV monitor screen.
Playback of VIDEO CD Returning to the menu display Ending the menu playback STOP/ RETURN STOP/ RETURN Keep the STOP key depressed for more than 2 seconds. Playing VIDEO CDs with the PBC function Operation key and display examples for VIDEO CD playback Software jacket indication 3 KENWOOD operation key SELECT RETURN 4 ¢ PREV. NEXT ÷ The jacket indications depend on the software and may differ from the above examples.
Playback of VIDEO CD Slow-motion playback To play a VIDEO CD in slow motion, press the SLOW key during playback. Forward and backward search To quickly advance or reverse the playback picture of a VIDEO CD, press the 1 or ¡ key during playback. SLOW Backward search TUNING Forward search Each press of the SLOW key changes the speed. 1 Slow 1 = 2 Slow 2 = 3 Slow 3 During forward search ÷ There will be no sound during slow-motion playback.
Playback of VIDEO CD Time search function Resume function To jump to a specific location of the track being played, specify the time of that location. ÷ Stop VIDEO CD menu playback if in progress. ÷ Cancel "PGM" in advance. 1 Play the desired track and press the TIME To resume playback from the location where playback was last stopped, press the RESUME key. ÷ Cancel "PGM" in advance. 1 Stop playback. SEARCH key.
Playback of VIDEO CD Using the Digest functions INTRO SCAN Plays the first ten seconds of each track of a CD-DA or VIDEO CD in turn. DIGEST DISC The first images of nine tracks of a VIDEO CD are displayed as 9 mini screens at a time on the TV screen. DIGEST TRACK A single track of a VIDEO CD is divided into 9 parts and the first image of each part is displayed as one of 9 mini screens. Select the CD input. 1 Press the STOP key.
Playback of VIDEO CD 3 Select the desired track number. IN INTRO SCAN Pressing the numeric key for the desired track resumes normal playback mode, and playback of the selected track begins. 1 2 3 4 5 6 7 8 9 10 0 IN DIGEST DISC Pressing the numeric key for the desired track number displayed on the screen resumes normal playback mode, and playback of the selected track begins.
Listening to an AUX input source Timer operation 1 Select AUX (external input). 2 Play the connected equipment. 3 Adjust the volume. Adjusting the AUX Input Level This adjusts the input level for the external equipment (video deck etc.) connected to the AUX input terminal. Adjust so that the volume of the AUX input source sounds at an equivalent level to the CD. 1 Press the AUX key. 2 Select "INPUT \ ?". \ (Press the set/demo key while the "?" mark is blinking.
Clock adjustment Timer operation As the clock is not only used to show the time of the day but also used in timer operations, be sure to set the clock in advance. 1 Activate the Clock adjustment mode. 1 Select " TIME ADJUST ?" \ \ ÷ The time display starts to blink. (Press the set/demo key while the "?" mark is blinking.) 2 Adjust the hour. 1 Select the figure of hour. To decrease hour Example: Adjustment to 8:07 To increase hour 2 Set it. ÷ Press the set/demo key.
Timer operation Timer operation Sleep timer (SLEEP) The unit is turned OFF automatically after the specified period has elapsed. Timer playback, timer recording (PROG 1, PROG 2) u Playback of the selected input source or recording of the TUNER or AUX input starts at the specified time. AI timer playback (PROG 1, PROG 2) u When timer playback starts, the volume level increases gradually until the set volume level is reached.
Timer operation Setting the timer program (PROG. TIMER) In each of PROG 1 and PROG 2, the timer data including the operating period and played contents can be program and set to be activated or deactivated. A non-finalized CD-R or CD-RW cannot be played back. Adjust the clock before setting the timer t Connect the related equipment under reference to "System connection" 6~8 1 Make preparations for the play (recording). To listen to CD To listen to tape Insert a disc.
Timer operation 3 Select the program timer ON/OFF. 1 Select "ON ?" or "OFF ?" ÷ If OFF is selected, the key function return to ordinary mode. 2 Set it. 4 Select ONETIME or EVERYDAY execution of the programed timer. 1 Select "ONETIME" or "EVERYDAY" ÷ In the ONETIME mode, the timer is set OFF after execution. ÷ In the EVERYDAY mode, the timer is executed everyday. 2 Set it. 5 Set the ON time then the OFF time. 1 Adjust the time. The time is returned 2 Set it.
Timer operation 6 Make the desired reservation. For timer playback or AI timer playback For timer recording 1 Select the mode. 1 Select the mode. (1) Select "PLAY" or "AI PLAY". 1 "PLAY" (Timer play) 2 "REC" 3 "AI PLAY" (Timer play with gradually increasing volume) (1) Select "REC". 1 "PLAY" 2 "REC" 3 "AI PLAY" (2) Set it. (2) Set it. 2 Adjust the volume level 2 Adjust the volume level (1) Adjust. (1) Adjust. ÷ When "PLAY" is selected, the timer playback will start at the set volume level.
Timer operation 4 Select the broadcast station (only when 4 Select the broadcast station (only when TUNER is selected above). TUNER is selected above). (1) Select the preset station No. (1) Select the preset station No. (2) Set it. (2) Set it. ÷ When the timer setting is completed by pressing the set/demo key, "COMPLETE" is displayed. ÷ When the timer setting is completed by pressing the set/demo key, "COMPLETE" is displayed.
Important Items In case of difficulty Maintenance Cleaning the head section Cotton swab Capstan Head Pinch roller Tape guides Cleaning the heads and peripheral components For maintaining the best condition of the deck and for longer service life, always keep the heads, capstan and pinch roller clean. To clean them, perform the following: 1. Open the cassette holder. 2. Using a cotton swab dipped in alcohol, clean the head, capstan and pinch roller carefully.
In case Important of difficulty Items Disc handling precautions Handling Hold the disc so that you do not touch the playing surface. Never play a cracked or warped disc During playback, the disc rotates at high speed in the player. Therefore, to avoid danger, never use a cracked or deformed disc or a disc repaired with tape or adhesive agent. Please do not use discs which are not round because they may cause malfunction.
In case of difficulty In case of difficulty What seems to be a malfunction is not always so. Before calling for service, check the following table according to the symptom of your trouble. Operation to reset The microcomputer may fall into malfunction (impossibility to operate, erroneous display, etc.) when the power cord is unplugged while unit is ON or due to an external factor. In this case, execute the following procedure to reset the microcomputer and return it to normal condition.
In case of difficulty Tuner section Symptom Remedy 78 £ £ Radio stations cannot be received. ÷ Connect antennas. ÷ Select a band. ÷ Tune to the frequency of the desired station. Noise interferes. ÷ Install the outdoor antenna in an apart position from the road. ÷ Switch the suspected electric appliance OFF. ÷ Install the TV or the system at an increased distance between them. A station has been preset but it cannot be received by pressing the P.CALL key. ÷ Preset stations with tunable frequencies.
In case of difficulty Cassette deck section Symptom Remedy Q Sound cannot be produced by pressing the play key. ÷ Clean the head referring to "Maintenance". ÷ The tape is wound too tight due to irregular winding. ÷ Play a recorded tape. No operation occurs even when an operation key is pressed. ÷ Press operation keys in more than a few seconds after closing the cassette holder. ¡ ÷ Change the tape transport direction or reverse the tape insertion orientation.
Specifications In case of difficulty Main unit [Amplifier section] [General] Rated output power during STEREO operation (1 kHz, 10% T.H.D., at 6 Ω) ................. 50 W + 50 W Frequency response AUX ............................ 30 Hz~100 kHz (0 dB ~ -3dB) Power consumption ............................................ 120 W Dimensions ............................... W : 180 mm (7-1/16”) H : 255 mm (8-7/16”) D : 335 mm (13-3/16”) Weight (net) ........................................... 5.4 kg (11.