KDC-BT368U KDC-BT330U KDC-BT31 CD-RECEIVER INSTRUCTION MANUAL AMPLI-TUNER LECTEUR DE CD MODE D’EMPLOI REPRODUCTOR DE DISCOS COMPACTOS RECEPTOR DE FM/AM MANUAL DE INSTRUCCIONES For your records Record the serial number, found on the back of the unit, in the spaces designated on the warranty card, and in the space provided below. Refer to the model and serial numbers whenever you call upon your Kenwood dealer for information or service on the product.
CAUTION Use of controls or adjustments or performance of procedures other than those specified herein may result in hazardous radiation exposure. In compliance with Federal Regulations, following are reproductions of labels on, or inside the product relating to laser product safety. JVC KENWOOD Corporation 2967-3, ISHIKAWA-MACHI, HACHIOJI-SHI, TOKYO, JAPAN THIS PRODUCT COMPLIES WITH DHHS RULES 21CFR SUBCHAPTER J IN EFFECT AT DATE OF MANUFACTURE.
IC (Industry Canada) Notice CAUTION This device complies with Industry Canada licence-exempt RSS standard(s). Operation is subject to the following two conditions: (1) This device may not cause interference, and (2) this device must accept any interference, including interference that may cause undesired operation of the device. The term “IC: ” before the certification/ registration number only signifies that the Industry Canada technical specification were met.
SOFTWARE LICENSE AGREEMENT The software embedded in the Product (hereinafter the "Licensed Software") provided by Licensor is copyrighted to or sublicensable by the Licensor, and this Agreement provides for the terms and conditions which Users shall follow in order to use the Licensed Software. The User shall use the Licensed Software by agreeing with the terms of this Software License Agreement.
Article 8 Termination In case the User falls under any of the events described in the following items, the Licensor may immediately terminate this Agreement or claim that the User compensates for the damage incurred by the Licensor due to such event: (1) when the User violated any provision of this Agreement; or (2) when a petition has been filed against the User for an attachment, provisional attachment, provisional disposition or any other compulsory execution.
CONTENTS BEFORE USE BEFORE USE 2 BASICS 3 GETTING STARTED 4 1 Select the display language and cancel the demonstration 2 Set the clock and date 3 Set the initial settings RADIO 5 CD/USB/iPod/ANDROID 7 AUX 9 Pandora® 10 iHeartRadio® 11 BLUETOOTH® 12 AUDIO SETTINGS 19 DISPLAY SETTINGS 21 TROUBLESHOOTING 22 REFERENCES 25 Maintenance More information SPECIFICATIONS 27 INSTALLATION/ CONNECTION 28 2 IMPORTANT • To ensure proper use, please read through this manual before using t
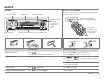
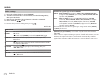
BASICS Faceplate Volume knob Remote control (RC-406) Loading slot This unit can be remotely controlled with an optionally purchased remote control. Display window Remote sensor (Do not expose to bright sunlight.) Lights up when Bluetooth connection is established. ( 12) Detach button Attach Pull out the insulation sheet when using for the first time. Flashes when the unit enters searching status.
GETTING STARTED To set the date 7 Turn the volume knob to select [DATE FORMAT], then press the knob. 8 Turn the volume knob to select [DD/MM/YY] or [MM/DD/YY], then press the knob. 9 Turn the volume knob to select [DATE SET], then press the knob. 10 Turn the volume knob to make the settings, then press the knob.
GETTING STARTED RADIO SYSTEM KEY BEEP ON: Activates the keypress tone. ; OFF: Deactivates. SOURCE SELECT PANDORA SRC ON: Enables PANDORA in source selection. ; OFF: Disables. ( 10) IHEART SRC ON: Enables IHEARTRADIO in source selection. ; OFF: Disables. ( 11) BUILT-IN AUX ON: Enables AUX in source selection. ; OFF: Disables. ( 9) CD READ 1: Automatically distinguishes between audio file disc and music CD. ; 2: Forces to play as a music CD. No sound can be heard if an audio file disc is played.
RADIO Other settings 1 Press the volume knob to enter [FUNCTION]. 2 Turn the volume knob to select an item (see the following table), then press the knob. 3 Repeat step 2 until the desired item is selected or activated. 4 Press and hold to exit. To return to the previous setting item, press . Default: XX TUNER SETTING AUTO MEMORY YES: Automatically starts memorizing 6 stations with good reception. ; NO: Cancels. • Selectable only if [NORMAL] is selected for [PRESET TYPE].
CD/USB/iPod/ANDROID Start playback The source changes automatically and playback starts. CD M Eject disc Label side USB input terminal USB CA-U1EX (max.: 500 mA) (optional accessory) To On the faceplate On the remote control Playback/pause Press Press Reverse/Fast-forward*4 Press and hold S / T. Press and hold S / Select a track/file Press S / T. Press S / Select a folder*5 Press J / K. Press Repeat play*6 Press Random play*6 Micro USB 2.0 cable*2 (commercially available) . . / .
CD/USB/iPod/ANDROID Select control mode While in iPod source, press 5 repeatedly. MODE ON : Control iPod using the iPod itself. However, you can still play/ pause, file skip, fast-forward or reverse from this unit. MODE OFF : Control iPod from this unit. 3 Turn the volume knob to select a file, then press the knob. Quick Search (applicable only for CD, USB and ANDROID source) If you have many files, you can search through them quickly. Turn the volume knob quickly to browse through the list quickly.
AUX CD/USB/iPod/ANDROID Preparation: Select [ON] for [BUILT-IN AUX] in [SOURCE SELECT]. ( 5) Direct Music Search (using the remote control) 1 Press DIRECT. 2 Press the number buttons to enter a track/file number. 3 Press to search for music. Start listening 1 Connect a portable audio player (commercially available). or DIRECT. • To cancel, press • Not available if Random Play is selected. • Not applicable for iPod and ANDROID source.
Pandora® Preparation: Install the latest version of the Pandora application on your device (iPhone/iPod touch), then create an account and log in to Pandora. • Select [ON] for [PANDORA SRC] in [SOURCE SELECT]. ( 5) Create and store a new station 1 Press . 2 Turn the volume knob to select [NEW STATION], then press the knob. 3 Turn the volume knob to select [FROM TRACK] or [FROM ARTIST], then press the knob. A new station is created based on the current song or artist.
iHeartRadio® Pandora® Delete a station While listening to PANDORA... 1 Press . 2 Turn the volume knob to select [STATION DEL], then press the knob. 3 Turn the volume knob to select [SORT BY A-Z] or [SORT BY DATE], then press the knob. 4 Turn the volume knob to select the desired station to delete, then press the knob. 5 Turn the volume knob to select [YES], then press the knob. 6 Press and hold to exit.
BLUETOOTH® iHeartRadio® BLUETOOTH — Connection Search and store a station 1 Press . 2 Turn the volume knob to select a category, then press the knob. 3 Turn the volume knob (or press J / K on the remote control) to select the desired station. 4 Press the volume knob (or press on the remote control) to confirm. When a city list appears, you can search cities in alphabetical order by turning the volume knob quickly.
BLUETOOTH® Once pairing is completed, Bluetooth connection is established automatically. “BT1” and/ or “BT2” indicator on the faceplate lights up. • This unit supports Secure Simple Pairing (SSP). • Up to 10 devices can be registered (paired) in total. • Once the pairing is completed, the Bluetooth device will remain registered in the unit even if you reset the unit. To delete the paired device, 16, [DEVICE DELETE].
BLUETOOTH® To On the faceplate On the remote control First incoming call... Answer a call Press or the volume knob or one of the number buttons (1 to 6). Reject a call Press End a call Press Press . . Press . . Press . Press . Improve the voice quality While talking on the phone... 1 Press the volume knob to enter [FUNCTION]. 2 Turn the volume knob to select an item (see the following table), then press the knob. 3 Repeat step 2 until the desired item is selected or activated.
BLUETOOTH® Default: XX PHONE BOOK SETTINGS AUTO ANSWER 1 to 30: The unit answers incoming call automatically in the selected time (in seconds). ; OFF: Cancels. BATT/SIGNAL* AUTO: Shows the strength of the battery and signal when the unit detects a Bluetooth device and the Bluetooth device is connected. ; OFF: Cancels. Clock time is shown. * * * Functionality depends on the type of the phone used. Make a call You can make a call from the call history, phonebook, or dialing the number.
BLUETOOTH® Make a call using voice recognition 1 Press and hold Other settings to activate the voice recognition of the connected phone. 2 Speak the name of the contact you want to call or the voice command to control the phone functions. 1 Press the volume knob to enter [FUNCTION]. 2 Turn the volume knob to select an item (see the following table), then • Supported Voice Recognition features vary for each phone. Refer to the instruction manual of the connected phone for details.
BLUETOOTH® BLUETOOTH — Audio Bluetooth test mode You can check the connectivity of the supported profile between the Bluetooth device and the unit. • Make sure there is no Bluetooth device paired. 1 Press and hold . “PLEASE PAIR YOUR PHONE PIN 0000” appears. 2 Search and select this unit model name (“KDC-BT3 U”/“KDC-BT3 ”) on the Bluetooth device. 3 Operate the Bluetooth device to confirm pairing. “TESTING” flashes on the display. ** * The connectivity result (OK or NG) appears after the test.
BLUETOOTH® Listen to iPhone/iPod via Bluetooth Settings to use an App The App is designed to control the KENWOOD car receiver’s operations from the iPhone/iPod (via Bluetooth or via USB input terminal) or Android smartphone (via Bluetooth). • For more information, visit . 1 Press the volume knob to enter [FUNCTION]. 2 Turn the volume knob to select an item (see the following table), then press the knob. 3 Repeat step 2 until the desired item is selected or activated.
AUDIO SETTINGS While listening to any source... PRESET EQ NATURAL/ROCK/POPS/EASY/TOP40/JAZZ/POWERFUL/USER: Selects a preset equalizer suitable to the music genre. (Select [USER] to use the settings made in [MANUAL EQ].) BASS BOOST LEVEL1/LEVEL2/LEVEL3/LEVEL4/LEVEL5: Selects your preferred bass boost level. ; OFF: Cancels. LOUDNESS LEVEL1/LEVEL2: Selects your preferred low and high frequencies boost to produce a well-balanced sound at a low volume level. ; OFF: Cancels.
AUDIO SETTINGS SPEAKER SIZE FRONT The frequency and slope settings are automatically set for the crossover of the selected speaker. SIZE TWEETER REAR 3.5”/4”/4.75”/5”/6.5”/6.75”/7”/4×6/5×7/6×8/6×9/ 7×10: Selects according to the connected speaker size for optimum performance. REAR HPF R - HPF SLOPE SUBWOOFER LPF 1KHZ/1.6KHZ/2.5KHZ/4KHZ/5KHZ/6.3KHZ/8KHZ/ 10KHZ/12.5KHZ: Adjusts the crossover frequency for the tweeter speaker. GAIN LEFT –8 to 0: Adjusts the output volume of the left tweeter.
DISPLAY SETTINGS AUDIO SETTINGS CAR SETTINGS Identify your car type and rear speaker location in order to make the adjustment for [DTA SETTINGS]. CAR TYPE COMPACT/FULL SIZE CAR/WAGON/MINIVAN/SUV/MINIVAN(LONG): Selects the type of vehicle. ; OFF: Not compensating. R-SP LOCATION Selects the location of the rear speakers in your vehicle to calculate the furthest distance from the listening position selected (reference point).
TROUBLESHOOTING DISPLAY SETTINGS Default: XX Symptom DISPLAY COLOR SELECT Sound cannot be heard. • Adjust the volume to the optimum level. • Check the cords and connections. “MISWIRING CHECK WIRING THEN PWR ON” appears. Turn the power off, then check to be sure the terminals of the speaker wires are insulated properly. Turn the power on again. “PROTECTING SEND SERVICE” appears. Send the unit to the nearest service center. • Sound cannot be heard. • The unit does not turn on.
TROUBLESHOOTING Correct characters are not displayed (e.g. album name). • This unit can only display uppercase letters, numbers, and a limited number of symbols. • Depending on the display language you have selected ( 5), some characters may not be displayed correctly. “NA FILE” Make sure the disc contains supported audio files. ( 25) “NO DISC” Insert a playable disc into the loading slot. “TOC ERROR” Make sure the disc is clean and inserted properly. “PLEASE EJECT” Reset the unit.
TROUBLESHOOTING Bluetooth® iHeartRadio station cannot be selected. If “Explicit Content” in [Account Settings] is checked in the web version of iHeartRADIO, custom stations become unavailable. “NOT CONNECTED” Link to the application is impossible. No Bluetooth device is detected. • Search from the Bluetooth device again. • Reset the unit. ( 3) Bluetooth pairing cannot be made. • Make sure you have entered the same PIN code to both the unit and Bluetooth device.
REFERENCES Playable files • Playable audio file: MP3 (.mp3), WMA (.wma), AAC (.aac) • Playable disc media: CD-R/CD-RW/CD-ROM • Playable disc file format: ISO 9660 Level 1/2, Joliet, Long file name. • Playable USB device file system: FAT12, FAT16, FAT32 Even when audio files comply with the standards listed above, playback may be impossible depending on the types or conditions of media or device. The AAC (.m4a) file in a USB device or a CD encoded by iTunes cannot be played on this unit.
REFERENCES About Android device • This unit supports Android OS 4.1 and above. • Some Android devices (with OS 4.1 and above) may not fully support Android Open Accessory (AOA) 2.0. • If the Android device supports both mass storage class device and AOA 2.0, this unit always playback via AOA 2.0 as priority. About Pandora • Pandora is only available in certain countries. For more information, visit .
SPECIFICATIONS USB Standard USB 1.1, USB 2.0 Full Speed Usable Sensitivity (S/N = 26 dB) 8.2 dBf (0.71 μV/75 Ω) File System FAT12/16/32 Quieting Sensitivity (DIN S/N = 46 dB) 17.2 dBf (2.0 μV/75 Ω) Maximum Supply Current DC 5 V MP3 Decode Compliant with MPEG-1/2 Audio Layer-3 Frequency Response (±3 dB) 30 Hz — 15 kHz WMA Decode Compliant with Windows Media Audio Signal-to-Noise Ratio (MONO) 64 dB AAC Decode AAC-LC “.
INSTALLATION/CONNECTION SPECIFICATIONS Full Bandwidth Power 22 W × 4 (at less than 1 % THD) Speaker Impedance 4Ω—8Ω Tone Action Band 1: Band 2: Band 3: Band 4: Band 5: Band 6: Band 7: Band 8: Band 9: Band 10: Band 11: Band 12: Band 13: General Audio 50 W × 4 62.5 Hz ±9 dB 100 Hz ±9 dB 160 Hz ±9 dB 250 Hz ±9 dB 400 Hz ±9 dB 630 Hz ±9 dB 1 kHz ±9 dB 1.6 kHz ±9 dB 2.5 kHz ±9 dB 4 kHz ±9 dB 6.
INSTALLATION/CONNECTION Part list for installation Installing the unit (in-dash mounting) Do the required wiring. ( 30) (A) Faceplate Hook on the top side Orientate the trim plate as illustrated before fitting. Dashboard of your car (B) Trim plate Bend the appropriate tabs to hold the mounting sleeve firmly in place. (C) Mounting sleeve When installing without the mounting sleeve 1 Remove the mounting sleeve and trim plate from the unit.
INSTALLATION/CONNECTION Wiring connection IMPORTANT : We recommend installing the unit with a commercially available custom wiring harness specific for your car and leave this job to professionals for your safety. Consult your car audio dealer. Rear/front/subwoofer output Antenna terminal Fuse (10 A) When connecting to an external amplifier, connect its ground wire to the car’s chassis to avoid damaging the unit.
• “Made for iPod,” and “Made for iPhone” mean that an electronic accessory has been designed to connect specifically to iPod, or iPhone, respectively, and has been certified by the developer to meet Apple performance standards. Apple is not responsible for the operation of this device or its compliance with safety and regulatory standards. Please note that the use of this accessory with iPod or iPhone may affect wireless performance.