KDC-X598 KDC-BT558U KMR-D558BT CD-RECEIVER INSTRUCTION MANUAL AMPLI-TUNER LECTEUR DE CD MODE D’EMPLOI REPRODUCTOR DE DISCOS COMPACTOS RECEPTOR DE FM/AM MANUAL DE INSTRUCCIONES Take the time to read through this instruction manual. Familiarity with installation and operation procedures will help you obtain the best performance from your new CD-receiver.
CONTENTS BEFORE USE BEFORE USE 2 BASICS 3 GETTING STARTED 4 RADIO 5 CD / USB / iPod 6 AUX 8 Pandora® 8 iHeartRadio® 9 SiriusXM® Radio 10 BLUETOOTH® 12 AUDIO SETTINGS 17 DISPLAY SETTINGS 18 MORE INFORMATION 18 TROUBLESHOOTING 19 Warning Do not operate any function that takes your attention away from safe driving. Caution Volume setting: • Adjust the volume so that you can hear sounds outside the car to prevent accidents.
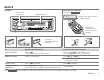
BASICS Faceplate Remote control (RC-406) Volume knob (turn/press) (except for KMR-D558BT ) Display window Remote sensor (Do not expose to bright sunlight.) Pull out the insulation sheet when using for the first time. Detach button Attach Detach How to replace the battery How to reset Your preset adjustments will also be erased. To Do this (on the faceplate) Do this (on the remote control) Turn on the power Press B SRC. • Press and hold to turn off the power.
GETTING STARTED 3 Set the initial settings 1 Press B SRC to enter STANDBY. 2 Press the volume knob to enter [FUNCTION]. 3 Turn the volume knob to make a selection (see the following table), then press the 1 Cancel the demonstration When you turn on the power (or after you reset the unit), the display shows: “CANCEL DEMO” “PRESS” “VOLUME KNOB” 1 Press the volume knob. [YES] is selected for the initial setup. 2 Press the volume knob again. “DEMO OFF” appears.
RADIO Other settings 1 Press the volume knob to enter [FUNCTION]. 2 Turn the volume knob to make a selection (see the following table), then press the knob. 3 Press and hold to exit. To return to the previous setting item or hierarchy, press Search for a station 1 Press B SRC to select TUNER. 2 Press J BAND repeatedly (or press *AM– / #FM+ on . Default: XX TUNER SETTING AUTO MEMORY YES: Automatically starts memorizing 6 stations with good reception. ; NO: Cancels.
CD / USB / iPod Start playback The source changes automatically and playback starts. CD Label side M Eject disc USB USB input terminal CA-U1EX (max.: 500 mA) (optional accessory) To Do this Pause or resume playback Press 6 IW (or press ENT IW on RC-406). Select a track/file Press S / T (or press S / T (+) on RC-406). Select a folder *3 Press J / K (or press *AM– / #FM+ on RC-406). Reverse/ Fast-forward Press and hold S / T (or press and hold S / T (+) on RC-406).
CD / USB / iPod Select a track/file from a list For iPod: Applicable only when [MODE OFF] is selected. ( 6) 1 Press . 2 Turn the volume knob to make a selection, then press the knob. • MP3/WMA/WAV file: Select the desired folder, then a file. • iPod or KME Light/ KMC file: Select the desired file from the list (PLAYLISTS, ARTISTS, ALBUMS, SONGS, PODCASTS*, GENRES, COMPOSERS*). * Only for iPod. • To return to the root folder (or first file), press number button 5 iPod.
AUX Pandora® Preparation: Select [ON] for [BUILT-IN AUX]. ( 4) Preparation: Install the latest version of the Pandora application onto your device (iPhone/ iPod touch), then create an account and log in to Pandora. • Select [ON] for [PANDORA SRC]. ( 4) To Do this Pause or resume playback Press 6 IW (or press ENT IW on RC-406). Start listening 1 Open the Pandora application on Skip a track Start listening 1 Connect a portable audio player (commercially available).
iHeartRadio® Preparation: Install the latest version of iHeart Link for KENWOOD application onto your device (iPhone/ iPod touch), then create an account and log in to iHeartRadio • Select [ON] for [IHEART SRC]. ( 4) Start listening 1 Open the iHeart Link application on your device. 2 Connect your device to the USB input terminal. USB input terminal KCA-iP102 (optional accessory) or accessory cable of the iPod/iPhone* 3 Press B SRC to select IHEARTRADIO. Broadcast starts automatically.
SiriusXM® Radio Preparation: 1 Connect the optional SiriusXM Vehicle Tuner (commercially available). Antenna Expansion port on the rear panel SiriusXM Vehicle Tuner 2 Activate the subscription through www.siriusxm.com/ activatenow or call 1-866-635-2349. The Radio ID is required to activate the SiriusXM Vehicle Tuner. The Radio ID is located on the label of the SiriusXM Vehicle Tuner and can also be shown on the unit’s display window when you select “Channel 0” after SiriusXM Vehicle Tuner is connected.
SiriusXM® Radio Default: XX Smart Favorites User stored channels (1 to 6) of the current band are recognized as Smart Favorite channels. SiriusXM Vehicle Tuner automatically buffered their broadcasting content in the background. • Smart Favorite channel is available with SXV200 or later SiriusXM tuner models. When you select a Smart Favorite channel, you can rewind and replay up to 30 minutes of any of the missed news, talk, sports or music content.
BLUETOOTH® You can operate Bluetooth devices using this unit. Connect the microphone MIC (Microphone input terminal) Microphone (supplied) Rear panel Adjust the microphone angle Secure using cord clamps (not supplied) if necessary. If you turn off the unit or detach the control panel during a phone call conversation, the Bluetooth connection is disconnected. Continue the conversation using your mobile phone.
BLUETOOTH® Bluetooth mobile phone Improve the sound quality during a call To Do this Receive a call Press or the volume knob or one of the number buttons (1 to 6) (or press on RC-406). • All the buttons and display flash when there is an incoming call. During a call, the buttons and display illuminate according to the settings made for [DISPLAY]. ( 18) • When [AUTO ANSWER] is set to the selected time, the unit answers incoming call automatically.
BLUETOOTH® Bluetooth mode operations 1 Press to enter Bluetooth mode. 2 Turn the volume knob to make a selection (see the following table), then press the knob. 3 Press and hold to exit. To return to the previous setting item or hierarchy, press CALL HISTORY PHONE BOOK NUMBER DIAL . 1 Press the volume knob to select a name or a phone number. • “INCOMING”, “OUTGOING”, or “MISSED” is shown on the lower part of the display to indicate the previous call status.
BLUETOOTH® 3 Turn the volume knob quickly to enter alphabet search mode. The first menu (ABCDEFGHIJK) appears. To go to the other menu (LMNOPQRSTUV or WXYZ1 ), press J / K. 4 Turn the volume knob or press S / T to select the desired first letter, then press the knob. • To search with numbers, select “1”. • To search with symbols, select “ ”. 5 Turn the volume knob to select a name, then press the knob. 6 Turn the volume knob to select a phone number, then press the knob to call.
BLUETOOTH® TRANSFER PB* “DL PB ” appear and transfer the phonebook of the connected phone to this unit manually. * Selectable only when the connected phone supports OPP. PIN CODE EDIT (0000) Changes the PIN code (up to 6 digits). 1 Turn the volume knob to select a number. 2 Press S / T to move the entry position. Repeat steps 1 and 2 until you finish entering the PIN code. 3 Press the volume knob to confirm. RECONNECT ON: The unit automatically reconnect when the Bluetooth device is within range.
AUDIO SETTINGS While listening to any source... 1 Press the volume knob to enter [FUNCTION]. 2 Turn the volume knob to select [AUDIO CONTROL], then press the knob. 3 Turn the volume knob to make a selection (see the following table), then press the knob. Repeat step 3 until the desired item is selected or activated. 4 Press and hold to exit. (or using RC-406) 1 Press AUD to enter [AUDIO CONTROL]. 2 Press J / K to make a selection, then press ENT IW.
DISPLAY SETTINGS MORE INFORMATION 1 Press the volume knob to enter [FUNCTION]. 2 Turn the volume knob to select [DISPLAY], then General press the knob. 3 Turn the volume knob to make a selection (see the following table), then press the knob. Repeat step 3 until the desired item is selected or activated. 4 Press and hold to exit. To return to the previous setting item or hierarchy, press .
MORE INFORMATION About iHeartRadio • iHeartRadio® is a third-party service, therefore the specifications are subject to change without prior notice. Accordingly, compatibility may be impaired or some or all of the services may become unavailable. • Some iHeartRadio® functionality cannot be operated from this unit. About Bluetooth • Depending on the Bluetooth version of the device, some Bluetooth devices may not be able to connect to this unit. • This unit may not work with some Bluetooth devices.
TROUBLESHOOTING Remedy “READ ERROR” appears. Copy the files and folders onto the USB device again. If this does not solve the problem, reset the USB device or use another USB device. “NO DEVICE” appears. Connect a USB device, and change the source to USB again. “COPY PRO” appears. A copy-protected file is played. “NA DEVICE” appears. Connect a supported USB device, and check the connections. “NO MUSIC” appears. Connect a USB device that contains playable audio files. • Reconnect the iPod.
TROUBLESHOOTING Bluetooth® Remedy “CH LOCKED” The selected channel is locked. Enter the correct pass code to unlock. ( 11) “CHAN UNSUB” The selected channel is unsubscribed. Call 1-866-635-2349 or 1-877-438-9677 to subscribe. “CH UNAVAIL” The selected channel is unavailable. “CHECK ANTENNA” Check the antenna and its connection are in good condition. “CHECK TUNER” Make sure the SiriusXM Vehicle Tuner is connected to the unit. “NO SIGNAL” Make sure the antenna is mounted outside the vehicle.
INSTALLATION / CONNECTION Warning • The unit can only be used with a 12 V DC power supply, negative ground. • Disconnect the battery’s negative terminal before wiring and mounting. • Do not connect Battery wire (yellow) and Ignition wire (red) to the car chassis or Ground wire (black) to prevent a short circuit. • Insulate unconnected wires with vinyl tape to prevent a short circuit. • Be sure to ground this unit to the car’s chassis again after installation.
Wiring connection Part list for installation Rear/ front/ subwoofer output MIC (Microphone input terminal) ( 12) Antenna terminal (A) Faceplate Fuse (10 A) To the optional SiriusXM Vehicle Tuner (commercially available) ( 10) (B) Trim plate If no connections are made, do not let the wire come out from the tab.
SPECIFICATIONS USB Standard USB 1.1, USB 2.0 (Full speed) Usable Sensitivity (S/N = 26 dB) 8.2 dBf (0.71 μV/75 Ω) File System FAT12/ 16/ 32 Quieting Sensitivity (DIN S/N = 46 dB) 17.2 dBf (2.0 μV/75 Ω) Maximum Supply Current DC 5 V MP3 Decode Compliant with MPEG-1/2 Audio Layer-3 Frequency Response (±3 dB) 30 Hz — 15 kHz WMA Decode Compliant with Windows Media Audio Signal-to-Noise Ratio (MONO) 64 dB WAV Decode Linear-PCM Stereo Separation (1 kHz) 40 dB Version Bluetooth Ver.2.
General Auxiliary SPECIFICATIONS Frequency Response (±3 dB) 20 Hz — 20 kHz Input Maximum Voltage 1 200 mV Input Impedance 30 kΩ Operating Voltage 14.4 V (10.5 V — 16 V allowable) Maximum Current Consumption 10 A Operational Temperature Range 0°C — +40°C Installation Size (W × H × D) 182 mm × 53 mm × 159 mm (7-3/16" × 2-1/8" × 6-1/4") Weight 1.2 kg (2.65 lbs) Subject to change without notice.
CAUTION Use of controls or adjustments or performance of procedures other than those specified herein may result in hazardous radiation exposure. In compliance with Federal Regulations, following are reproductions of labels on, or inside the product relating to laser product safety. JVC KENWOOD Corporation 2967-3, ISHIKAWA-MACHI, HACHIOJI-SHI, TOKYO, JAPAN THIS PRODUCT COMPLIES WITH DHHS RULES 21CFR SUBCHAPTER J IN EFFECT AT DATE OF MANUFACTURE.