KDC-BT648U KDC-X695 KDC-X395 KDC-348U CD-RECEIVER INSTRUCTION MANUAL AMPLI-TUNER LECTEUR DE CD MODE D’EMPLOI REPRODUCTOR DE DISCOS COMPACTOS RECEPTOR DE FM/AM MANUAL DE INSTRUCCIONES Take the time to read through this instruction manual. Familiarity with installation and operation procedures will help you obtain the best performance from your new CD-receiver.
CONTENTS Safety 3 Maintenance Preparation 4 How to attach/detach the faceplate How to reset your unit How to prepare the remote controller (RC-405) Getting Started 5 Canceling the display demonstration Setting the demonstration mode Adjusting the clock Initial settings before operations Basic Operations 6 Muting upon the reception of a phone call Listening to the Radio 8 Adjust [SETTINGS] mode settings Listening to the other external components Listening to a Disc/ USB device/ iPod Start play
Safety WARNING Stop the car before operating the unit. Important to know... To prevent a short circuit, never put or leave any metallic objects (such as coins or metal tools) inside the unit. ■ Caution: Adjust the volume so that you can hear sounds outside the car. Driving with the volume too high may cause an accident. ■ Condensation: When the car is airconditioned, moisture may collect on the laser lens. This may cause disc read errors. In this case, remove the disc and wait for the moisture to evaporate.
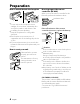
Preparation How to attach/detach the faceplate 1 1 How to prepare the remote controller (RC-405) When you use the remote controller for the first time, pull out the insulation sheet. Insulation sheet 2 2 ■ Do not expose the faceplate to direct sunlight, excessive heat, or humidity. Also avoid places with too much dust or the possibility of water splashing. ■ Keep the faceplate in its casing while detached. ■ The faceplate is a precision piece of equipment and can be damaged by shocks or jolts.
Getting Started Canceling the display demonstration The display demonstration is always turned on unless you cancel it. When you turn on the power (or after you reset the unit), the display shows: [CANCEL DEMO] \ [PRESS] \ [VOLUME KNOB] 1 Press the volume knob. [YES] is selected as the initial setup. 2 Press the volume knob again to confirm. [DEMO OFF] appears.
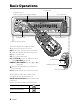
Basic Operations Loading slot Remote sensor ■ Do not expose to bright sunlight. Volume knob Ejects the disc Display window Detaches the faceplate The following indicator lights up when... ST: A stereo broadcast is received. RDS: Radio Data System service is available. TI: Traffic Information function is turned on. IN: A disc is in the unit. ATT: The sound attenuates. EQ: [SYSTEM Q] is set to an EQ mode other than [NATURAL]. (page 28) B.BOOST: [BASS BOOST] is set to [1] or [2].
When you press or hold the following button(s)... Remote Main unit General operation controller ■ Turns on. — ■ Turns off if pressed and held. Selects the available sources (TUNER, USB or iPod, CD, AUX, SRC STANDBY), if the power is turned on. SRC • If the source is ready, playback also starts. “iPod” and “CD” are selectable only when an iPod is connected or a disc is loaded. Volume knob VOLud Adjusts the volume level. (turn) 5 / ∞ Selects items. Volume knob ENT 38 Confirms selection.
Muting upon the reception of a phone call (KDC-X395/ KDC-348U only) To use this feature, connect the MUTE lead to your telephone using a commercial telephone accessory. (See “Installation Manual” on a separate volume.) When a call comes in, “CALL” appears. ■ The audio system pauses. ■ To continue listen to the audio system during a call, press SRC. “CALL” disappear and the audio system resumes. When a call ends, “CALL” disappear. ■ The audio system resumes.
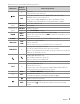
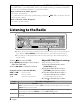
Item MONO SET PTY SEARCH Selectable setting (Preset: *) ON: Improves the FM reception (but the stereo effect may be lost). ; OFF *: Cancels (stereo effect resumes). Selects the available Program Type (page 9). Then, press 4 / ¢ to start searching. ■ [TI] is selectable only when the source is “FM”. If other playback source is selected, these settings are selectable under [TUNER SET] item.
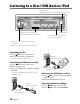
Listening to a Disc/ USB device/ iPod Ejects the disc. (“NO DISC” appears and “IN” indicator goes off.) ■ ■ Press to select track/file. Hold to fast-forwards/reverses. USB terminal Press to pause. Press again to resume playback. ■ Press to select next folder of Audio File/iPod. ■ Press to select next disc of CD changer. Start playing a disc 1 Press SRC to turn on the power. 2 Insert a disc into the loading slot. Apple iPod (commercially available) Playback starts automatically.
Selecting Repeat Play Selecting a folder/track/file Press number button 4 (REP) repeatedly to make a selection. Audio CD : TRACK REPEAT, REPEAT OFF Audio File : FILE REPEAT, FOLDER REPEAT, REPEAT OFF iPod : FILE REPEAT, REPEAT OFF CD changer : TRACK REPEAT, DISC REPEAT, REPEAT OFF • Not available if disc changer playback is selected. 1 Press to enter Music Search mode. “SEARCH” appears, then the current file name appears on the display.
■ To search for a character other than A to Z and 0 to 9, enter only “ * ”. ■ The article (a, an, the) of songs name will be skipped during search. Direct Music Search using the remote controller (RC-405) • Not available if Random Play, Scan Play, KENWOOD Music Editor media, iPod playback is selected. 1 Press DIRECT to enter Direct Music Search mode. “– – –” appears. 2 Press the number buttons to enter the track number. 3 Press 4 / +¢ to search for the music.
iPod control by Hand mode Press number button 1 (iPod) repeatedly to make a selection. KDC-X395 / KDC-348U Press and hold iPod repeatedly to make a selection. HANDS ON : Control iPod from the iPod. ■ This mode is not compatible with music information display. The display will show “iPod MODE”. HANDS OFF: Control iPod from the unit. Adjust [SETTINGS] mode settings While listening to an iPod or KENWOOD Music Editor media ... 1 Press the volume knob to enter [FUNCTION] mode.
Although the audio files are complied with the standards listed above, the play maybe impossible depending on the types or conditions of media or device. ■ Detailed information and notes about the playable audio files are stated in an online manual on the following site: www.kenwood.com/cs/ce/audiofile/ About USB device This unit can play audio files stored on a USB mass storage class device. ■ Install the USB device in the place where it will not prevent you from driving your vehicle properly.
Operation of Hands-Free Phoning Preparation : KDC-X395/ KDC-348U: Only with the optional accessory KCA-BT300 or KCA-BT200 connected. KDC-X395/ KDC-348U ■ Press and hold to enter Bluetooth mode. ■ Press to answer an incoming call. ■ Press and hold for about 2 seconds to memorize the current phone number. ■ Press briefly to recall memorized phone number. KDC-BT648U/ KDC-X695 ■ Press to enter Bluetooth mode. ■ Press to answer an incoming call.
the Bluetooth device. PIN code is set to “0000” as the default. You can change this code. Refer to [PIN CODE EDIT] under (page 22). 4 By operating the Bluetooth device, start hands-free connection. Step 2. Connection If you have registered 2 or more cellphones, you need to select one of them. For more details, see (page 20). When a cell-phone is connected, the “BT” indicator lights up. Step 3.
*(AM–), or +(¢) on the remote controller. 4 Make a call. ■ Press the volume knob. ■ Press OK on the remote controller. ■ You can input max 25 (KDC-BT648U/ KDC-X695) / 32 (KDC-X395/ KDC-348U) digits. Speed Dialing (Preset Dial) 2 Press number button (1 – 6). 3 Press the volume knob to make a call.
download of phone book data. In this case, try downloading manually. To download from the cell-phone manually 1 By operating the cell-phone, end the hands-free connection. 2 By operating the cell-phone, send the phone book data to this unit By operating the cell-phone, download the phone book data to this unit. ■ During downloading: “DOWNLOADING” is displayed. ■ After completion of downloading: “COMPLETE” is displayed. 3 By operating the cell-phone, start the hands-free connection.
4 Input the PIN code ■ Turn the volume knob to select the number. ■ To move to the next digit, press ¢. ■ To delete the last digit, press 4. 5 Press the volume knob to transmit the PIN code. If “PAIRING OK” is displayed, registration is completed. When “CONFIRM PHONE” is displayed, confirm connection with a cell-phone operation. 6 The receiver is connected to a cell-phone, with “HF CONNECT” displayed, and exits the easy pairing mode.
7 “PAIRING” is displayed (KDC-X395/ KDC-348U with KCA-BT300 only) If “PAIRING OK” is displayed, proceed to step 10. If “PIN CODE NG” is displayed, proceed to steps 8. 8 Input the PIN code ■ Turn the volume knob to select the number. ■ To move to the next digit, press ¢. ■ To delete the last digit, press 4. 9 Press the volume knob to transmit the PIN code. If “PAIRING OK” is displayed, registration is completed.
■ To select “PB NAME CHK”, play the registered voice. ■ To select “PB NAME DEL”, delete a voice tag. Turn the volume knob to select “YES”, then press to confirm. 7 “ENTER 1” is displayed. When a beep is heard, say a voice tag within 2 seconds. 8 “ENTER 2” is displayed. When a beep is heard, say the same voice tag as that you said in step 7 within 2 seconds. “COMPLETE” is displayed. 9 Press the volume knob to return to step 5. ■ To exit Setting mode, press . ■ To exit Bluetooth mode, press SRC.
Item Selectable setting (Preset: *) DEVICE DELETE Cancel registration of the Bluetooth device. 1. Turn the volume knob to select the Bluetooth device, then press to confirm. 2. Turn the volume knob to select “YES”, then press to confirm. SMS DOWNLOAD Download a short message. (For details, see page 23.) VOICE TAG PB NAME EDIT Registers voice for voice recognition and voice to select the Phone number category in Phone book. PN TYPE EDIT (For details, see page 20.
SMS (Short Message Service) Preparation : KDC-X395/ KDC-348U: Only with the optional accessory KCA-BT300 or KCA-BT200 connected. KDC-X395/ KDC-348U Press and hold to enter Bluetooth mode. KDC-BT648U/ KDC-X695 Press to enter Bluetooth mode. Downloading the SMS Display the SMS 1 KDC-BT648U / KDC-X695 ¤ Press to enter Bluetooth mode. KDC-X395 / KDC-348U Press and hold the volume knob to enter Bluetooth mode. 2 Turn the volume knob to select [SETTINGS], then press to enter.
■ The unopened message is displayed at the beginning of the list. Other messages are displayed in the order of reception. ■ The SMS that has arrived when the cellphone is not linked with Bluetooth cannot be displayed. Download the SMS. ■ The short message cannot be displayed during downloading the SMS. ■ Unread messages are prefixed with an asterisk (*). HD Radio™ Tuner Control Preparation : Only with the optional accessory HD Radio tuner connected.
■ To cancel the Direct Access Tuning mode, press . ■ If you make no button operation for 10 seconds, the Direct Access Tuning mode is automatically canceled. Using the remote controller (RC-405) #FM+ / *AM– : Selects band. 4 / +¢ : Selects station. 1–6 : Selects preset station. iTunes Tagging • Only with optional accessory KTC-HR300 tuner connected. Pressing and holding while “TAG” is lit saves song’s information.
Satellite Radio Tuner Control Preparation : Only with the optional accessory Satellite radio tuner connected. ■ ■ Press and hold for about 2 seconds to memorize the current channel. Press briefly to recall memorized channel. 1 Press SRC to select “SIRIUS” or “XM”. 2 Press BAND repeatedly to select a band (SR1/ SR2/ SR3/ SR4 ; XM1/ XM2/ XM3/ XM4). 3 Press 4 / ¢ to search for a channel. ■ You need to register to the service provider to receive the service by Satellite Radio.
Adjust [SETTINGS] mode settings While listening to the radio... 1 Press the volume knob to enter [FUNCTION] mode. 2 Turn the volume knob to select [SETTINGS], then press to enter. 3 Turn the volume knob to make a selection, then press to confirm. See table below for selection. 4 Hold to finish the procedure. Item Selectable setting (Preset: *) SEEK MODE Selects the tuning mode for 4 / ¢ buttons. CHANNEL *: Normal manual seeking control.
Function settings Press SRC to select a source other than “STANDBY”. Press the volume knob to enter [FUNCTION] mode. Turn the volume knob to select [AUDIO CONTROL] or [SETTINGS], then press to enter. Turn the volume knob to make a selection, then press to confirm. ■ See table below for selection. ■ Repeat step 3 until the desired item is selected/activated. ■ Press to return to the previous item. 5 Hold to finish the procedure.
Item SUB-W PHASE Selectable setting (Preset: *) REVERSE (180°)/ NORMAL (0°) *: Selects the phase angle of the subwoofer output to be in line with the speaker output for optimum performance. (Selectable only if a setting other than [THROUGH] is selected for [LPF SUBWOOFER].) SUPREME SET ON *: Creates realistic sound by interpolating the high-frequency components that are lost in AAC/ MP3/ WMA audio compression. ; OFF: Cancels.
Installation/connection Part list: A Faceplate ...................................................................(×1) B Escutcheon ..............................................................(×1) C Mounting sleeve...................................................(×1) D Wiring harness .......................................................(×1) E Removal tool .......................................................... (×2) F Flat head screw (for Nissan cars).................
■ Mounting and wiring this product requires skills and experience. For safety’s sake, leave this work to professionals. If you experience problems during installation, consult your Kenwood dealer. ■ Reception may drop if there are metal objects near the Bluetooth antenna. Bluetooth antenna unit For Good Reception To assure good reception, note the following: Communicate with the cell-phone within the line-of-sight distance of 10 m (30 ft).
Wiring connection USB connector AUX input (Stereo) Use the mini-plug (3.5 mm; 1/8”) cable which is stereo type and does not have any resistance.
Installing the unit 1 3 Connect the wiring harness to the unit. Other wiring connection has been completed earlier. (page 32) C 2 1 B D A 2 2 Before attaching, make sure the direction of the escutcheon is correct. (Wider hooks on the bottom side.) 1 Dashboard of your car 3 C 4 Bend the appropriate tabs to hold the mounting sleeve firmly in place. 5 B A Installing without using the mounting sleeve (Japanese car) 1 Remove the mounting sleeve and escutcheon B from the unit.
Installation the Microphone Unit (KDC-X695 only) 1 Check the installation position of the microphone H. 2 Remove oil and other dirt from the installation surface. 3 Install the microphone. 4 Wire the microphone cable up to the hands-free box with it secured at several positions using tape or the like. ■ Install the microphone as far away as possible from the cell-phone. Peel the release coated paper of double-face adhesive tape to fix on the place shown above.
Symptom “COPY PRO” appears. “READ ERROR” appears. Remedy/Cause A copy-protected file is played. Copy the files and folders for the USB device again. If the error message is still displayed, initialize the USB device or use other USB devices. “NO DEVICE” appears. No USB device is connected. Connect a USB device, and change the source to USB again. “NO MUSIC” or “ERROR 15” appears. The connected USB device contains no playable audio file.
Symptom “HF ERROR 07” appears. Remedy/Cause The memory cannot be accessed. Turn off the power and on again. If this message still appears, press the reset button on the control unit. “HF ERROR 68” appears. The unit cannot communicate with the cell-phone. Turn off the power and on again. If this message still appears, press the reset button on the control unit. “UNKNOWN” appears. The Bluetooth device cannot be detected. “DEVICE FULL” appears. 5 Bluetooth device have already been registered.
Specifications FM tuner section Frequency range (200 kHz space): 87.9 MHz — 107.9 MHz Usable sensitivity (S/N= 26 dB): 11.2 dBf (1 μV/75 Ω) Quieting sensitivity (DIN S/N = 46 dB): 19.2 dBf (2.
FCC WARNING IC (Industry Canada) Notice This equipment may generate or use radio frequency energy. Changes or modifications to this equipment may cause harmful interference unless the modifications are expressly approved in the instruction manual. The user could lose the authority to operate this equipment if an unauthorized change or modification is made.
Units purchased through the U,S.A. military exchange service overseas may be serviced under warranly in the continental U.S.A., subject 10 the lollowing conditions 1) The original warranty is in effect. 2) Proof 01 purchase is provided to the servicer. Any and all implied warranties, including warranties 01 merchantabilify and fitness for aparficular purpose, shall be limited in duration to the length of this warranty.
KENWOOD USA CORPORATION This warranty will be honored only in the USA WHO IS PROTECTED This warranty is enforceable only by the original purchaser KENWOOD LIMITED WARRANTY FOR CAR STEREO COMPONENTS WHAT WE WILL PAY FOR We will pay for all labor and material expenses tor covered ilems, Paymen! 01 shipping charges is discussed in the next section of lhis warranty. HOW LONG IS THE WARRANTY Kenwood U.S.A.